Table of Contents
Advertisement
Owner's Manual
Infrared Broilers
Improper installation, adjustment, alteration, service or maintenance can cause property damage, injury
or death. Read the installation, operating and maintenance instructions thoroughly before installing or
M
R
ANUAL 1199790
EV 0 (6/14)
$21.00
170
270
servicing this equipment.
1100 Old Honeycutt Road Fuquay-Varina, North Carolina 27526 USA
www.southbendnc.com
P32D-171
WARNING
IMPORTANT FOR FUTURE REFERENCE
Please complete this information and retain this
manual for the life of the equipment:
Model #: ___________________________
Serial #: ___________________________
Date Purchased: _____________________
171
INFRARED BROILER
MANUAL SECTION BR
Advertisement
Table of Contents

Subscribe to Our Youtube Channel
Related Manuals for Southbend 170


Summary of Contents for Southbend 170
- Page 1 IMPORTANT FOR FUTURE REFERENCE Please complete this information and retain this manual for the life of the equipment: Model #: ___________________________ Serial #: ___________________________ Date Purchased: _____________________ Owner’s Manual Infrared Broilers P32D-171 WARNING Improper installation, adjustment, alteration, service or maintenance can cause property damage, injury or death.
-
Page 2: Safety Precautions
Southbend replacement parts are installed. Give this Owner’s Manual and important papers to the proper authority to retain for future reference. Copyright © 2014 by Southbend. All rights reserved. Published in the United States of America. PAGE 2 OF 46... -
Page 3: Table Of Contents
Congratulations! You have purchased one of the finest pieces of heavy-duty commercial cooking equipment on the market. You will find that your new equipment, like all Southbend equipment, has been designed and manufactured to meet the toughest standards in the industry. Each piece of Southbend equipment is carefully engineered and designs are verified through laboratory tests and field installations. - Page 4 NTRODUCTION NFRARED ROILER The serial plate is located on the interior side of the lower front panel, as shown below. Figure 1 Broilers Serial Plate Locations On free standing models, the Serial Plate is located inside the unit behind the filter. To remove the filter, push it up and pull out the bottom.
-
Page 5: Specifications
Therefore, installations should comply with all local codes. Southbend reserves the right to change specifications and product design without notice. Such revisions do not entitle the buyer to corresponding changes, additions, or replacements for previously purchased equipment. - Page 6 PECIFICATIONS NFRARED ROILER ENTILATION WARNING Improper ventilation can result in personal injury or death. Ventilation which fails to properly remove flue products can cause headaches, drowsiness, nausea, or could result in death. All units must be installed in such a manner that the flow of combustion and ventilation air is not obstructed. Provisions for adequate air supply must be provided.
- Page 7 (see Figure 1. Connect the Southbend cooking equipment ONLY to the type of gas for which it is configured and adjusted.
- Page 8 (see Figure 2). Connect the Southbend cooking equipment ONLY to the type of gas for which it is configured and adjusted.
- Page 9 NFRARED ROILER PECIFICATIONS Figure 3 Free Standing Broiler Preasure Tap Location 1/8" NPT Pressure Tap Figure 4 Oven Base Broilers Pressure Tap Locations 1/8" NPT PRESSURE TAP 1/8" NPT PRESSURE TAP OWNER’S MANUAL 1199790 REV 0 (6/14) PAGE 9 OF 46...
-
Page 10: Installation
35 mbar (14” W.C). NOTICE EXHAUST FANS AND CANOPIES: It is recommended that the Southbend equipment be installed under a ventilation hood. Consult local codes for proper installation of hoods. Proper ventilation is the owner’s responsibility. Any problem due to improper ventilation will not be covered by warranty. - Page 11 NFRARED ROILER NSTALLATION TTACH A set of four legs is packed with equipment ordered with legs. (For units ordered with casters, go to Step 2b.) Raise equipment sufficiently to allow legs to be attached. For safety, “shore up” and support the equipment with an adequate blocking arrangement strong enough to support the load.
- Page 12 NSTALLATION NFRARED ROILER Figure 6 Installation of Casters TTACH ESTRAINT NOTICE For an appliance equipped with casters, (1) the installation shall be made with a connector that complies with the Standard for Connectors for Movable Gas Appliances, ANSI Z21.69 or Connectors for Moveable Gas Appliances, CAN/CGA-6.16, and a quick-disconnect device that complies with the Standard for Quick-Disconnect Devices for Use With Gas Fuel, ANSI Z21.41, or Quick Disconnect Devices for Use with Gas Fuel, CAN1-6.9, (2) adequate means must be provided to limit the movement of the appliance without depending on the connector and the quick-...
- Page 13 NFRARED ROILER NSTALLATION Figure 7 Installation of Restraint Be sure all controls are turned off prior to disconnecting. After reconnecting, be sure all controls are turned off and all pilots are lit. NOTICE Adequate means must be provided to limit the movement of the appliance without depending on the connector and the quick-disconnect device or its associated piping to limit the appliance movement.
- Page 14 ONNECT UPPLY If the Southbend equipment is being installed at over 2,000 feet altitude and that information was not specified when ordered, contact the appropriate authorized Southbend Service Representative or the Southbend Service Department. Failure to install with proper orifice sizing will result in poor performance and may void the warranty.
- Page 15 NFRARED ROILER NSTALLATION Minimum supply pressure is 7” W.C. for natural gas, 11” W.C. for propane. An external pressure regulator and shut off valve are provided. If using a flexible-hose gas connection, the I.D. of the hose must not be smaller than the connector on the equipment, and must comply with ANSI Z21.69.
-
Page 16: Operation
OPERATION OF INFRARED BROILER Southbend Infrared broilers broil in half the time of ordinary broilers. The burners reach operating temperature in just 90 seconds, and their intense infrared energy quickly heats the food, not the surrounding air. The broiling grid adjusts to four heights, and rolls out for easy access. - Page 17 NFRARED ROILER PERATION Turn the burner control(s) to HIGH and visually check that the burners have ignited. When the burners ignite, a blue flame will cover the surface of the ceramics for 10-15 seconds. Within 30 seconds this haze will disappear and the ceramics will glow red.
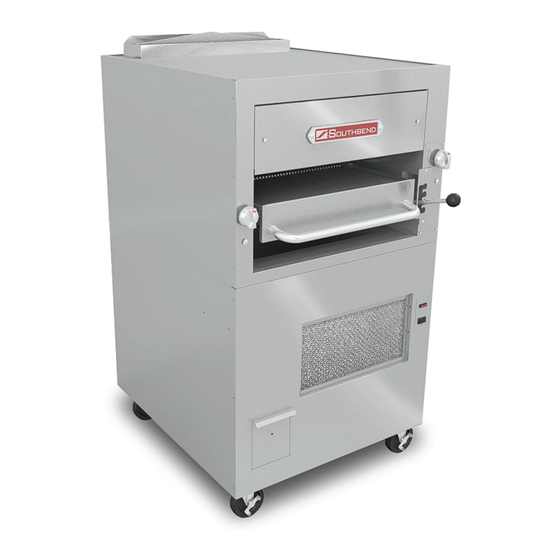
- Page 18 PERATION NFRARED ROILER Figure 8 Controls of Model 170 Broiler Burner Controls (OFF-HI-LOW) Broiler Rack Height Adjustment Lever Broiler Rack (rolls out) Blower ON-OFF switch & light Filter Broiler Drippings Collection Drawer Model 170 PAGE 18 OF 46 OWNER’S MANUAL 1199790 REV 0 (6/14)
- Page 19 NFRARED ROILER PERATION Figure 9 Controls of Model 171 Warming Oven (heated by flue gases) rolls out) Broiler Burner Controls (OFF-HI-LOW) Broiler Rack Height Adjustment Lever Broiler Rack (rolls out) Blower ON-OFF switch & light Filter Broiler Drippings Collection Drawer Model 171 OWNER’S MANUAL 1199790 REV 0 (6/14) PAGE 19 OF 46...
- Page 20 PERATION NFRARED ROILER Figure 10 Controls of Model 270 Upper Broiler Rack Upper Broiler Burner Controls (rolls out) (OFF-HI-LOW) Upper Broiler Rack Height Adjustment Lever Upper Broiler Dripping Collection Drawer Lower Broiler Burner Controls (OFF-HI-LOW) Lower Broiler Rack Height Adjustment Lever Lower Broiler Rack (rolls out) Blower ON-OFF Switch...
- Page 21 NFRARED ROILER PERATION Figure 11 Operation of Oven Each oven has a thermostatic control that can be set in the FOR UNITS WITH ELECTRONIC IGNITION oven 175°F to 550°F (66°C to 260°C). Convection ovens have a 1. Turn the Oven Gas Shut-Off Valve to ON. fan that can be set to HI speed or LO speed.
- Page 22 PERATION NFRARED ROILER UGGESTIONS FOR OOKING SING A ONVECTION As a guide, set oven temperatures 25 to 50 degrees lower than called for in recipes using conventional (non-convection) ovens. FROZEN ENTREE PRODUCTS: Punch holes in lid before heating. Tent lid if product has a tendency to stick, i.e., lasagna or macaroni and cheese.
- Page 23 NFRARED ROILER PERATION ORRECTING ROBLEMS WHEN OOKING WITH A ONVENTION If... Then... Cakes are dark on the sides and not done in the center… lower oven temperature Cake edges are too brown… reduce number of pans or lower oven temperature Cakes have light outer color…...
-
Page 24: Cooking Hints
OOKING INTS NFRARED ROILER OOKING INTS Due to the speed of the Infra-red broiler, broiling times will be reduced and cooking techniques may need some modifica- tion. For most broiling of steaks, chops, etc., the burners should be operated on “HI” and the degree of internal rareness and surface condition can be controlled by raising or lowering the rack mechanism. - Page 25 If other appliances connected to the same source of gas or electricity are also not operating correctly, the problem is likely not within the equipment. If the problem only occurs for the Southbend equipment, and if the above solutions to do not solve the problem, call for repair service.
-
Page 26: Cleaning
Southbend appliances are sturdily constructed of the best materials and are designed to provide durable service when treated with ordinary care. To expect the best performance, your equipment must be maintained in good condition and cleaned daily. - Page 27 Reserve procedure to reasemble broiling rack mechansim. NTERIOR WARNING FOR YOUR SAFETY, DISCONNECT THE POWER SUPPLY TO THE SOUTHBEND EQUIPMENT BEFORE CLEANING THE OVEN. WHEN CLEANING THE BLOWER WHEEL OF A CONVECTION OVEN, BE SURE TO HAVE THE POWER SWITCH IN THE “OFF” POSITION.
-
Page 28: Adjustments
NOTICE Warranty will be void and the manufacturer is relieved of all liability if service work is performed by other than a qualified technician, or if other than genuine Southbend replacement parts are installed. ACCESS TO SERVICEABLE COMPONENTS To open the kick panel below the oven door, lift the kick panel straight up and pull the top edge away from the oven. The kick panel is hinged at the bottom corners. - Page 29 NFRARED ROILER DJUSTMENTS Figure 12 DJUSTMENT OF HERMOSTAT The oven thermostat is carefully calibrated at the factory so that the dial setting matches the actual oven temperature. Field recalibration is seldom necessary, and should not be resorted to unless considerable cooking experience definitely proves that the control is not maintaining the temperatures to which the dial is set.
- Page 30 DJUSTMENTS NFRARED ROILER Figure 13 DJUSTMENT OF ILOT AND URNER The burner orifice is of the fixed type, sized for the type of gas and the operating altitude. To adjust the burner air-gas mixture, loosen the screw that secures the air shutter on the mixer face and rotate the mixer cap to obtain a clear, stable blue flame with a distinct inner cone at each port.
- Page 31 RESSURE ( ASE) There is not an internal pressure regulator. The external pressure regulators supplied by Southbend are factory set at 6” W.C. for natural gas and 10” W.C. for propane gas. To check the manifold pressure, do the following: 1.
-
Page 32: Troubleshooting
Warranty will be void and the manufacturer is relieved of all liability if service work is performed by other than a qualified technician, or if other than genuine Southbend replacement parts are installed. Replacement parts (including parts not listed in this manual) may be ordered either through a Southbend Authorized Parts Distributor or a Southbend Authorized Service Agency. -
Page 33: Southbend
NFRARED ROILER ROUBLESHOOTING ROUBLESHOOTING ROILER The following table lists the possible causes of oven-related problems that may occur Problem Look for - 1 Not enough heat – Restriction in valve. – Restriction in gas supply. – Misalignment of orifice tube. –... -
Page 34: Southbend
ROUBLESHOOTING NFRARED ROILER ROUBLESHOOTING CAUTION Proper and efficient operation of oven is dependent on correct installation and function of components. Always verify that components are in place and functioning as intended. The following table lists the possible causes of oven-related problems that may occur Problem Look for - 1 Oven will not come on. -
Page 35: Southbend
Value. If you continue to have if you continue to have issues after replacing the thermpile, then issues after replacing the safety valve, then contact Southbend contact Southbend Technical Support for assistance at Technical Support for assistance at 919-762-1000 option 2. -
Page 36: Southbend
If wire breaks or loose attempt to ignite oven. attempt to ignite oven. connections are not found, call Southbend Technical Service. Replace ignition module Replace ignition module and attempt to ignite oven. and attempt to ignite oven. -
Page 37: Southbend
NFRARED ROILER ROUBLESHOOTING TROUBLESHOOTING CONVECTION-OVEN BLOWER WARNING Before attempting to service or replace any electrical component, make sure power source has been disconnected. CAUTION When changing motor or servicing oven, always verify that blower wheel rotation is clockwise when looking into the oven cavity. -
Page 38: Southbend
ROUBLESHOOTING NFRARED ROILER Figure 17 Convection-Oven Blower Does Not Run Convection-oven blower does not run. DISCONNECT POWER AT CIRCUIT BREAKER. Remove the control knobs from the front of the range. Remove the screws that secure the top of the control panel and carefully tilt the panel forward to expose the back of the blower switch that is mounted in the front panel. -
Page 39: Southbend
NFRARED ROILER ROUBLESHOOTING Figure 18 Convection-Oven Blower Does Not Run, Continued (Continuing from previous page.) CHECK THAT POWER IS DISCONNECTED AT CIRCUIT BREAKER. Remove the wire terminal cover from the blower motor. Check that the red wire is capped off. Remove the wire nuts from the black and the white wires. -
Page 40: Southbend
ROUBLESHOOTING NFRARED ROILER Figure 19 Wiring Diagram for 120 Volt Oven Bases with Electronic Ignition PAGE 40 OF 46 OWNER’S MANUAL 1199790 REV 0 (6/14) -
Page 41: Southbend
NFRARED ROILER ROUBLESHOOTING Figure 20 Wiring Diagram for Oven Base with Standing Pilot OWNER’S MANUAL 1199790 REV 0 (6/14) PAGE 41 OF 46... -
Page 42: Southbend
ROUBLESHOOTING NFRARED ROILER Figure 21 Wiring Diagram 240V Oven Base with Electronic Ignition PAGE 42 OF 46 OWNER’S MANUAL 1199790 REV 0 (6/14) -
Page 43: Southbend
NFRARED ROILER ROUBLESHOOTING Figure 22 Wiring Diagram for 170, 171, 270 Broilers OWNER’S MANUAL 1199790 REV 0 (6/14) PAGE 43 OF 46... -
Page 44: Southbend
ROUBLESHOOTING NFRARED ROILER Figure 23 Wiring Diagram for Warming Oven PAGE 44 OF 46 OWNER’S MANUAL 1199790 REV 0 (6/14) -
Page 45: Southbend
NFRARED ROILER Notes: OWNER’S MANUAL 1199790 REV 0 (6/14) PAGE 45 OF 46... - Page 46 ROILER INFRA-RED BROILERS A product with the Southbend name incorporates the best in durability and low maintenance. We all recognize, however, that replacement parts and occasional professional service may be necessary to extend the useful life of this appliance. When service is needed, contact a Southbend Authorized Service Agency, or your dealer. To avoid confusion, always refer to the model number, serial number, and type of your appliance.
Need help?
Do you have a question about the 170 and is the answer not in the manual?
Questions and answers