
Subscribe to Our Youtube Channel
Related Manuals for Recsea RVH-X1000


Summary of Contents for Recsea RVH-X1000
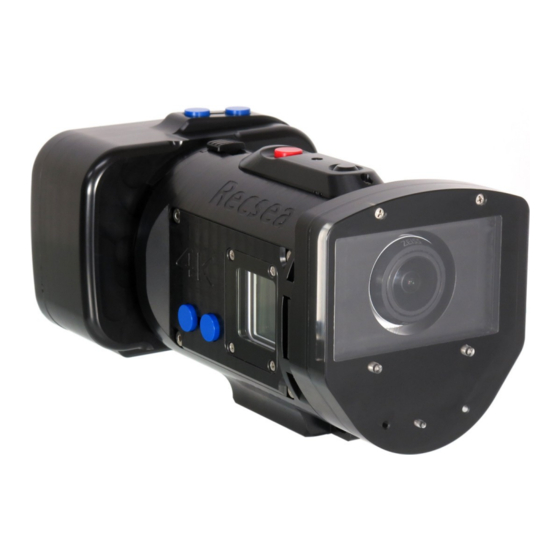
- Page 1 SONY FDR-X1000V 4K Action Cam Waterproof Housing Recsea RVH-X1000 MANUAL Please read this manual before use. NTF CORPORATION UH Division http://www.seatool.net...
- Page 2 INTRODUCTION SONY FDR-X1000V 4K Action Cam Waterproof Housing RVH-X1000 ※ Thank you for purchasing the RECSEA RVH-X1000 Waterproof Housing. ※ To ensure proper and safe use, please thoroughly read this manual. ※ Improper use may cause leakage causing irreparable damage to your digital camera.
- Page 3 HOUSING PACKAGE CONTENTS Be sure all items listed here are included: ・RVH-X1000 Waterproof Housing ・RM-LVR2 Waterproof Housing ・RVH to RM Mount Cover ・Wrist Strap ・Reserve O-rings x 2 ・O-ring Grease w/O-ring Removal Pick GETTING TO KNOW YOUR RVH-X1000 HOUSING...
-
Page 4: Warranty Information
Dealer Name Serial Number ※Dealer: Stamp your company name and contact information, purchase date, model and serial number. Recsea/Seatool Manufacturing & Sales NTF CORPORATION UH Division 390-1 Mii, Midori-Ku, Sagamihara-Shi Kanagawa 252-0151, Japan T: +81 (0)50-7541-0294 F: +81 (0)42-780-5720... - Page 5 ※ Please refer to camera and remote manuals for explanation of controls. OPENING AND CLOSING LENS PORT ※ Please do the following operations in a clean area with low humidity and dust. 1. To OPEN, slide the Latch Lock Lever in direction shown with index finger. 2.
-
Page 6: Installing Camera
5. To CLOSE, close Lens Port. 6. Place Port Latch over the Latch Groove at at the base of the Lens Port. 7. Push Port Latch down making sure it is firmly locked into place and Lens Port is closed. INSTALLING CAMERA CAUTION! Before using, please be sure to test the housing (without camera) in a bucket of... -
Page 7: Removing Camera
REMOVING CAMERA CAUTION! After use in water, water will remain in seams between port and housing, and Port Latch. Wipe any water off housing with a soft dry towel to prevent water from falling on camera. 1. Open Lens Port as instructed in OPENING AND CLOSING THE LENS PORT, page 3. 2. -
Page 8: Handling Precautions
6. While pressing the Open & Close Lock Button, turn the Open & Close Dial completely to the left making sure the Open & Close Lock Button is engaged (Note: If lock button is flush with dial base the lock is not engaged properly.). 7. -
Page 9: External Lighting
EXTERNAL LIGHTING ※ One (1) Tripod Screw Socket and one (1) Ball Joint Base SBB-M10 Socket are provided at the bottom of the Camera housing for use in attaching Seatool/Recsea genuine tray and grip assemblies or SSB-M10 Ball Joint Base. - Page 10 O-RING GREASING & MAINTENANCE ( 1) CAUTION! DO NOT use silicone grease other than that provided by Seatool/Recsea. ※ This housing uses two (2) O-rings. Be sure to install O-rings as shown on the next page. Failure to do so will result in water leakage.
-
Page 11: Specifications
※ For replacement of consumable parts such as O-rings please contact your dealer or Seatool/Recsea. OPTIONS The following items are optional. Please contact Seatool/Recsea or your local dealer if you wish to purchase. ・RVH-X1000 O-ring Set ・Seatool O-ring Grease 3 ml Tube... -
Page 12: After-Sale Service
※ Warranty does not cover any losses resulting from any malfunction of this product, including those related to lost profits or any related expenses. ※ Seatool/Recsea will stock parts necessary for repair for five (5) years from stop of production. - Page 13 MEMO...
Need help?
Do you have a question about the RVH-X1000 and is the answer not in the manual?
Questions and answers