Paradox Spectra 1689 User Manual
Hide thumbs
Also See for Spectra 1689:
- User manual (47 pages) ,
- User quick reference manual (4 pages) ,
- User quick reference manual (2 pages)

Subscribe to Our Youtube Channel
Related Manuals for Paradox Spectra 1689


Summary of Contents for Paradox Spectra 1689
- Page 1 LCD and 16-Zone LED Keypads 1689 1641BL 16-Zone LED Keypad LCD Keypad User’s Manual...
-
Page 3: Table Of Contents
Table of Contents Introduction............1 Basic Operation ............. 2 Keypad Indicator Lights..........2 Visual Feedback............3 For the Spectra 1689 LED Keypad Module ............3 For the Spectra 1641BL LCD Keypad Module ............4 Auditory Feedback ............4 Alarm Memory Display ..........5 Event List (1641BL LCD Keypad Modules Only) ...............6... - Page 4 One-Touch Arming............22 One-Touch Regular Arming ........22 One-Touch Stay Arming.........22 Fast Exit ..............23 One-Touch Force Arming........23 One-Touch Bypass Programming ......23 Keyswitch Arming............24 Auto-Arming ..............24 Timed Auto Arming ..........24 No Movement Auto Arming ........26 Additional Features ......... 26 Programming Chime Zones ........26 Keypad Muting ............27 Panic Alarms ...............28 PGM Button...
-
Page 5: Introduction
(i.e. motion detectors, door contacts, etc.) and various output devices (i.e. bells, sirens, lights, etc.). The elegant and user-friendly Spectra 1689 LED Keypad Modules and 1641BL LCD Keypad Modules allow you to easily access your security system's functions and provide you with an easy-to-understand display of your security system's alarm and operational status. -
Page 6: Basic Operation
2.0 Basic Operation The Spectra 1689 LED and 1641BL LCD Keypad Modules function in the same way, but display visual feedback differently. This section will provide an overview of the keypads. Many of the features in your system must be enabled by the installer. -
Page 7: Visual Feedback
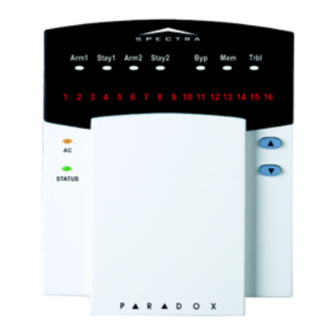
2.2 Visual Feedback 2.2.1 For the Spectra 1689 LED Keypad Module The numbers and symbols on the keypad’s screen communicate your system’s status as shown in Figure 2. Figure 2: Overview of the 1689 LED Keypad Module Trouble Display Arm Lights (red):... -
Page 8: For The Spectra 1641Bl Lcd Keypad Module
2.2.2 For the Spectra 1641BL LCD Keypad Module The LCD (liquid crystal display) is a 32-character screen that displays messages that can be customized to your needs. Figure 3: Overview of the 1641BL LCD Keypad Module The messages on the LCD screen will display the system’s status and guide you through the system’s operations. -
Page 9: Alarm Memory Display
All zones where alarms have occurred will be stored in memory. The system will erase the contents of the Alarm Memory every time the system is armed. For Spectra 1689 LED Keypad Modules: If an alarm has occurred on a zone, the [ symbol will illuminate. After disarming the... -
Page 10: Event List (1641Bl Lcd Keypad Modules Only)
2.5 Event List (1641BL LCD Keypad Modules Only) The Event List will record all the actions that occur in the system. How do I view the Event List? 1. Press the [ ] key. 2. Press the [ ] key. 3. -
Page 11: Trouble Display
Press the [ ] key to stop the “Trouble Beep”. TRBL For Spectra 1689 LED Keypad Module: When a trouble condition occurs, the [ TRBL symbol will illuminate. How do I access the Trouble Display? 1. -
Page 12: Trouble List
For Spectra 1641BL LCD Keypad Module: When a trouble condition occurs, “System Trouble [ ] to View” will appear on the TRBL screen. How do I access the Trouble Display? 1. Press the [ ] key. TRBL “Trouble View System Trouble” will appear on the screen. - Page 13 getting low. Also, the device’s yellow light will flash. [3] Power Failure The system has detected a loss of AC power. This trouble usually occurs during a power failure. If a power failure is not occurring in your establishment and this trouble appears, contact your monitoring station for service.
- Page 14 Your alarm system’s clock must be reprogrammed. This is the only trouble that we recommend that you correct. For Spectra 1689 LED Keypad Module: How do I reprogram the clock? 1. Perform steps 1 and 2 from How do I access the Trouble Display? on page 7.
- Page 15 4. After entering the time (step 3B) press the [1] key to set the time in a.m. or the [2] key to set the time in p.m. for the U.S. time format. 5. Enter the date in the YYYY/MM/DD format. The information will be saved automatically.
-
Page 16: Partitioning
[13] Wireless Transmitter Supervision Loss A wireless transmitter is no longer communicating with its receiver or its batteries are disconnected. To view on which zones the Wireless Transmitters are experiencing trouble, press the [ ] key after step 2 from the Trouble Display (see How do I access the Trouble Display? on page 7 or page 8). -
Page 17: Programming Access Codes
3.0 Programming Access Codes Access codes are personal identification numbers that allow you to enter certain programming modes, arm or disarm your system as well as activate or deactivate PGMs. The Spectra security system supports the following: • 1 System Master Code •... -
Page 18: Duress Code
Master Code 2 is permanently assigned to Partition 2 (except when partitioning is disabled, Master Code 2 will be assigned to Partition 1) and can be used to create, modify or delete user access codes (see section 3.4) that are assigned to the same partition. - Page 19 How do I program Access Codes? 1. Press the [ ] key. ENTER 2. Enter your [ MASTER CODE 3. Enter 3-digit [ ] (see Table 1 below). SECTION 4. Enter a new 4- or 6-digit [ ACCESS CODE 5. Press the [ ] key to exit.
-
Page 20: Arming & Disarming
4.0 Arming & Disarming Take full advantage of your Spectra system by familiarizing yourself with all the arming methods. If your system is not partitioned (section 2.7 on page 12), everything is considered as belonging to Partition 1. 4.1 Exit Delay After entering a valid arming sequence, an Exit Delay Timer will provide you with enough time to exit the protected area before the system arms. -
Page 21: Regular Arming
How do I disarm the system? For a Stay or Instant armed system, go to step 2. 1. Enter through a designated entry point (i.e. front door). 2. Enter your [ ACCESS CODE If you have access to both partitions (section 2.7 on page 12): 3. -
Page 22: Instant Arming
bypassed when Stay arming. For example, when you go to sleep at night, doors and windows can be armed without arming other zones like motion detectors. How do I Stay arm? 1. Close all zones in the desired partition (except Stay zones). -
Page 23: Force Arming
If you have access to both partitions: To Instant arm one partition: 1. Press the [ ] key. STAY 2. Enter your [ ACCESS CODE 3. Choose a partition. 4. Press and hold the [ ] key for 3 seconds. STAY To Instant arm both partitions: 1. -
Page 24: Manual Bypass Programming
For example, you may wish to bypass certain zones when workers are renovating part of your establishment. Once the system is disarmed, the bypass entries are erased. For Spectra 1689 LED Keypad Modules: When zones are bypassed, the [ ] symbol will illuminate. -
Page 25: Bypass Recall Feature
Manual Bypass Programming can also be activated by using One-Touch Bypass Programming (section 4.7.5 on page 23). To remove the Bypass feature from a zone, in step 3 enter the zone number again or press [ ] to erase all current FORCE entries. -
Page 26: One-Touch Arming
entries saved in memory. This eliminates the need to manually re-program the bypass entries every time you arm the system. How do I recall bypass entries? 5. Press the [ ] key. 6. Enter your [ (see the note on page 21) ACCESS CODE 7. -
Page 27: Fast Exit
4.7.3 Fast Exit When the system is already Stay armed: This feature will allow you to exit already armed premises and keep the system armed. Exit and Stay Arm: Press and hold the [ ] key for 3 STAY seconds (see the note on page 21) to start the Exit Delay (see page 16). -
Page 28: Keyswitch Arming
4.9.1 Timed Auto Arming You can program the time your alarm system will automatically arm itself everyday. For Spectra 1689 LED Keypad Modules: How do I program the Auto-Arm Timer? 1. Press the [ ] key. - Page 29 4. Enter the desired [ ] using the 24Hr TIME clock (i.e. 6:15 p.m. = 18:15). For the 1689 LED Keypad Module also refer to Appendix A on page 44. For Spectra 1641BL LCD Keypad Modules: How do I program the Auto-Arm Timer? 1.
-
Page 30: No Movement Auto Arming
5.1 Programming Chime Zones A Chime Enabled zone will advise you every time it is opened by causing your keypad to beep. For Spectra 1689 LED Keypad Modules: How do I chime zones? 1. Press & hold the [9] key for 3 seconds. -
Page 31: Keypad Muting
zone number again so the number extinguishes or press ] to remove Chiming from all zones programmed to FORCE Chime. When you program Chime Zones, once you press and hold the [9] key, the [ ], [ ], [ ], [ STAY STAY ], [... -
Page 32: Panic Alarms
and hold the [ ] key for 3 seconds to enable or disable CLEAR Keypad Muting. If the keypad emits a confirmation beep, Keypad Muting is enabled for that keypad. If the keypad emits a rejection beep, the feature is disabled. 5.3 Panic Alarms In case of an emergency, the Spectra system can provide three panic alarms that can immediately generate an alarm... -
Page 33: Quick Function Keys
5.5 Quick Function Keys Upon request of your installer or monitoring station you may have to perform one of the following. Press: 5.5.1 Test Report ] + [ ] + [ ENTER MASTER CODE If your system is monitored by your monitoring station, this feature will send a test report code to the monitoring station. -
Page 34: Programming Time And Day (Clock)
5.6 Programming Time and Day (clock) For Spectra 1689 LED Keypad Modules: How do I program the System Clock? 1. Press the [ ] key. ENTER 2. Enter [ ] and enter [100]. MASTER CODE 3. Enter the time using the 24Hr clock (i.e. -
Page 35: Keypad Settings (1641Bl Lcd Keypad Modules Only)
6. Enter the date in the YYYY/MM/DD format. The information will be saved automatically. If the time on your keypad is displayed with a.m. or p.m., your keypad is configured with the U.S. time format. 5.7 Keypad Settings (1641BL LCD Keypad Modules Only) You can modify the keypad’s setting to suit your needs. -
Page 36: The Help Menu
5.8 The Help Menu (1641BL LCD Keypad Modules Only) The 1641BL LCD Keypad module comes with a Help menu that is divided into two sections which the installer can use to enter information about your system: Zone Info and Notes. The Notes section contains general notes, messages or important information such as emergency numbers and tips. -
Page 37: Fire Alarms
6.0 Fire Alarms Upon a fire alarm, the bell/siren will emit three “squawks” at 2 second intervals until silenced or reset by entering a valid access code. If the zone is a Delayed Fire Zone, there is a delay before the system contacts the monitoring station. This will prevent unnecessary reporting of false alarms. - Page 38 Figure 5: Delayed Fire Zone Event Sequence Delayed Fire Zone is triggered Bell/siren activated. Transmission of the report delayed for 30 seconds. Problem corrected within 30 seconds? Has [ CLEAR Generate alarm and been pressed alert Security within 30 Company seconds? Bell/siren silenced.
- Page 39 Minimizing Fire Hazards The three most common causes of fires: • Cooking is the leading cause of home fires in the U.S. It's also the leading cause of fire injuries. Cooking fires often result from unattended cooking and human error, rather than mechanical failure of stoves or ovens.
- Page 40 Providing a Fire Warning System Household fires are especially dangerous at night. Fires produce smoke and deadly gases that can overcome occupants while they sleep. To warn against fire, smoke detectors should be installed outside each separate sleeping area in the immediate vicinity of the bedrooms and on each additional story of the family living unit, including basements.
-
Page 41: Testing & Maintenance
7.0 Testing & Maintenance With the system disarmed and the “ ” light ON, activate READY motion detectors by walking in the protected area. Open and close protected doors and verify that the corresponding key illuminates. Your installer can advise you of the best way to test your particular system. -
Page 42: System Checklist
8.0 System Checklist Zone Description Is this system partitioned? Partition 1 = _____________________________________ Partition 2 = _____________________________________ Zone # and Partition Entry Byp Stay Force 24Hr Description 1 or 2 Delay 01:_______________ ____ 02:_____________ ____ Keyswitch? Y Type:____________ 03:______________ ____ Fire Zone? Y Delayed? Y ____... - Page 43 Zone # and Partition Entry Byp Stay Force 24Hr Description 1 or 2 Delay 11:_______________ ____ 12:_______________ ____ 13:_______________ ____ 14:_______________ ____ 15:_______________ ____ 16:_______________ ____ Access Codes For security reasons, write only the user’s name and not his or her access code. 4-Digit Codes 6-Digit Codes Partition User # and Name...
- Page 44 Partition User # and Name Byp Stay Force 1 or 2 Only Only 006:_____________ ____ 007:_____________ ____ 008:_____________ ____ 009:_____________ ____ 010:_____________ ____ 011:______________ ____ 012:_____________ ____ 013:_____________ ____ 014:_____________ ____ 015:_____________ ____ 016:_____________ ____ 017:_____________ ____ 018:_____________ ____ 019:_____________ ____ 020:_____________ ____...
- Page 45 Partition User # and Name Byp Stay Force 1 or 2 Only Only 026:_____________ ____ 027:_____________ ____ 028:_____________ ____ 029:_____________ ____ 030:_____________ ____ 031:_____________ ____ 032:_____________ ____ 033:_____________ ____ 034:_____________ ____ 035:_____________ ____ 036:_____________ ____ 037:_____________ ____ 038:_____________ ____ 039:_____________ ____ 040:_____________ ____...
- Page 46 Partition User # and Name Byp Stay Force 1 or 2 Only Only 046:_____________ ____ 047:_____________ ____ 048:___________ ____ Duress: Y Special Keys and Features ] One-Touch Regular arming is activated ENTER ] One-Touch Stay arming is activated STAY ] One-Touch Force arming is activated FORCE ] One-Touch Manual Bypass Programming is activated...
- Page 47 System Timers Enter and exit your premises through the designated doors. Exit Delay 1 (Partition 1): _______sec. = time to exit site Exit Delay 2 (Partition 2): _______sec. = time to exit site Entry Delay 1 = _______sec. = time to disarm before alarm; enter through zone #___________ Entry Delay 2 = _______sec.
-
Page 48: Appendix A
9.0 Appendix A For Spectra 1689 LED Keypad Modules only Do not read the following if you have not read these sections: • User Access Codes (see section 3.4 on page 14). • System’s Clock (see section 5.6 on page 30). - Page 49 (fire and emergency options are only available on certain Paradox models). This is due to a number of reasons, including by not limited to inadequate or improper installation/positioning, sensor limitations, battery performance, wireless signal interruption, inadequate maintenance or the potential for the system or telephone lines to be compromised or circumvented.
- Page 50 Warning for Connections to Non-Traditional Telephony (eg. VoIP) Paradox alarm equipment was designed to work effectively around traditional telephone systems. For those customers who are using a Paradox alarm panel connected to a non-traditional telephone system, such as "Voice Over Internet Protocol"...
- Page 52 Printed in Canada - 02/2007 SPEK-EU07...
Need help?
Do you have a question about the Spectra 1689 and is the answer not in the manual?
Questions and answers