Table of Contents
Advertisement
Advertisement
Table of Contents

Related Manuals for Paradox K656 Touch Sense


Summary of Contents for Paradox K656 Touch Sense
- Page 1 K656 Touch Sense LCD Keypad User Guide...
-
Page 3: Table Of Contents
Table of Contents Overview ..........5 Areas ........... 11 Arming ..........12 Disarming ..........16 User Codes and Labels ......18 Programming User Settings ....24 Trouble Display ........31 Remote Control Feedback ....34 Voice Dialer / SMS ........ 35 Testing and Maintenance ...... -
Page 5: Overview
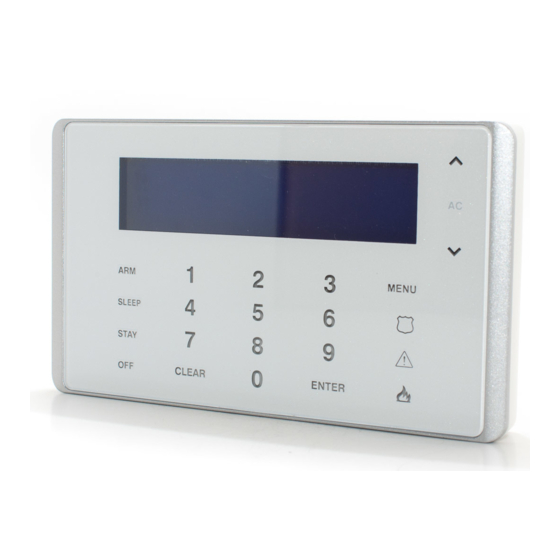
Chapter 1: Overview Introduction The K656 Touch Sense Keypad provides touchpad technology with simplified menu-driven navigation. Whether arming or disarming your system, bypassing zones, or viewing the system status, the menu-driven prompts guide you every step of the way. This sleek, innovative keypad makes using your security system easier than ever. - Page 6 K656 Overview 1) 32-character blue LCD screen 2) System AC power status indicator 3) Arrow keys - use to scroll the menu options 4) Main menu key 5) Panic keys (police, medical, and fire) 6) Enter key - saves current data, accesses sub-menus, or exits the current menu 7) Clear key - erases current data entry or reverts to the preceding step...
-
Page 7: Keypad Settings
Setting Time & Date To set the time and date: 1) Press [ ] > [9] > [2] MENU SETTINGS TIME AND DATE 2) Enter your user code. 3) To change the time, place the cursor under the number you want to change by using the [ ] button and enter the time. - Page 8 Figure 1: Modifying Keypad Settings Press Press MENU Scroll Speed SETTINGS Press Key Brightness KEYPAD Press Key Sensitivity Press LCD Brightness increase or decrease Press the numbers LCD Contrast Press Mute Press Dim Intensity Press MENU Press Press CLEAR Dim Delay to exit Press About...
-
Page 9: Confidential Mode
Confidential Mode Your installer can program keypads not to display the status of your system automatically by changing the keypad to Confidential Mode. In Confidential Mode: • The zones and status messages will NOT be displayed • The indicator lights will NOT illuminate •... -
Page 10: Panic Alarms
will start beeping when opened (HH:MM). Enter the time that the chimed zone(s) will stop beeping when opened (HH:MM). 4) Press [ ] to exit chime programming. CLEAR Panic Alarms Your system can be programmed to send an alarm to your monitoring station to request help from the police, a medical facility, the fire department, or a telephone number of your choosing. -
Page 11: Areas
Chapter 2: Areas Your installer can set your keypad to recognize separate protected areas. Having separate areas in your system can be useful in situations where shared security systems are more practical. For example, a company that has both an office and a warehouse area, can arm and disarm each area separately while controlling access to each area. -
Page 12: Arming
Chapter 3: Arming When your system is armed, it can respond to any breach in the protected zones by causing an alarm and sending a report to your monitoring station. To arm your system: 1) Press [ ] > [1] , then select an arming MENU DISARM... - Page 13 order to bypass a zone, the following conditions must be met: • The zone must have the Bypass option programmed by your installer. • The Bypass option must be enabled in your User Options (not necessary if One-touch Bypass has been activated by your installer).
-
Page 14: Keyswitch Arming
3) Press [2] RECALL BYPASS 4) Press [ ] to save and exit. CLEAR One-Touch Buttons If enabled by your installer, you can access the following features without using your user code by pressing and holding the desired One-Touch button. Table 2: One Touch Button Button Feature Regular arm... - Page 15 3) If you have access to more than one area, enter the area’s number, or use the [ ] and [ ] buttons and press [ ENTER 4) Enter the time you want the area to be armed according to the 24-hour clock (e.g., 9 a.m. is 09:00 and 9 p.m.
-
Page 16: Disarming
Chapter 4: Disarming When your system is disarmed, it deactivates any alarms in progress, and it deactivates the zones so that an alarm will not be triggered if zones are breached. Entry Delay Timer Your installer will program designated entry points (e.g., the front door) with an Entry Delay Timer. - Page 17 • The alarm memory will be erased after the next alarm occurs and a valid user code has been entered. To view the alarms that occurred the last time the system was armed: 1) When the system is disarmed, the screen will display Alarm in Memory: Press menu>4.
-
Page 18: User Codes And Labels
Chapter 5: User Codes and Labels User codes allow access to the system. Your system supports up to 999 user codes. Codes can be assigned to user number between 002 and 999 (user number 001 is the System Master Code). Your installer will usually program user codes to be four or six digits in length. -
Page 19: Copy User Options
Copy User Options This feature allows you to copy the user options, access control options, and area assignments from one user code to another. All user options are copied except the user code, card assignment, remote control assignment, and user label. To copy user options: 1) Press [ ] >... -
Page 20: Special Function Keys
buttons on your keypad, press the button until the desired letter appears on the screen. For example, if you want to enter the letter “C” you would press the [1] button three times (see Table 3 on page 20). NOTE: For Hebrew, Russian and Greek keypads, refer to the standard and special characters appendices on page 43 and page 44. - Page 21 Every time the [ ] key is pressed it will switch between number keys and letter keys. ] = Lower Case / Upper Case MENU Every time the [ ] key is pressed it will switch MENU between lower and upper case letters. [ ] = Special Characters After pressing the [ ] button, the cursor will turn into a flashing black square.
- Page 22 Table 4: Special Characters Catalogue Polish Hungarian Turkish Page 22 User Codes and Labels...
-
Page 23: Deleting User Codes
Deleting User Codes To delete user codes, follow steps 1 to 3 in Programming User Settings on page 24. In step 4, press [ ]. Once the CLEAR information is erased, press the [ ] button three ENTER times to save and exit. Programming User Codes The System Master and users with the Master feature can program user codes along with user options and area... -
Page 24: Programming User Settings
Chapter 6: Programming User Settings Using the K656 keypad, you can add new users to the system and modify their level of access to the system. The following points are important to keep in mind when programming a new user: •... - Page 25 To program a user: Press [ ] > [9] > [1] MENU SETTINGS USER CODES Enter the master code. Select one of the following: : Enter user number [002] to [999]. SELECT USER : Finds the next available user number. FIND FREE USER Enter the new user code.
-
Page 26: User Options
Select the user’s access control options: Input Description Value [1] Access control [2] Can disarm with access card [3] Access card with extended unlocked period Input Value Arming with card Feature Off Disabled Off Regular arm On Stay arm On Force arm Input Description Value... - Page 27 • When option [1] is ON and option [2] is OFF, the user can program and modify user codes (P.I.N. only) and user labels. • When both options [1] and [2] are ON, the user has Full Master rights. The user can create or modify user codes, user options, user access control options, access card numbers, remote control serial numbers, user labels and area assignments according to their...
-
Page 28: Access Control User Options
Option [8]: Area Access • When option [8] is ON, the keypad will permit access to all the areas assigned to the user code. • When option [8] is OFF, the keypad will only permit access to the areas it controls. For example, the keypad is assigned area 1 only, and your user code is assigned areas 1 to 8. - Page 29 Extended Unlocked Period to 15 seconds, a user code with “Extended Unlocked Period” enabled will have a total of 45 seconds to pass through the door. Options [4] and [5]: Arming with Card • Options [4] and [5] define the type of arming when arming with an access control card.
- Page 30 however the user must enter a user code to disarm the armed area. • When option [8] is OFF, a user can gain access to an access control door only if the door’s area(s) is already disarmed. NOTE: For option [8] to function in the ON position, option [5] “Arm Only”...
-
Page 31: Trouble Display
Chapter 7: Trouble Display Trouble Display If your system experiences any problems, Trouble(s) press Menu>5 will appear on the screen. The Trouble Display will only display the troubles that occur in the area(s) to which the keypad has been assigned. To view the Trouble Display: 1) Press [ ] >... - Page 32 • [5] Printer • [6] AC Failure • [7] Battery Failure • [8] Low Supply Group 4: Network Trouble • [1] Missing Keypad • [2] Missing Module • [3] Lost Voice Mdl. • [6] General Failure • [7] Network OverLd Group 5: Zone Tamper Group 6: Zone Low Battery Group 7: Zone Fault...
- Page 33 view the history log for all areas to which the keypad is assigned. To view the History Log: 1) Press [ ] > [7] MENU HISTORY LOG 2) If you have access to more than one area, select the area(s) you wish to view. 3) Use the [ ] and [ ] buttons to scroll through the events.
-
Page 34: Remote Control Feedback
Chapter 8: Remote Control Feedback If your system includes the Wireless Zone Expansion module (RTX3), it will be able to support remote controls including the Two-Way Remote Control (REM2). This remote allows you to change the status of the system, and it also provides visual and auditory feedback. -
Page 35: Voice Dialer / Sms
Chapter 9: Voice Dialer / SMS The VDMP3 Voice Dialer, is a voice-assisted module that can be programmed to call up to 8 telephone numbers in the event of an alarm. You can also call the VDMP3 from an outside line, enabling you to arm or disarm the system as well as activate up to 8 programmable outputs (PGMs). - Page 36 SMS Programming If the system is equipped with a PCS Series communication device, events in the system can be reported to up to 16 telephone numbers via SMS text messaging. As a Master User, you can: • Set which phone numbers (up to16) will receive text messages to report system events.
-
Page 37: Testing And Maintenance
Chapter 10: Testing and Maintenance Burglar Alarm Testing NOTE: It is important to disarm the system before testing the alarm. Two people are needed to complete this test. One person will watch the screen on the keypad while the other person walks around the protected areas and opens the zones (i.e., opens the doors and windows that are protected, walk in the path of the motion detectors, etc.). - Page 38 The system will test all its connections and can send a report to your monitoring station. If the system detects a problem, the Trouble Display will show on the screen (refer to Trouble Display on page 31). Call your installer for repairs if any troubles occur.
-
Page 39: Fire And Burglar Alarms
Chapter 11: Fire and Burglar Alarms Standard Fire Zone During a fire alarm, the bell/siren emits an intermittent sound ( ) until silenced or reset. If the zone is BEEP BEEP BEEP a Standard Fire Zone, your system can immediately send an alert to your monitoring station. -
Page 40: Fire Safety Tips
Fire Safety Tips How should you prepare in case of a fire in your home or business? • Remind everyone to escape first, and then call for help. • Develop a fire escape plan and designate a meeting place outside. •... -
Page 41: Minimizing Home Fire Hazards
Figure 2: Delayed Fire Zone Minimizing Home Fire Hazards How can you avoid the three most common causes of fires at home? • Never leave cooking food unattended. It’s the leading cause of fire injuries. Cooking fires often result from unattended cooking and human error, rather than mechanical failure. -
Page 42: Home Fire Warning System
Home Fire Warning System Household fires are especially dangerous at night. Fires produce smoke and deadly gases that can overcome occupants while they sleep. To warn against fire, install smoke detectors outside each separate sleeping area in the immediate vicinity of the bedrooms and on each additional story of the family living unit, including basements. - Page 43 Appendix 1 : Standard Characters Hebrew Standard Characters Russian Standard Characters Greek Standard Characters Press key Press key Press key once twice three times ...
- Page 44 Appendix 2 : Special Characters Hebrew Special Characters Page 44 Appendix 2 : Special Characters...
- Page 45 Russian Special Characters Appendix 2 : Special Characters Page 45...
- Page 46 Greek Special Characters Page 46 Appendix 2 : Special Characters...
-
Page 47: Index
Index Access Codes Deleting ....................23 Labelling ....................19 System Master ..................18 User ......................18 Access Control ....................28 Access Control User Options Access Control ..................28 Add Tolerance Window to Schedule ..........29 Arming with Card ................29 Can Disarm with Access Card ............28 Card to Unlock and Code to Disarm .......... - Page 48 Characters, Special ..................22 Chime Zones ....................9 Clock, Set Time and Date ................7 Code Follows Schedule ................29 Command Functions .................10 Confidential Mode ..................9 Date, Set ......................7 Deactivating a Security System ..............16 Delay Timer Entry ......................16 Exit ......................12 Delayed Fire Zone ..................39 Deleting User Access Codes ..............23 Delay ......................7...
- Page 49 History Log ....................32 Ignoring Zones when Arming, see Bypass Programming Key Brightness ....................7 Key Sensitivity ....................7 Keypad Letter Assignment ................20 Keypad, LCD Settings .....................7 Keyswitch Arming ..................14 Brightness ....................7 Contrast ....................7 Master Code ....................18 Master Feature, in User Options ............26 Mute ........................
- Page 50 Recall, Bypassed Zones ................13 REM2 ........................34 REM3 ........................34 Remote Control Feedback ...............34 Safety Tips, Fire ....................40 Schedule Code Follows ..................29 Schedule Tolerance Window, see Add Tolerance to User Schedule Scroll Speed ..................... 7 Sensitivity ......................7 Serial Number ....................7 SMS Messages ....................36 Sounds - Beeping ..................
- Page 51 Access Control, see Access Control User Options Area Access .................... 28 Arm Only ....................27 Bypass ..................... 27 Duress ..................... 27 Force Arm ....................27 Master Feature ..................26 Programming ..................26 Stay & Instant Arm ................27 User Settings ....................24 VDMP3 Plug-In Voice Dialer ..............35 Viewing Alarms In Memory ................
- Page 55 Canadian and international patents may also apply. Trademarks: Paradox, Digiplex and EVO are trademarks of Paradox Ltd. or its affiliates in Canada, the United States and/or other countries. Certification: For the latest information on products approvals, such as UL and CE, please visit www.paradox.com.
- Page 56 K656-EU03 • 04/2011 PARADOX.COM Printed in Canada...
Need help?
Do you have a question about the K656 Touch Sense and is the answer not in the manual?
Questions and answers