Table of Contents
Advertisement
Advertisement
Table of Contents

Related Manuals for Raidon SL3610-2S-LB2


Summary of Contents for Raidon SL3610-2S-LB2
- Page 1 SL3610/20-2S-LB2 User Manual v.2.0 (September, 2009)
- Page 2 If you have any questions on RAIDON products or need the latest product information, user manual or firmware, please contact us at supporting@raidon.com.tw and we will get back to you as soon as possible.
-
Page 3: Table Of Contents
Contents Chapter 1 RAID Introduction ..............5 What is RAID?................5 RAID Functions................5 RAID 0 / RAID 1 / Linear..............5 Chapter 2 Installation ................... 8 Accessories Check & Product Diagrams........8 Messages on LCD & LED Instruction..........10 Hardware Installation.............. - Page 4 3.5.5.1 Disk Utility..................36 3.5.5.2 RAID Setting................... 37 3.5.5.3 Firmware Upgrade................37 3.5.5.4 Save Configuration................. 38 3.5.5.5 Restore Configuration..............38 3.5.5.6 Factory Reset................. 39 3.5.6 Log File................... 39 3.5.6.1 Samba Log File................39 3.5.6.2 FTP Log File................... 39 3.5.6.3 DHCP Server Log File..............40 3.5.6.4 System Log File................
-
Page 5: Chapter 1 Raid Introduction
Chapter 1 RAID Introduction 1.1 What is RAID? RAID (redundant array of independent disks or redundant array of inexpensive disks) Whenever and wherever we are, we store our data in a hard drive. Abnormally access, slower speed and unresponsiveness are all expected when an accident occurs or the hard disk reaches its service life because a hard disk is widely used. - Page 6 The RAID 0 array does not backup data, so it is not regarded as a real RAID application. If one of the hard disks is damaged, the entire array will fail, and all data in the array will be lost. Therefore, the fault tolerance of RAID 0 is lower than that of any hard disk in the array.
- Page 7 Below is the comparison between 2 RAID levels: Hard Disk Minimum Basic Operation Data Transfer RAID Level Available Data Reliability Number of Hard Method Speed Capacity Disks Striping data Total capacity across each of all the hard Highest drive disks Half of total Mirroring capacity of all...
-
Page 8: Chapter 2 Installation
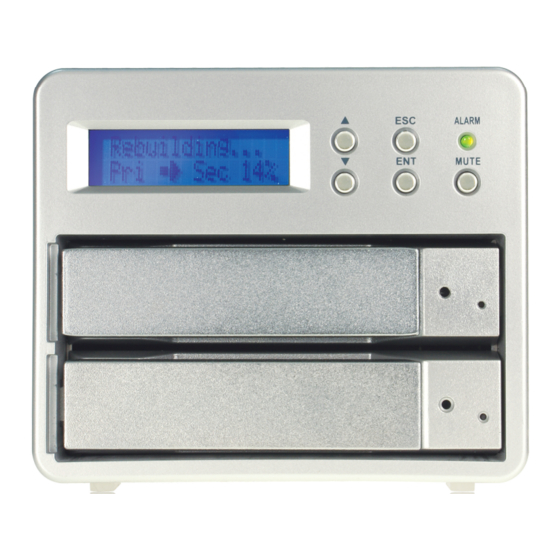
Make sure the related accessories and the product body are not damaged or missing. If you have any questions, contact the distributor or sales. Front View LCD screen LCD buttons ALARM MUTE Key Insertion Opening HDD 0 Access LED Tray Handle HDD 1 SL3610-2S-LB2 Installation... -
Page 9: Status Led
2. To replace or remove the hard disks, please shut down the machine and turn off the power first. Removing the hard disks while the power is on will result in system malfunction and may damage the data. Rear View Gigabit LAN Port USB2.0 Port SL3610-2S-LB2 Installation... -
Page 10: Messages On Lcd & Led Instruction
USB2.0 Port Gigabit LAN Port Reset SL3620-2S-LB2 Notice : 1. The indicator on the left will light on green when Gigabit LAN Port is connected to Gigabit LAN and the indicator on the right will light on orange when Host Access is enabled. 2. - Page 11 ● Messages Shown on LCD LCD Message Display System First Tier Second Tier Third Tier System Info. Booting HD1:OK HD2:OK 2-1-1 F1:O F2:O IP:DCHP Raid-1 IP Mode:DHCP 2-1-2 010.001.002.110 RAID Mode:Raid-1 F1_3416 F2_OFF 2-1-3 Temp:48°C/118°F Temp:30°C/86°F 2-1-4 Alarm:50°C/122°F FIRMWARE 2-1-5 VERSION FIRMWARE 2-1-6...
- Page 12 Second Tier Third Tier Fourth Tier 2-3-1 System Setup. Network Setup DHCP Mode? 2-3-1-1 Second Tier Third Tier Fourth Tier 2-3-1 System Setup. Input Password: Network Setup Change Password DHCP Mode? Old Password: 2-3-1-1 2-3-2-1 00000000 00000000 2-3a 2-3-2 Input Password: Change Password Old Password: New Password...
- Page 13 Instruction of Displaying Message 1-1 Boot Screen 1-2 Main Screen : Displaying RAID mode & IP address 2-1 System Information 2-1-1 System Status HD1 : First HDD Status (Upper one) HD2 : Second HDD Status (Lower one) OK : Normal / OFF : No HDD is installed / BAD : HDD Failed F1 : Fan Status O: Normal / X : Fan Failed T : Temperature...
- Page 14 (the default value is 30°C) 2-3-4-2a/b Set the overheat temperature : 50/60°C two kinds of temperature for your choice (the default value is 50°C) 2. Description of LED Indicators SL3610-2S-LB2 Front Panel LED LED Status Power on...
-
Page 15: Hardware Installation
SL3620-2S-LB2 Front Panel LED LED Status Power on Blue / Blinks Booting Completely Blue / Lights On RAID Fail Purple / Lights On Rebuilding Purple / Lights On Fan Fail Blue & Purple / Blinks Overheat Purple / Lights On Tray LED LED Status Access... -
Page 16: Initial Setup
4. Once the installation is completed, insert the tray back and fix it firmly in the proper place. 5. Connect the Gigabit LAN port and, finally, connect the power cord. 6. Hardware installation is completed. You can power on the system to start the related setup and application. - Page 17 The default account and password are as follows: Login Username: admin Default Password: admin 2. If you use formatted hard disks, the system will display current system information and setting will be available. If you use 2 new hard disks, you need to format the hard disks or create a disk array first.
- Page 18 3. Please enter “Basic Setting” and click “Wizard” to change the system related information, including host name, IP address and password, etc. For detailed descriptions, refer to Chapter 3. Change IP setting Notice : 1. Before the disks are formatted or the disk array is created, be sure not to change any system information.
-
Page 19: Chapter 3 User Interface Introduction
Chapter 3 User Interface Introduction 3.1 User Interface Architecture The following is the UI architecture: Basic Quick Setup → Wizard Add User Add Group Add Share Control panel Users and Group → User Management Group Management File → File Server Share Management System →... -
Page 20: Login
3.2 Login SL3610/3620-2S-LB2 supports graphic user interface (GUI) to manage the system. Make sure that the network wire is connected and the setting program is installed first. Refer to Chapter 2.3 for related settings. For the example below, IP address is: 10.1.2.200 (your own host IP address) Open the browser and input: http://10.1.2.XXX The default account and password are as follows: Login account: admin... - Page 21 To format the hard disk separately, refer to the following procedures: 1. Enter “Maintenance” and click “Disk Utility”. 2. Choose the hard disk to be formatted and choose file format. SL3610/3620-2S-LB2 provides 3 formats: Fat32, Ext2 and Ext3. After choosing, click “Format”. The system will start to format automatically and display the progress.
-
Page 22: Set Raid Directly Without Formatting
3.3 Set RAID Directly without Formatting 1. Enter “Maintenance” and click “Disk Array”. 2. Select “Disk Array Mode” and “Format File System”. After choosing, click “Create Disk” and the system will start to perform hard disk formatting and RAID system setting automatically. User Interface Introduction... -
Page 23: Basic
3. Once formatting is complete, the system will restart automatically. It can be ready for use once startup is complete. If the hard disk installed needs not be formatted again, the system will display the present system information and you can make related setting changes immediately. Notice : 1. - Page 24 Notice : 1. The password shall not exceed 16 characters and must be English letters in lower case and numeric numbers. 2. To install more than 2 SL3610/3620-2S-LB2s, it is recommended that you change the password to prevent other persons from changing your system information via the default password. 3.
-
Page 25: Add User
6. Verifying the related equipments All setting information will be displayed together. If you are sure everything is OK, click “Finish” to finish the setting; if the data is wrong, click “Previous Page” to return to the procedure to set again. Once the above procedures are complete, the basic setting of the SL3610/3620-2S-LB2 system is finished. -
Page 26: Add Group
3. Access Authority Setting Set the user’s access authority. (If you are setting for the first time, only the default “Public” folder is available.) Once the shared folder is set, you can find the exclusive folder of the newly added user on Net Neighbors. -
Page 27: Add Share
3. Access Authority Setting Set the authority to access folders of the group. (If you are setting for the first time, only the default “Public” folder is available.) 3.4.4 Add Share Add a share folder rapidly through 3 steps 1. Setting of the Share Folder’s Name Input the name of the folder, move the mouse to a blank area on the screen, click the left mouse key and the system will set the folder path automatically. -
Page 28: Control Panel
3. Setting of NFS Access Authority To set the access authority of NFS, check “allow access by all users” to allow all access or fill in the IP address of the access device allowed directly. 3.5 Control Panel 3.5.1 Users and Groups In Users and Groups, you can set and manage two items: users and groups. -
Page 29: Group Management
Notice : 1. User ID shall be 20 characters in length at maximum which must be English letters in lower case and numeric numbers, “-”, “_” or “.” and its first character must be an English letter. 2. The password is 16 characters in length at maximum which must be English letters in lower case. To add a user to a group, click the name of the user first and then click “Add to Group”... -
Page 30: Share Management
‧NFS Server Setting ※ Check “Enable” to initiate the NFS server function. ‧Guest Access Setting ※ Click “Enable” to permit guest access. ※ Check “Enable Disk Quota” to set the upper limit of data (Mega Bytes) uploaded by the guest. 3.5.2.2 Share Management The share management screen will display all existing share names. -
Page 31: Printer Sever Setting
‧NFS access ※ Check “Allow access by all users” to permit all users to access. Or add the IP of the access computer or subnet mask in the list to permit access. ‧Delete Share ※ After selecting a folder name, click “Delete Share” to delete the designated share name. Notice : To delete the data in the folder, please backup the data prior to deletion. -
Page 32: System
3.5.3 System System setting includes 6 functions: “Network Setting”, “Time Setting”, “Server Startup”, “Information”, “Disk Capacity” and “Error Notice Setting”. 3.5.3.1 LAN Setting ‧Hostname ※ You must set an independent name for SL3610/3620-2S-LB2 over the LAN. Notice : 1. The number of characters is limited to 15 characters, which must consist only English letters, numeric numbers or “-”. -
Page 33: Turn Off Server
The NTP (network time protocol) server is one that is provided over the network primarily for network time checking of the user’s host. By default, the system now provides two NTP server addresses, time. windows.com and time.nist.gov, for users to choose. 3.5.3.3 Turn Off Server ※... -
Page 34: Disk Usage
3.5.3.5 Disk Usage Display information about the use status of the present hard disk and restriction on user capacity. ※ Overview of present hard disk status ※ Use status and capacity restriction for each user. 3.5.3.6 Error Notification Setting ‧Monitoring Services Setting ※... -
Page 35: Network Service
※ Error Handling Pop-Up Machines The host name of the administrator computer that displays the error window can be designated. 3.5.4 Network Service 3.5.4.1 DHCP Server Check “Server Enable” to start the DHCP server. If the DHCP function is selected, fill in a related IP address. -
Page 36: Bonjour
3.5.4.2 Bonjour SL3610/3620-2S-LB2 supports Apple’s Bonjour protocol and iTunes server ※ Check “Enable” to initiate the Bonjour protocol. 3.5.5 Maintenance System maintenance includes: There are six options: disk utility, disk area, firmware update, storage configuration, restore configuration and factory reset. 3.5.5.1 Disk Utility Disk information will display hard disk name, file system type, total capacity, used capacity, cluster configuration and all configured hard disks. -
Page 37: Raid Setting
Notice : 1. Once the USB disk is detected by the system, you need to set the read authority before reading the “usb1” folder. 2. To remove the USB disk, click “Uninstall” before removal. 3.5.5.2 RAID Setting SL3610/3620-2S-LB2 supports two disk array level applications: RAID 0 RAID 1, and Linear. If only one hard disk is inserted, the “disk array”... -
Page 38: Save Configuration
Notice : Random firmware upgrade may cause your system unable to operate normally. If your system operates normally, it is recommended that you not upgrade the firmware. If you have any question about firmware upgrade, contact the technical service personnel of Raidon or write to supporting@raidon.com.tw. 3.5.5.4 Save Configuration This function can save the present system configuration file and save it in the hard disk. -
Page 39: Factory Reset
3.5.5.6 Factory Reset By entering the factory default page, you can reset the system configuration file to the factory default. Once a decision is made to reset to the factory default, all system settings, including users and network, etc. will be lost. 3.5.6 Log File Login records include: Five items: “Samba Log File”, “FTP Log File”, “DHCP Server Log File”, “System Log File”... -
Page 40: Dhcp Server Log File
3.5.6.3 DHCP Server Log File Can display all DHCP related log files. If you do not initiated the DHCP function, no information will be displayed. 3.5.6.4 System Log File Can display all system related records. 3.5.6.5 Administrator Log File Can display all records relating to the “Administrator”. 3.6 Personal Information “User Account”... - Page 41 2. The screen of ongoing software update is as follows: Once the software is updated, the system will restart. Input the account and password again to enter the system setting screen. 3. Click the control panel and network server and you will find that the TorrentFlux option is added. Click TorrentFlux to bring up the screen below, press Save and then click Link to bt.
-
Page 42: Operation Methods For Change And Search Of The Ip Address
4. Click Link to bit to bring up the screen below. Input the account and password and press Login. Account: mysql or admin Password: 123456 or admin 5. After this screen appears, you can start to use the TorrentFlux function to upload and download BT files. - Page 43 2. Click “Setup” and the setting software will detect automatically and present the following result screen. In case multiple RAIDON NAS are installed over the network, the blank on the left will display all devices detected. In this screen, you can learn related IP address of the present server. To change such information of the server as related IP address, etc, select the name of the server first and then click “OK”.
- Page 44 4. After entering the setting screen, connect the network wire to your host and SL3610/20-2S-LB2, click Set IP configuration mai to input the IP address (the default IP of SL3610/20-2S-LB2 is 192.168.1.1) or click “obtain an IP address” to obtain the IP address from the server after connecting SL3610/20-2S-LB2 to the network.
-
Page 45: Firmware Update Procedures
7. After you click “Save”, the system will again ask you if you are sure to change the setting. If so, click “OK”. If you do not want to change, click “Cancel”. 8. Setting is completed. Once the system is reset, it will jump back to the beginning screen. To change other servers, repeat the above procedures. - Page 46 3) After completing update, in order to ensure that the system run steadily, we suggest you to rebuild RAID system. For detail information please refer to Chapter 3. 4) After completing above process, please move data back to SL3610/3620-2S-LB2 and the update process is finished.
-
Page 47: Appendix A Frequently Asked Questions
Appendix A Frequently Asked Questions 1. Unable to detect device on the setup Util.exesoftware? A . 1) Make sure that SL3610/3620-2S-LB2 and the RJ-45 network on the PC are connected to the switch and the power is turned on. 2) It takes about 2 minutes 2 minutes to start SL3610/3620-2S-LB2 after power on. Before the startup is completed, the system will be unable to find SL3610/20-2S-LB2.
Need help?
Do you have a question about the SL3610-2S-LB2 and is the answer not in the manual?
Questions and answers