Table of Contents
Advertisement
Quick Links
Advertisement
Table of Contents

Related Manuals for Raidon NAS SL3610-2S-LB2


Summary of Contents for Raidon NAS SL3610-2S-LB2
- Page 1 SL3610/20-2S-LB2 Quick Installation Guide v.1.0 (September, 2009)
-
Page 2: Product Diagrams And Contents Of Product Package
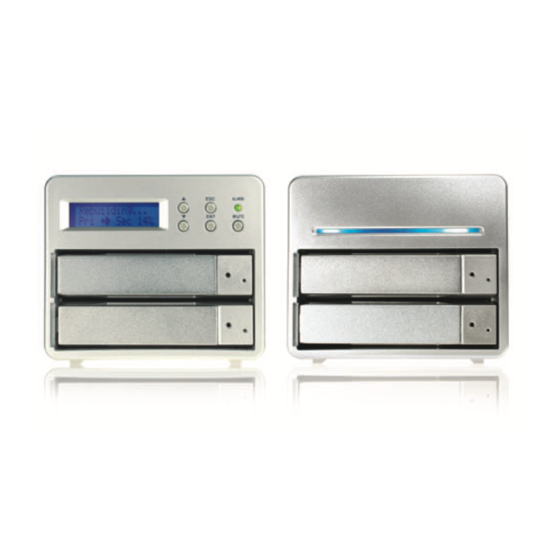
A. Product Diagrams and Contents of Product Package SL3610-2S-LB2 Front View LCD screen LCD buttons ALARM MUTE Key Insertion Opening HDD 0 Access LED Tray Handle HDD 1 Rear View Gigabit LAN Port USB2.0 Port The indicator on the left will light on green when Gigabit LAN Port is connected to Gigabit LAN and the indicator on the right will light on orange when Host Access is enabled. - Page 3 SL3620-2S-LB2 Front View Status LED Key Insertion Opening HDD 0 Access LED Tray Handle HDD 1 Rear View USB2.0 Port Gigabit LAN Port Reset 1. The indicator on the left will light on green when Gigabit LAN Port is connected to Gigabit LAN and the indicator on the right will light on orange when Host Access is enabled.
-
Page 4: Precautions Before Application
1. We suggest you to use 2 brand new 3.5-inch SATA hard drives with the same brand and model number. 2. If you want to use two used hard drives on RAIDON NAS, please transfer your data on other hard drives in case the data loss caused by setting. - Page 5 “2.3 Initial Setup” in the user manual for the information about network setting. 2. “RAIDON NAS” will be shown in the left column, and the related setting details will be shown at the right side. Select “RAIDON NAS” in the left column and click “OK”. If “RAIDON NAS” is not shown in the column, please click “Search again”...
- Page 6 3. Enter the password. (Default password: admin) 4. Select “ Obtain an IP address” and then click “Next” to proceed. 5. Set Date and Time by your time zone and then click “Next” to proceed.
- Page 7 6. Make sure all settings details are right and click “Save” to confirm. The setting process will go back to the step 1. You will see all setting details at the right side. E. Start RAIDON NAS 1. Input IP address on the browser.
- Page 8 2. The System Information screen will show the new installed hard drives. Please format the hard drives first, and then proceed to the following process. 3. Click “Maintenance / RAID Setting” and see the Disk Status at the right side. Please select RAID level as your need and click “Create Raid System”...
- Page 9 5. Creating RAID System 6. The system will reboot while the RAID system is built up. It takes about 3 minutes to reboot. After finish, please login again. 7. Input username and password. Default user name: admin Default password: admin...
-
Page 10: Quick Setup
8. After login, you can see the system information. F. Quick Setup Please select “Quick Setup / Wizard” at the left side to start the quick setup process. - Page 11 1. Setting Language Select “set From Browser Options”. 2. Change Password Input new password→Input new password again→click “Next” to proceed. 3. Setting Host Name The host name must be changed. Please make sure to change it and click “Next” to proceed. 4.
-
Page 12: Add Users
5. Setting Time Select “Default” to let the time consistent with the browser. 6. Complete Setting Please check the information in “New Settings” column. If all the information is correct, please click “Confirm” to complete the setting process. G. Add Users 1. - Page 13 2. Please input username and password, select “Create Shared Private Folder” and click “Next” to proceed to the next page. 3. User Management You can add users into the default group or add group. After finish, please click ”Next” to proceed. 4.
-
Page 14: Add Group
H. Add Group 1. Select “Add Group” at the left side and create the group name. Click “Next” to proceed. 2. Group Management Add / Remote group members and click “Next” to proceed. 3. Authority Management After finish the setting, click “confirm” to complete the process. - Page 15 I. Add Shared Folders 1. Due to the default authority setting is “Public”, please add a new folder first. Select “Add Share” at the right side, input the name of the folder and click “Next” to proceed. 2. Select the users who are admitted to access the folder and move them from the right column to the left column.
- Page 16 Thank you for using the product of RAIDON Technology Inc. The information in the manual has been thoroughly checked before publication, but may not conform to the product actually delivered. Actual product specifications depend on the product shipped to you. Any update in the specifications or product-related information shall not be subject to further notice.
Need help?
Do you have a question about the NAS SL3610-2S-LB2 and is the answer not in the manual?
Questions and answers