
Subscribe to Our Youtube Channel
Related Manuals for REI CD-2000


Summary of Contents for REI CD-2000
- Page 1 AM/FM/CD/MP3 Receiver with USB/SD & Auxiliary Input 3 Built-in Microphone inputs for PA Announcements Installation/Operation Manual 50W x 4 CD-2000...
- Page 2 Thank you for purchasing the CD-2000 AM/FM/CD/MP3/USB/SD Receiver from REI. This product is designed and tested to withstand temperature and vibration extremes. Please read the owner’s manual carefully before attempting to install. If you have an installation question or need installation assistance, please call the: SERVICE HOT LINE 1-877-726-4617 Toll Free USA &...
-
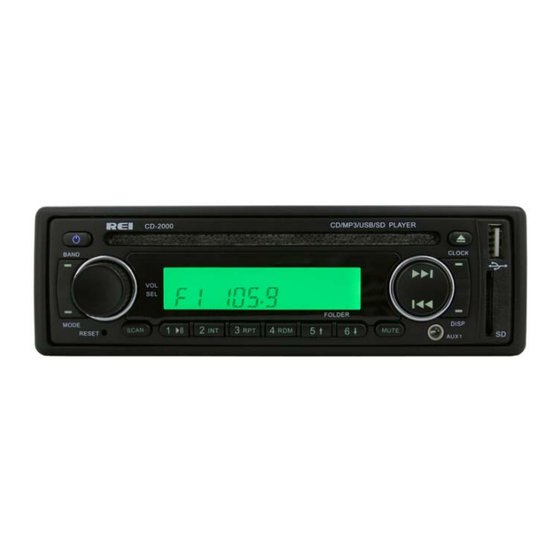
Page 3: Controls And Indicators
CONTROLS AND INDICATORS Power Button Volume/Select Knob Band Button Mode Button Reset Button Scan Button Preset Memory Buttons/r Playback Options Mute Button Radio Station Tune/Seek, Track Control Buttons (10) Front Auxiliary Input Jack (11) SD Card Input slot (12) Display Button (13) Clock Button (14) USB Input Slot (15) Eject Button... -
Page 4: Operation
OPERATION 1) Power Button Press the Power Button to turn ON or OFF the unit. A red light means the unit is in standby, a Blue light means the radio is on. 2) Volume/Select Knob Rotate the knob left or right to change the volume level. Press the knob to select one of the following functions: VOL---BASS---TREB---BAL---FAD Rotate the knob to adjust the desired setting. - Page 5 9) TUNE / SEEK /TRACK Buttons Under Radio mode, press the desired button to manually tune a station moving upward USB INTERFACE or downward. Press and hold button momentarily and the radio will automatically seek USB Standard USB1.1/2.0 (Full Speed) or down to the next available radio station.
-
Page 6: Specifications
RADIO SYSTEM MENU SPECIFICATIONS: Press and hold the VOL/SEL button for 2 seconds. LCD will display MENU, make General Specifications the desired selection below: Operating Voltage (10.0 –15.6V allowable) Maximum Current Consumption To change display SCROLL OPTIONS, rotate VOL/SEL, then press to choose: Standby Current Consumption 10mA ... -
Page 7: Troubleshooting
To remove the radio, disconnect the rear support stud if installed. Carefully The CD-2000 has three PA Microphone inputs, 2 Dynamic & 1 Carbon microphone release the front Trim Ring lock tabs at the top and bottom of the nosepiece. Then input. -
Page 8: Radio Connections
RADIO CONNECTIONS REQUIRED RADIO DIMENSIONS Follow this easy wiring diagram when installing. Be sure to disconnect the battery Verify the radio will fit by following the suggested dimensions below. negative terminal before beginning. RADIO INSTALLATION Verify lock Clips on the DIN collar are pressed inward. Place the collar into the dash opening.
Need help?
Do you have a question about the CD-2000 and is the answer not in the manual?
Questions and answers