Table of Contents
Advertisement
Quick Links
Advertisement
Table of Contents

Subscribe to Our Youtube Channel
Related Manuals for La San Marco PLUS 7


Summary of Contents for La San Marco PLUS 7
- Page 1 PLUS 7 QUICK START GUIDE...
-
Page 2: Quick Start Guide
QUICK START GUIDE La San Marco S.p.A. ENGLISH cod. 7770.053 EDITION May 2012... -
Page 3: Machine Description
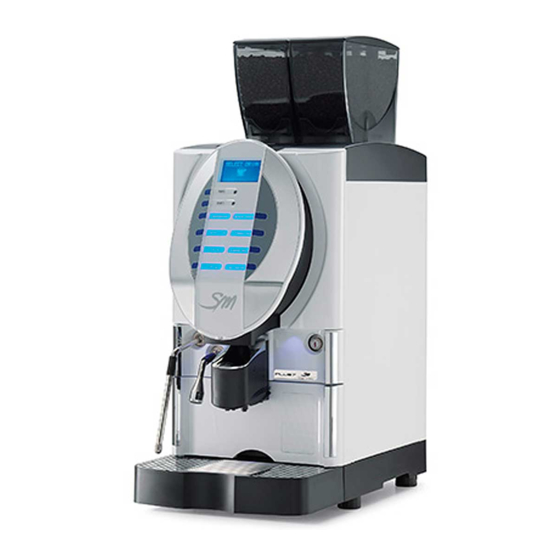
MACHINE DESCRIPTION LEGEND 1 . COFFEE HOPPER 3 . CARD READER (OPTIONAL) 4 . DOOR POWDER COFFEE 5 . DISPLAY 6 . INFO BUTTON 7 . SHIFT BUTTON 8 . DOSES BUTTON 9 . RUBBER PROTECTION 10 . 11 . HOT WATER DISPENSER 12 . -
Page 4: Auto Cleaning
STARTING UP After checking that the machine door is closed and the ground bin and the drip tray are inserted, power on the machine by means of the main switch underneath the machine basement (Fig. A). keep key SHIFT pressed and then press key INFO, (Fig. B) and the machine will set itself to on state. (FOR SELF CONFIGURATION, keep key SHIFT pressed and then press key INFO, afterwards insert the waiter pass- word 61111). - Page 5 DISPLAY THE AVAILABLE DRINKS SELECTION AND BOILERS TEMPERATURE Press the INFO key with the machine in SELECT DRINK mode to display the available drinks selection: B1 ESPRESSO BLACK COFFEE B2 B3 CAPPUCCINO LATTE MACCHIATO B4 B5 CHOCO MOCHA B6 B7 STEAM HOT WATER B8 Press SHIFT button once or twice to display the second or third dose drinks menu.
-
Page 6: Hot Water
DISPENSING 1) COFFEE/CAPPUCCINO/CHOCO DISPENSING Adjust the coffee dispenser to the correct height and place a cup under it then press the desired dose key. For Waiters’ Card place the smart card above the proper reader before pressing the dose key. The display shows: XXXXXXXX Where “XXXXXXXX”... - Page 7 STEAM WAND USE AND CLEANING STEAM WAND NOT AVAILABLE FOR MACHINE IN SELF CONFIGURATION 1) Before using the steam wand 2) Use the steam wand to foam or 3) Press the steam button to stop press the steam button to heat any liquid into the jug by the delivery before removing purge the nozzle.
- Page 8 AUTOMATIC CLEANING OF POWER CLEANER -COFFEE GROUP- MIXER - MILK FROTHER AT THE END OF EACH WORKING DAY, AND/OR IN CASE THE MACHINE WILL NOT BE USED SOME TIME, WE STRONGLY RECOMMEND TO CARRY OUT AUTOMATIC CLEANING OF THE COFFEE GROUP,THE MIXER AND THE MILK FROTHER.
-
Page 9: Mixer Cleaning
10 Open the front door -1-, insert 11 Close the front door. 12 Wait the end of the group clean- the detergent tablet into the ing cycle delivery. brewing chamber -2- GROUP CLEANING GROUP CLEANING GROUP CLEANING INSERT CLEANSER INSERT CLEANSER ENDS IN XX sec. - Page 10 19 Press (N°7) key to start the 20 At the end of the milker clean- milker cleaning cycle. ing cycle the display will show: Put the milk infeed pipe into a glass of cold water. Press (N°7) key, the milk frother will start dispensing another cleaning cycle only with water.
-
Page 11: Cleaning Tablets
24 Clean the grounds bin com- 25 Reinsert the drip tray. 26 Reinsert de grounds bin. partment. PLEASE NOTE: a) Do not interrupt the cleaning cycle. If the cleaning cycle is interrupted by any type of operation unrelated to the pro- cedure, when the machine functioning is set back again, the cleaning cycle will automatically be activated. -
Page 12: Manual Cleaning Of Milk Frother And Coffee Outlet
MANUAL CLEANING OF MILK FROTHER AND COFFEE OUTLET 1 Open the machine door and re- Remove the coffee outlet from Remove the milk frother from move the coffee outlet cover. its holder. the coffee outlet and disconnect silicone tubes No. -3- and -4. 4 Disassemble the milk frother 5 Disassemble the coffee outlet (1) in all its parts (first by turning... -
Page 13: Other Recommended Cleaning
OTHER RECOMMENDED CLEANING DRIP TRAY CLEANING GROUNDS BIN CLEANING HOPPER CLEANING Once a day rinse the drip tray in a Once a day rinse the grounds bin. Once a week clean the hopper by sink. means of a cloth and approved food detergent. - Page 14 Milk temperature setting The milk frother is equipped with a MILK TEMPERATURE REGULATOR which reduces the quantity of sucked milk. Turn the regulator clockwise to increase the milk temperature, or turn it anticlockwise to reduce it. MACHINE FUNCTIONS MESSAGES 1) Alarm for machine door position OPEN DOOR Cause: the front door is open;...
- Page 15 a) Lift the coffee outlets completely. b) Remove and empty the grounds bin. After 10 seconds the display shows: SELECT DRINK GR0UNDS BIN OPEN Press ( Info ) key, the display shows: CLOSE THE GROUNDS BIN GROUNDS BIN OPEN Reinsert the grounds bin into its housing. 3) Message of missing coffee SELECT DRINK MISSING COFFEE...
- Page 16 4) Message of missing decaffeinated Cause: Missing coffee in the decaffeinated door and in the brewing chamber. SELECT DRINK MISSING DECAF. Result: The machine interrupts the decaffeinated dispensing selections. Solution : press ( Info ) key, the display shows. To reset the alarm put decaffeinated into the decaf door and press again the dose required: INSERT DECA COFFEE POWNDER 7/8 gr.
-
Page 17: Drip Tray Full
Solution: press ( Info ) key, the display shows: INSERT DRIP TRAY DRIP TRAY OUT reinsert the drip tray. 6) Message of drip tray full. (ONLY FOR MACHINES WITHOUT DIRECT WATER DISCHARGE). The display will show the following message: SELECT DRINK DRIP TRAY FULL Cause: waste bin is full. -
Page 18: Access The Main Setting Menus With Password Or Smart-Card
ACCESS THE MAIN SETTING MENUS WITH PASSWORD OR SMART-CARD A) ACCESS THE MAIN SETTING MENUS WITH PASSWORD To enter the programming environments, a password is required which define the access rights to the different environ- ments. The password must be composed with 5 numbers. To insert the passwords proceed as follows: PASSWORD Turn the machine OFF... - Page 19 B) ACCESS THE MAIN SETTING MENUS WITH SMART CARD To enter the programming environments, place one of the following smart cards above the proper reader with the led light ON with the machine in OFF mode: - WAITER SMART CARD - OWNER SMART CARD if the inserted card it is correct the reader led light off .
- Page 20 Note...
- Page 22 La San Marco S.p.A. Via Padre e Figlio Venuti, 10 34072 Gradisca d’Isonzo (GO) Ital y Http://www.lasanmarco.com...
Need help?
Do you have a question about the PLUS 7 and is the answer not in the manual?
Questions and answers