Table of Contents
Advertisement
Advertisement
Table of Contents

Subscribe to Our Youtube Channel
Related Manuals for Worlde Panda200


Summary of Contents for Worlde Panda200
- Page 1 PANDA200 MIDI Controller Owner’s Manual 1.0 Version...
-
Page 2: Table Of Contents
Contents FEATURES .............................3 INTRODUCTION..........................4 FRONT PANEL OVERVIEW ....................4 REAR PANEL OVERVIEW....................6 HOOKUP DIAGRAM......................7 OPERATION ...........................8 1. FULL LEVEL........................8 2. 16 LEVELS...........................8 3. PAD BANK ..........................9 4. PRESET..........................9 5. PROGRAM CHANGE ......................9 6. EDIT ...........................10 6.1 PAD EDIT........................10 6.2 CONTROL EDIT ....................11 7. -
Page 3: Features
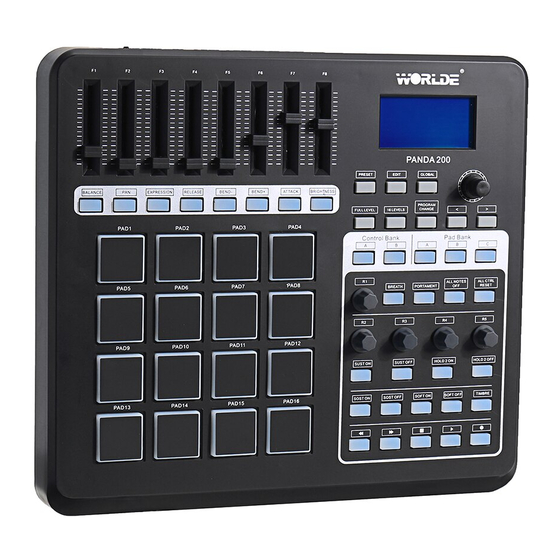
FEATURES 16 trigger pads with velocity. 5xAssignable Dials. 8xAssignable Slider, each slider can be edit by user. 26xAssignable Buttons Function buttons, providing functions like, EDIT, GLOBAL, LEVELS, PRESET, PAD GROUP, and etc. 1xMIDI OUT.(1XMIDI IN)pplied by USB and DC 9V. Compatible with WinXP/Vista/Win7 and Mac OSX. -
Page 4: Introduction
FRONT PANEL OVERVIEW 1. LCD – The display is used for navigating menus, displaying data, and affecting change on PANDA200’s options and parameters. 2. [VALUE] (Push to Enter) –This dial is used for incrementing and decrementing Presets, parameter values and settings. This dial also functions as an [ENTER] button when it is pressed down. - Page 5 10. [CONTROL BANK]. The PANDA200 features 2 independent banks of continuous controllers. Effectively, this allows you to control up to 78 independent parameters with the knob, faders and buttons on the PANDA200. The [CONTROL BANK] button is used to switch among the 2 banks.
-
Page 6: Rear Panel Overview
MIDI data from your computer to a device attached to the MIDI OUT port of the PANDA200. 3. MIDI OUT – Use a five-pin MIDI cable to connect the MIDI OUT of the PANDA200 to the MIDI IN of an external device. -
Page 7: Hookup Diagram
USB cable is connected to your computer before opening any software applications with which you intend to use the PANDA200. If the unit is not plugged in before, your software application might not recognize the PANDA200 as an available device. -
Page 8: Operation
OPERATION 1. FULL LEVEL When the [FULL LEVEL] button is activated, the PANDA200 pads always play back at maximum velocity (127). This way, no matter how hard or soft you hit a pad, the PANDA200 will always trigger the sound at its maximum velocity (volume). -
Page 9: Pad Bank
3. PAD BANK These 3 buttons switch between pad banks A, B, C. You can store different sounds in each one of the 3 different banks, giving you access of up to 48 different sounds you can trigger. When you Press [A], [B], or [C]. The LCD will display the current Pad bank, and the note of each pad is changed. -
Page 10: Edit
*SET BANK M: Use [ < ] or [ > ] button to select Bank M field. While in Bank M field, use [VALUE] dial to select desired value, Pressing [ENTER] to confirm the value. *SET BANK L: Use [ < ] or [ > ] button to select ‘Bank L’ field. While in Bank L field, use [VALUE] dial to select desired value, Pressing [ENTER] to confirm the value. -
Page 11: Control Edit
6.2 CONTROL EDIT The knobs and sliders can be set to transmit special value of the Control . *SET CONTROL VALUE: Use [ < ] or [ > ] button to select Control VALUE field,The LCD display ‘CTLdata2, While in Control VALUE field, use [VALUE] dial to select desired Controller VALUE. -
Page 12: Global
8. GLOBAL When you press[GLOBAL] button, the GLOBAL MODE be activated, it has 7 pages in this mode,Table 1 shows corresponding function for each page. Page 1 MIDI COMMON CHANNEL Page2 PAD VELOCITY CURVE Page 3 MUTE Page 4 Reset Page5 SAVE GLOBAL Page6... -
Page 13: Mute
8.3 Page3-MUTE In MUTE ON mode, any message cannot be send. Press [ENTER] to switch the MUTE mode. 8.4 Page4 Reset Reset the all the controller, include the pads, knobs, buttons and sliders.. 8.5 Page5-SAVE GLOBAL Use [ > ] or [< ]button to select SAVE GLOBAL page in GLOBAL MODE. You will see ‘SAVE_ALL’... - Page 14 Question: Do I need to use a power adapter if I am using the PANDA 100 with a computer? Answer: No. The PANDA200 will draw power directly from the USB port. However, if your USB port does not supply enough power or if you are using a USB hub, it may be necessary to use a power adapter.
-
Page 15: Troubleshooting
Usually, the MIDI settings can be accessed through the application’s Preferences menu. PANDA200’S MIDI Make sure that the PANDA200 is channel not the same as sending MIDI information on the application’s incoming channel that the target device MIDI channel. - Page 16 receive mode of your software. I am only hearing one 16 Level function is When engaged, the 16 Level sound when I hit engaged. function will map the last hit pad different pads. to all 16 pads. Deactivate 16 Level to return to normal operation.
-
Page 17: Technical Specifications
5-pin DINx1 Slave connectorx1(MIDI over USB) DC IN 6V DC, 1A Sales Head Office: Hangzhou Worlde Digital Piano Co., Ltd Hangzhou Worlde Music Electronic Co.,Ltd Add:5 Houshan Rd, Wuchang Industrial Park, Yuhang District, Hangzhou, 310023,P.R.China Tel:0086 571 88730848 Fax:0086 571 88730748 Email:sales@worlde.com.cn...
Need help?
Do you have a question about the Panda200 and is the answer not in the manual?
Questions and answers