
Subscribe to Our Youtube Channel
Related Manuals for Worlde MINI


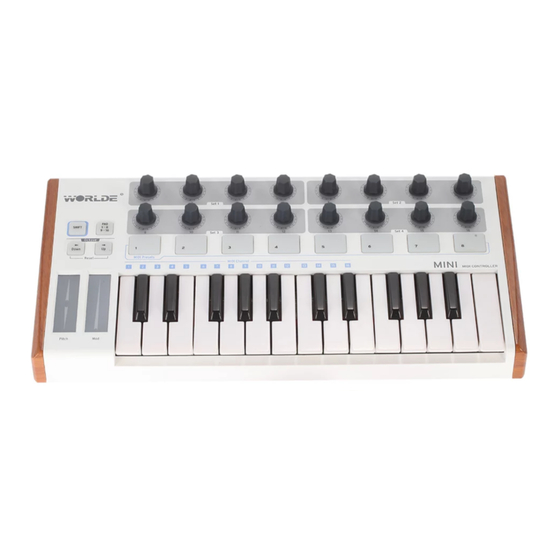
Summary of Contents for Worlde MINI
- Page 1 HANGZHOU WORLDE DIGITAL PIANO CO.,LTD HANGZHOU WORLDE MUSIC ELECTRONIC CO., LTD WEBSITE: WWW.WORLDE.COM.CN EMAIL:SALES@WORLDE.COM.CN TEL:86 571 88730848 Worlde MINI MIDI Controller User’s Manual - 1 -...
-
Page 2: Table Of Contents
3.2 Side panel overview .................................. 7 4.SETUP .................................... 8 4.1 Minimum System Requirements .............................. 8 5.USING WORLDE MINI WITH SOFTWARE ........................ 8 5.1 Creating MIDI Presets with the MIDI Control Center ......................8 5.1.1 Overview: What is a MINI Preset? .............................. 8 ... -
Page 3: Introduction
TEL:86 571 88730848 1. Introduction Thank you for purchasing the Worlde MINI USB controller. To help you get the most out of your new instrument, please read this manual carefully. In order to use the functions of this product, you’ll need to make settings in the application you’re using. Make settings as described in the owner’s manual for your application. -
Page 4: Parts And Their Functions
HANGZHOU WORLDE DIGITAL PIANO CO.,LTD HANGZHOU WORLDE MUSIC ELECTRONIC CO., LTD WEBSITE: WWW.WORLDE.COM.CN EMAIL:SALES@WORLDE.COM.CN TEL:86 571 88730848 3.Parts and Their Functions 3.1 MINI Keyboard Overview 3.1.1 Top Panel Overview ③ ○ ① ⑤ ⑥ ④ ② - 4 -... -
Page 5: Keyboard
8. USB connector Connect the MINI to your computer with a USB cable via this port. 3.1.2 Keyboard WORLDE MINI has a 25-key velocity-sensitive mini-keyboard with a control surface designed for perfect integration with software interface. 3.1.3 Pitch and Modulation touch strips If you touch the Pitch bend strip at its center and move your finger forward or backward it will alter the pitch of the played sound. -
Page 6: Shift And Pad Bank Buttons
Pitch and Modulation strips 3.1.4 Shift and Pad Bank buttons Let’s start on the right: The Pads 1-8/9-16 button toggles the MINI pads between two different sets of eight pad assignments. The Shift button serves two purposes: recalling one of eight presets from memory (Shift+ pad), and selecting the master MIDI channel (Shift + keyboard). -
Page 7: The Pads/Preset Buttons
The Parameter control encoders 3.1.7 The pads/preset buttons The eight large buttons arranged across the front of the MINI serve a dual purpose. Their exact duties are determined by the state of the Shift and Pads buttons. For example: The pads can be assigned to trigger up to sixteen particular MIDI notes (drums, stabs, bass notes, whatever). -
Page 8: Setup
5.1 Creating MIDI Presets with the MIDI Control Center 5.1.1 Overview: What is a MINI Preset? Thanks to the MIDI Control Center software it’s possible to configure the MINI to work with practically any device or software capable of responding to MIDI information. -
Page 9: Assign A Pad To Start/Stop Mmc
5.1.2.1 Select the Pad Mode Let’s begin by selecting Pad 7 by clicking on its graphic in the MIDI Control Center or by tapping Pad 7 on the MINI. Then click the Mode field to activate the pull-down menu: 5.1.2.2 Set the MMC Message number... -
Page 10: Assign A Couple Of Pads To Midi Notes
5.1.3 Assign a couple of Pads to MIDI notes The natural thing to do when you’re starting a song is to lay down the kick and snare tracks. The MINI pads can be assigned to any MIDI note number that you like, so for this example we’ll set Pads 1 and 2 to trigger the General MIDI note numbers for the Bass drum and Snare drum (MIDI note numbers 36 and 38, respectively). -
Page 11: Assign A Pad To Toggle A Midi Cc # Between Two Values
One popular musical effect these days is to take an audio loop, filter it heavily for certain sections of a song, and switch it back to the full-open sound later in the song. You can pre-configure one of the MINI pads to send those commands to a filter plug-in that should be readily available in your DAW software. -
Page 12: Assign An Encoder To Control A Midi Cc # Between Two Values
HANGZHOU WORLDE DIGITAL PIANO CO.,LTD HANGZHOU WORLDE MUSIC ELECTRONIC CO., LTD WEBSITE: WWW.WORLDE.COM.CN EMAIL:SALES@WORLDE.COM.CN TEL:86 571 88730848 Next we’ll set some minimum and maximum values that might work (adjust them to suit the audio source): The first press of Pad 6 will send a CC# 74 command with a value of 78, which will close the filter down part way but still let a lot of the audio pass through. -
Page 13: Assign The Mod Strip To Aftertouch
HANGZHOU WORLDE DIGITAL PIANO CO.,LTD HANGZHOU WORLDE MUSIC ELECTRONIC CO., LTD WEBSITE: WWW.WORLDE.COM.CN EMAIL:SALES@WORLDE.COM.CN TEL:86 571 88730848 Encoder 5 has been selected, so it is shown in red. It is assigned to the Global MIDI channel; you can specify any MIDI channel from 1-16 or leave it on the Global channel. -
Page 14: Save The Changes To A Preset
The upper right-hand section of the MIDI Control Center software has a button called “Send to Keyboard”. Right below that is a pull-down menu that allows you to specify which of the MINI’s eight memory locations will be the repository for the Preset you’ve created. -
Page 15: Recalling A Preset / Switching Between Presets
Shift button and press one of the pads. In the picture above the combination of the Shift button and Pad 2 will select Preset #2 from the MINI preset memory locations. -
Page 16: Changing The Global Midi Channel
16 possible MIDI channel numbers, and indicate which key you should use in conjunction with the Shift button to change the Global MIDI Channel setting. For example, if you want to switch the Global channel of the MINI to MIDI Channel 2, hold the Shift button and press the first C# key: Then when it’s time to switch to channel 1, for example, use the same technique but press a different key: in that case,... -
Page 17: Advanced Setup Information
We’ve done our best to provide you with bug-free firmware (the software inside the keyboard itself). Should a problem be found later however, you should be able to upgrade it using the procedure described below. We strongly advise you to perform such an upgrade only if instructed to by WORLDE support engineer. - 17 -... - Page 18 HANGZHOU WORLDE DIGITAL PIANO CO.,LTD HANGZHOU WORLDE MUSIC ELECTRONIC CO., LTD WEBSITE: WWW.WORLDE.COM.CN EMAIL:SALES@WORLDE.COM.CN TEL:86 571 88730848 The current firmware revision is automatically displayed at launch time provided the keyboard is plugged in. Before attempting this procedure, be sure to have the new firmware file handy.
-
Page 19: Specifications
HANGZHOU WORLDE DIGITAL PIANO CO.,LTD HANGZHOU WORLDE MUSIC ELECTRONIC CO., LTD WEBSITE: WWW.WORLDE.COM.CN EMAIL:SALES@WORLDE.COM.CN TEL:86 571 88730848 7. Specifications Connectors: USB connector Power supply: USB bus power mode Current consumption: 100 mA or less Dimensions (W x D x H): 14.8 x 7.5 x 1.6 inches / 375 x 190 x 40 mm Weight: 35 oz /1000 g Included items: USB cable, Owner’s manual...
Need help?
Do you have a question about the MINI and is the answer not in the manual?
Questions and answers