Table of Contents
Advertisement
Quick Links
Advertisement
Table of Contents

Subscribe to Our Youtube Channel
Related Manuals for Drive ST5D


Summary of Contents for Drive ST5D
- Page 1 ST5D User Manual...
-
Page 2: Table Of Contents
ST#5 Instruction Booklet TABLE OF CONTENTS INTRODUCTION --------------------------------------------------------1 IMPORTANT PRECAUTIONS ----------------------------------------2 ELECTROMAGNETIC INTERFERENCE AND WARNINGS ----3 IDENTIFICATION OF PARTS ----------------------------------------5 CHARGING THE BATTERIES --------------------------------------11 DISASSEMBLING YOUR SCOOTER -----------------------------12 ASSEMBLING YOUR SCOOTER ----------------------------------13 CARE AND MAINTENANCE ----------------------------------------14 OPERATING YOUR SCOOTER ------------------------------------15 TROUBLESHOOTING ------------------------------------------------17 TECHNICAL SPECIFICATIONS... -
Page 3: Introduction
Instruction Booklet INTRODUCTION Thank you and congratulation on purchasing your new Drive Medical Ltd. Mobility Scooter. It is designed to provide you with transportation ability indoors and outdoors. We pride ourselves on providing safe and comfortable products. Our goal is to ensure your complete satisfaction. -
Page 4: Important Precautions
•The grade climbing degree will be affected by weight capacity, driving speed, and ramp degree, and scooter parameter. •To prevent any danger from motor defected; please avoid to drive on long ramp or any uneven terrain. •A slow speed must always be used when ascending, descending or traversing aslope or incline and also on uneven terrain, ramps and soft or loose surfaces, such as gravel or grass. -
Page 5: Electromagnetic Interference And Warnings
ST#5 Instruction Booklet ELECTROMAGNETIC INTERFERENCE AND WARNINGS CAUTION: It is very important that you read this information regarding the possible effects of Electromagnetic Interference on your motorized scooter. Powered wheelchairs and motorized scooters may be susceptible to electromagnetic interference (EMI), which is interfering electromagnetic energy (EM) emitted from sources such a radio stations, TV stations, amateur radio (HAM) transmitters, two-way radios, and cellular phones. - Page 6 ST#5 Instruction Booklet Motorized Scooter Electromagnetic Interference: Because EM energy rapidly becomes more intense as one moves closer to the transmitting antenna (source), the EM fields from hand-held radio wave sources (transceivers) are of special concern. It is possible to unintentionally bring high levels of EM energy very close to the motorized scooter control system while using these devices.
-
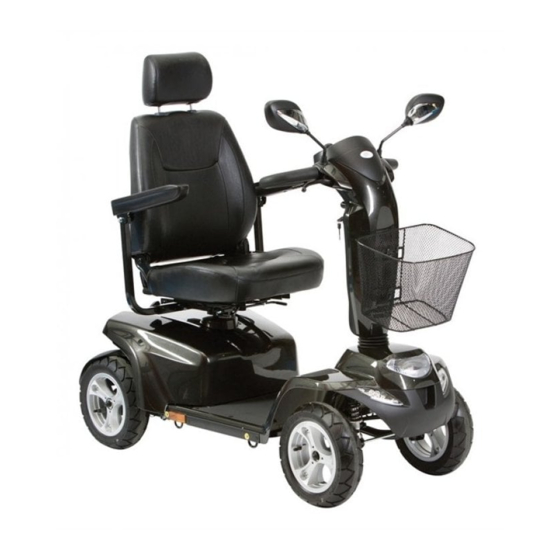
Page 7: Identification Of Parts
ST#5 Instruction Booklet IDENTIFICATION OF PARTS Before attempting to drive this scooter on your own, it is important that you familiarize yourself with the controls, and how to operate Rear MIrror Swivel Seat With Head Rest Thumb Lever Tiller Angle... - Page 8 ST#5 Instruction Booklet FUNCTION OF PARTS: MAIN SWITCH (A) 1.By turning the key clockwise to NO to turn on the power 2.By turning the key anticlockwise to OFF to turn off the power. Speed Dial Knob (B) The Rabbit means fast and Turtle is slow. By turning this you control total speed transferred to thumb controls.
- Page 9 ST#5 Instruction Booklet Battery Gauge Capacity Battery Display Capacity% ☆ ☆ ☆ ☆ ☆ ☆ ☆ >80 ☆ ☆ ☆ ☆ ☆ ☆ <80 ☆ ☆ ☆ ☆ ☆ <65 ☆ ☆ ☆ ☆ <50 ☆ ☆ ☆ <35 ☆ ☆...
- Page 10 ST#5 Instruction Booklet Table of Warning Sound Settings Function Volume Button Volume Adjustment Reverse Warning Sound Head Light Button Flash Turn Signal Warning Left or Right Turn Signal Sound Button Minimum Stop (Warning) Warning Stop (Warning) Light Sound Button Low Voltage Warning Hi &...
- Page 11 ST#5 Instruction Booklet Thumb Lever Pulling right thumb lever (E) moves scooter forward. Pulling left thumb lever (F) moves the scooter backward. (This can be reversed if required by local dealer.) Releasing both, engages automatic brake. These are also your accelerator. The further you depress them, the faster you go.
- Page 12 Helps keep scooter from tipping over. Free-Wheeling Lever (L) When lever is in N (Neutral) position, scooter can be moved manually without power. When lever is in D (Drive) position, scooter can be driven. Normal position is D. Figure 11 Figure 11 Your scooter should be delivered fully configured for your use;...
-
Page 13: Charging The Batteries
ST#5 Instruction Booklet CHARGING THE BATTERIES Batteries must be charged before using the scooter for the first time and should be recharged after each daily use. Each country may require a different charger. The charging procedure may vary slightly from below. If you require further details, please contact your authorized dealer. Always ensure the scooter key is in the OFF position before charging the batteries. -
Page 14: Disassembling Your Scooter
ST#5 Instruction Booklet DISASSEMBLING YOUR SCOOTER Disassembling Basket By lifting the basket (O) upwards. Disassembling Seat By lifting lever (H) and seat (a) upward. Rear Compartment Cover Open the Compartment Cover (P) according to arrow's direction. Figure 13 Figure 13 Figure 14 Figure 14 Figure 15... -
Page 15: Assembling Your Scooter
ST#5 Instruction Booklet ASSEMBLING YOUR SCOOTER To assemble scooter, you can repeat disassembly directions in reverse. Abbreviated directions are given below. Refer to Figures on pages 12 to locate parts. 1.Use the tiller adjustment to move tiller up and out of the way. 2.Place front basket. -
Page 16: Care And Maintenance
ST#5 Instruction Booklet CARE AND MAINTENANCE Cleaning Your Scooter: If your scooter is dirty, use a damp or lightly soapy cloth to wipe it down. Do not use running water to wash or rinse scooter in order to protect electrical parts. Polish with an automotive liquid polish. -
Page 17: Operating Your Scooter
4.Steer scooter by turning tiller toward the way you want to go. 5.Practice driving where there are is No obstacle. Start at the slowest speed and drive forward and backward; make some turns. As you get more comfortable, you can increase speed by turning speed dial toward picture of rabbit. - Page 18 •When turning to corner, swing front wheels widely, so back wheels will turn more tightly. •Use scooter only where it is safe for waiting. •Drive in low speeds when reversing, riding downhill, over ramp or curb, or on uneven surface, downhill, ramps, curbs, or uneven surfaces. Other Operating Information:...
-
Page 19: Troubleshooting
Either a Stop function is active or a Charger Inhibit or OONAPU condition has occurred. •Release the Stop condition (seat raised etc.) Drive Inhibit •Disconnect the Battery Charger •Ensure the throttle is in neutral when turning the controller on. - Page 20 ST#5 Instruction Booklet The controller may have an internal fault. Other error •Check all connections and wiring. Other Problems Low tire pressure: pump up tires to 2.0 - 2.4 bar. During charging, light on charger does not change to green: Contact your authorized dealer. Scooter will not move when key is turned on: 1.Check Power Reserve Indicator on control panel, it should be lighting in green, yellow, and red zones.
-
Page 21: Technical Specifications
ST#5 Instruction Booklet TECHNICAL SPECIFICATIONS Overall Length 1440 mm / 57" Overall Width 680 mm / 27" Overall Height 1360 mm / 53.5" Wheels:Front 330 mm / 13" 330 mm / 13" Wheels:Rear Weight w/ Batteries 138 kg / 304 Ibs Max. -
Page 22: Inspection Checks
- If wheels wobble or do not spin easily, adjust steering pivot pin or front wheel bearing. Rear wheels: - Test wheel for firm seat on the axle drive shaft. - Rear wheels must spin without wobbling Electronics / Electrical System: - Check all plug connections for condition and firm connection. - Page 23 I declare that the mobility scooter described above is new and unused, and has not been registered before. Mark Harris Signed: On behalf of Drive Medical Ltd Date: Drive M edical Ltd, Ainley’s Industrial Estate, Elland, West Yorkshire HX5 9JP...
- Page 24 Warranty Information Drive Medical ST5D Scooters are warranted for 12months (24 months frame) from the date of purchase on side frames and crossbars. (NB Batteries are warranted for 12 months.) » During the warranty period any parts that have become defective due to...
Need help?
Do you have a question about the ST5D and is the answer not in the manual?
Questions and answers