
Related Manuals for Drive Stingray


Summary of Contents for Drive Stingray
- Page 1 OWNERS MANUAL & INSTRUCTIONS 12 Harbor Park Drive, Port Washington, NY 11050 Toll Free: 877-224-0946 • 516-998-4600 Website: www.drivemedical.com...
-
Page 2: Table Of Contents
TABLE OF CONTENTS PREFACE & INTRODUCTION SAFETY NOTICE Before Driving While Driving Labeling PARTS INTRODUCTION Parts Description OPERATION Control Panel How to Operate Your Scooter How To Set To Freewheel Mode DRIVING ON THE ROAD BATTERY CHARGING AND CARE Charging The Battery Charger Battery INSPECTION AND MAINTENANCE... -
Page 3: Preface & Introduction
As designs change some illustrations and pictures in the manual may not correspond to the vehicle that you purchased. We reserve the right to make design modifications. The Stingray series of scooters have been designed and manufactured to provide a comfortable and secure yet affordable solution for some mobility requirements. -
Page 4: Safety Notice
• Be extremely cautious when driving your scooter on busy streets or in shopping malls. • Please do not drive your scooter after consuming alcohol or when you are tired. • Please be careful when driving your scooter in low light. It has not been designed for use at night. -
Page 5: While Driving
“CLIMBING ANGLE” in “SPECIFICATION” • Always use a low speed setting when ascending or descending a gradient. • Do not drive on roads with large drops or potholes. Refer to the section entitled “MAX. GROUND CLEARANCE” in “SPECIFICATION”. • Do not cross water gutters where the width is too big and where there is a risk of getting the wheels stuck. - Page 6 SAFETY NOTICE WARNING! • Do not set in the freewheel mode when driving on a gradient. • Always re-engage the anti-freewheel device before use. Failure to do so may result in injury. • To protect your safety, the power will automatically cut off and electromagnetic brake system will activate while you are driving down a steep gradient (over 8º).
- Page 7 BATTERY BEFORE LEVERmode • Always pull UP FIRMLY for OPERATING freewheel mode Do not exceed recommended • Always push DOWN FIRMLY for Inclines and weight limits. drive mode REFER TO WARNING OPERATORS MANUAL FOR DISCONNECT BEFORE INFORMATION SEPERATING FRAME WARNING Radio waves may affect scooter control.
-
Page 8: Emi
SAFETY NOTICE This portion of the content will provide the user with basic information that describes the problems with EMI, known sources of EMI, protective measures either to lessen the possibility or exposure or to minimize the degree of exposure, and suggested action should unexpected or erratic movement occur. -
Page 9: Important Information
SAFETY NOTICE 3. Long-range transmitters and transceivers, such as commercial broadcast transmitter (radio and TV broadcast antenna towers) and amateur (HAM) radios. NOTE: Other types of hand-held devices, such as cordless phones, laptop computers, AM/FM radios, TV sets, CD player, and cassette players, and small appliances, such as electric shavers and hair dryers, so far as we know, are not likely to cause EMI problems to your powered scooter. -
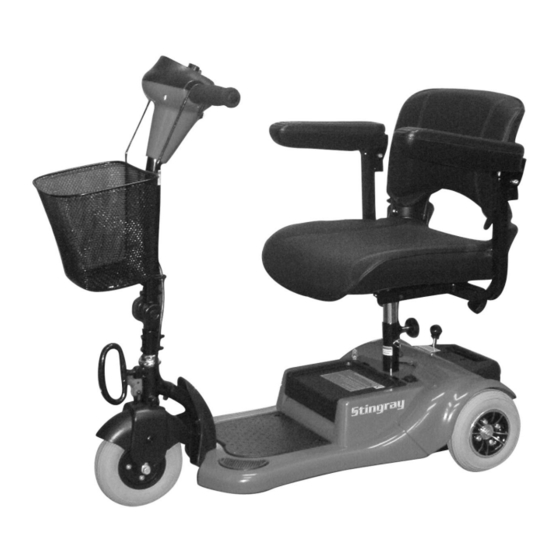
Page 10: Parts Introduction
PARTS INTRODUCTION PARTS DESCRIPTION 1. Speed Dial 5. Tiller Adjustment Bolt 9. Freewheel Mode Lever 2. Charger Socket Cover 6. Arm Rest 10. Anti-tip wheels 3. Basket 7. Seat Post 4. Tiller 8. Rear Reflector... -
Page 11: Operation
OPERATION CONTROL PANEL 1. Speed Dial 2. Horn Button 3. Speed Control Lever 4. Battery Indicator 5. Power Switch 6. Power Eye HOW TO OPERATE YOUR SCOOTER Power switch • To switch the power on, turn the key clockwise in the ignition. The power eye should illuminate. - Page 12 OPERATION Horn Button Press the horn button to sound the horn. Release the button Braking Electro-magnetic brake: Release the speed control lever will be activated automatically, and the scooter will stop. WARNING When on a gradient NEVER set the vehicle to the freewheel be applied.
-
Page 13: Battery Indicator
The batteries should be charged up at least once a week even if the scooter is not used. 2. After charging or replacing a new battery, drive the vehicle for 2-3 minutes to make sure the battery capacity is sufficient. -
Page 14: How To Set To Freewheel Mode
OPERATION HOW TO SET TO FREEWHEEL MODE • Engaged Mode (Fig. 4.1): Push the lever down completely, the scooter can be driven by motor power. • Freewheel Mode (Fig 4.2): Lift the lever up completely, the scooter can be moved manually. -
Page 15: Driving On The Road
OPERATING YOUR STINGRAY STARTING AND DRIVING 1. Make sure the seat is installed properly. 2. Make sure the tiller has been secured properly. 3. Fold down the armrests so you can rest your arms on them. 4. Turn the power switch to “ON”. - Page 16 OPERATING YOUR STINGRAY MAIN CIRCUIT BREAKER ( RESET BUTTON ) When the voltage in your scooter’s batteries becomes low or the scooter is heavily strained because of excessive loads or steep inclines, the main circuit breaker may trip to protect the motor and electronics from damage.
-
Page 17: Battery Charging And Care
BATTERY CHARGING AND CARE CHARGING THE BATTERY Follow the procedure below step by step: 1. Turn the power switch to (OFF). 2. Connect the charger’s power cord into the power outlet. 3. Open the charging rubber cover on the rear shroud. Then connect the charger’s round plug to the charging socket. - Page 18 BATTERY CHARGING AND CARE SUGGESTION 1. Do not disconnect the charger cord if charging is not completed. The battery life will be seriously shortened or decayed if the battery is repeatedly used without being fully charged. Therefore be sure to charge the battery fully every time. 2.
-
Page 19: Charger
BATTERY CHARGING AND CARE CHARGER Both the chargers red and orange LEDs will be switched ON during charging. The orange LED will turn green when charging completed. It is recommended to leave the charger plugged in for at least 1-2 hours after the green light has become illuminated. This process may increase or maintain the performance of the batteries. - Page 20 BATTERY CHARGING AND CARE CLEANING THE BATTERY If water, battery acid, dust or other substances contaminate the batteries, they will discharge quickly. The batteries supplied with the scooter are sealed and as such are maintenance free. Please follow the steps below to clean the battery. 1.
-
Page 21: Inspection And Maintenance
INSPECTION AND MAINTENANCE DAILY CHECKING Check following items before driving. If your find anything abnormal, contact an authorized dealer for further inspection or advice before using the battery. ITEM INSPECTION CONTENT HANDLEBAR • Is there any looseness? • Can it turn left and right smoothly? SPEED CONTROL DIAL •... -
Page 22: Regular Checking Record
INSPECTION AND MAINTENANCE REGULAR CHECKING RECORD To make sure your scooter is correctly serviced. Take it to your dealer for regular maintenance checks. This should be at intervals of six months after the first inspection after one month. Your dealer may charge a fee for this. SUGGESTION Even if you don’t use the vehicle for a long time it should still be regularly maintained. -
Page 23: Battery, Fuse And Tire
MAINTENANCE • You must maintain the scooter frequently if you tend to drive on grass, sand, or gravel or in other adverse environments. Do not use water, oil or other chemical solutions to clean your scooter. Be sure NOT... -
Page 24: Storage
INSPECTION AND MAINTENANCE • Do not spray the scooter with a hose or tap as this may cause damage to electronic components and the scooter controller. • Please take the scooter to authorized Dealers for repairs and adjustments. Improper adjustments could lead to accidents and scooter malfunction. •... -
Page 25: Disassembling The Scooter
INSPECTION AND MAINTENANCE DISASSEMBLING THE SCOOTER The Stingray can be disassembled to 4 pieces. The seat, front section, rear section and battery. Follow these steps to disassemble. 1. Switch the scooter off, unscrew the seat knob and remove pin. Pull up on seat to remove. -
Page 26: Assembling The Scooter
INSPECTION AND MAINTENANCE ASSEMBLING THE SCOOTER 1. Position the front and rear sections of the scooter. Align the lower curved locking brackets of the front section with the corresponding pegs on the front of the rear section. Holding the seat first, slowly pivot the rear section forward until the curved locking brackets are fully connected onto the top rear pegs 2. -
Page 27: Troubleshooting
TROUBLESHOOTING • When you have trouble with your scooter • You can inspect the following before taking your scooter to the dealer. PROBLEM SYMPTOM REMEDY SCOOTER WILL NOT • Batteries not connected • Check batteries are SWITCH ON connected • Rear and sections not •... -
Page 28: Specifiction
250 LBS. (INCLUDING GOODS) REMARK: Drive reserves the right to modify the specification if necessary. The final specification is subject to the individual scooter you purchase from your dealer. NOTE: Maximum driving distance is based on an ambient temperature of 68°F, a 165 lb. -
Page 29: Warranty
• Electronic controller • Drive train components Drive will repair these products with new or refurbished parts, free of charge, in the U.S.A. for one (1) year from the original date of purchase in the event of defective materials or workmanship. -
Page 30: Limited Warranty
This warranty only covers failures due to defects in materials or workmanship which occur during normal use and does not cover damage that occurs in shipment or failures which are caused by products not supplied by Drive or failures resulting from accident, misuse, abuse, neglect, mishandling, misapplication, alteration, modification, commercial use or by anyone other than an authorized Dealer, or damage that is attributable to acts of God. - Page 31 Warranty Registration Please type or print Serial#__________________________________________Date Purchased___/___/___ Owner Name ___________________________________________________________ Address _______________________________________________________________ City ______________________________________State ________ Zip ____________ Additional Required Owner Information Please indicate your understanding of your Scooter by completing the following information. _________ I have read and fully understand __________ Owners Manual, especially sections on operating instructions, safety guidelines, maintenance and battery instructions.
- Page 32 FIRST HERE FOLD Place Stamp Here 12 Harbor Park Drive Port Washington, NY 11050 FOLD HERE SECOND STAPLE TAPE WITH SEAL...
- Page 33 12 Harbor Park Drive, Port Washington, NY 11050 Toll Free: 877-224-0946 • 516-998-4600 Website: www.drivemedical.com...
Need help?
Do you have a question about the Stingray and is the answer not in the manual?
Questions and answers
Need the charging cable (round 3 plug)$
The charging cable type for the Drive Stingray with a round 3 plug is not specified in the provided context.
This answer is automatically generated