Table of Contents
Advertisement
EG
I
INSTALLATION INSTRUCTION
ISTRUZIONI D'INSTALLAZIONE
NOTICE D'INSTALLATION
●
●
F
INSTALLATIONSANLEITUNGEN
INSTRUCCIONES DE INSTALACION
●
INSTRUÇÕES DE INSTALAÇÃO
O O D D H H G G I I E E S S T T O O P P O O Q Q E E T T H H S S H H S S
●
D
E
OPERATING INSTRUCTION
ISTRUZIONI D'USO
NOTICE D'UTILISATION
●
●
BEDIENUNGSANLEITUNGEN
INSTRUCCIONES DE USO
●
P
MANUAL DE INSTRUÇÕES
O O D D H H L L I I E E S S C C R R H H S S E E W W S S
●
GR
XFETTO DCI
HPL / SCL V2
Air conditioner • Climatizzatore d'aria • Climatiseur
Klimagerät • Acondicionador de aire
Aparelho de ar condicionado • K K l l i i m m a a t t i i o o t t i i k k o o v v
37.4252.045.00
06/2013
Advertisement
Table of Contents

Related Manuals for Argo XFETTO DCI HPL


Summary of Contents for Argo XFETTO DCI HPL
- Page 1 INSTALLATION INSTRUCTION ISTRUZIONI D’INSTALLAZIONE NOTICE D’INSTALLATION ● ● INSTALLATIONSANLEITUNGEN INSTRUCCIONES DE INSTALACION ● INSTRUÇÕES DE INSTALAÇÃO O O D D H H G G I I E E S S T T O O P P O O Q Q E E T T H H S S H H S S ●...
-
Page 2: Product Information
CONTENTS PRODUCT IDENTIFICATION INFORMATION SIGNALING LAMPS CORRECT DISPOSAL OF THE PRODUCT IN ACCORDANCE ACCESSORIES SUPPLIED WITH THE UNIT WITH THE EUROPEAN INSTALLATION DIRECTIVE 2002/96/EC BEFORE USING THE APPLIANCE At the end of its working life this USING THE REMOTE CONTROL UNIT equipment must not be disposed of as REMOTE CONTROL UNIT an household waste. -
Page 3: Product Identification
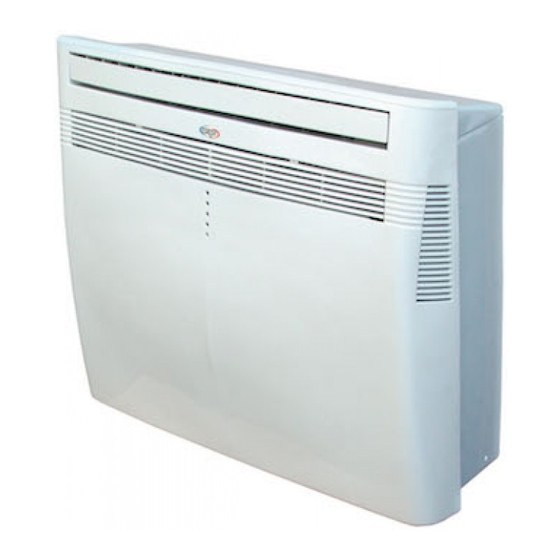
PRODUCT IDENTIFICATION 1. Wireless remote control unit 2. Signaling lamps 3. Supply air deflector 4. Lateral air intake grilles 5. Front air intake grille 6. Air filter 7. Electric cable with plug 8. Air inlet hole 9. Air outlet fan 10. -
Page 4: Accessories Supplied With The Unit
ACCESSORIES SUPPLIED WITH THE UNIT 1. PLASTIC TUBE (1pcs.) 2. EXTERNAL GRILLES (2pcs.) 3. INTERNAL GRILLES (2pcs.) 4. TENSION BARS (2pcs.) 5. FULL SCALE DIAGRAM (1pcs.) 6. RAWL PLUGS + SCREWS (15pcs.) 7. REMOTE CONTROL UNIT (1pcs.) 8. BATTERIES FOR REMOTE CONTROL (2pcs.) INSTALLATION The installation should be carried out by a qualified installer, following the instructions as shown. - Page 5 - Insert in the two holes the supplied plastic tube; cut it at the right length: it is necessary to measure the thickness of the wall and subtract 70 mm. OUTSIDE - Fix the two anti-intrusion grilles and the two external grilles INSIDE with the blades toward the bottom using wall rawl plugs and screws.
- Page 6 WARNING! The supplied plastic conduits can be used for Plastic tubes ø 160mm wall thickness up to 50 cm; in special cases (i.e. installations Insulation in a garret) it can be necessary to utilise longer tubes. The maximum allowable length is 2 m. You can go to any building material retailer, buy the plastic tube of the same diameter (ø160 mm), of the proper length and cover it outside with insulating material (thickness: about 3-4 cm).
-
Page 7: Before Using The Appliance
BEFORE USING THE APPLIANCE Check that the power supply at the location where the air conditioner is going to be used is 220-240V ~ 50Hz . ● Make sure that the electrical installation is suitable to supply continuously current necessary for the air conditioner in ●... -
Page 8: Using The Remote Control Unit
TEMPERATURE SENSOR SELECTOR USING THE REMOTE CONTROL UNIT Under normal conditions the room temperature is detected ● and checked by the temperature sensor placed in the HOW TO INSTALL BATTERIES remote controller (I FEEL icon displayed ).This function Remove trhe lid in the rear part of the remote control unit ●... -
Page 9: Remote Control Unit
REMOTE CONTROL UNIT DISPLAY I FEEL mode is active Information is displayed when the remote controller is switched on. (remote controller If switched off, only the operating mode, the room temperature and sensor active) the clock are shown Electrical heating is active Operation mode Room temperature... -
Page 10: How To Set The Present Time
HOW TO SET THE PRESENT TIME HEATING PERFORMANCE A heat pump conditioner heats a room by taking heat from 1. Press the button ST three times. outside air. The heating efficiency will fall off when the The time indication alone flashes. outdoor temperature is very low. - Page 11 COOLING AND DEHUMIDIFYING NOTE Function selection Use DRY operation when you want to reduce the humidity ● in the room. Room temperature ● Once the room temperature reaches the set level, the unit repeats the cycle of turning on and off automatically. During DRY operation, the fan speed is automatically set ●...
-
Page 12: Setting The 1 Hour Timer
SETTING THE 1 HOUR TIMER NOTES During the high power operation the room temperature ● This function causes the unit to operate for one hour at the could not correspond to the set temperature. set conditions, regardless of whether the unit is on or off. ●... -
Page 13: Adjusting The Air Flow Direction
ADJUSTING THE AIR FLOW DIRECTION OPERATION WITHOUT THE REMOTE CONTROL UNIT HORIZONTAL (manual) If you have lost the remote control unit or it has troubles, The horizontal air flow can be adjusted by moving the vertical vanes to the left or right, as indicated in the following figures. follow the steps below. -
Page 14: Troubleshooting
Trouble: Poor cooling or heating performance. TROUBLESHOOTING Possible cause: 1. Dirty or clogged air filters. 2. Heat source or many people in room. WARNING 3. Doors and/or windows are open. 4. Obstacle near air intake or air discharge port. The use of portable telephones near the air conditioner •... -
Page 15: Care And Cleaning
HOW TO DISCHARGE THE CONDENSATE WATER The Humidity removed by the unit is collected and discharged automatically, but in special conditions some condensate water could remain inside the unit. If you are not going to make use of the air conditioner for a long period, it is necessary to discharge the eventual condensate water through the service tube for condensate discharge placed under the bottom of the unit. - Page 16 Via Varese, 90 - 21013 Gallarate - Va - Italy Tel. +39 0331 755111 - Fax +39 0331 776240 www.argoclima.com...
Need help?
Do you have a question about the XFETTO DCI HPL and is the answer not in the manual?
Questions and answers