Table of Contents
Advertisement
Quick Links
SebArt
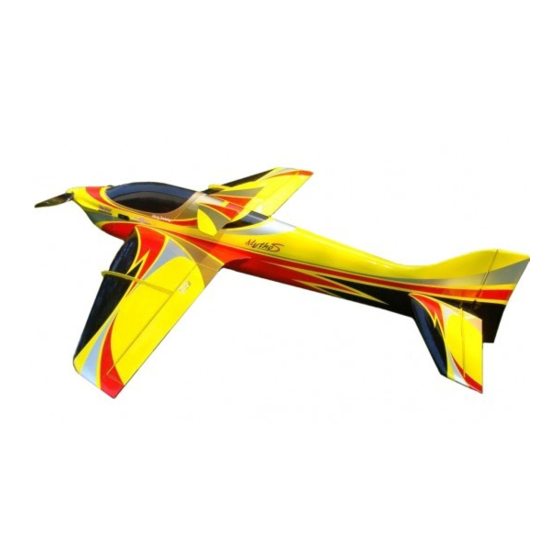
Mytho S
The all new Mytho S 125E ARF was designed by Italy aerobatic
pilot, Sebastiano Silvestri.
For this professional ARF model design has been selected the
ultimate and best aerodynamically effective ideas of the
modernst F3A models and combined with the well know and
succesfull Wind S pro F3A SebArt design.... the result will
surprise you!
The Mytho S 125E ARF, with his extremely lightweight structure
and all wood airframe, will offer you an impressive precision
and smoothness at any airspeed and flight condition.
The Mytho S 125E ARF will be your next F3A dream plane!
Specifications:
Wingspan:..............180 cm (71 in)
Length:.................190 cm (75 in)
Wing Area:........61 dm² (945 sq.in)
Weight:....3.650 g. RTF less motor battery Prop: .............................................APC 18x8E
ASSEMBLY MANUAL
.....the only aerobatic limit is your fantasy!
Recommended Set Up:
Radio:.........................6-ch with 5 digital servos
Motor: ..new Hacker A60-5XS + Jeti SPIN 99-Opto
Motor battery: .................5000-6S Thunder Power
professional line
125E
ARF
Advertisement
Table of Contents

Subscribe to Our Youtube Channel
Related Manuals for Sebart Mytho S 125E ARF


Summary of Contents for Sebart Mytho S 125E ARF
- Page 1 Mytho S 125E ASSEMBLY MANUAL The all new Mytho S 125E ARF was designed by Italy aerobatic pilot, Sebastiano Silvestri. For this professional ARF model design has been selected the ultimate and best aerodynamically effective ideas of the modernst F3A models and combined with the well know and succesfull Wind S pro F3A SebArt design..
- Page 2 Required radio, motor and battery Radio equipment: Minimum 6-channel radio system • 5 digital servo: 3 JR DS 8401 or DS 8425 (ailerons and rudder) + 2 JR DS • 3201 (elevators) 2 servo extension 100mm, for aileron servos • •...
- Page 3 Warranty information SebArt garantees this kit to be free from defects in both material and workmanship at the date of purchase. This warranty does not cover any parts damage by use or modification, and in no case shall SebArt’s liability exceed the original cost of the purchased kit.
- Page 4 High rate: 40° up & down Normal flight: D/R: 30% Expo: 30% Snap: D/R: 40% Expo: 50% Spin & 3D: D/R: 100% Expo: 95% For the RUDDER we recommend the following throws: High rate: 40° left & right Normal flight: D/R: 40% Expo: 60% Snap: D/R: 50% Expo: 70% Spin &...
- Page 5 Be sure that your batteries are fully charged, as per the instructions included with your batteries and that your radio is fully charged as per its instructions. Finally... have nice flights! SEBART International S.r.l. Via L. Tabellione, 1 47891 Rovereta - Repubblica di San Marino (RSM) www.sebart.it...
- Page 6 Epoxy 20 min. step 01 step 02...
- Page 7 Epoxy 20 min. step 03 Axis hinge step 04...
- Page 8 Epoxy 20 min. step 05 step 06...
- Page 9 step 07 Medium step 08...
- Page 10 90° step 09 Medium step 10...
- Page 11 step 11 Aileron step 12...
- Page 12 step 13 step 14...
- Page 13 adesive tape step 15 step 16...
- Page 14 Remove tape step 17 step 18...
- Page 15 Thin step 19 step 20...
- Page 16 Thin step 21 step 22...
- Page 17 Medium step 23 step 24...
- Page 18 Medium step 25 step 26 Elevator...
- Page 19 step 27 step 28...
- Page 20 adesive tape step 29 step 30...
- Page 21 Remove tape step 31 Epoxy 20 min. step 32...
- Page 22 step 33 Epoxy 20 min. Epoxy 20 min. step 34...
- Page 23 Axis hinge step 35 Epoxy 20 min. step 36...
- Page 24 OPZION 1 OPZION 2 step n° 72/81 step 37 step 38...
- Page 25 step 39 Medium step 40...
- Page 26 step 41 step 42...
- Page 27 105 mm step 43 Rudder Rudder Extension 950 mm. step 44...
- Page 28 step 45 step 46...
- Page 29 step 47 step 48...
- Page 30 step 49 step 50...
- Page 31 Drill 6 mm. 20 mm. step 51 Drill 4 mm. step 52...
- Page 32 Epoxy 5 min. Thin step 53 step 54...
- Page 33 step 55 step 56...
- Page 34 step 57 step 58...
- Page 35 step 59 step 60...
- Page 36 Silicon step 61 step 62...
- Page 37 step 63 Remove Silicon step 64...
- Page 38 Elevator Extension 1200 mm. step 65 step 66...
- Page 39 Drill 1,5 mm. step 67 step 68...
- Page 40 step 69 Drill 1,5 mm. step 70...
- Page 41 PRESS step 71 OPZION 2 step n° 72/81 step 72...
- Page 42 step 73 step 74...
- Page 43 Medium step 75 step 76...
- Page 44 Medium step 77 Drill step 78...
- Page 45 step 79 step 80...
- Page 46 step 81 Electric engine version step 82...
- Page 47 Electric engine version step 83 step 84 Electric engine version...
- Page 48 Electric engine version step 85 step 86 Electric engine version...
- Page 49 Electric engine version step 87 step 88 Electric engine version...
- Page 50 Electric engine version step 89 step 90 Electric engine version...
- Page 51 Electric engine version step 91 step 92 Electric engine version...
- Page 52 Medium Electric engine version step 93 step 94 Electric engine version...
- Page 53 step 95 step 96...
- Page 54 step 97 step 98...
- Page 55 step 99 step 100...
- Page 56 step 101 step 102...
- Page 57 step 103 step 104...
- Page 58 C.G. step 105 step 106...
Need help?
Do you have a question about the Mytho S 125E ARF and is the answer not in the manual?
Questions and answers