Table of Contents
Advertisement
Quick Links
Kirby Morgan
Operations and Maintenance Manual
E-Mail: KMDSI@KirbyMorgan.com, Web Site:www.KirbyMorgan.com
Manual prepared by Marine Marketing and Consulting, Dive Lab, Inc., and KMDSI.
NOTE: This manual is the most current for the Kirby Morgan 77 Helmet. It is page dated March 2013. Future
changes will be shown on page III and the changed pages will carry the date of change. Previous manuals may not
reflect these updates.
Diving with compressed breathing gas is a hazardous activity. Even if you do everything
right there is always the danger that you may be killed or injured. No piece of diving
equipment can prevent the possibility that you may be killed or injured any time you
enter the water.
The Kirby Morgan 77 diving helmet meets or exceeds all performance and testing requirements of all
government and non-government testing agencies throughout the world. It is CE approved.
Kirby Morgan, SuperLite
®
SuperFlow
and DECA are all registered trademarks of Kirby Morgan Dive Systems, Inc. Use of these terms to describe products
®
that are not manufactured by KMDSI is illegal.
The two dimensional images (such as photographs and illustrations) of our products are © copyrighted and trademarks of Kirby
Morgan Dive Systems, Inc. The three dimensional forms of our products are trademark, trade design and trade dress protected.
© ⅯⅯⅩⅡ. Kirby Morgan Dive Systems, Inc. All rights reserved. This manual is made available for the express use of the owner of
this Kirby Morgan product. No part of this manual may be reproduced, stored in any retrieval system, or transmitted, or used in any
form or by any means, whether graphic, electronic, mechanical, photocopy, or otherwise by technology known or unknown, without
the prior written permission of Kirby Morgan Dive Systems, Inc.
KMDSI Part #100-085
Patented, patents pending, foreign patents apply
Kirby Morgan Dive Systems, Inc.
Santa Maria, CA 93455, USA
Telephone (805) 928-7772, FAX (805) 928-0342
, BandMask, Band Mask, KMB, KMB-Band Mask, DSI, Diving Systems International, EXO, REX
Document Number
77 Diver's Helmet
®
1430 Jason Way
WARNING
130318003
™
,
®
Advertisement
Table of Contents
Troubleshooting

Related Manuals for Kirby Morgan 77


Summary of Contents for Kirby Morgan 77
- Page 1 Morgan Dive Systems, Inc. The three dimensional forms of our products are trademark, trade design and trade dress protected. © ⅯⅯⅩⅡ. Kirby Morgan Dive Systems, Inc. All rights reserved. This manual is made available for the express use of the owner of this Kirby Morgan product.
-
Page 2: Warranty Information
® Warranty Information Kirby Morgan Dive Systems, Inc. warrants every new mask, helmet, or KMAC Air Control System to be free from defects in workmanship for a period of three hundred sixty five (365) days from date of purchase. This warranty covers all metal, fiberglass, and plastic parts. This warranty does NOT cover rubber parts, communications components, or head cushions. -
Page 3: Record Of Changes
® Record Of Changes It is the responsibility of the owner of this product to register their ownership with Kirby Morgan Dive Systems, Inc., by sending the warranty card provided. This card is to establish registration for any necessary warranty work and provides a means of communication that allows KMDSI to contact the user regarding this product. -
Page 4: Table Of Contents
� � � � � � � � � � � � � � � � � � � � � � � � � � � � � � � � � � � � � � � � � � � � � � � � � � � � � � � � � � � � � � � � � � � © ⅯⅯⅩIⅡ Kirby Morgan Dive Systems, Inc. All rights reserved. Document # 130318003... - Page 5 � � � � � � � � � � � � � � � � � � � � � � � � � � � � � � � � � � � � � � � � � � � � � � � � � � � � � © ⅯⅯⅩIⅡ Kirby Morgan Dive Systems, Inc. All rights reserved. Document # 130318003...
- Page 6 � � � � � � � � � � � � � � � � � � � � � � � � � � � � � � � � � � � � � � � � � � � � � � � � � � � � � � � � � � � � � � � � � � � � � � � � � � � � � � � � � � © ⅯⅯⅩIⅡ Kirby Morgan Dive Systems, Inc. All rights reserved. Document # 130318003...
- Page 7 � � � � � � � � � � � � � � � � � � � � � � � � � � � � � � � � � � � � � � � � � � � � � � � � � � � � � � � � � � � � � � � � � � � � � � � � � � � � � � � � � � � � � � � � � © ⅯⅯⅩIⅡ Kirby Morgan Dive Systems, Inc. All rights reserved. Document # 130318003...
- Page 8 � � � � � � � � � � � � � � � � � � � � � � � � � � � � � � � � � � � � � � � � � � � � � � � � � � � � � � � � � � � � � � � � � � � � VIII © ⅯⅯⅩIⅡ Kirby Morgan Dive Systems, Inc. All rights reserved. Document # 130318003...
- Page 9 � � � � � � � � � � � � � � � � � � � � � � � � � � � � � � � � � � � � � � � � � � � � � � � � � � � � � � � � � � � � � � � � � � � � � � � � © ⅯⅯⅩIⅡ Kirby Morgan Dive Systems, Inc. All rights reserved. Document # 130318003...
-
Page 10: Definition Of Signal Words Used In This Manual
Manuals are reviewed. Any updates/changes will be posted on the KMDSI website and may be downloaded for insertion/correction. Important Safety Information: This Kirby Morgan 77 diving helmet is intended for use by trained divers who have successfully completed a recognized training course in surface supplied diving... - Page 11 Diving is a life threatening occupation. Even if you do everything right you can still be killed or injured. None of the models of Kirby Morgan helmets or masks can prevent ac- cidents, injuries or death due to improper training, poor-health, improper supervision, improper job requirements, improper maintenance or acts of God.
- Page 12 30 lbs. KMDSI recommends that persons with a previous neck or back injury seek professional medical approval prior to engaging in surface supplied diving opera- tions using the Kirby Morgan 77. Use of the Kirby Morgan 77 with a pre-existing physical/ medical condition may result in death or serious injury.
- Page 13 Always read the Material Safety Data Sheet (MSDS) for any chemical - adhesive, cleaning agent, or lubricant - used on your Kirby Morgan helmet. Some of these chemicals may cause serious bodily injury or death if used improperly or without the proper personal protective equipment.
-
Page 15: Chapter 1 General Information Kmdsi Products
They are not the part number. Next to the exploded drawing is a list of the “location” numbers that match the Kirby Morgan part num- bers along with the name of the part. Always check the part number when ordering to make sure it is correct. -
Page 16: Full-Face Masks And Manifolds
2) no comfort insert is required on the 28 3) the face ports for the 18 and the 28 differ slightly in size. Both the KMB 18 and KMB 28 are approved. © ⅯⅯⅩIⅡ Kirby Morgan Dive Systems, Inc. All rights reserved. Document # 130318003... - Page 17 (tender) and one or more surface-supported divers, recompres- sion chambers, or other submersible systems. ™ SuperMask M-48 ™ marked w/ Rebreather pod © ⅯⅯⅩIⅡ Kirby Morgan Dive Systems, Inc. All rights reserved. Document # 130318003...
-
Page 18: Kirby Morgan Diving Helmets
SuperLite 17A/B Kirby Morgan ® ® ™ approved and marked approved and marked ™ ™ Yoke and Latch Catch Neck Pad and Assembly Sealed Pull Pins. © ⅯⅯⅩIⅡ Kirby Morgan Dive Systems, Inc. All rights reserved. Document # 130318003... - Page 19 In all other respects, this tube adjustable demand regulator. The helmet is helmet is nearly identical to the Kirby Morgan 37. available in the umbilical over the shoulder, “B” configuration only. © ⅯⅯⅩIⅡ Kirby Morgan Dive Systems, Inc. All rights reserved. Document # 130318003...
- Page 20 All helmets and suits can leak water under certain conditions. Divers should use extreme caution when diving in contaminated waters. © ⅯⅯⅩIⅡ Kirby Morgan Dive Systems, Inc. All rights reserved. Document # 130318003...
- Page 21 • Rugged helmet shell and other components • No refinishing required if the surface is scratched or gouged • Elimination of threaded inserts for securing port retainer to helmet shell © ⅯⅯⅩIⅡ Kirby Morgan Dive Systems, Inc. All rights reserved. Document # 130318003...
-
Page 23: Chapter 2 Description & Operational Specifications Kirby Morgan
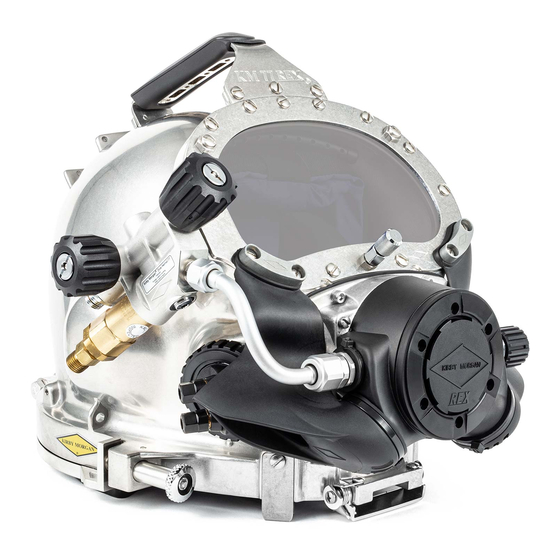
Kirby Morgan 77 WARNING This manual is our effort to explain the operation, maintenance and use of the Kirby Morgan helmet. We do not herein make any effort to teach the principles of diving. It is our assumption the reader is a qualified diver. -
Page 24: 2�2�2� Notified Body
® Dive Lab at Panama City, Florida. It meets or exceeds ply Requirements table were developed to allow the all current U.S. Navy and European diving standards. © ⅯⅯⅩIⅡ Kirby Morgan Dive Systems, Inc. All rights reserved. Document # 130318003... -
Page 25: 2�7�2 Using The Rex ® Regulator Low-Pressure Compressor Supply Pressure Requirements Table
• Always take the standby diver into consideration planned depth, and the anticipated work rate. © ⅯⅯⅩIⅡ Kirby Morgan Dive Systems, Inc. All rights reserved. Document # 130318003... - Page 26 The umbilical assembly should be composed of good the topside regulator should be set at 140 p.s.i.g. over quality diving hose that meets industry standards. bottom pressure for optimum regulator performance. © ⅯⅯⅩIⅡ Kirby Morgan Dive Systems, Inc. All rights reserved. Document # 130318003...
-
Page 27: Helmet Features
The fol- peak work output. This is the same regulator used lowing is a general description of the features of the on the KM47. KM 77. © ⅯⅯⅩIⅡ Kirby Morgan Dive Systems, Inc. All rights reserved. Document # 130318003... -
Page 28: General Description
8) A system of two sealed pull pin locks is on the suffer from a serious “squeeze” that could cause KM 77. One lock is located on each side of the hel- injury or death. met. The spring and sliding shaft of these locks are inside an O-ring sealed main body. - Page 29 The gas flow continues out through the regulator the diver’s need. The regulator continues to match exhaust system, or into the oral nasal mask by means © ⅯⅯⅩIⅡ Kirby Morgan Dive Systems, Inc. All rights reserved. Document # 130318003...
- Page 30 Bonnet* adapter L.P. plug Nut* ** components of EGS valve * components of free-flow valve Components of the EGS valve and free-flow valve. (Rebuild with kit #525-313) © ⅯⅯⅩIⅡ Kirby Morgan Dive Systems, Inc. All rights reserved. Document # 130318003...
- Page 31 The waterproof type actually clears the diver’s shoulders. is recommended when a “round robin” or diver/tender both mics “on” communications system is used. © ⅯⅯⅩIⅡ Kirby Morgan Dive Systems, Inc. All rights reserved. Document # 130318003...
- Page 32 Wings Exhaust System assembly to be unsealed from the Ultra low-resistance exhalation helmet. This simplifies getting out system. Very dry. of the helmet. © ⅯⅯⅩIⅡ Kirby Morgan Dive Systems, Inc. All rights reserved. Document # 130318003...
-
Page 33: Emergency Gas Supply System (Egs)
Roller lever Cover Starboard Whisker Inlet valve Adjustment O-ring lock nut Washer Exploded view of the REX regulator. ® Cover Nipple tube (Rebuild with kit #525-310) Retaining Ring © ⅯⅯⅩIⅡ Kirby Morgan Dive Systems, Inc. All rights reserved. Document # 130318003... -
Page 34: 2�9�4 Helmet Attachment To The Diver
NOTE: This valve can be adjusted for various 2.9.4 Helmet Attachment to the Diver relief pressures. On the KM 77, the ring on the base of the helmet shell has a machined O-ring sealing surface. The O-ring that seals against this surface sits inside the neck dam ring assembly. - Page 35 This could lead to drowning. © ⅯⅯⅩIⅡ Kirby Morgan Dive Systems, Inc. All rights reserved. Document # 130318003...
-
Page 36: 2�9�5 Sealing Arrangement
This separates the breathing gas flow from the larger gas space on the interior of the helmet, and this in turn reduces carbon dioxide buildup. © ⅯⅯⅩIⅡ Kirby Morgan Dive Systems, Inc. All rights reserved. Document # 130318003... -
Page 37: 2�9�9 Face Port Or Viewing Lens
The weld lenses are standard 2 x 4 1/2 inches or 4 1/2 x 5 1/2, identical to the lenses used in topside welding hoods. They may be replaced quickly without tools. © ⅯⅯⅩIⅡ Kirby Morgan Dive Systems, Inc. All rights reserved. Document # 130318003... -
Page 38: Helmet Transport And Storage
• the weight of the box is usually 40 pounds (18 Packaging Step 3 Kg); © ⅯⅯⅩIⅡ Kirby Morgan Dive Systems, Inc. All rights reserved. Document # 130318003... -
Page 39: 2�11�1 Helmet Carrying Bag
To help protect your KM 77, the helmet carrying bag This is your assurance that you are getting genuine Kirby should be used to transport and store your helmet Morgan replacement parts. between jobs. © ⅯⅯⅩIⅡ Kirby Morgan Dive Systems, Inc. All rights reserved. Document # 130318003... -
Page 41: Chapter 3.0 Operating Instructions
Operating Instructions WARNING This manual is our effort to explain the operation, maintenance and use of the Kirby Morgan hel- met. We do not herein make any effort to teach the principles of diving. It is our assumption the reader is a qualified diver. We highly recommend that all divers should train, under controlled conditions, in the use of any model of commercial diving helmet that they have not previously used or trained in, prior to use on the job. -
Page 42: First Use Of Your Kirby Morgan Diving Helmet
3.2 acfm to the diver at depth. Only systems that can deliver the required gas flow should be used. © ⅯⅯⅩIⅡ Kirby Morgan Dive Systems, Inc. All rights reserved. Document # 130318003... -
Page 43: Initial Adjustments To Your Helmet
3.4.1.4 Head Cushion Adjustment Fit test (follow these instructions if refitting or re- 1 or 2 pieces of top foam may be used sizing the head cushion. © ⅯⅯⅩIⅡ Kirby Morgan Dive Systems, Inc. All rights reserved. Document # 130318003... -
Page 44: Adding Earphone Holes To The Head Cushion
No earphone holes are included on the side foams. These may be trimmed in if desired. Using the template for general size and location, mark the desired area for cut out. © ⅯⅯⅩIⅡ Kirby Morgan Dive Systems, Inc. All rights reserved. Document # 130318003... - Page 45 Kirby Morgan ® Ear Hole Trim Template © ⅯⅯⅩIⅡ Kirby Morgan Dive Systems, Inc. All rights reserved. Document # 130318003...
-
Page 47: Head Cushion Foam Spacer (Hcfs)
Velcro Strap around to the top of the head cushion and secure. Proper installation and alignment of the HCFS in the helmet. © ⅯⅯⅩIⅡ Kirby Morgan Dive Systems, Inc. All rights reserved. Document # 130318003... -
Page 48: Maintenance Of The Head Cushion Foam Spacer (Hcfs)
This could lead to severe per- sonal injury or death. © ⅯⅯⅩIⅡ Kirby Morgan Dive Systems, Inc. All rights reserved. Document # 130318003... -
Page 49: Adjusting The Neck Pad
Loosening these screws from the mount nuts allows the neck pad to be adjusted. Washer Adjustment nut Teflon ® Washer Washer Locking collar Hinge bolt Washer Screw Locking Collar components. T-washer Neck pad © ⅯⅯⅩIⅡ Kirby Morgan Dive Systems, Inc. All rights reserved. Document # 130318003... -
Page 50: Pre Dress-In Procedure
6) Be sure the communications wires are hooked up and tested. 7) Inspect the oral/nasal mask. Make sure it is on the regulator mount nut properly and the valve is installed properly. © ⅯⅯⅩIⅡ Kirby Morgan Dive Systems, Inc. All rights reserved. Document # 130318003... -
Page 51: Preparing The Helmet For Diving
You can test the one way valve by connecting the bailout bottle to the emergency valve and pressurizing the sideblock. There must be no gas leakage through the one way valve. © ⅯⅯⅩIⅡ Kirby Morgan Dive Systems, Inc. All rights reserved. Document # 130318003... -
Page 52: Emergency Gas System (Egs)
The umbilical is hooked into one of these rings to keep any strain off the helmet. In addition, the rings on the harness are used to hang © ⅯⅯⅩIⅡ Kirby Morgan Dive Systems, Inc. All rights reserved. Document # 130318003... - Page 53 The divers depth, the length of time the diver may be without the main gas supply, and the gas consump- © ⅯⅯⅩIⅡ Kirby Morgan Dive Systems, Inc. All rights reserved. Document # 130318003...
- Page 54 In this way, if you have a leak, you will probably figure it out and will be able to take appropriate action. © ⅯⅯⅩIⅡ Kirby Morgan Dive Systems, Inc. All rights reserved. Document # 130318003...
- Page 55 Disadvantages • Regulator will flood and need service daily • Two valves to open in * Requires ability to reach cylinder emergency valve without difficulty © ⅯⅯⅩIⅡ Kirby Morgan Dive Systems, Inc. All rights reserved. Document # 130318003...
- Page 56 You can use a quick-disconnect whip to connect the EGS valve to the bail-out bottle. This makes dressing the diver much easier. © ⅯⅯⅩIⅡ Kirby Morgan Dive Systems, Inc. All rights reserved. Document # 130318003...
-
Page 57: Setting Up To Dive
“pop”. Do not twist the connectors. Tape the two connectors with a bit of electrical tape to prevent them from pulling apart. © ⅯⅯⅩIⅡ Kirby Morgan Dive Systems, Inc. All rights reserved. Document # 130318003... -
Page 58: Opening The Breathing Gas Supply To The Helmet
If the face port fails underwater the helmet will flood and drowning may result. © ⅯⅯⅩIⅡ Kirby Morgan Dive Systems, Inc. All rights reserved. Document # 130318003... -
Page 59: Donning The Kirby Morgan Helmet
Pull the The tender must be available to assist the diver while he is dressing into his helmet. © ⅯⅯⅩIⅡ Kirby Morgan Dive Systems, Inc. All rights reserved. Document # 130318003... - Page 60 Be sure the head cushion is attached to the bottom of forward until your face is in position against the oral the helmet. Pull the nose block device knob out all nasal mask. the way. © ⅯⅯⅩIⅡ Kirby Morgan Dive Systems, Inc. All rights reserved. Document # 130318003...
- Page 61 If the pins are not engaged correctly the neck dam/ring assembly may not seal and the helmet could flood. The diver could drown as a result. © ⅯⅯⅩIⅡ Kirby Morgan Dive Systems, Inc. All rights reserved. Document # 130318003...
-
Page 62: Testing The Breathing System
To perform this test, the diver must have an assistant unconsciousness. This could lead to suf- standing by. The assistant should be in control of the focation and death. © ⅯⅯⅩIⅡ Kirby Morgan Dive Systems, Inc. All rights reserved. Document # 130318003... -
Page 63: Removing The Helmet
Once the seal is broken the neck ring assembly will come loose from the helmet. © ⅯⅯⅩIⅡ Kirby Morgan Dive Systems, Inc. All rights reserved. Document # 130318003... -
Page 64: Diving Procedures
It is essential for the diver to ensure that the breathing system is working properly before he enters the water. Note the correct attachment of the diver’s umbilical to his harness and the use of a submersible pressure gauge for the bailout system. © ⅯⅯⅩIⅡ Kirby Morgan Dive Systems, Inc. All rights reserved. Document # 130318003... -
Page 65: Water Entry And Descent
Keep in mind that if the defogger valve is left open, the bailout bottle will drain very quickly, particularly if the diver is deep. © ⅯⅯⅩIⅡ Kirby Morgan Dive Systems, Inc. All rights reserved. Document # 130318003... -
Page 66: Demand Regulator Free Flow
© ⅯⅯⅩIⅡ Kirby Morgan Dive Systems, Inc. All rights reserved. Document # 130318003... -
Page 67: Post Dive Procedures
The head cushion should be dried and replaced in the hat before storage. The regulator adjustment knob should be unscrewed all the way out (counterclockwise) until © ⅯⅯⅩIⅡ Kirby Morgan Dive Systems, Inc. All rights reserved. Document # 130318003... -
Page 69: Chapter 4 Troubleshooting
Troubleshooting 4.1 General Kirby Morgan diving helmets are highly reliable life support equipment which should not malfunction if proper preventative maintenance procedures are followed. Most problems encountered in using the helmet can be easily remedied. The following information covers most potential operating difficulties. -
Page 70: Side Valve Malfunction
Clear cushion or dam under o-ring at neck dam. Regulator assembled improperly. Check for proper assembly. Damaged or loose reg pod. Tighten/ repair pod Damaged gasket Replace gasket © ⅯⅯⅩIⅡ Kirby Morgan Dive Systems, Inc. All rights reserved. Document # 130318003... -
Page 71: Demand Regulator Malfunction
Service regulator. Knob difficult to turn. Stem bent. Replace stem. Valve will not flow gas. Foreign matter in valve. Disassemble, clean, and reassemble. Stripped control knob. Replace knob. © ⅯⅯⅩIⅡ Kirby Morgan Dive Systems, Inc. All rights reserved. Document # 130318003... -
Page 73: Chapter 5 Inspection And Maintenance
The daily and monthly inspections will determine The checklist can be laminated placed on a clipboard the necessity for overhaul with greater accuracy than and checked off with a grease pencil. Completion © ⅯⅯⅩIⅡ Kirby Morgan Dive Systems, Inc. All rights reserved. Document # 130318003... - Page 74 The checklist’s are intended to be used for all models of KMDSI SuperLite and KM Helmets and band ® masks. All KMDSI helmet and band mask manuals can be downloaded free at www.kirbymorgan.com. © ⅯⅯⅩIⅡ Kirby Morgan Dive Systems, Inc. All rights reserved. Document # 130318003...
-
Page 75: Chapter 6.0 General Preventative Maintenance
Other tools may be required for certain specialized operations. Open end wrenches in the following sizes: 3/8 inch 7/16 inch 9/16 inch 3/4 inch 7/8 inch 1 inch © ⅯⅯⅩIⅡ Kirby Morgan Dive Systems, Inc. All rights reserved. Document # 130318003... -
Page 76: Component And Parts Cleaning
If the face port fails underwater the helmet used on most components that call will flood and drowning may result. © ⅯⅯⅩIⅡ Kirby Morgan Dive Systems, Inc. All rights reserved. Document # 130318003... -
Page 77: General Cleaning & Inspection Procedures
(brushed ) finish. Kirby Morgan highly recommends rinsing your hel- met thoroughly after every dive. Regular polishing © ⅯⅯⅩIⅡ Kirby Morgan Dive Systems, Inc. All rights reserved. Document # 130318003... -
Page 78: O-Ring Removal/Inspection/Cleaning And Lubrication
O-rings. If an O-ring fits too tightly in its groove to be removed using the fingers, use the ap- propriate tool from an O-ring removal kit (brass or © ⅯⅯⅩIⅡ Kirby Morgan Dive Systems, Inc. All rights reserved. Document # 130318003... - Page 79 Failure to do could result in the transmission of communicable diseases, some of which may cause long term disability or death. © ⅯⅯⅩIⅡ Kirby Morgan Dive Systems, Inc. All rights reserved. Document # 130318003...
- Page 80 When the retaining ring is properly installed, the cover should be oriented so that the Kirby Morgan name is level on the cover. If an imaginary line is drawn through the Kirby Morgan name, it will bisect the holes on opposite sides of the retaining ring.
-
Page 81: Mild Soap Solution For General Cleaning And Leak Detector Use
Sanitizing Procedure: 6.3.2.2 Acidic Cleaning Solution and Unless otherwise directed, use the following proce- Procedures Metal parts that have visible corrosion should first © ⅯⅯⅩIⅡ Kirby Morgan Dive Systems, Inc. All rights reserved. Document # 130318003... - Page 82 Failure to thoroughly rinse germicidal cleansing solution from diving equipment may result in lung irritation and/or long-term degradation of rubber and silicone components of this equipment. © ⅯⅯⅩIⅡ Kirby Morgan Dive Systems, Inc. All rights reserved. Document # 130318003...
-
Page 83: Daily Maintenance
To wash the head cushion, place it in a solution of mild dish soap. Lightly brush the fabric with a soft Uncover the earphones so they may dry. nylon brush to remove perspiration and skin oil, then © ⅯⅯⅩIⅡ Kirby Morgan Dive Systems, Inc. All rights reserved. Document # 130318003... - Page 84 12) Reinstall the head and chin cushions when dry. 13) For additional details on daily maintenance, consult the Dive Lab website at www.divelab.com © ⅯⅯⅩIⅡ Kirby Morgan Dive Systems, Inc. All rights reserved. Document # 130318003...
-
Page 85: Locking Collar Assembly & Helmet Ring
Check the screws on the ring to ensure they are properly tightened. 6.5.3 Head Cushion and Chin Cushion Remove the foam from the head cushion and inspect © ⅯⅯⅩIⅡ Kirby Morgan Dive Systems, Inc. All rights reserved. Document # 130318003... -
Page 86: Communications Inspection
Good communications are vital to your safety. Regul a rly in spect th e co m ponen ts of th e communications system and replace when necessary. © ⅯⅯⅩIⅡ Kirby Morgan Dive Systems, Inc. All rights reserved. Document # 130318003... -
Page 87: Rex ® Demand Regulator & Exhaust System Post Dive Cleaning & Sanitizing
Tie Wrap Exhaust Main Body Regulator body Valve Seat Exhaust valve Diaphragm Cover Starboard Whisker Washer The REX Demand Regulator & Exhaust System Cover ® Retaining Ring © ⅯⅯⅩIⅡ Kirby Morgan Dive Systems, Inc. All rights reserved. Document # 130318003... -
Page 88: Sanitizing
10 minutes to maximize germ killing action then rinse thoroughly. © ⅯⅯⅩIⅡ Kirby Morgan Dive Systems, Inc. All rights reserved. Document # 130318003... -
Page 89: Post Dive Reassembly
This would allow the diaphragm to fall out and the helmet would flood. This could lead to serious personal injury or death. © ⅯⅯⅩIⅡ Kirby Morgan Dive Systems, Inc. All rights reserved. Document # 130318003... -
Page 91: Kirby Morgan
If © ⅯⅯⅩIⅡ Kirby Morgan Dive Systems, Inc. All rights reserved. Document # 130318003... -
Page 92: One Way Valve
1) The one way valve assembly must be removed from is present, clean using the acidic solution as outlined the side block. Use the open end wrench to remove it. in the KMDSI cleaning procedures. © ⅯⅯⅩIⅡ Kirby Morgan Dive Systems, Inc. All rights reserved. Document # 130318003... -
Page 93: Reassembly Of The One Way Valve
5) If the adapter has been removed, it must be cleaned and wrapped with Teflon tape. ® © ⅯⅯⅩIⅡ Kirby Morgan Dive Systems, Inc. All rights reserved. Document # 130318003... -
Page 94: Side Block Assembly
Swing the bent tube down and out of the way. pull the bent tube assembly straight out of the regula- tor inlet nipple. 4) The side block assembly is ready to start removal. © ⅯⅯⅩIⅡ Kirby Morgan Dive Systems, Inc. All rights reserved. Document # 130318003... -
Page 95: Separating The Side Block Assembly From The Helmet Shell
The nut seen here secures both the air train and the sideblock. The fasteners that secure the sideblock also hold the air train in place. Air train (installs inside helmet) Helmet shell Side block assembly © ⅯⅯⅩIⅡ Kirby Morgan Dive Systems, Inc. All rights reserved. Document # 130318003... - Page 96 6) Be sure to remove all traces of old silicone sealant NOTE: The alignment screw is located in a recess below from the side block and helmet shell. the stud. © ⅯⅯⅩIⅡ Kirby Morgan Dive Systems, Inc. All rights reserved. Document # 130318003...
-
Page 97: Side Block Assembly Replacement
Material hole, or air flow hole. This could lead to Safety Data Sheet. drowning. © ⅯⅯⅩIⅡ Kirby Morgan Dive Systems, Inc. All rights reserved. Document # 130318003... - Page 98 (4 Newton meters). DO NOT OVER- TIGHTEN. 6) Tighten the screw to the correct torque, 20 inch pounds (2.25 Newton meters). 7) Clean off all excess silicone sealant. © ⅯⅯⅩIⅡ Kirby Morgan Dive Systems, Inc. All rights reserved. Document # 130318003...
-
Page 99: Defogger Valve
L.P. plug Nut* ** components of EGS valve * components of free-flow valve Components of the sideblock, including the EGS valve and the defogger or “free-flow” valve. © ⅯⅯⅩIⅡ Kirby Morgan Dive Systems, Inc. All rights reserved. Document # 130318003... - Page 100 EGS valve seat. Since the parts have a similar appearance, it’s a good idea to keep the parts for the defogger and EGS valve separate. © ⅯⅯⅩIⅡ Kirby Morgan Dive Systems, Inc. All rights reserved. Document # 130318003...
-
Page 101: Cleaning And Lubricating
Be sure to lubricate all parts, with the exception of the valve seat, prior to reassembly. Install the washer on the defogger valve stem. Install the o-ring on the defogger bonnet. © ⅯⅯⅩIⅡ Kirby Morgan Dive Systems, Inc. All rights reserved. Document # 130318003... - Page 102 Install the spring in the defogger valve control block. knob. Side block Valve o-ring stem Washer Components of the defogger valve. Knob Washer Valve seat Spring Bonnet © ⅯⅯⅩIⅡ Kirby Morgan Dive Systems, Inc. All rights reserved. Document # 130318003...
-
Page 103: Emergency Gas System Valve Assembly
5) The adapter that provides the breathing gas to the Loosen the bonnet on the EGS valve. Remove the lock nut and spring Removal of the bonnet, valve stem, and seat. © ⅯⅯⅩIⅡ Kirby Morgan Dive Systems, Inc. All rights reserved. Document # 130318003... -
Page 104: Cleaning And Lubricating
Note lubricated. the stud which is used to mount the side block is fastened with Loctite 222. This is a dealer ® serviceable item only. © ⅯⅯⅩIⅡ Kirby Morgan Dive Systems, Inc. All rights reserved. Document # 130318003... -
Page 105: Reassembly Of Emergency Valve
1/8 of a turn. system pressure. Adapter for EGS supply Valve Bonnet seat o-ring Knob Valve Side block stem body Washer Components of the EGS valve Spring © ⅯⅯⅩIⅡ Kirby Morgan Dive Systems, Inc. All rights reserved. Document # 130318003... - Page 106 Remember to install the washer before you replace Tighten the nut that holds the handle in place. the valve handle. The properly assembled side block with the non-return valve and EGS adapter in position. © ⅯⅯⅩIⅡ Kirby Morgan Dive Systems, Inc. All rights reserved. Document # 130318003...
-
Page 107: Bent Tube Assembly
Replace the o-ring on the bent tube if it is worn or The mount nut can then be rotated until free of the damaged. © ⅯⅯⅩIⅡ Kirby Morgan Dive Systems, Inc. All rights reserved. Document # 130318003... -
Page 108: Reinstallation Of The Bent Tube Assembly
Kirby Morgan masks and helmets. threading inward. If the nipple tube threads inward Always use a torque wrench to tighten the fittings on the bent tube assembly. © ⅯⅯⅩIⅡ Kirby Morgan Dive Systems, Inc. All rights reserved. Document # 130318003... -
Page 109: Demand Regulator & Exhaust System Overhaul
Whisker Exhaust valve Washer Horseshoe Cover Main tube Cover Retaining Inlet valve Ring Nipple tube Diaphragm Roller lever Blowapart of KM77 regulator with pod and oral/nasal mask. © ⅯⅯⅩIⅡ Kirby Morgan Dive Systems, Inc. All rights reserved. Document # 130318003... - Page 110 Loosen the bolts gradually, moving from one to another. © ⅯⅯⅩIⅡ Kirby Morgan Dive Systems, Inc. All rights reserved. Document # 130318003...
- Page 111 Failure to replace with the second maintenance could result in an improper seal of the pod, or loosening of the fasteners. Separate the pod./regulator assembly from the helmet shell. © ⅯⅯⅩIⅡ Kirby Morgan Dive Systems, Inc. All rights reserved. Document # 130318003...
-
Page 112: Removal Of Regulator Alone
The regulator should be pulled from the pod as the mount nut is being loosened. 5) Pull the regulator body away from the helmet. © ⅯⅯⅩIⅡ Kirby Morgan Dive Systems, Inc. All rights reserved. Document # 130318003... -
Page 113: Regulator Disassembly
7) Loosen the nipple tube lock nut, then unscrew and remove the nipple tube. Note: Take care not to damage the knife edge of the nipple tube. © ⅯⅯⅩIⅡ Kirby Morgan Dive Systems, Inc. All rights reserved. Document # 130318003... - Page 114 Main tube Diaphragm Roller lever Cover Horseshoe Starboard Whisker Adjustment O-ring lock nut Washer Cover Nipple tube Inlet valve Retaining Ring Blowapart drawing of the REX regulator. ® © ⅯⅯⅩIⅡ Kirby Morgan Dive Systems, Inc. All rights reserved. Document # 130318003...
- Page 115 9) After removal of the horseshoe, the roller lever can be removed. Tilt the regulator towards the bent tube side and remove the balance poppet. The adjustment assembly including the sprint and spacers. © ⅯⅯⅩIⅡ Kirby Morgan Dive Systems, Inc. All rights reserved. Document # 130318003...
- Page 116 Remove the horseshoe prior to attempting to snap firmly into place. The seats should be smooth remove the roller lever. and straight. © ⅯⅯⅩIⅡ Kirby Morgan Dive Systems, Inc. All rights reserved. Document # 130318003...
- Page 117 If the exhaust whisker cover is cracked or damaged it should be removed and replaced. Remove the sleeve from the exhaust whisker cover if it needs cleaning or you are replacing the exhaust whisker body. © ⅯⅯⅩIⅡ Kirby Morgan Dive Systems, Inc. All rights reserved. Document # 130318003...
-
Page 118: Precautions For Cleaning
Inlet valve The adjustment system must be clean and properly Use extreme care when cleaning the nipple tube lubricated to turn freely. and main tube to avoid damage. © ⅯⅯⅩIⅡ Kirby Morgan Dive Systems, Inc. All rights reserved. Document # 130318003... -
Page 119: Rex ® Regulator Re-Assembly
Back side of regulator o-ring o-ring Note the engraved letter “B” on the main tube. It must face outwards, away from the helmet to be installed properly. © ⅯⅯⅩIⅡ Kirby Morgan Dive Systems, Inc. All rights reserved. Document # 130318003... - Page 120 The lever is installed after the horseshoe is shaking the inlet valve loose by tilting the regulator installed. up and shaking it. If the inlet valve falls out, it was © ⅯⅯⅩIⅡ Kirby Morgan Dive Systems, Inc. All rights reserved. Document # 130318003...
- Page 121 Install a new Teflon washer on the side ® block end. 19) Inspect the whisker valve plastic bodies for dam- age and contamination. Install new valves ensuring © ⅯⅯⅩIⅡ Kirby Morgan Dive Systems, Inc. All rights reserved. Document # 130318003...
- Page 122 You can also make or death. marks on the whiskers with a felt tip pen. © ⅯⅯⅩIⅡ Kirby Morgan Dive Systems, Inc. All rights reserved. Document # 130318003...
- Page 123 This is how the whiskers should look when they are properly installed on the regulator. © ⅯⅯⅩIⅡ Kirby Morgan Dive Systems, Inc. All rights reserved. Document # 130318003...
- Page 124 This would allow the diaphragm to fall out and the helmet would flood. This could lead to serious personal injury or death. © ⅯⅯⅩIⅡ Kirby Morgan Dive Systems, Inc. All rights reserved. Document # 130318003...
- Page 125 The gaps on the edge of regulator cover must be centered between the holes on the regulator retainer ring. © ⅯⅯⅩIⅡ Kirby Morgan Dive Systems, Inc. All rights reserved. Document # 130318003...
- Page 126 8) Check for proper free flow. Turning the adjustment knob out till free flow then back in until it stops. The low pressure air source must be adjustable over a range from 135-150 p.s.i. © ⅯⅯⅩIⅡ Kirby Morgan Dive Systems, Inc. All rights reserved. Document # 130318003...
-
Page 127: Rex ® Adjustment Troubleshooting
Remedy: Replace bent tube. Problem: Depressing the regulator cover results in little or no flow. Remedy: Slowly back out counterclockwise on the inlet nipple 1/8 turn, re-check, readjust as necessary. © ⅯⅯⅩIⅡ Kirby Morgan Dive Systems, Inc. All rights reserved. Document # 130318003... -
Page 128: Oral/Nasal Mask
Nose block device Valve Nose block Port packing Regulator Valve body mount nut The oral nasal mask and the parts associated with it are easy to access. © ⅯⅯⅩIⅡ Kirby Morgan Dive Systems, Inc. All rights reserved. Document # 130318003... -
Page 129: Reinstalling The Pod On The Helmet
Tighten the nuts gradually so that the tension is pulled up evenly on all four sides of the pod. Regulator mount nut © ⅯⅯⅩIⅡ Kirby Morgan Dive Systems, Inc. All rights reserved. Document # 130318003... - Page 130 14) Install the chin strap as per Chapter 8. The two nuts below the regulator are installed on the 15) Adjust the regulator per this chapter. outside of the pod. © ⅯⅯⅩIⅡ Kirby Morgan Dive Systems, Inc. All rights reserved. Document # 130318003...
-
Page 131: Reinstalling The Regulator On The Helmet
Only use a torque screwdriver to tighten the screws that secure the whiskers to the face port. Make sure the whisker spacers are in position before tightening the screws that secure the whiskers. © ⅯⅯⅩIⅡ Kirby Morgan Dive Systems, Inc. All rights reserved. Document # 130318003... - Page 132 10) Install and tighten the whisker retainer screws to 15 inch pounds. Be sure to use a small amount of Loctite 222 to secure the screws. ® © ⅯⅯⅩIⅡ Kirby Morgan Dive Systems, Inc. All rights reserved. Document # 130318003...
-
Page 133: Overpressure Relief / Bleed Valve Overhaul Procedures
Replacement is only necessary if the rubber seat is Vinegar, Fresh water deteriorated, cut, and/or chipped. Mild dish soap Ultrasonic sink, if available Magnifying glass New valve body o-ring © ⅯⅯⅩIⅡ Kirby Morgan Dive Systems, Inc. All rights reserved. Document # 130318003... -
Page 134: Overpressure Relief Valve Reassembly
EGS supply and possible serious indicates 180- 200 p.s.i.g. (12.40-13.78 bar). If the re- personal injury if the valve fails. © ⅯⅯⅩIⅡ Kirby Morgan Dive Systems, Inc. All rights reserved. Document # 130318003... - Page 135 This procedure also explains the steps necessary for readjusting after cleaning or overhaul. © ⅯⅯⅩIⅡ Kirby Morgan Dive Systems, Inc. All rights reserved. Document # 130318003...
-
Page 137: Chapter 8 Mechanical System Maintenance
This could be fatal. NOTE: For o-ring Removal/Inspection/Cleaning & Installation see Chapter 6. For General Cleaning Guidelines, including KMDSI recommended clean- ing, sanitizing solutions, and procedures, see Chap- ter 6. © ⅯⅯⅩIⅡ Kirby Morgan Dive Systems, Inc. All rights reserved. Document # 130318003... -
Page 138: Nose Block Assembly
All of the parts of the nose block device (with the exception of the o-ring that seals on the back side of the port retainer) can be seen here. © ⅯⅯⅩIⅡ Kirby Morgan Dive Systems, Inc. All rights reserved. Document # 130318003... -
Page 139: Nose Block Device Replacement
Properly installed nose block device. Do not tighten the nose block packing too much or the nose block device will not slide easily. © ⅯⅯⅩIⅡ Kirby Morgan Dive Systems, Inc. All rights reserved. Document # 130318003... -
Page 140: Handle
Handle Unscrew the front three handle retainer screws. Helmet shell Blowapart drawing of the handle and helmet shell. Remove the screws at the rear of the handle. © ⅯⅯⅩIⅡ Kirby Morgan Dive Systems, Inc. All rights reserved. Document # 130318003... -
Page 141: Handle Grip Rubber
Tighten the screws on the rear of the handle to 15 back to front. inch pounds. 4) Tighten the front bolts to 15 inch pounds. 5) Tighten the rear bolts to 15 inch pounds. © ⅯⅯⅩIⅡ Kirby Morgan Dive Systems, Inc. All rights reserved. Document # 130318003... -
Page 142: Face Port
3) Next, unscrew the eleven port retainer screws and four whisker screws with kidney plates and spacers. Pull the retainer clear of the helmet shell. © ⅯⅯⅩIⅡ Kirby Morgan Dive Systems, Inc. All rights reserved. Document # 130318003... -
Page 143: Port Retainer
They will usually be found lodged in the whisker. 6) Remove the old port and sealing o-ring. Port retainer Packing Port Helmet shell O-ring O-ring Kidney plate KM77 Port retainer system. © ⅯⅯⅩIⅡ Kirby Morgan Dive Systems, Inc. All rights reserved. Document # 130318003... -
Page 144: Face Port, Port Retainer And Nose Block Replacement
4) Slip the o-ring on the small tube that protrudes Lubricate the port o-ring prior to installing it in from the rear of the port retainer nose block guide. the o-ring groove. © ⅯⅯⅩIⅡ Kirby Morgan Dive Systems, Inc. All rights reserved. Document # 130318003... - Page 145 ® the face port. This can cause the port to in serious personal injury or death. fail unexpectedly and drowning could re- sult. © ⅯⅯⅩIⅡ Kirby Morgan Dive Systems, Inc. All rights reserved. Document # 130318003...
-
Page 146: Special Note Regarding Ports
The nose block guide is threaded into the port retainer, and is easily replaced if damaged. Under normal use, the port re- tainer should never need replacement. © ⅯⅯⅩIⅡ Kirby Morgan Dive Systems, Inc. All rights reserved. Document # 130318003... -
Page 147: Neck Dam
Screw for alignment with the joints on the split rings. Blowapart drawing of neck dam assembly for the helmet. © ⅯⅯⅩIⅡ Kirby Morgan Dive Systems, Inc. All rights reserved. Document # 130318003... - Page 148 4) The alignment marks on the neck dam must be Use a small, sharp punch to locate the bottom positioned directly over the joints in the split rings. hole. © ⅯⅯⅩIⅡ Kirby Morgan Dive Systems, Inc. All rights reserved. Document # 130318003...
- Page 149 Once the cut is started, pull on the neoprene and maintain tension on it as you continue cutting. The cutting edge of the blade should follow the outside © ⅯⅯⅩIⅡ Kirby Morgan Dive Systems, Inc. All rights reserved. Document # 130318003...
-
Page 150: Latex Neck Dam Replacement
4) Lubricate the tips of the neck dam mounting screws lightly with silicone grease. This will prevent them from grabbing and twisting the rubber. Use the screw to punch through the neck dam. © ⅯⅯⅩIⅡ Kirby Morgan Dive Systems, Inc. All rights reserved. Document # 130318003... -
Page 151: Trimming A Latex Neck Seal
This may feel a bit snug above water, but will be very comfortable under water. Trim latex neck dams with the largest, sharpest scissors available. © ⅯⅯⅩIⅡ Kirby Morgan Dive Systems, Inc. All rights reserved. Document # 130318003... -
Page 152: Neck Dam Pull Strap
Do not overtighten. Split Ring Neck O-ring Stepped Ring Pull Strap Screw Diagram of the pull strap. © ⅯⅯⅩIⅡ Kirby Morgan Dive Systems, Inc. All rights reserved. Document # 130318003... -
Page 153: Snap Tabs, Chin Strap, And Earphone Retainers
® the face port. This can cause the port to fail unexpectedly and drowning could re- sult. Removing the snap tab that also holds the earphone retainer. © ⅯⅯⅩIⅡ Kirby Morgan Dive Systems, Inc. All rights reserved. Document # 130318003... -
Page 154: Chin Strap Removal
Read and follow the direc- tions in the MSDS before using this material. Apply Loctite to the screws that secure the chin ® strap. © ⅯⅯⅩIⅡ Kirby Morgan Dive Systems, Inc. All rights reserved. Document # 130318003... -
Page 155: O-Ring Seal Replacement
8.11.2 Replacement of Sealed Pull Pins 1) Insert the pin(s) into the helmet ring on the base of the helmet. The cam angle must be correct for the pins to work. © ⅯⅯⅩIⅡ Kirby Morgan Dive Systems, Inc. All rights reserved. Document # 130318003... - Page 156 CAUTION Wear hand protection when using Loctite . This material ® may irritate your skin. Read and follow the directions in the MSDS before using this material © ⅯⅯⅩIⅡ Kirby Morgan Dive Systems, Inc. All rights reserved. Document # 130318003...
-
Page 157: Swing Tongue Catch
Remove the screw from the port side of the swing 3) Remove the spring spacer. tongue catch. Spacer Screw Washer Screw Swing tongue catch Washer Spring Spring spacer Diagram of the swing tongue catch. © ⅯⅯⅩIⅡ Kirby Morgan Dive Systems, Inc. All rights reserved. Document # 130318003... -
Page 158: Reassembly Of The Swing Tongue Catch
Loctite prior to assembly. ® All of the screws in the swing tongue catch assembly should be lightly coated with Loctite ® prior to assembly. © ⅯⅯⅩIⅡ Kirby Morgan Dive Systems, Inc. All rights reserved. Document # 130318003... - Page 159 9) If needed, reinstall the pod and regulator assem- Read and follow the direc- bly per Chapter 7. tions in the MSDS before using this material. Properly assembled swing tongue catch. © ⅯⅯⅩIⅡ Kirby Morgan Dive Systems, Inc. All rights reserved. Document # 130318003...
-
Page 160: Locking Collar
3) Turn the sealed pull pins until they are disen- gaged and lift the locking collar away. 4) Clean all parts that will be reused. Loosen the bolt to remove it from the hinge. © ⅯⅯⅩIⅡ Kirby Morgan Dive Systems, Inc. All rights reserved. Document # 130318003... -
Page 161: Locking Collar Disassembly
Washer Locking collar Hinge bolt Washer Screw T-washer Neck pad Exploded view of the locking collar assembly. Slide the neck pad off the locking collar. © ⅯⅯⅩIⅡ Kirby Morgan Dive Systems, Inc. All rights reserved. Document # 130318003... -
Page 162: Locking Collar Reassembly
12) Install the second washer onto the protruding hinge pin. 13) Tighten the nut until the bolt threads just pro- trude past the end of the nylock insert. © ⅯⅯⅩIⅡ Kirby Morgan Dive Systems, Inc. All rights reserved. Document # 130318003... -
Page 163: Head Cushion And Chin Cushion
The foam for the chin cushion is included when the kit for the head cushion is ordered. The head cushion foam is easily replaceable. The chin cushion. © ⅯⅯⅩIⅡ Kirby Morgan Dive Systems, Inc. All rights reserved. Document # 130318003... -
Page 164: Communications System
Cover Microphone Screw Earphone Comm Module Washer Washer O-ring Comm Post Comm Nut Wiring Harness The components of the communications system are shown here in exploded view. © ⅯⅯⅩIⅡ Kirby Morgan Dive Systems, Inc. All rights reserved. Document # 130318003... -
Page 165: Removal Of Communications Assembly
1) Slide the earphones out of the retainers. 2) Pull the microphone out of the oral/nasal mask. The large plastic nut is removed from the communications module. Remove the earphones from the earphone retainers. © ⅯⅯⅩIⅡ Kirby Morgan Dive Systems, Inc. All rights reserved. Document # 130318003... -
Page 166: Replacement Of Communications Assembly
Tighten by hand until snug against the helmet. Do not use a wrench to tighten this part. 4) Place the earphones in the earphone retainers. 5) Route the earphone wires so they do not obscure © ⅯⅯⅩIⅡ Kirby Morgan Dive Systems, Inc. All rights reserved. Document # 130318003... -
Page 167: Microphone Replacement
2. Black (Right) White (Left) Earphone Assem- bly Wires 515-019 Microphone Right Earphone Short Left Earphone Long Diagram depicting correct earphone wire insertion for the Waterproof Connector © ⅯⅯⅩIⅡ Kirby Morgan Dive Systems, Inc. All rights reserved. Document # 130318003... -
Page 168: Waterproof Connector
6) Tighten the screws until snug. Do not overtight- Use the 3/4 inch wrench to unscrew the waterproof connector. 7) Install the rubber cover. 6) Pull the connector through the module. © ⅯⅯⅩIⅡ Kirby Morgan Dive Systems, Inc. All rights reserved. Document # 130318003... -
Page 169: Terminal Connections In The Waterproof Connector
8.15.8 Terminal Connections in the Waterproof Connector Installing the black wire. Installing the Mount Nut. Installing the white wire. Tightening the Mount Nut. Installing the green wire. © ⅯⅯⅩIⅡ Kirby Morgan Dive Systems, Inc. All rights reserved. Document # 130318003... - Page 170 Installing the right earphone wires. Installing the red wire. Installing the left earphone wires. Installing the red microphone wire. Installing the O-ring. Installing the white microphone wire. © ⅯⅯⅩIⅡ Kirby Morgan Dive Systems, Inc. All rights reserved. Document # 130318003...
-
Page 171: Communications Posts
Read and follow the direc- 8) Thread the screws into the communications mod- tions in the MSDS before ule. using this material 9) Tighten the screws until snug; do not overtighten. © ⅯⅯⅩIⅡ Kirby Morgan Dive Systems, Inc. All rights reserved. Document # 130318003... -
Page 173: Chapter 9.0 Accessories For The Kirby Morgan 77
2) Check the O-ring on the low pressure whip to be Thread the hose into the side block opening. Remove the plug from the side block and install the inflator hose here. © ⅯⅯⅩIⅡ Kirby Morgan Dive Systems, Inc. All rights reserved. Document # 130318003... -
Page 174: Weld Lens Assembly
This could cause flooding through the port. Remove the two plug screws from the port retainer. Install the screws through the mount ears. © ⅯⅯⅩIⅡ Kirby Morgan Dive Systems, Inc. All rights reserved. Document # 130318003... -
Page 175: Weld Shield Assembly
KMDSI SuperFlow first stage regulator (or any high perfor- ® mance regulator) used for the bail-out supply. © ⅯⅯⅩIⅡ Kirby Morgan Dive Systems, Inc. All rights reserved. Document # 130318003... -
Page 177: Table Of Equivalents
Inches of Mercury (Hg) 2.036 Quarts Gallons 0.25 Square Feet Square Inches Temperature ( F - 32) Temperature ( 0.5555 Tons (U.S.) Pounds 2000 Watts Horsepower 0.001341 © ⅯⅯⅩIⅡ Kirby Morgan Dive Systems, Inc. All rights reserved. Document # 130318003... -
Page 178: Appendix 1: Torque Specifications
Loctite Loctite ® ® 2.25 530-045 Screw, tongue catch Loctite Loctite ® ® 530-032 Screw, tongue catch spring Loctite Loctite ® ® 530-015 Screw, pull pin assembly © ⅯⅯⅩIⅡ Kirby Morgan Dive Systems, Inc. All rights reserved. Document # 130318003... -
Page 179: Km 77 Torque Table #3 - Regulator
222 or equivalent medium strength thread locking compound. ® Checklist, Maintenance, and Pre-Dive Inspections For the most current check lists, helmet maintenance procedures, and pre-dive inspections, please check on the Internet at www.divelab.com. © ⅯⅯⅩIⅡ Kirby Morgan Dive Systems, Inc. All rights reserved. Document # 130318003... - Page 180 Kirby Morgan helmets and masks © ⅯⅯⅩIⅡ Kirby Morgan Dive Systems, Inc. All rights reserved. Document # 130318003...
- Page 181 Regardless of the approved lubricant used, never mix different kinds of lubricants. Persons mixing han- dling and working with breathing gases should be properly trained in all aspects of safe gas handling. © ⅯⅯⅩIⅡ Kirby Morgan Dive Systems, Inc. All rights reserved. Document # 130318003...
- Page 182 CO because the diver cannot ventilate as freely as when breathing at the surface. When breathing © ⅯⅯⅩIⅡ Kirby Morgan Dive Systems, Inc. All rights reserved. Document # 130318003...
-
Page 183: Requirements Table
50 (heavy work) 62.5 (severe work) 75 (severe work) 92.5 150 P.S.I.G. (10.35 BAR) 40 (heavy work) 10.5 50 (heavy work) 11.7 62.5 (severe work) 75 (severe work) 13.3 © ⅯⅯⅩIⅡ Kirby Morgan Dive Systems, Inc. All rights reserved. Document # 130318003... - Page 184 40 RMV. ® For more information, check the Dive Lab website, www.divelab.com Click on Technical Section and check for Surface-Supplied Breathing Requirements. © ⅯⅯⅩIⅡ Kirby Morgan Dive Systems, Inc. All rights reserved. Document # 130318003...
- Page 185 Performance is based on a minimum of 75 RMV to depths of 220 FSW (67 MSW) using a 3/8 (9.5mm) um- bilical 600 foot (183 meters) long, made up of two 300 foot (91 meter) sections. © ⅯⅯⅩIⅡ Kirby Morgan Dive Systems, Inc. All rights reserved. Document # 130318003...
Need help?
Do you have a question about the 77 and is the answer not in the manual?
Questions and answers