Table of Contents
Advertisement
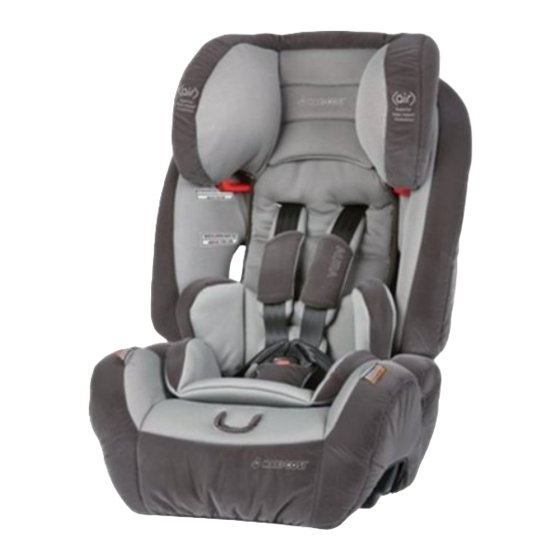
Aura
Convertible Booster Seat
To be used in a forward-facing position with built-in
harness by a child whose shoulders are above the
lower shoulder height marker (approx. 6 months of
age) until their shoulders reach the middle shoulder
height marker (approx. 4 years of age).
Then to be used with a lap-sash seatbelt until the
child's shoulders reach the upper shoulder
height marker (approx. 6-8 years of age).
IMPORTANT: KEEP THIS BOOKLET IN THE PLACE PROVIDED ON
THE CHILD RESTRAINT.
Advertisement
Table of Contents

Subscribe to Our Youtube Channel
Related Manuals for Maxi-Cosi Aura


Summary of Contents for Maxi-Cosi Aura
- Page 1 Aura Convertible Booster Seat To be used in a forward-facing position with built-in harness by a child whose shoulders are above the lower shoulder height marker (approx. 6 months of age) until their shoulders reach the middle shoulder height marker (approx. 4 years of age).
-
Page 2: Table Of Contents
Table of Contents Warnings ..........................3-5 Parts list ..........................6-7 Vehicle information ....................... 8 Location of anchor fitting ..................... 8 Anchorage fitting installation ..................... 9 Upper anchorage fitting installation ................10 Upper anchorage fittings for sedans only ..............11 Upper anchorage fitting ....................12 Correct vehicle position .................... -
Page 3: Warnings
warnings WARNINGS Read and follow all of the installation instructions for maximum protection. If you have any questions regarding the installation or use of this restraint, please contact Dorel Australia or agent, or a child restraint fitting station authorised by the relevant transport authority, or in New Zealand, to consult the agent for the vehicle. - Page 4 warnings WARNINGS GENERAL VERY IMPORTANT: Only replace the cover with a Dorel Australia supplied replacement cover with identical shoulder height markers or a replacement cover meeting AS/NZS 8005. • Use the restraint exactly as shown in the instructions. • Supervision of children is needed because they may be able to undo buckles. • DO NOT LEAVE CHILDREN UNATTENDED IN THE CAR. • Do not alter or modify this restraint. • Repairs must only be done by the manufacturer or agent. • Do not allow the restraint to come into contact with polishes, oils, bleach and other chemicals.
- Page 5 warnings WARNINGS TO PARENTS AND OTHER USERS • DO NOT MODIFY YOUR CONVERTIBLE BOOSTER SEAT or use any accessories or parts supplied by other manufacturer’s. • NEVER USE CONVERTIBLE BOOSTER SEAT IF IT HAS DAMAGED OR MISSING PARTS. • DO NOT use a cut, frayed or damaged vehicle seat belt. • THE CONVERTIBLE BOOSTER SEAT CAN BECOME VERY HOT IF LEFT IN THE SUN. • Always lightly touch the surface of any metal or plastic parts to check their temperature BEFORE putting your child in the Booster Seat. Contact with these parts can burn your child’s skin. • The restraint should not be purchased or sold as a second hand item. It is recommended not to use child restraints older than 10 years as the protection in an accident may be reduced • Seat belt extenders should not be used if the seat belt is not long enough to secure the child.
-
Page 6: Parts List
parts list Front Headrest height adjuster Harness tightening strap (under headrest cover flap) Harness Air Protect cells (x2) Arm Rest Belt path holes (x2) 10 Insert pad Harness Covers Buckle 11 Cup holders (x2) Harness release lever (under flap) -
Page 7: Parts List
parts list Back 12 Top tether 13 Instruction manual storage 14 Belt path 15 Splitter plate 16 Harness storage... -
Page 8: Vehicle Information
vehicle information Location of Anchor Fitting NOTE : • The anchor point can be found in different locations in different cars. The illustration above shows possible locations of anchor points. Sometimes it is on the parcel shelf in sedans, and on the floor area in station wagons, vans and hatchbacks. Make sure that you do not confuse the luggage hook in the back of a station wagon with anchor points. Refer to your owner’s manual. • An extension strap may be needed for vehicles without a fixed parcel shelf. Extension straps and extra fittings are available from various stores. Extension straps 300mm ref no. 014398 Extension straps 600mm ref no. 014399 Anchor bolt kit ref no. -
Page 9: Anchorage Fitting Installation
vehicle information Anchorage Fitting Installation IMPORTANT Child restraints must be used correctly to provide proper protection for your child. The new type of clip anchorage system on child restraint must be used in the correct way. Be especially careful to use the clip in the following way. CORRECT Make sure there is no slack in the top strap and the attachment clip is upright in the anchorage fitting. INCORRECT The clip must not lie flat on the anchorage fitting. INSTALLATION CORRECT INCORRECT... -
Page 10: Upper Anchorage Fitting Installation
vehicle information Upper Anchorage Fitting Installation FOR CARS FITTED WITH A CHILD RESTRAINT UPPER ANCHORAGE POINT Locate the upper anchorage point behind the rear seating position (consult the car owner’s handbook for the location of the upper anchorage point). Remove the thread plug from the parcel shelf/floor/roof and install the attachment bolt as shown in Figure 1. -
Page 11: Upper Anchorage Fittings For Sedans Only
vehicle information Upper Anchorage Fittings For Sedans Only If the car is not fitted with a child restraint anchorage point. For sedans only – Drill a 9mm diameter hole in the parcel shelf on the centre – line of the seating position as shown in Fig 2. Install the anchor bolt as shown in Fig 3. Centre line of seating position Figure 2... -
Page 12: Upper Anchorage Fitting
vehicle information Vehicle Anchorage Fitting For sedans only Drill a 9 mm diameter hole in the parcel shelf on the centre-line of the seating position as shown in Figure 2 (as shown on pg 11). Install the anchor bolt as shown in Figure 3 (as shown on pg 11). -
Page 13: Correct Vehicle Position
vehicle information Correct Vehicle Position CORRECT USE CORRECT USE CORRECT USE CORRECT USE INCORRECT USE INCORRECT USE... -
Page 14: General Instructions
general instructions Top Tether Strap TOP TETHER 1. Press on the adjuster button with thumb and pull strap back through to loosen anchorage strap. BUTTON 2. To tighten, hold the adjuster firmly and pull on loose end of top tether. BUTTON UPPER ANCHORAGE 3. -
Page 15: Headrest Adjustment
general instructions Headrest Adjustment Before you adjust the headrest, be sure to press the harness release lever and pull on the harness to loosen. ADJUSTING THE HEADREST HEIGHT • The child restraint is fitted with headrest Height Adjustment Lock which is colour. -
Page 16: Using The Harness Buckle
general instructions Using The Harness Buckle PRESS TO RELEASE BUCKLE • Press red button to release buckle CLICK Step 2 Step 1 Step 1 : Insert one buckle tongue Step 2 : Insert the second buckle as shown above. tongue as illustrated above. Listen for a ‘CLICK’. NOTE : Remember to always pull up on the harness straps to make sure buckle is locked properly. -
Page 17: Cleaning Buckle
general instructions Cleaning Buckle The buckle should be cleaned by following the steps: • Place the buckle unit under running water (40 degrees Celsius) • Let the water flow through the mouth of the buckle for one minute. Simultaneously latch and unlatch the tongues into the buckle several times until a strong audible “click” is heard. • If you still cannot hear a strong audible “click” after latching the buckle several times, then repeat the process again. DO NOT oil any part of the buckle and allow buckle to dry. IMPORTANT - Only genuine replacement parts supplied by Dorel Australia Pty Ltd can be used on the Convertible Booster Seat. -
Page 18: Use In Toddler Mode
use in toddler mode Use As Toddler Restraint With Built-In Harness To be used in forward-facing position with in built harness by a child whose shoulders are above the lower shoulder height marker LABEL 1 (approximately 6 months of age) until their shoulders reach the middle shoulder height marker LABEL 2 (approximately 4 years of age). -
Page 19: Preparing Seat To Fit Your Child
use in toddler mode Preparing seat to fit your child You MUST make these adjustments with your child before you install the child restraint in the vehicle. Please adjust harness according to the infants shoulder height prior to installation. CONFIGURING THE HARNESS BELT FOR SHOULDER HEIGHT: 1. Lift the harness release lever at the front of seat. -
Page 20: Toddler Use Installation
use in toddler mode Toddler use installation FORWARD-FACING BELT PATH (6 MONTHS TO 4 YEARS) The shoulder straps must be in the slots which are nearest to the child’s shoulders, but not more than 25 mm below the child’s shoulders. If the baby’s neck muscles are unable to NOTE : support their head, then the child should remain in a rear facing seat. BELT FROM TOP SIDE SLOT CONNECTION SLIDE BELT THROUGH... -
Page 21: Toddler Use Installation
use in toddler mode Toddler use installation CLICK 4. Pull both top and bottom Slide belt from bottom Click seatbelt buckle parts of belt through connection between arm into place. opposite side slot. rest and seat wing. Wrap belt from bottom connection around armrest. Do not wrap belt from top connection around anything. Anchor hook PUSH PULL... -
Page 22: Removing Insert
use in toddler mode Removing Insert The insert is to be used from 6 months to approximately 1 year) To remove insert To remove the insert, simply undo the buckle and pull the insert out. To replace insert Feed the crotch part of the buckle through the opening slot in the insert. Position the harness in the correct place and fasten buckle assembly. -
Page 23: Use In Booster Mode
use in booster mode Child Shoulder Height Markers CAUTION: INBUILT HARNESS MUST BE STORED BEFORE BOOSTER SEAT MODE To be used as a booster mode when the child’s shoulders are above the middle height LABEL 2 LABEL 3 marker until their shoulders reach the upper height marker (approxi- mately 6 to 8 years). -
Page 24: Remove Harness System
use in booster mode Remove Harness System SPLITTER PRESS PLATE 1. Lift the harness 2. Locate the splitter plate 4. Release the buckle release lever and pull on the back of the child on harness to loosen. restraint and unhook the harness. 3. Remove both shoulder straps by pulling it out completely from the front. Seat is now ready for 5. Roll the loose end of the 6. Lift the crotch buckle... -
Page 25: Booster Seat Using Lap-Sash Only: Installation
use in booster mode Booster Seat Using Lap-Sash Only: Installation BOOSTER SEAT BELT PATH (4 YEARS TO 6-8 YEARS) The shoulder strap must be in the shoulder belt guide which is nearest to the child’s shoulders, but not lower than the child’s shoulders Place the Booster Seat Have your child sit in the Position the sash belt firmly against the back safety seat with their back through the shoulder of a forward facing flat against its back. -
Page 26: Booster Seat Using Lap-Sash Only: Installation
use in booster mode Booster Seat Using Lap-Sash Only: Installation CORRECT USE INCORRECT USE INCORRECT USE Correct Shoulder Position To ensure the correct head support is obtained, the bottom of the headrest MUST be even or slightly higher with the top of child’s shoulders as illustrated. NOTE : If the vehicle seat belt lays across child’s neck or face, then readjust the headrest height. CAUTION! In the event of a crash, a seat belt across the child’s throat could cause a strangulation hazard. ALWAYS USE THE SASH GUIDE WARNING: A SASH BELT UNDER THE ARM OR BEHIND THE BACK IS DANGEROUS ACCESSORIES... -
Page 27: The Next Seat For Your Child
use in booster mode The next seat for your child BOOSTER SEAT To be used with a lap-sash seatbelt by a child whose shoulders are above the lower shoulder height marker (approx. 4 years of age) until the child’s shoulders reach the upper shoulder height marker (approx. -
Page 28: Care And Maintenance
care & maintenance Care and Maintenance NOTE: Before you start please remove the harness Headrest cover: Adjust the booster seat headrest to its highest position. Separate velcro at the back of the headrest and pull forward from the top center panel to remove cover. Carefully slide down and remove from back rest panel. Remove Air Protect cells from each side before washing. Main body cover: Separate velcro at the back of the seat side wings. - Page 29 care & maintenance Care and Maintenance • CLEANING METAL AND PLASTIC PARTS - Sponge clean with mild soap and cool water. NEVER clean with ammonia or bleach based, or spirit-type cleaners. • DO NOT USE THIS SAFETY SEAT WITHOUT ITS COVER • FROM TIME TO TIME CHECK THE SEAT for worn parts, torn material and stitching. If damage is found, DO NOT try to modify the seat. • IMPORTANT - Only genuine replacement parts supplied by Dorel Australia Pty Ltd can be used on the Convertible Booster Seat. • WHEN IN TODDLER MODE - Check regularly that child restraint is still buckled in with seatbelt. Follow the manufacturer’s instructions at all times. Before removal, ensure you have carefully noted the way which the various parts are attached to the seat so as to facilitate reassembly. Your child restraint is equipped with a buckle designed to give your child maximum protection during proper use. When working properly, your buckle should always fasten with an audible “click”.
-
Page 30: Notes
care & maintenance Notes... -
Page 31: Warranty
WARRANTY DOREL AUSTRALIA PTY LTD WARRANTS YOUR NEW PRODUCT TO BE FREE FROM DEFECTS IN MATERIALS AND WORKMANSHIP FOR 6 YEARS ON THE SEAT & 3 YEARS ON THE TRIM, FROM THE DATE OF PURCHASE, PROVIDED THAT THE PRODUCT IS USED IN GUARANTEE ACCORDANCE WITH ACCOMPANYING RECOMMENDATIONS OR INSTRUCTIONS WHERE PROVIDED. - Page 32 Europe’s most popular and trusted car seat brand. Australia © 2014 Dorel Australia, Pty Ltd. All Rights Reserved. YOU2013 #015527-A 08/14...
Need help?
Do you have a question about the Aura and is the answer not in the manual?
Questions and answers