Intermec EasyCoder 3400e User Manual
Barcode label printer
Hide thumbs
Also See for EasyCoder 3400e:
- User manual (126 pages) ,
- Quick start manual (20 pages) ,
- Instructions manual (6 pages)
Table of Contents
Advertisement
Advertisement
Table of Contents

Related Manuals for Intermec EasyCoder 3400e


Summary of Contents for Intermec EasyCoder 3400e
- Page 1 User’s Manual P/N 071881-001...
- Page 2 Precision Print, PrintSet, Virtual Wedge, and CrossBar are trademarks of Intermec Technologies Corporation. The name Centronics is wholly owned by GENICOM Corporation. IBM is a registered trademark of International Business Machines Corporation. Throughout this manual, trademarked names may be used. Rather than put a trademark (® or...
- Page 3 If a Hardware Configuration Test Label Does Not Print 1-10 Connecting the Printer to Your System 1-10 Connecting Your Printer to a PC 1-11 Connecting the Printer to a PC Serial Port 1-11 Connecting the Printer to a PC Parallel Port 1-12 Connecting Your Printer to a Network 1-12...
-
Page 4: Table Of Contents
EasyCoder 3400e Bar Code Label Printer User’s Manual Loading Media Into the Printer 2-6 Loading Roll Media for Straight-Through Printing 2-6 Loading Media for Self-Strip Printing 2-8 Loading Thermal Transfer Ribbon 2-10 Setting the Media Sensitivity Number 2-12 Setting the MSN for Intermec Media and Ribbon 2-13... - Page 5 Adjusting the Label Mark Sensor 5-6 Using the Printer Memory Efficiently 5-8 How Is the Printer Storage Memory Used? 5-8 Making the Most of Your Memory 5-8 Increasing Throughput 5-9 What Is an Image Band? 5-9 How the Image Bands Command Works 5-9...
- Page 6 EasyCoder 3400e Bar Code Label Printer User’s Manual Printer Options A-6 Communication Interface A-6 Finishers A-6 Bar Code Symbologies Supported A-8 2D Symbologies A-9 International Character Sets B-3 Advanced Character Table B-3 Emulation Mode Character Table B-4 IBM Translation Character Table B-4...
- Page 7 Full ASCII Table D-3 Full ASCII Control Characters Table D-5 Contents...
- Page 8 asdf...
- Page 9 Before You Begin This section introduces you to standard warranty provisions, safety precautions, warnings and cautions, document formatting conventions, and sources of additional product information. A documentation roadmap is also provided to guide you in finding the appropriate information. To receive a copy of the standard warranty provision for this product, contact your local Intermec sales organization.
- Page 10 EasyCoder® 3400e Bar Code Label Printer User’s Manual The warnings and cautions in this manual use the following format. Warning A warning warns you of an operating procedure, practice, condition, or statement that must be strictly observed to avoid death or serious injury to the persons working on the equipment.
- Page 11 Analysts and programmers should use this manual to learn how to operate, program, and connect the EasyCoder® 3400e printer to a network or system. The first part of this manual tells you how to install, operate, maintain, and troubleshoot your printer. The last part of the manual covers advanced features of the 3400e printer.
- Page 12 The following conventions are used throughout this manual for operating procedures and descriptions of the printer. Feed/Pause refers to the Feed/Pause button on the printer front panel. Downloaded commands appear in the order that you enter them into the printer with the following conventions: Convention <...
- Page 13 Before You Begin You may need additional information when working with printers in a data collection system. Please visit our Web site at www.intermec.com to download many of our current manuals in PDF format. To order printed versions of the Intermec manuals, contact your local Intermec representative or distributor.
- Page 14 asdf...
- Page 16 asdf...
- Page 17 NugFont HelvC This chapter introduces the EasyCoder® 3400e printer and explains how to get your new printer running for the first time. Features of your printer include: Support for direct thermal and thermal transfer printing applications. Chapters 1 and 2 explain how to load both types of media.
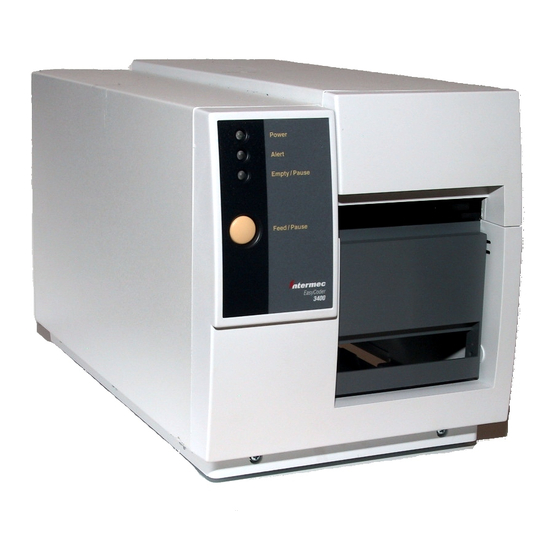
- Page 18 EasyCoder 3400e Bar Code Label Printer User’s Manual Front View Power/Data Alert LED Empty/Pause button Feed/Pause button Back View Media window Several options are available for use with your printer. See Appendix A for complete descriptions of these options. r /D...
- Page 19 Plug in the printer. Open the printer and load media. Print a configuration test label. The back of your printer contains the AC power receptacle, the serial communications port, the On/Off switch, and two banks of DIP switches. To plug in the printer 1.
- Page 20 EasyCoder 3400e Bar Code Label Printer User’s Manual 3. Plug the AC power cord into the receptacle at the rear of the printer. Plug the other end of the power cord into a grounded wall outlet or surge protector. 4. Turn the On/Off switch to the on position. When you power on the printer, the Power On LED lights, the Empty/Pause LED flashes, and the platen roller advances.
- Page 21 In fanfold printing, you place a stack of fanfold media at the rear of the printer and feed it into the printer through a slot in the rear cover. Refer to Chapter 2, “Operating the Printer,” for instructions on loading rolls of media.
- Page 22 11. Press Feed/Pause to advance one label through the printer and out the label opening in the front cover. The printer is now ready to print the configuration test label. The yellow Empty/Pause LED goes out. Note: If the yellow Empty/Pause LED does not go out, press Feed/Pause a second time and then reload the media and try again if the Empty/Pause LED still does not go out.
- Page 23 NugFont HelvC You can print the hardware configuration test label to test the printer and make sure it is operating correctly. The hardware configuration test label lists the printer’s configuration. Use this label for reference when installing your printer and for verification of proper printer operation.
- Page 24 If you are unable to print a hardware configuration test label, see “Printer Operation Problems” in Chapter 4. You can connect your printer to a PC, a local area network, an AS/400 (or other midrange computer), or a mainframe. This section tells you how to connect your printer to any of these systems.
- Page 25 NugFont HelvC You can connect your printer to either a serial port or parallel port on your PC. You must provide the correct cables for connecting the printer. See the following sections for cable information. Contact your Intermec representative for ordering assistance if you do not have the appropriate cables.
- Page 26 EasyCoder 3400e Bar Code Label Printer User’s Manual If you are using a parallel port to communicate with your printer, you need a parallel cable to run between the printer and the PC. You can purchase a parallel cable from Intermec (Part No. 051211) or from your local computer store.
- Page 27 To connect a printer directly to an AS/400 or other midrange computer, you need a twinax adapter card. a twinaxial cable equivalent to IBM part number 7362267 or 7362062. The maximum cable length for the twinax interface is 1,525 meters (5,000 feet).
- Page 28 IBM part number 2577672 or 1833108. The maximum cable length allowed is 1,500 meters (4,920 feet). See the IBM specification Installation and Assembly of Coaxial Cable and Accessories, part number GA27-2805-4, for further information.
- Page 29 NugFont HelvC You need to configure the serial port of the printer to match the configuration of your PC or network controlling device. If the printer’s default settings do not match, use the DIP switch settings table to configure the serial port.
-
Page 30: Dip Switch Settings
EasyCoder 3400e Bar Code Label Printer User’s Manual DIP Switch Settings O = OFF 1 = ON Baud Rate Selection 115200 57600 38400 19200 9600 4800 2400 1200 Parity Selection * Even None Number of Data Bits *7 Bit 8 Bit... - Page 31 After connecting the printer to your system, you need to test communications. The easiest way to test communications is to set the printer to Data Line Print mode, which is part of Test and Service mode, and send a character string down from your system.
- Page 32 EasyCoder 3400e Bar Code Label Printer User’s Manual Example of Using DOS to Verify Printer Communications 1. At the DOS prompt, type this command and press Enter: MODE COM1 96,E,7,1,N 2. Type these command lines and press Enter: COPY CON COM1...
- Page 34 asdf...
- Page 35 NugFont HelvC Use this chapter to understand how to use the printer front panel, load roll media and media for self-strip printing, set the media sensitivity number, and communicate with the printer. To operate the printer, you need to understand: Front panel Explains how light emitting diodes (LEDs) help you monitor the status of the printer and the various tasks the Feed/Pause button performs.
- Page 36 Media or system faults If the Empty/Pause or the Alert LED remains on, your printer is experiencing a media or system fault. For help, see Chapter 4, “Troubleshooting.”...
- Page 37 NugFont HelvC The Feed/Pause button, located on the front of the printer, performs these functions depending on the mode of the printer: Printer Mode You Want To Idle Feed out one label or a minimum specified amount of media. Continuously feed media.
- Page 38 3. Place the media roll on the supply roll post and position it firmly against the printer. Note: If you are using a narrow roll of media [less than 7.62 centimeters (3 inches)], insert the media support between the roll of media and the supply roll retainer before securing it.
-
Page 39: Loading Roll Media For Straight-Through Printing
9. Use PrintSet, your third-party software, or the IPL command set to configure the printer for the kind of media you are using (continuous or mark label). Refer to the PrintSet online help, your third-party documentation, or the IPL Programming Reference Manual for help. - Page 40 EasyCoder 3400e Bar Code Label Printer User’s Manual Note: Refer to the label located on the inside of the media cover for directions on loading media. For your convenience, you may want to refer to it when loading media in the future.
-
Page 41: Loading Media For Self-Strip Printing
7. Unroll several inches of media, insert it between the upper media guide and the lower media guide, and out the front of the printer. 8. Release the lower media guide and adjust the edge guide to position the media firmly against the inside wall of the printer. - Page 42 1. Raise the printhead by rotating the head lift lever clockwise until the printhead disengages. 2. Place the empty ribbon core that came with the printer onto the ribbon rewind hub. 3. Detach the leader from the new thermal transfer ribbon roll and unwind the end of the ribbon approximately 20.32 centimeters (8 inches).
-
Page 43: Loading Thermal Transfer Ribbon
Loading Thermal Transfer Ribbon 5. Route the ribbon leader through the printer mechanism as shown in the above illustration. Note: Make sure the ribbon runs above the upper media guide. The shiny side of the ribbon must come in contact with the printhead. - Page 44 Use this three-digit number to optimize print quality and print speed on your printer. You can achieve the best print quality on the printer by using only Intermec ribbon and media products. The default sensitivity setting for thermal transfer media is 567. For direct thermal media, the default sensitivity setting is 470.
- Page 45 Top Bank Set switches 1 through 6 and 8 off. Set switch 7 on. Bottom Bank Set switches 1 through 8 off. 4. Hold the Feed/Pause button down for 1 second. The printer prints out the software configuration label. 5. Return the DIP switches to their original settings.
- Page 46 EasyCoder 3400e Bar Code Label Printer User’s Manual If you are not using Intermec media and ribbon, or you misplaced your packaging with the three-digit sensitivity number label on it, you can set the approximate sensitivity number. The first column of the Direct Thermal and Thermal Transfer Media Sensitivity Settings tables list the approximate sensitivity settings.
- Page 47 3400e Printer Thermal Transfer Media and Ribbon Sensitivity Settings (continued) Approximate Sensitivity Sensitivity Numbers Setting 500 Series Medium Sensitivity (Paper) 300 Series Low Sensitivity (Plastic) 200 Series Low Sensitivity (Kapton) NugFont HelvC Direct Thermal Media Duratran II-1/Premium - 7 European Premium Paper/Premium...
- Page 48 EasyCoder 3400e Bar Code Label Printer User’s Manual You are now ready to print labels by downloading data from the host to the printer. Downloading is the universal term used to describe the transfer of information from the host to any connected peripheral device, such as your printer. When you transfer data from your printer to the PC or host, you are performing a process called uploading.
- Page 49 3. Select the Test Label option button. 4. Select either the Text or the Bar Code option button. If you select to print text, you can choose any font in the Select Printer Font list box. If you select to print a bar code, you can choose any symbology in the Select Symbology list box.
- Page 52 asdf...
- Page 53 For information on maintenance procedures such as replacing media or ribbon, see Chapter 1, “Getting Started,” and Chapter 2, “Operating the Printer.” Inspect the printer and the rest of your data collection system equipment on a regular basis. Your inspection should include the following: Make sure you have properly grounded the printer.
- Page 54 EasyCoder 3400e Bar Code Label Printer User’s Manual Clean your printer regularly to maintain the quality of your labels and extend the life of your printer. This table contains suggestions for cleaning the printer. Use the illustration on the next page to locate the parts you need to clean.
- Page 55 Label taken sensor Tear bar Warning Switch off the printer power and remove the power cord before cleaning any part of the printer. Avertissement Mettez l’imprimante hors tension et débranchez le câble d’alimentation avant de nettoyer une parte de l’imprimante.
- Page 56 EasyCoder 3400e Bar Code Label Printer User’s Manual In order for the printhead to provide good print quality, it must maintain close contact with the media. Therefore, cleaning media debris from the printhead is very important. Clean after every roll [or 15,240 centimeters (6,000 inches)] of media or when necessary.
-
Page 57: Cleaning The Printhead
Use a general purpose cleaner (soapy water/mild detergent) to clean the printer covers. o not use abrasive cleansers or solvents. Be sure to clean the transparent panel on the media cover so that the media supply inside the printer is visible when you close the cover. -
Page 58: Cleaning The Drive Roller And Tear Bar
EasyCoder 3400e Bar Code Label Printer User’s Manual Cleaning the drive roller and tear bar preserves print quality by maintaining close contact between the media and the printhead. To clean the drive roller and tear bar 1. Turn the On/Off switch to the off position and remove the power cord. - Page 59 Always clean the media guides immediately after a label jam in the printer. To clean the media guides and media path 1.
- Page 60 EasyCoder 3400e Bar Code Label Printer User’s Manual Three label sensors on the printer require regular cleaning: Label taken sensor Label mark sensor Label gap sensor To clean the label sensors 1. Turn the On/Off switch to the off position and remove the power cord.
-
Page 61: Cleaning The Label Sensors
HelvC Cleaning the Label Sensors Cotton swab Drive roller NugFont Label taken sensor Label mark sensor Upper media guide (underside) Cleaning brush Lower media guide Label gap sensor 3XXXU.036 Maintaining the Printer 3-11... - Page 62 NugFont asdf...
- Page 64 asdf...
- Page 65 1. First try cleaning the printer components and checking all of the connections. See Chapter 3, “Maintaining the Printer,” for details. 2. If cleaning the printer and checking the connections does not solve the problem, use the following tables to locate the symptom. Follow the solution in the table to fix your problem.
-
Page 66: Plugging In The Printer
EasyCoder 3400e Bar Code Label Printer User’s Manual Printer Operation Problems (continued) Symptom Possible Causes Labels stop feeding You have set the printer for through the printer. continuous label stock. (continued) Media is sticking to the paper path. Printer slows down. - Page 67 Dirty printhead. NugFont HelvC Solution Reset the memory to return the printer to its default configuration. For help, see “Resetting the Memory on Your Printer” in Chapter 6. After you reset the memory, power off the printer and return the DIP switches to the required setting.
-
Page 68: Print Quality Problems
EasyCoder 3400e Bar Code Label Printer User’s Manual Print Quality Problems (continued) Symptom Possible Causes Printing not aligned Printer is misfeeding media. on label. Labels are not Incorrect label rest point setting. stopping at the right point for removal. Incorrect label stock setting. -
Page 69: Adjusting The Label Mark Sensor
Several problems can cause data loss or communication problems on the printer. Data loss can result in printing errors or missing field data. Your printer is a serial ASCII device. It communicates with the host through an ASCII serial communication I/O port. Hardware handshaking involves the use of a hardware wire. - Page 70 XOFF character. The XOFF character alerts the host to the fact that the printer buffer is full and cannot receive any more data. When the printer is ready to receive more data, it sends the XON character.
- Page 72 asdf...
-
Page 73: Correcting Uneven Print Quality
NugFont HelvC This chapter explains how to optimize and maintain print quality, use the printer memory more efficiently, and maximize throughput. Intermec designed and configured your printer to provide the best possible print quality for both direct thermal and thermal transfer media. However, there are many factors that you need to take into account before you can achieve maximum print quality. - Page 74 EasyCoder 3400e Bar Code Label Printer User’s Manual To adjust the bias adjust screw 1. Remove the media cover and locate the bias adjust screw. A le p ty In t e In t e r m e r m e 2.
- Page 75 Use the darkness adjust control in combination with the PrintSet software configuration tool to fine-tune the darkness of print on your labels. The fine adjustments compensate for variations in the media (“lot to lot”), the printhead, or the printer. Set the darkness adjust control after you enter the media sensitivity number.
- Page 76 The label mark sensor detects the mark on the back of continuous media stock. The printer uses the output to determine the start of print. The label mark sensor is behind the platen roller and near the inboard edge of the printer.
- Page 77 NugFont HelvC Adjusting the Label Mark Sensor Locate the label mark sensor behind the platen roller near the inboard edge of the printer. Use your index finger to adjust the label mark sensor. Inboard edge of printer. The platen roller is not shown for clarity only.
- Page 78 There are limits to the number of formats, fonts, graphics, or pages that you can store in the printer. You can define up to 16 fonts, but there may not be enough room depending on the amount of memory being used for other purposes. The more formats, graphics, and fonts you store, the less memory is available.
- Page 79 However, if the number of image bands is too low, the imaging process is unable to keep up with the print speed. In this case, the printer stops printing and starts again at the lowest print speed with the maximum number of image bands. If the image band command is set too high, the printer spends more time than necessary imaging and slows down label production.
- Page 80 If the label prints, the image band setting is optimal. You do not need to perform any more adjustments. If the number of image bands is too low, the printer aborts the label before printing is completed and attempts to reprint the label at the slowest speed (2 ips) with the highest number of image bands (20).
- Page 82 asdf...
- Page 83 The function the printer is currently executing terminates, and the printer performs the new function. The printer remains in Test and Service mode until you turn the power off and reset the DIP switches. The printer executes all functions as soon as you select them.
- Page 84 EasyCoder 3400e Bar Code Label Printer User’s Manual Use the information in the following table to set the DIP switches for the appropriate Test and Service mode function you want to perform. Test and Service DIP Switch Settings Default settings are noted with an...
- Page 85 Use Data Line Print mode to troubleshoot communication between the printer and the host and to test the operation of the printer. When the printer is in Data Line Print mode, it prints out all downloaded data with the hexadecimal equivalent directly underneath it.
- Page 86 3. Set the DIP switches to reset a portion or all of the memory by using the Test and Service DIP Switch Settings table on page 6-4. 4. Hold the Feed/Pause button down for 1 second. The printer resets a portion or all of its memory.
- Page 87 You can move the label rest point and X forms adjust configuration commands forward or backward by setting the printer DIP switches. Use the top bank of DIP switches to determine whether the movement is forward or backward. Use the bottom bank of DIP switches to set the number of dot increments for label rest point, X forms adjust, and Y forms adjust.
- Page 88 EasyCoder 3400e Bar Code Label Printer User’s Manual Dot Increments DIP Switch Settings 0 = OFF 1 = ON # of dot increments Bottom Bank 3XXXU.047...
- Page 89 You need to move the label rest point forward 10 dot increments (0.05 inch) so that the printer feeds more label out when it is done printing. Find 10 in the # of Dot Increments column. It shows a 1 in the columns of DIP switches 2 and 4, and a O in the columns of 1, 3, and 5.
- Page 90 8. If you need to readjust the DIP switches in the Bottom Bank, repeat Steps 4 through 7. If not, exit Test and Service mode by turning off the printer and returning all DIP switches to their original settings.
- Page 91 NugFont HelvC If you are replacing an Intermec 8636 or 8646 printer with a 3400e printer, you can keep your existing network, hardware, software, and label formats by using Emulation mode. The labels produced on your new printer will look like the ones that your old 86XX printer printed.
- Page 92 EasyCoder 3400e Bar Code Label Printer User’s Manual 8. Press the Feed/Pause button. The printer prints out the software configuration label. Verify that the label states the correct mode. 9. Turn the printer off and then on. 10. Download the 86XX formats, fonts, and graphics from the host to the printer.
- Page 93 Each dot increment is 5 mil (0.005 inch). When you move the X origin forward, the printer moves the top of form away from the edge before printing the label information. When you move the X origin backward, the printer moves the top of form closer to the edge before printing the label information.
- Page 94 EasyCoder 3400e Bar Code Label Printer User’s Manual 5. Press the Feed/Pause button. The printer prints out the software configuration label using the new X forms adjust setting. 6. Verify the X forms adjust number on the software configuration label matches the number you set in Step 4.
- Page 96 asdf...
- Page 97 This section describes the specifications of the 3400e printer. Input Voltage 100, 120, or 230 VAC ± 10% Frequency 47-63 Hz The 3400e printer is capable of direct thermal (DT) printing or thermal transfer (TTR) printing using thermal transfer ribbon. Operating 10°C to 40°C (50°F to 104°F) Humidity...
- Page 98 EasyCoder 3400e Bar Code Label Printer User’s Manual Printed dot size Width Resolution Number of elements “X” dimensions Printed dot size Width Resolution Number of elements “X” dimensions Roll Widths Diameter Maximum Minimum You can change the print speed in 1 ips increments only: 2, 3, 4, 5, 6, 7, or 8.
- Page 99 Number Description Label width Backing width (or tag width) Gap between labels Label length - self-strip media Label length - butt cut media Media thickness (including backing) Reflective sensor mark length Notch diameter Notch height Roll diameter NugFont HelvC 3XXXU.O55 Minimum 16.5 mm (0.65 inch) 19.1 mm (0.75 inch)
- Page 100 For more information, see your EasyLAN 10i documentation. This option lets you connect your printer to an IBM twinaxial cable system with a twinax interface so your printer emulates an IBM 5256 Model 1 printer and can operate with an IBM System/34, System/36, System/38, or AS/400 host computer.
- Page 101 The following pin descriptions are for the printer’s parallel interface connector: Signal Return DATASTB BUSY SELECT CHASSIS GND INIT FAULT NugFont HelvC Direction Description Negative pulse. Latches DB0-7 on the rising edge. Eight bits in parallel provide data input. High is logical 1 and LOW is logical 0.
- Page 102 EasyCoder 3400e Bar Code Label Printer User’s Manual The e series printers support these bar code symbologies: Codabar Originally developed in 1972, Codabar is a numeric symbology most commonly used in libraries, blood banks, and air parcel express applications. Code 2 of 5 Code 2 of 5 is a straightforward numeric symbology developed in the late 1960s.
- Page 103 2D symbologies provide a more efficient way of encoding data than standard bar code symbologies. 2D symbologies use two dimensions to hold data instead of one, allowing much more information to be stored in a smaller amount of space. Your printer provides the capability for printing both stacked and matrix 2D symbologies.
- Page 104 EasyCoder 3400e Bar Code Label Printer User’s Manual Data Matrix Data Matrix is a 2D matrix symbology which is made up of square modules arranged within a perimeter finder pattern. The finder pattern is a perimeter to the data region and is one module wide. Two adjacent sides are solid dark lines. These lines are used to define physical size, orientation, and symbol distortion.
- Page 106 asdf...
-
Page 107: International Character Sets
U.S. character set. To use the tables, find the hex code for the U.S. character that corresponds with the character in your language. If you are running your printer in Advanced mode (you are not using 86XX Emulation), use this table to find the right hex codes for the international character sets. - Page 108 Germany France £ Norway/Denmark Sweden/Finland Spain Switzerland Italy If you are running your printer with IBM Translation enabled, use this table to find the right hex codes for the international character sets. U.S. ASCII ¦ U.K. ASCII ¦ Germany France...
- Page 109 ¶ § & " @ A B C D E F G H I P Q R S T U V W X Y d e f ç Ç ü é â ä à å ê ë è É æ Æ ô ö ò û ù ÿ Ö Ü ø á...
- Page 110 EasyCoder 3400e Bar Code Label Printer User’s Manual Each internal font in the printer has a different character set associated with it as shown in the following tables. The hex codes accompany each character. Characters in Fonts 7 x 9 Standard...
- Page 111 Characters in Fonts c25, c26, c28 c30-c41 ØØ Ø1 1Ø ! " # $ % & 2Ø 3Ø A B C D E F 4Ø P Q R S T 5Ø 6Ø 7Ø 8Ø 9Ø ¡ AØ BØ À Á CØ...
- Page 112 EasyCoder 3400e Bar Code Label Printer User’s Manual Characters in Font OCR A ØØ Ø1 Ø2 1Ø 2Ø 3Ø 4Ø 5Ø 6Ø 7Ø 8Ø 9Ø AØ BØ CØ DØ EØ FØ Ø3 Ø4 Ø5 Ø6 Ø7 Ø8 Ø9 ØA ØB ØC...
-
Page 113: Character Sets
Characters in Font OCR B Size 2 ØØ Ø1 Ø2 1Ø 2Ø 3Ø 4Ø 5Ø 6Ø 7Ø 8Ø 9Ø AØ BØ CØ DØ EØ FØ Ø3 Ø4 Ø5 Ø6 Ø7 Ø8 Ø9 ØA ØB Character Sets ØC ØD ØE ØE 44XXU.072... - Page 114 asdf...
- Page 116 asdf...
-
Page 117: Communication Protocols
(<VT>), the printer returns all active status. The printer status response time ranges from 30ms to 100ms depending on the complexity of the received message block. In the case of a transmission error, the printer responds with a <NAK> and discards the entire message block. - Page 118 ASCII characters <DC1> (XON) and <DC3> (XOFF) to start and stop the flow of data from the host to the printer. Hardware flow control uses pin 11 or pin 20 (internally connected together) on the printer’s serial port to indicate “Ready” or “Busy” for data flow control.
-
Page 119: Polling Mode D
This protocol is the default setting for the printer. Return the protocol setting to Polling Mode D by setting the printer DIP switches to the factory default settings (9600, E, 7, 1). Use Multi-Drop protocol to connect up to 32 devices to an Intermec controller on a four-wire RS-485 (two twisted pair). - Page 120 EasyCoder 3400e Bar Code Label Printer User’s Manual Note: Please use caution when replacing control characters with printable characters. You cannot replace one control character with more than one printable character. The following table lists the protocol characters that you can redefine and the protocols...
-
Page 121: Communications Interfaces
Reference Manual (Part No. 044737) for more detailed information. Use the RS-232 serial interface in all asynchronous point-to-point full- or half-duplex direct data communications or modem control. The printer cable must have the pin assignments for an RS-232 serial interface shown in the table on the next page. -
Page 122: Rs-422 Serial Interface
EasyCoder 3400e Bar Code Label Printer User’s Manual Use the RS-422 interface in long line point-to-point direct connect installations. The printer cable must have the pin assignments for an RS-422 serial interface shown in the table on this page. Use the RS-485 serial interface for Multi-Drop installations only. The printer cable must have the pin assignments for an RS-485 serial interface shown in the table on this page. - Page 123 REQUEST TO SEND DATA TERMINAL READY DATA SET READY CARRIER DETECT GROUND Communications Reference SHIELD PRINTER NOTE: The metal backshell is connected directly to the shield to achieve electrostatic discharge (ESD) immunity. SHIELD PRINTER NOTE: The metal backshell is connected directly to the shield to achieve electrostatic discharge (ESD) immunity.
- Page 124 EasyCoder 3400e Bar Code Label Printer User’s Manual Straight Through DTE to DCE Cable for Use with a Modem (Part Number 043237S) 25-PIN (PLUG) D-SUB METAL BACKSHELL CHASSIS GROUND TRANSMITTED DATA RECEIVED DATA REQUEST TO SEND CLEAR TO SEND DATA TERMINAL READY...
- Page 125 NugFont HelvC The rear panel of the printer contains the serial port connector. It is a 25-pin D-style subminiature receptacle. The port is wired as a data terminal equipment (DTE) device. Refer to the following figure for pin names on the serial port: Communications Reference 3XXXU.063...
- Page 126 NugFont HelvC asdf...
- Page 128 asdf...
- Page 129 Binary 00000000 00000001 00000010 00000011 00000100 00000101 00000110 00000111 00001000 00001001 00001010 00001011 00001100 00001101 00001110 00001111 00010000 00010001 00010010 00010011 00010100 00010101 00010110 00010111 00011000 00011001 00011010 00011011 00011100 00011101 00011110 00011111 Char Binary 00100000 00100001 00100010 00100011 00100100 00100101 00100110 00100111...
- Page 130 EasyCoder 3400e Bar Code Label Printer User’s Manual Full ASCII Table (continued) Binary 01000000 01000001 01000010 01000011 01000100 01000101 01000110 01000111 01001000 01001001 01001010 01001011 01001100 01001101 01001110 01001111 01010000 01010001 01010010 01010011 01010100 01010101 01010110 01010111 01011000 01011001 01011010...
- Page 131 Control Character Definition Acknowledgment Bell Backspace Cancel Carriage Return Device Control 1 (XON) Device Control 2 Device Control 3 (XOFF) Device Control Delete Data Link Escape End of Medium Enquiry End of Transmission Escape End Transmission Block End of Text Full ASCII Table Control Character...
- Page 132 asdf...
- Page 134 asdf...
- Page 135 The current parameter settings that determine the operating characteristics of the printer. data file The collection of data and printer commands that, when sent to the printer, is merged with a format file to print a label. Data Line Print mode A mode of operation in which the printer prints each command (accompanied by its ASCII code) that it receives from the host.
- Page 136 International standard bar code for retail food packages corresponding to the Universal Product Code (UPC) in the United States. Emulation mode An operating mode in which the printer has the operating characteristics of an 8636 or 8646 printer. Feed/Pause A printer control panel button that advances the media and causes the printer to pause printing.
- Page 137 Glossary graphic A bitmap picture downloaded to the printer by the host before printing. HIBC Health Industry Bar Code standard. A modified version of Code 39 that has 43 characters, utilizes the Modulus 43 check character, and reserves some character combinations for special usage.
- Page 138 The distance between the edge of a label and where the printing starts on that label. See also top of form. media The label stock on which the printer prints labels. Media can be made of plain paper, polyester, thermally reactive paper, or other materials with adhesive backing and ribbon.
- Page 139 The state in which the printer is able to print; the normal operating state of the printer. Ready/Busy line Pin 11/20 of the rear panel connector. Indicates the printer is ready or not ready.
- Page 140 Often serial transmission is used to link host computers to terminals and PCs to printers. soft font A file stored in the printer to provide the ability to print text using fonts that are not resident in the printer. Standard protocol A communications protocol capable of controlling communications between two devices connected by a single data communication line.
- Page 141 Bar code and text fields that change from one label to the next. XON/XOFF protocol A protocol that stops the host from sending data when the printer buffer fills up and starts it again when the buffer empties.
- Page 142 asdf...
- Page 143 Index...
- Page 144 asdf...
-
Page 145: Printing Test Labels
A-4 Advanced mode, B-3 Code Page 850, B-5 Emulation mode, B-4 NugFont HelvC character sets (continued) extended, B-6 IBM translation, B-4 international, B-3 cleaning drive roller, 3-8 label sensors, 3-10 media guides, 3-9 media path, 3-9 printer covers, 3-7... -
Page 146: Electrical Requirements
EasyCoder 3400e Bar Code Label Printer User’s Manual configuring the serial port, 1-15 connecting printer to a mainframe, 1-14 printer to a network, 1-12 printer to a PC using the parallel port, 1-12 using the serial port, 1-11 printer to an AS400, 1-13... -
Page 147: Opening The Printer
2-14 media specifications, A-5 memory additional storage, flash SIMM, 5-8 increasing amount available, 5-9 increasing amount available in printer, 6-6 limitations, 5-8 resetting, 6-6 returning printer to default settings, 6-6 usage limitations, 5-8 problems, 5-8... -
Page 148: Printhead
EasyCoder 3400e Bar Code Label Printer User’s Manual printer (continued) options, A-6 coax interface, A-6 twinax interface, A-6 plugging in, 1-5 allocation, 5-8 storage limitations, 5-8 understanding, 5-8 serial port, C-11 printhead cleaning, 3-6 specifications, A-4 printhead specifications, A-4 printing... -
Page 149: User-Defined Protocol
4-3 checklist, 4-3 communication problems, 4-7 print quality problems, 4-5 printer operation problems, 4-3 twinax interface option, A-6 UPC, A-9 uploading, definition, 2-16 user-defined protocol, C-5 warnings and cautions, x warranty information, ix X forms adjust default origin, 6-13... - Page 150 asdf...