Table of Contents
Advertisement
Quick Links
Advertisement
Table of Contents

Related Manuals for Konica Minolta 5600


Summary of Contents for Konica Minolta 5600
- Page 1 4283-7704-01 MINOLTA FAX 5600 Operator’s Manual...
- Page 2 Welcome …...
- Page 3 ® As an E partner, MINOLTA has determined that this product meets NERGY the E guidelines for energy efficiency. NERGY Copyright © 1999 by MINOLTA CO., LTD; all rights reserved. is a registered mark of the United States Environmental Protection Agency. NERGY...
- Page 4 Close up, the bar code label looks some- thing like this, but with a different set of numbers: Please copy down your machine’s serial number below for future reference, and note the machine’s model number: My machine’s serial number: ________________________________________ My machine’s model number: MINOLTAFAX 5600...
-
Page 6: Table Of Contents
Table of Contents Getting started Ans/Fax Ready mode......... 1.20 If the paper runs out . - Page 7 Programming an F-Code transmission ......2.51 MINOLTAFAX 5600 Quick Reference ......
- Page 8 Getting started A quick trip through the basics of your Minolta fax machine A quick introduction to fax ..........1.1 Packaging contents .
-
Page 10: Getting Started
Getting started A quick introduction to fax What’s a fax document? A fax document is anything a fax user wants to fax to someone else. It can be one or more pages, and it can be text, a drawing or even a copy of a photograph. What’s a fax number? Because your fax operates on standard phone lines, a fax number is just a regular phone number. -
Page 11: Packaging Contents
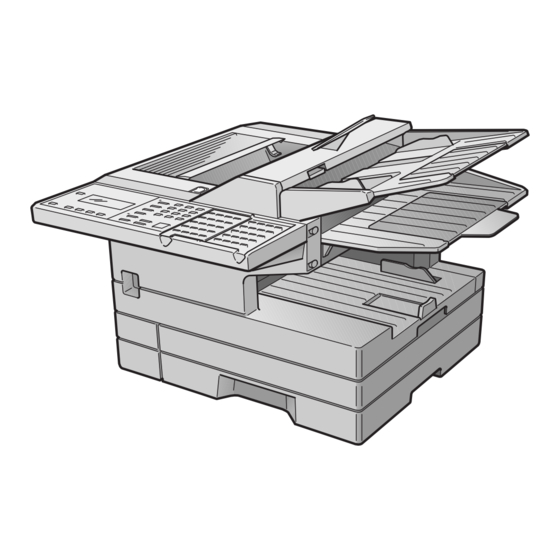
Getting started Packaging contents Parts list Note: Any terms used here that are unclear to you right now will be explained in detail in the coming pages. Included in your fax machine’s packaging: Control panel — The keys you use to operate your machine. (See page 1.4 Fax machine Telephone line cord for more details.) - Page 12 Getting started Scanner cover — Open this by using the scanner cover release to remove original document paper jams. Document feeder — Place your original document here for faxing or copy- ing. It holds up to 50 sheets. Document guides — Adjust these to fit the width of the original document so it will feed properly into the machine.
-
Page 13: The Keys And Their Functions
Getting started The keys and their functions 5 6 7 1 2 3 8 9 10 13 14 15 PRINTER PAPER JAM REPLACE ALARM PAPER MEMORY COMMUNICATION AUTO RECEIVE CONNECT ANSWER LIGHT CONTRAST HALFTONE fliptab a fliptab b Important: Some of the functions mentioned here are covered in the “Beyond the —... -
Page 14: Operating Tips
Getting started Operating tips Soft keys — Shortcut keys. Any function that can be turned on or off can be programmed into these four keys. If the light above one of these keys glows, To press: 0 (zero), 1, 2, 3, 4, 5, 6, 7, 8, 9, # or * this indicates the setting that’s been programmed into it (see page 2.24) is Use: The numeric keypad. -
Page 15: Setting Up
Getting started Setting up Pick an installation spot Installing the printing supplies Where should you install your fax machine? The location should be: Your fax machine prints incoming faxes and copies with a laser print engine. The engine requires two types of printing supplies (sometimes also called consumables): •... -
Page 16: Installing A New Drum Cartridge
Getting started Loading paper Your machine holds up to 650 sheets at a time: 500 sheets in the paper cassette and Unpack the toner cartridge from its carton. 150 sheets in the multipurpose tray. Hold the toner cartridge with both hands, and shake it well as shown. -
Page 17: Attaching The Parts
Getting started Attaching the parts Use the power switch on the front of the machine to turn it on. The markings Attach the document are international standards: I means on, tray by inserting it O means off. into the appropriate holes, as shown. -
Page 18: Attaching Your Telephone Or Answering Machine
Getting started Attaching an handset Adjust the volume as needed: To turn the volume up, press / . To turn the volume down, press . PROGRAM To attach the handset: The display, or , indicates the volume. The possible settings are: Use the screws included with the handset and a small Phillips-head screwdriver to attach the handset cradle to the side of your fax machine. -
Page 19: Easystart
Getting started EasyStart EasyStart software is already installed on your Minolta fax machine. It guides you Entering initial settings through the process of entering your machine’s settings. Remember that the settings you make here can always be changed later. We’ll Important: If you press during EasyStart, your fax machine returns to STOP... - Page 20 Getting started now asks if you want to set the calendar/clock to automatically now asks you to enter the name you want to appear at the top of recognize daylight saving time ( faxes you send. The name may be up to 22 characters in length. Use the one-touch keys to enter letters and other non-numeric characters.
-
Page 21: Year 2000 Compliance
Getting started Press or / until the mode you want appears. PROGRAM Here, we’ve changed the setting to Pulse mode: Phone Type: Pulse Program/Enter Press to save the setting and continue. ENTER now shows the machine’s current reception mode. Fax Ready Program/Enter For now, press or /... -
Page 22: Sending Faxes
Getting started Sending faxes Guidelines Reviewing contrast: You have three choices for the contrast setting: Page sizes • Normal (“ ” on the control panel) — Suited to most documents. NORM • Light — Lightens up overly dark, “muddy” original documents. While you’ll probably send letter- and legal-sized documents most of the time, it’s possible to fax a piece of paper as small as a notepad sheet or one nearly 3 feet long. -
Page 23: Adjusting The Machine For Larger Documents
Getting started Changing the pause length Using memory transmission The pause is set by the factory to last two seconds, but you can set it to last as long Your fax machine has a great memory! Take advantage of it, and you could: as ten seconds if necessary. -
Page 24: Inserting A Document
Getting started Inserting a document Enter the fax number. Also, enter any access codes necessary, just as you would for a regular phone Adjust the document guides — by sliding either of them to the left or right — call. (Example: Enter 9 to “dial out” from an office telephone system, or 1 for to fit the page(s) you’re faxing. -
Page 25: Sending A Fax Using Monitor/Call Or A Handset
Getting started At the end of the operation, your fax machine beeps and displays: If you’re using an handset, hang up after pressing START 972-555-2009 At the end of the operation, your fax machine beeps and displays: Complete 972-555-2009 Important: Whenever you transmit a document, what actually appears on Complete the top line of the display depends on information stored in the Note: If the call fails and you used... -
Page 26: Review Commands, An Introduction
Getting started To redial a fax call manually with the monitor speaker or an handset: Use the numeric keypad to enter the length you want between redial Make sure the document is in the feeder and that the resolution and attempts. -
Page 27: Receiving Faxes
Getting started Receiving faxes Answering calls manually Tel Ready mode In any reception mode, you can always answer calls manually if you have an hand- Use it if: • You want to use the same line for both fax and phone calls set installed. -
Page 28: Fax Ready Mode
Getting started Fax Ready mode Fax/Tel Ready mode The Fax/Tel Ready mode is a combination of the Fax Ready and Tel Ready modes. Use it if: Your fax machine uses its own phone line and doesn’t share it with a phone or an answering machine. -
Page 29: Tel/Fax Ready Mode
Getting started Tel/Fax Ready mode Ans/Fax Ready mode The Tel/Fax Ready mode is a combination of the Tel Ready and Fax Ready modes. Use it if: You’re using an answering machine that’s connected directly to your fax machine. Use it if: An handset is installed on your fax machine In this mode: An answering machine connected to your fax machine answers each You’re using the machine as both a telephone and a fax machine... -
Page 30: If The Paper Runs Out
Getting started Using an answering machine with your fax machine If the paper runs out To connect your answering machine to your fax machine: Getting the word from your machine Set the fax machine for Ans/Fax Ready, as described on page 1.20. When your fax machine runs out of paper, the machine beeps, the REPLACE PAPER Set your answering machine to answer calls after no more than two rings. -
Page 31: Making Copies
Getting started Making copies Your fax machine also doubles as a convenience copier. Use the numeric keypad to enter the number of copies you want to make for To make copies with your fax machine: each page in the document. Choose from 1 to 99 copies. Here, we’ve chosen 03 copies. -
Page 32: Using Your Fax Machine As A Phone
Getting started Using your fax machine as a phone Your fax machine can also be used as a phone, if you have an handset installed. EasyDial directory dialing The following is a brief look at the machine’s telephone features. The EasyDial directory feature is available for regular phone calls as well as fax calls. Review the EasyDial instructions on page 2.17 for more information. -
Page 34: Beyond The Basics
Beyond the basics Advanced Fax Features. Entering settings for your fax machine ....... 2.1 Autodialer . -
Page 36: Entering Settings For Your Fax Machine
Beyond the basics Entering settings for your fax machine The EasyStart feature guided you through the “just-gotta” settings on your machine. Press or / until the mode you want appears. In this example, PROGRAM In the next few pages, we’ll cover additional settings. we’ve chosen light contrast. -
Page 37: Using Code To Enter Characters
Beyond the basics Using to enter characters Print settings CODE You can set three parameters for printing received fax messages: Some settings give you a chance to enter an identifying name (see EasyStart, page • Print reduction rate 1.10). You can do this with the one-touch key, and you can also use the key. -
Page 38: Copy Settings
Beyond the basics Reduction margin Press to save the setting. The shows the current setting for ENTER half-page reception: Your fax machine’s reduction margin is measured in millimeters (mm). We’ll define reduction margin by explaining how it’s used: Half Page Recpt: Off When a fax message enters your machine’s electronic brain, the machine measures Program/Enter the message’s length and compares it to (a) the length of your selected paper plus... -
Page 39: Ecm
Beyond the basics Setting Press or / until the reduction setting you want appears. In this PROGRAM example, we’ve chosen 75%. “Line noise,” or static on the line during a call, can easily disrupt the flow of data from one fax machine to another. Copy Reduc Rate: 75% Program/Enter That’s why your fax machine gives you the option of using Error Correction Mode... -
Page 40: Silent Mode, Settings
Beyond the basics Setting silent mode Press or / until the mode you want appears. PROGRAM Silent mode allows you to mute the ringer, the alarm and the key tones. If you want to turn off the alarm, select “On” and the machine will be quiet. Otherwise, the machine will beep. -
Page 41: Language Settings
Beyond the basics Setting the confirmation stamp Printing your settings You can set your fax machine so that it will automatically place a small stamp mark After you’ve programmed settings into your machine, print a settings list. We on the front of each original document that it successfully scans. recommend this, particularly if you’re sharing the machine with other users, who might change the settings. -
Page 42: Autodialer
Beyond the basics Autodialer Your fax machine’s autodialer stores your most frequently called phone and fax Special Dialing Characters numbers for instant recall so you don’t have to remember them. It’s something like Your fax machine allows you to enter special dialing characters when programming an electronic phone book. -
Page 43: Call Groups
Note: Up to 10 one-touch or speed-dial numbers can contain one alternative number. After you have entered 10 alternative numbers (maximum Select One-Touch Select One-Touch allowed), the MINOLTAFAX 5600 will no longer prompt you for an 02:No Number Stored 02:9-1-555-987-6543 alternative number. - Page 44 Beyond the basics now displays: now displays: 02:Name ;Upper 02:Name ;Upper 02:Group No. 02:Group No. S. W. Region Office_ 2,6_ The machine is now prompting you for a name — a Location — so you’ll be You may now assign this number to up to 32 call groups. (If necessary, review able to find it in the EasyDial directory (see page 2.15).
- Page 45 Beyond the basics One-touch fax dialing If you specified transmission from the feeder: • Your fax machine dials the other fax machine. To dial a fax call using a one-touch number: • When the other machine answers, your fax feeds the document through its scan- Insert the document.
-
Page 46: Using Speed-Dial Numbers
Beyond the basics Press the key for the one-touch number you want to erase. Use the numeric keypad to enter the desired speed-dial number’s three-digit Here, we’ve selected 02: identifier code. Here, we’ve entered 005 and the shows either: Select One-Touch Enter Speed-Dial No. - Page 47 After you have entered 10 alternative numbers (maximum Press to save the setting and continue. ENTER allowed), the MINOLTAFAX 5600 will no longer prompt you for an alternative number. now displays: If you do not want to enter or change an alternate number, skip to step 8.
- Page 48 Beyond the basics If you specified normal transmission from memory: Press ENTER • Your fax machine scans your entire document into memory, then dials the other will display the next empty speed-dial number. fax machine. If you want to enter this speed-dial number, go back to step 4. •...
-
Page 49: Printing A Call Group Directory
Beyond the basics Note: If the call fails, and you used to dial, press Printing a call group directory MONITOR CALL MONITOR CALL hang up. Your machine can also print a call group directory. (If necessary, review “Call groups,” Erasing a speed-dial number page 2.8.) This lists all your stored autodialer numbers by Location and lists the groups to which these numbers belong. -
Page 50: Easydial Directory Dialing
Beyond the basics EasyDial directory dialing If an EasyDial call fails If an EasyDial call fails, what happens next depends upon the kind of call it was. EasyDial directory dialing makes your autodialer even more like an electronic phone book. EasyDial sorts and displays numbers alphabetically according to their If it was a fax call …... -
Page 51: Broadcasting
Beyond the basics Broadcasting Broadcasting basics Delayed broadcasting The fastest way to fax one document to many recipients is to broadcast it. What if you want the broadcast to take place later? That’s the purpose of setting up a delayed broadcast. In an ordinary broadcast, you send the fax as you normally would, except you just add more fax numbers. -
Page 52: Delayed Transmission
Beyond the basics Delayed transmission Take advantage of lower evening and weekend long-distance rates with delayed When the date and time are entered, press to save the delayed trans- ENTER transmission. Your fax machine can store up to 99 delayed commands, each of which mission. -
Page 53: Reviewing Or Cancelling Delayed Commands
Beyond the basics Reviewing or cancelling delayed commands Reviewing or cancelling parts of a broadcast You also can review or cancel certain numbers within a broadcast: If you’ve stored a delayed command in your fax machine, it will hold it in memory until it either completes the command successfully or reaches its maximum number Press REVIEW COMMANDS... -
Page 54: Printing A Delayed Command List
Beyond the basics Printing a delayed command list Your machine can print a command list which tells you: • The command’s identification number • The phone number, or “remote location” • The start time (this appears in a format) • A “note” telling if the command is a polling or F-Code operation (see pages 2.29–2.31 for more on polling and 2.34–2.43 for more on F-Code communication). -
Page 55: Batch Transmission
Beyond the basics Batch transmission Batch transmission allows you to store multiple documents in an electronic “basket” Your display can show only 20 characters at a time. To view characters beyond throughout the day and then fax that entire basket to one location. those 20, press to scroll to the left or / to scroll to the right. -
Page 56: Printing A List Of Batch Boxes
Beyond the basics Storing a document for batch transmission Enter the name the same way you entered your fax name during EasyStart. A batch box’s name may be up to 24 characters in length. Your fax machine can store up to 40 documents (each document can include one page or many pages) in each batch box until the date and time you designate the Important: As in EasyStart, enter letters and other non-numeric characters batch transmission to take place. -
Page 57: Printing A Document Stored In A Batch Box
Beyond the basics Printing a document stored in a batch box Erasing a document stored in a batch box To print a document stored in a batch box: To erase a document stored in a batch box on your fax machine: Press / , 4, . -
Page 58: Erasing An Empty Batch Box
Beyond the basics Erasing an empty batch box Batch boxes must be empty to be erased. If a box has documents stored in it, then you first have to erase those documents. See page 2.22. To erase an empty batch box: Press / , 5, . -
Page 59: Special Features
Beyond the basics Special features Your fax machine has numerous special features to make your communications easier. Setting the Soft Key We’ll cover them here. Press / , 1, . The shows: PROGRAM ENTER Select Soft Key No. Soft Keys 1:Memory Tx Soft Keys are shortcut keys. -
Page 60: Copy & Fax
Beyond the basics Copy & Fax Enter the fax number. Either press a one-touch key, enter a speed-dial number or use the numeric keypad to enter the fax number. With the Copy & Fax feature turned on, your machine asks if you want to make a Note: To erase characters, press to erase to the left. -
Page 61: Cover Page
Beyond the basics Cover page Entering the cover page message Press / , 2, Your fax machine can store a cover page to send at the beginning of each outgoing PROGRAM ENTER fax. This page includes the current date and time, your Location and your fax Use the one-touch keypad to enter a message for the cover page. -
Page 62: Setting The Activity Journal
Beyond the basics Setting the activity journal Setting the printing order of the activity journal Your fax machine prints the activity journal for every fax transaction. For example, Just as a checkbook records your daily financial transactions, your fax machine if your machine has to redial a call, it will list those redials on the journal. - Page 63 Beyond the basics Setting the reports: s and To set the printing of one or both of these reports: Press / , 3, . The shows: PROGRAM ENTER Your fax machine can print reports of transmissions and receptions. There are two different reports: a transmit confirmation report ( ) and a receive TCR Selected confirmation report (...
-
Page 64: Quick Memory Transmission
Beyond the basics Quick Memory transmission Polling Using Quick Memory transmission can save you time over standard Polling allows someone to fax a document to you without having to make the call or memory transmissions. pay for it. There are several kinds of polling: For a normal memory transmission, your fax: (1) scans your entire document into •... -
Page 65: Continuous Polling
Beyond the basics Continuous polling To add additional fax numbers, press between each one to insert a BROADCAST To set up your machine for continuous polling: comma then enter the number as in step 6. You can specify up to 30 numbers (and/or call groups) for continuous polling. -
Page 66: Oneline + Distinctive Ring Detection
Beyond the basics Printing a stored polling document OneLine + distinctive ring detection To print a document you’ve stored for regular polling without erasing it, Many phone companies now offer their customers a special service which makes it press / , 3, PROGRAM ENTER... -
Page 67: Call Request
Beyond the basics To use on your fax machine: Important: For this feature to work, the remote fax machine must have a similar call-request capability. Your machine must also have an handset Contact your phone company to make sure it has set up service for you. -
Page 68: Numbering Pages
Beyond the basics Talking first, then receiving a fax Press ENTER To talk first and then receive a fax: Enter Fax Number When you’ve finished your phone conversation, don’t hang up. From here, continue sending the document using whatever type of transmission you Tell the person at the other fax machine to press and to hang up START... -
Page 69: F-Code Communication
Beyond the basics F-Code communication F-Code: an introduction Creating or modifying an F-Code box , part of the United Nations agency that standardizes international Choosing the F-Code box type telecommunications, has created a fax industry standard for using sub-addressing and password-based communications. One name for this standard is F-Code, and Before you set up an F-Code box, first decide how your callers will use it —... - Page 70 Beyond the basics To create or modify an F-Code box: Enter the name the same way you entered your fax name during EasyStart. An F-Code box’s name can be up to 16 characters in length. Keep pen and paper with you as you follow these steps. As you decide on a sub-address and enter it into your machine, write it down.
- Page 71 Beyond the basics Note: No other F-Code box in this machine can have the same sub-address Press to save the password. The now shows: ENTER as the one you enter here. Box Type: Bulletin Note: To erase characters, press to erase to the left. CANCEL Program/Enter To change just one number, press...
- Page 72 Beyond the basics Overwrite Doc — Overwriting documents tells your machine if it should Use the numeric keypad to enter a two-digit number indicating how many overwrite (erase) existing documents when it receives a new one. days (00-31), you want your fax machine to keep received documents in this Note: This setting is available only when the reception protection setting is F-Code box.
-
Page 73: Printing A List Of F-Code Boxes
Beyond the basics Printing a list of documents stored in Press to save the settings. The shows: ENTER your F-Code boxes Auto Print: Program/Enter The list of documents stored in your machine’s F-Code boxes includes: (1) Each box’s identifier number On: Print the document automatically when it’s received. - Page 74 Beyond the basics Use the numeric keypad to enter the four-digit . code. Use the numeric keypad to enter the two-digit number (01-50) of the F-Code Here, we’ve entered 2345: bulletin box that stores the document you want to print. We’ve entered 03: 03:Set F-Code Doc.
-
Page 75: Using A Security Box
Beyond the basics Erasing a document stored in a bulletin box Press . The shows: ENTER To erase a stored document: 03:Erase F-Code Doc. Check Stop/Enter Press / , 6, shows: PROGRAM ENTER Note: If you want to quit without erasing any document in the bulletin box, Select F-Code Box press . -
Page 76: Using A Relay Box
Beyond the basics Erasing an empty F-Code box Use the numeric keypad to enter the two-digit number (01-50) of the F-Code security box that holds the documents you want to print. We’ve entered 03: An F-Code box must be empty in order to erase it. (If you select an F-Code box in these steps which is not empty, the machine beeps. -
Page 77: F-Code Transmission And Polling
Beyond the basics Press If you want to toggle between manual transmission and memory transmis- ENTER If you’ve entered an incorrect . code, your fax machine rejects the attempt sion, press MEMORY TRANSMIT and returns to standby mode. Press five times and then press OPTIONS ENTER If you’ve entered the correct... - Page 78 Beyond the basics Press Press . The shows: START OPTIONS ENTER Delayed If in step 10 you chose an immediate transmission, your fax machine begins dialing. Enter Time: 15/17:05 If you chose a delayed command, the machine shows “Reserved” on the , indicat- ing that it has stored the command in memory and will complete it later.
-
Page 79: Programmable One-Touch Keys
Beyond the basics Programmable one-touch keys Using the power of programmable one-touch keys Document storage: • Regular polling documents (pages 2.29) In order to complete some operations on your machine, you may have to follow sev- • F-Code polling documents (pages 2.43) eral steps and press several different buttons. - Page 80 Beyond the basics Press . The asks for the type of operation you want to program into Next, tell your fax to carry out this delayed command one of these ways: ENTER the programmable one-touch: Option 1: Perform the command once at a certain time on a certain day of the month.
-
Page 81: Programming A Broadcast / Group
Beyond the basics Programming a broadcast / group Press / until the mode you want appears. PROGRAM Press . The asks if you want the confirmation stamp on or off when Programming a broadcast is very similar to programming a delayed transmission. ENTER But instead of sending to just one phone number, you set up multiple numbers for using this programmable one-touch number. - Page 82 Beyond the basics Use the numeric keypad to enter up to 230 fax numbers — you can use any asks if you want to program additional settings for this one-touch. combination of call groups, one-touch keys, speed-dial numbers and manually- 68: Option: dialed numbers.
-
Page 83: Programming Regular Polling
Beyond the basics Press . The asks if you want to turn the Copy & Fax feature on or Press the key that you want to program or change. Here, we’ve selected 72. ENTER off for this programmable one-touch number. Select Program No. -
Page 84: Programming A Batch Transmission
Beyond the basics Programming a batch transmission Next, while you can still see the fax number on the , press OPTIONS twice and then press ENTER For this operation to work, two things must be true: If you want the polling to begin immediately every time you press the key, •... - Page 85 Beyond the basics Note: Do not enter any characters here. If you do, you can’t program a Press . The asks if you want the confirmation stamp on or off when ENTER batch transmission into this key. If you accidentally enter characters using this programmable one-touch number.
-
Page 86: Programming An F-Code Transmission
Beyond the basics Programming an F-Code transmission Press . The now shows either: ENTER For this operation to work, two things must be true: 70:Fax#/Com-Options 70:Fax#/Com-Options • You must know how the remote fax is using each F-Code box to which you’re 9-5558743_ transmitting —... - Page 87 Beyond the basics If you want the transmission to begin immediately every time you press the Press . The asks which contrast mode you want when using this ENTER key, press and skip to step 15. programmable one-touch number. ENTER If you want to delay the transmission, press OPTIONS ENTER...
-
Page 88: Programming F-Code Polling
Beyond the basics now displays the next programmable one-touch key. Press . The asks for the type of operation you want to program into ENTER If you do not want to enter or change any other key’s programming, press the programmable one-touch: STOP to return your machine to standby mode. -
Page 89: Programming Printouts
Beyond the basics Programming printouts Press . The shows: ENTER Enter Password To program a programmable one-touch key to print a list: Press / , 1, . The shows the first empty programmable PROGRAM ENTER one-touch number available: Note: If this box doesn’t have a password, press . -
Page 90: Programming A Document Storage Operation
Beyond the basics Press / until the list you want appears. To select a different programmable one-touch key than the one that appears PROGRAM on the , press that key now. Press ENTER Press . The asks what kind of operation you want to program into ENTER now displays the next programmable one-touch key. -
Page 91: Printing Lists Using Programmable One-Touch
Beyond the basics Press . The asks if you want the box to overwrite (erase) any docu- Press / until the mode you want appears. ENTER PROGRAM ments it is currently storing whenever it stores a new document. Press ENTER Overwrite Doc.: Off Program/Enter now displays the next programmable one-touch key. -
Page 92: Storing Fax Documents With Programmable One-Touch
Beyond the basics Storing fax documents with programmable one-touch Press to erase the number. ENTER To store a fax document for either polling or F-Code polling using a programmable Erase P One-Touch one-touch number: Complete Insert the document. To erase another programmable one-touch key, repeat steps 2–5. Or press STOP return to standby mode. -
Page 93: Security Features
Beyond the basics Security features Your machine has a number of security features to keep your private fax documents Operation protection private, avoid unwanted outside communication and even protect against unautho- rized use of your machine. Important: For this feature to work, you must have activated the passcode protec- tion, as described in the left column. -
Page 94: Security Reception
Beyond the basics Using your fax machine during operation protection Press . The shows: ENTER When you press any key on your machine, the shows: Security Rx: Program/Enter Operation Protected Enter Passcode: **** Press or / until the setting you want appears. PROGRAM Here, we’ve chosen “On.”... -
Page 95: Masking The Pin
Beyond the basics Use the numeric keypad to enter the passcode. Here, we’ve entered 6296: Set PIN Mode Enter Passcode: **** Print Mem Rx Doc. Enter Passcode: 6296 Use the numeric keypad to enter the four-digit passcode. Here, we’ve entered 6296. - Page 96 Beyond the basics Dialing from the numeric keypad while using the mask Press . In our example, we’re setting speed-dial number 001: ENTER If you’ve specified Mode 1 — use “star” power 001:PIN Number Enter the phone number, then press the * (“star”) key and enter the always goes last.
-
Page 97: Setting Security Transmission
Beyond the basics Performing batch transmission while using the mask Setting security transmission Note: The following instructions presume you are familiar with how to set and use Your fax’s security transmission feature provides extra assurance that your documents both your machine’s autodialer and its batch transmission feature. If you go where you’re sending them. -
Page 98: Setting For Use With A Closed Network
Beyond the basics Setting for use with a closed network Setting Block Junk Fax For maximum communications security, use a closed network. This limits your Your fax machine’s Block Junk Fax feature lets you bar the gates against unautho- machine to only communicating with other Minolta fax machines which can “pre- rized incoming faxes (“junk fax”). - Page 99 Beyond the basics Clearing a number from the blocked numbers list now asks if you want to enter a number: To clear a number from the list: Set BlockJunk Dial Press / , 1, 2, Program/Enter PROGRAM ENTER If your Block Junk Fax setting is either Mode2 or Mode3, skip to step 3. If you want to enter or modify a number, press and go on to step 5.
-
Page 100: Using Department Codes
Beyond the basics Using department codes Clearing a department code Press / , 2, . The shows: You can keep track of how your machine is used through its department code feature. PROGRAM ENTER When the department code setting is activated, the machine reminds each user to Select Department No enter the department code before sending or polling a document. - Page 101 Beyond the basics Turning department code protection on and off Press START Important: This feature will work only if you’ve activated the passcode protection Enter Dept. Code (see page 2.58). Press / , 1, . The shows: PROGRAM ENTER Use the numeric keypad to enter the appropriate four-digit department code. Set Dept.
- Page 102 Just in case … Tips on caring for your machine What to do if problems occur Glossary Clearing paper jams ..........3.1 Print quality problems .
-
Page 104: Clearing Paper Jams
Just in case … Clearing paper jams If an original document jams If a printout jams To clear a printout jammed inside your fax machine: Press the scanner cover release and open the scanner cover. Important: Hold the cover open. It won’t stay Press the printer cover release open by itself. - Page 105 Just in case … To clear a printout jammed at the paper cassette: To clear a printout jammed at the multipurpose tray: Pull forward on the paper cas- Remove the paper stack from sette to open it. the tray. Carefully remove the jammed Carefully remove the jammed paper(s) from the machine’s paper from the machine,...
-
Page 106: Print Quality Problems
Just in case … Print quality problems If your machine’s printouts develop quality problems, try to find the example below that matches your printout problem. When you find one which is like yours, try the suggested solutions. If they don’t work, contact your authorized Minolta dealer. Printouts are too dark ABCDE Pages are blank... - Page 107 Just in case … Printouts have irregularities Printouts have toner smudges ABCDE ABCDE • The paper you’re using may have absorbed moisture, per- • The toner may be unevenly distributed inside the toner haps due either to high humidity or water having been cartridge.
-
Page 108: Troubleshooting
Just in case … Troubleshooting Occasionally, your fax machine encounters some trouble transmitting or receiving What you see on the What it means/What to do documents. When it does, it alerts you with an alarm. You can identify the problem Check Cassette Paper The paper cassette is out of paper. - Page 109 Just in case … What you see on the What it means/What to do What you see on the What it means/What to do You tried to erase a batch box which contains at The F-Code box . code you entered isn’t valid. Document Stored Invalid I.D.
-
Page 110: Errors
Just in case … What you see on the What it means/What to do What you see on the What it means/What to do You selected “Mode1” in the mask feature You tried to enter too many numbers or other No PIN Number Too Many Characters and tried to call using an autodialer number in... - Page 111 Just in case … Specific errors Transmission errors Following are some error codes you may see on an error report: .1.1 The remote fax machine didn’t respond to your machine. Call someone at the remote machine’s location. Dialing errors .1.2 Your fax machine’s page counter detected a possible document feeder error.
- Page 112 Just in case … “Check Message” printouts When there’s a problem with a fax call and your machine detects an error, it pro- duces an error printout headed by the words “Check Message.” This printout lists the following information about the transmission: •...
-
Page 113: Caring For Your Fax Machine
Just in case … Caring for your fax machine With proper installation and a little maintenance, your fax machine should give you Keep the air vents clean dependable service for years to come. You should never cover your machine or it may overheat. However, dust can build Although it requires little day-to-day care, you can take these simple precautions to up and become a sort of “cover.”... -
Page 114: Corrective Cleaning
Just in case … Corrective cleaning If you have unsatisfactory printout quality Your machine automatically cleans its charger and transport roller, two items which Below are some simple cleaning tips for keeping your fax machine operating are very important to printout quality. If you notice poor printout quality, it may smoothly. -
Page 115: Common Questions
Just in case … Common questions If you have a question about using your fax machine, read the section that applies Sending faxes to your particular question. Q: Sometimes, I try to send a fax while using either the handset or the feature. -
Page 116: Reports
Just in case … Q: Can I transmit a document that’s extra long? Q: The specifications (page .1) list an average per-page transmission time, but when I transmit a page it can take much longer. Why? A: Yes, if the receiving fax machine is equipped to handle long documents. Many machines have a special setting which allows them to receive documents that A: We base this specification on transmission of an industry-standard test docu- exceed the normal length. -
Page 117: Working With Your Answering Machine
Just in case … Receiving faxes Polling Q: My fax never answers. What’s wrong? Q: What’s the purpose of polling? A: Check to make sure your fax machine is properly connected to a working A: Polling lets you automatically “pull” a document which is set in another fax power outlet and phone jack (see pages 1.6–1.8). -
Page 118: Glossary
Just in case … Glossary This glossary contains terms you may encounter when discussing or reading about fax Broadcast — A fax transmission in which a single document is sent to more than one loca- machines. Please use these definitions for reference only. tion. - Page 119 Just in case … Default — The setting your machine will always refer to if no other action has been pro- Group 3 — Refers to fax machines that use digital encoding. These units transmit one page grammed. For example, you can set the default for this machine to send a fax by using its in less than one minute and produce resolution of 203 98, 203 196, or 406 392 lpi.
- Page 120 Just in case … — Modified Huffman, the standard Group 3 data compression method. A one-dimen- ) — Private branch exchange; privately-owned telephone equipment serving a PABX sional coding scheme that compresses data in a horizontal direction only. A feature of all particular building, business or area.
- Page 121 Just in case … Resolution — The resolution of documents transmitted or copied by fax machines is mea- — Transmit confirmation report; this provides proof that your Minolta fax did send the sured by the number of horizontal ( ) and vertical ( ) lines per inch (lpi) the unit can print.
- Page 122 Appendix and index...
-
Page 124: Specifications
Appendix and index Specifications General Memory Backup Time: (Total memory capacity: Backup time) 2MB: 100 hours Type: Desktop 4MB: 50 hours Laser plain paper facsimile 6MB: 33 hours Compatibility: ITU-T Super Group 3, Group3 8MB: 25 hours Phone System: Public Switched Telephone Network (PSTN) or 16MB:11 hours equivalent (Must be charged for at least 24 hours to reach full... - Page 125 Appendix and index Scanning speed: ** Normal: 1.9 sec/page (Tx), 1,9 sec/page (Copy) ** Fine: 1.9 sec/page (Tx), 2,8 sec/page (Copy) ** Super Fine: 3.8 sec/page (Tx), 3,8 sec/page (Copy) ** Grayscale: 1.9 sec/page (Tx), 2,8 sec/page (Copy) Halftone Grayscale: 256-level in feeder Tx or copy, 64-level in memory Tx Document output Print destiny:...
-
Page 126: Multi-Access Table
Appendix and index Multi Access table Dual access table Simultaneous Scanning Printing Memory Memory operation document a stored Printing a list Current transmission reception into memory document operation Scanning document into memory Printing a stored document Printing a list Memory transmission Memory reception Triple access table Simultaneous... -
Page 127: Minoltafax 5600 Quick Reference
Appendix and index MINOLTAFAX 5600 Quick Reference One-Touch Keys Press Press Program Enter Protect passcode Program Enter Enter a one-touch key “ “ Enter Set operation protection “ “ Enter Erase a one-touch key “ “ Enter Set PIN mode “... -
Page 128: Index
Appendix and index Index Activity journal ............. 2.27 Date and time, setting . - Page 129 Appendix and index Grayscale ............1.1, 1.13, 2.1, OneLine + distinctive ring detection ( ) .
- Page 130 Appendix and index Security reception ............2.59–2.60 Security transmission .
-
Page 131: Regulatory Information
MINOLTAFAX 5600 is 0.9. date and time it was sent and an identification of the business or other identity, or other individual sending the message and the telephone number of the sending machine or such business, entity or individual. -
Page 132: Safety Information
Appendix and index Safety information Laser safety Warning labels This fax machine contains a page printer which operates by means of a laser. There is no possibility of danger from the laser, provided the fax machine is operated according to the instructions provided in this manual. Since radiation emitted by the laser is completely confined with a protective housing, the laser beam cannot escape from the machine during any phase of user operation. - Page 133 Copyright 1999 MINOLTA CO., LTD. Printed in China The information contained in this manual is subject to change without notice to incorporate improvements made on the product or products the manual covers. MINOLTA CO., LTD. 3-13, 2-Chome, Azuchi-Machi, Chuo-ku, Osaka 541-8556, Japan 1999.