Cisco 7960 User Manual
Ip phone
Hide thumbs
Also See for Cisco 7960:
- Administrator's manual (212 pages) ,
- User manual (179 pages) ,
- Administration manual (150 pages)

Related Manuals for Cisco Cisco 7960


Summary of Contents for Cisco Cisco 7960
- Page 1 620-05600070C — Release 5.6.2 7960/7940 T ISCO ELEPHONE UIDE www.tekelec.com...
- Page 2 Dissemination of this information and/or concepts to other parties is prohibited without the prior written consent of Tekelec. In no event will Tekelec be liable for any incidental or consequential damage in connection with the furnishing, performance or use of this material.
-
Page 3: Table Of Contents
Table of Contents • • • • • • 1 Your Cisco Telephone Introduction ....................1 Accessing Phone Features ................... 1 In This Manual ....................... 1 Telephone Descriptions ................1 Cisco 7940/7960 Features Table ...............2 Identifying Your 7960 Telephone Type .............4 Moving Your Telephone ................5 2 Basic Phone Features Adjusting the Display Contrast ..............7 Adjusting the Volume .................8... - Page 4 Company Directory Lookup ................13 Voice Mail ......................14 Incoming voice mail ..................14 Saved voice mail ................... 15 Call Management ....................15 Call Screening ....................15 Call Forwarding ..................... 16 Web Services ...................... 16 Stock quote....................16 Weather ......................17 Using the Call Directory ................
- Page 5 Enabling/Disabling Call Block................26 Blocking Number of Last Call Received .............. 26 Adding Numbers to Call Block List ..............27 Listing Blocked Numbers..................27 Deleting Numbers from Call Block ..............27 Call Forward (All Calls) ................29 Enabling Call Forward (All).................. 29 …using the Phone ..................
- Page 6 Conference Call Tips ................... 41 Dial Tone and Ringer Patterns ..............41 Direct Extension Assignment ..............42 Programming a Guest Phone ................42 Re-establishing the Guest Phone................ 42 Re-establishing Your Old Phone ................. 42 Do Not Disturb ..................43 Tips for using Do Not Disturb ................43 Enabling/Disabling Do Not Disturb ..............
- Page 7 Canceling a Meet-Me Conference............... 53 Modifying a Meet-Me Conference ............... 54 Getting a List of Meet-Me Conferences............... 55 MultiCall Park .................... 55 Parking a Call ...................... 55 Retrieving a Parked Call..................55 Music on Hold ................... 56 Mute ......................56 Night ......................
- Page 8 Adding to the List................... 69 Listening to the List..................69 Deleting from the List..................70 Redial ......................71 …using the Phone....................71 …using Star Codes ..................... 71 Remote Access to Call Forwarding ............71 Setting or Changing Remote Forwarding ............71 Canceling Remote Forwarding ................
- Page 9 Dialing Your Telephone ................. 88 …from the email program on your PC..............88 Using Controls While Playing Messages ..........89 Rewind/Fast Forward ..................89 Rewind to the Beginning of a Message ............... 89 Fast Forward to the End of a Message ............... 89 Pause Play of a Message..................
- Page 10 Exiting the Voice Mail System ............... 101 5 Voice Mail Features (Option A Menu) Menus and Commands ................103 Accessing Your Voice Mail..............107 …from your phone..................... 107 …from any other internal phone ................ 108 …from any outside touchtone phone ..............108 Dialing Main Number ...................
- Page 11 Managing Distribution Groups............... 118 Creating a New Group..................119 Editing or Modifying a Group ................120 List All Group Members ................120 Add a Member to the Group ................ 120 Delete Group Member ................. 121 Play the Group Name .................. 121 Change the Group Name ................
- Page 12 Forwarding a Message to Another Mailbox ......... 133 Replying to a Message ................134 Dialing Back a Caller ................134 Sending a Message Directly to an Extension ........134 Personal Greetings .................135 Recording Personalized Mailbox Greetings ............135 Listening to Your Greetings ................136 Receiving Pager Notification ..............
-
Page 13: Your Cisco Telephone
Introduction This guide describes how to use all of the features that are provided by your T6000 telephone system on your Cisco 7960 or 7940 telephone. NOTE: This chapter may cover more than one model of phone. Although the chapter applies to all models, some text may apply only to a certain phone model. -
Page 14: Cisco 7940/7960 Features Table
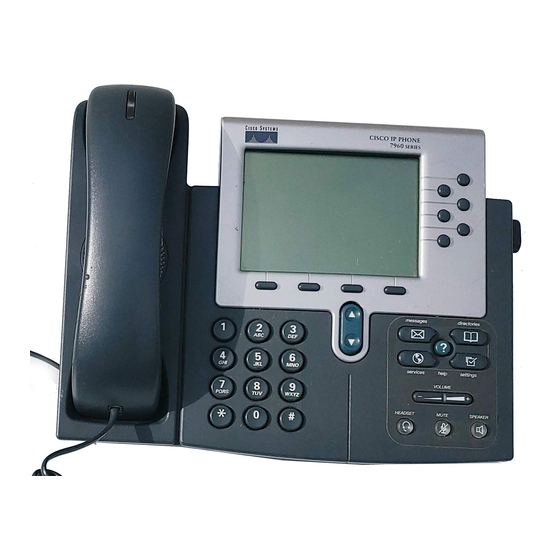
On-screen mode MUTE buttons and “i” button SPEAKER HEADSET Figure 1: Cisco 7960 Telephone NOTE: The Cisco 7960 and 7940 phones are exactly alike except that the 7940 has only two line buttons. Cisco 7940/7960 Features Table Features Descriptions LCD screen The IP Phone "desktop"... - Page 15 LCD via the settings button. SPEAKER button This button toggles the speakerphone function on and off. MUTE button This button toggles the microphone function on and off. Works with the speakerphone, handset, or headset microphone. Cisco 7960/7940 Telephone User Guide Your Cisco Telephone 620-05600070B...
-
Page 16: Identifying Your 7960 Telephone Type
Identifying Your 7960 Telephone Type There are three different protocols available on a Cisco 7960 telephone: MGCP and SCCP. The telephone features and how to use them can vary depending on the telephone’s configured protocol. You can tell which version of 7960 you have by looking at what is displayed on the LCD screen and comparing what you see to the following figures. -
Page 17: Moving Your Telephone
In This Manual Figure 2: Cisco 7960 MGCP Telephone LCD Screen Figure 3: Cisco 7960 SCCP Telephone LCD Screen Moving Your Telephone Before moving your telephone, you should check with your system administrator to make sure that there is power for the telephone at the new location. You need a power adapter for your phone at the new location as well. - Page 18 Plug the telephone into the LAN connection jack and the power adapter into a wall outlet. Watch to ensure that the phone registers and boots up properly. If it does not, contact your system administrator. Your Cisco Telephone Cisco 7960/7940 Telephone User Guide 620-05600070B...
-
Page 19: Basic Phone Features
Basic Phone Features NOTE: This chapter may cover more than one version of Cisco 7960 phone (SCCP or MGCP). Although the chapter applies to all types, some information may apply only to a certain phone configuration. The user is alerted to these differences by an icon which is shown at left. -
Page 20: Adjusting The Volume
Press the HEADSET button to use the headset. Answering a Second Call (Call Waiting) The easiest way to answer a call when you are already speaking on a call is by using the Answer soft key. Basic Phone Features Cisco 7960/7940 Telephone User Guide 620-05600070B... -
Page 21: Using The Answer Soft Key
The line button indicators on the 7960 SIP phone appear on the LCD display next to the line buttons. There is one indicator per line. The indicator provides a visual indication of the line’s state, which can be registered, unregistered, number mode, or URL mode. Cisco 7960/7940 Telephone User Guide Basic Phone Features 620-05600070B... -
Page 22: Making An External Call
Dial the desired number, including “1” and the area code, if required. On the 7960 SCCP, place the call by: a. Pressing Dial. On the 7960 SCCP, the speakerphone turns on. b. On the 7960 SCCP, do one of the following: Basic Phone Features Cisco 7960/7940 Telephone User Guide 620-05600070B... -
Page 23: Making An Internal Call
Selecting a Ringer Sound To change the sound of your telephone’s ringer (“personalized ringing”), follow these steps: Press the Settings button. On the phone display, a list of four options appear. Cisco 7960/7940 Telephone User Guide Basic Phone Features 620-05600070B... -
Page 24: Services Feature
NOTE: The Cisco IP phone maintains several directory services for you. Press the services button. • The services features menu is displayed. When prompted, enter your phone password. Use the scroll key to select the Directory option. Press the Select softkey. Basic Phone Features Cisco 7960/7940 Telephone User Guide 620-05600070B... -
Page 25: Personal Directory
Use the scroll key to select the Company Directory Lookup option. • A Last name: prompt is displayed. Using the phone keypad, enter the name to search for. Cisco 7960/7940 Telephone User Guide Basic Phone Features 620-05600070B... -
Page 26: Voice Mail
(Number), name of caller leaving the message (Name), date and time received (Date), and length of message (Duration). Use the scroll key to select any of the message fields. Basic Phone Features Cisco 7960/7940 Telephone User Guide 620-05600070B... -
Page 27: Saved Voice Mail
The call management menu is displayed. It has two options: Call Screening and Call Forwarding. Call Screening Use the scroll key to select the Call Screening option. Press the Select softkey. Cisco 7960/7940 Telephone User Guide Basic Phone Features 620-05600070B... -
Page 28: Call Forwarding
Use the scroll key to select the Stock quote option. Press the Select softkey. • The Symbol: prompt is displayed. Using the phone keypad, enter the stock symbol. Press the Select softkey. Basic Phone Features Cisco 7960/7940 Telephone User Guide 620-05600070B... -
Page 29: Weather
NOTE: If your phone display indicates you have missed calls, you can use the Missed Calls option on the Directory menu to view call history and call back the missed call. Cisco 7960/7940 Telephone User Guide Basic Phone Features 620-05600070B... -
Page 30: Viewing Or Dialing Received And Placed Calls
Press the line button and select another line or feature soft key. • On the 7960 MGCP, the call is disconnected when the line button is pressed. Pressing another line button gives you dial tone. Basic Phone Features Cisco 7960/7940 Telephone User Guide 620-05600070B... -
Page 31: After A Call
Picking-up the handset turns off the speaker. If you leave the handset off hook, you can switch back and forth between the handset and speakerphone by pressing the SPEAKER button. Cisco 7960/7940 Telephone User Guide Basic Phone Features 620-05600070B... -
Page 32: Speakerphone Troubleshooting
Move closer to the microphone and face the microphone when speaking. The caller’s voice echoes. Decrease the speaker volume. Basic Phone Features Cisco 7960/7940 Telephone User Guide 620-05600070B... -
Page 33: System Telephone Features
NOTE: This chapter may cover more than one version of Cisco 7960 phone (SCCP or MGCP). Although the chapter applies to all types, some information may apply only to a certain phone configuration. -
Page 34: Creating An Abbreviated Dial Code
Dial the phone number you want to assign to this Abbreviated Dial code followed by the # sign, or press * to cancel. The phone number you entered for this Abbreviated Dial number is repeated back. System Telephone Features Cisco 7960/7940 Telephone User Guide 620-05600070B... -
Page 35: Deleting An Abbreviated Dial Code
Press the Dial soft key, or line or SPEAKER button, or pickup the handset. Hang up. On any subsequent incoming call that provides no caller ID, the calling party gets a message that the party they are calling does not accept anonymous calls. Cisco 7960/7940 Telephone User Guide System Telephone Features 620-05600070B... -
Page 36: Disabling Anonymous Call Rejection
While in an active call, follow these steps: Notify the other party that you need to put them on hold for a moment. Press the more soft key and then the Trnsfer soft key. System Telephone Features Cisco 7960/7940 Telephone User Guide 620-05600070B... -
Page 37: Blind Transfer
If you hang up without pressing Call Back, you are removed from the queue. While you are queued, the line is unavailable for use. Cisco 7960/7940 Telephone User Guide System Telephone Features 620-05600070B... -
Page 38: Call Block (Selective Call Rejection)
A voice prompt tells you whether Call Block is enabled or disabled and then gives the menu choices. Press 2 to add the number of the last call you received to the blocked list. System Telephone Features Cisco 7960/7940 Telephone User Guide 620-05600070B... -
Page 39: Adding Numbers To Call Block List
Press * to return to the Call Block menu when you are finished listening to member numbers. Deleting Numbers from Call Block Press *60 or *80 on the telephone keypad. Press the Dial soft key, or line or SPEAKER button, or pickup the handset. Cisco 7960/7940 Telephone User Guide System Telephone Features 620-05600070B... - Page 40 The voice prompt announces that all phone numbers have been removed from the list and you are returned to the Call Block menu. 16. Select a menu item or hang up. System Telephone Features Cisco 7960/7940 Telephone User Guide 620-05600070B...
-
Page 41: Call Forward (All Calls)
• Press the EndCall softkey • Press the SPEAKER button • Press the line button • Pickup and replace the handset. Call forward (all) is enabled and the display shows “Fwd”. Cisco 7960/7940 Telephone User Guide System Telephone Features 620-05600070B... -
Page 42: Using Star Codes
# to enable the forwarding number or * to exit without enabling forwarding. 10. Forwarding for all calls is enabled. System Telephone Features Cisco 7960/7940 Telephone User Guide 620-05600070B... -
Page 43: Disabling Call Forward (All)
NOTE: The display will show the available options as the prompts are played. Depending on available space on the display, the final entry (usually * for re-enter or exit) may not appear completely. Cisco 7960/7940 Telephone User Guide System Telephone Features 620-05600070B... - Page 44 Calls forwarded to an off-net number that are unanswered will roll over to voice mail (if available) at the forwarded to destination. Calls that stay on-net and are unanswered will roll over to your voice mail (if available). System Telephone Features Cisco 7960/7940 Telephone User Guide 620-05600070B...
-
Page 45: Disabling Call Forward (Busy)
On the 7960 SCCP, press the Dial soft key. • If you do not have a previously configured forward number, you will be instructed to enter a forwarding number and press #. Cisco 7960/7940 Telephone User Guide System Telephone Features 620-05600070B... -
Page 46: Disabling Call Forward (No Answer)
• On the 7960 SCCP phone, press 79* on the telephone keypad. On the 7960 SCCP phone, press the Dial soft key, or line or SPEAKER button, or pickup the handset. System Telephone Features Cisco 7960/7940 Telephone User Guide 620-05600070B... -
Page 47: Call Forward (Out Of Service)
Include the area code, if necessary. The display shows the number as it is entered. Press #. A prompt asks you to confirm the forwarding number by pressing # or re-enter the forwarding number by pressing *. Cisco 7960/7940 Telephone User Guide System Telephone Features 620-05600070B... -
Page 48: Disabling Call Forward (Out Of Service)
…using the Phone Press the more soft key (if necessary) until you see the DC Pick-Up (DC Pick..) soft key. Press the DC Pick.. soft key. System Telephone Features Cisco 7960/7940 Telephone User Guide 620-05600070B... -
Page 49: Using Star Codes
Using this feature dials the telephone number of the last incoming call. However, if the caller is shown as “Unknown”, then Call Return will not work. Press *69 on the telephone keypad. NOTE: On the 7960 MGCP phone, you may skip the next step. Cisco 7960/7940 Telephone User Guide System Telephone Features 620-05600070B... -
Page 50: Call Trace
NOTE: If your phone is configured to be part of a Hunt Group, it will skip to the next phone in the hunt group before you will be able to pick up the second incoming call. System Telephone Features Cisco 7960/7940 Telephone User Guide 620-05600070B... -
Page 51: Answering The Second Call
While already on a phone call, this feature allows the user to view the Caller ID of a second incoming phone call and decide how the second call should be handled. The user has four options: Cisco 7960/7940 Telephone User Guide System Telephone Features 620-05600070B... -
Page 52: Caller Id Block
Check with your system administrator for the availability of this feature on your system. To create a conference call, follow these steps: Make a call or be engaged in a call. Press the more soft key. System Telephone Features Cisco 7960/7940 Telephone User Guide 620-05600070B... -
Page 53: Conference Call Tips
There are several types of ringers – all are answered the same way: • One Ring – Internal (Extension-to-Extension) Calls and when the system has called your extension to remind you or to notify you about something. • Two Rings – External Calls Cisco 7960/7940 Telephone User Guide System Telephone Features 620-05600070B... -
Page 54: Direct Extension Assignment
Once you have programmed another phone with your old phone’s extension, you must reconfigure your old phone before using it. Your old phone displays the message “Pickup handset to configure”. Pickup the handset and perform the following steps: System Telephone Features Cisco 7960/7940 Telephone User Guide 620-05600070B... -
Page 55: Do Not Disturb
Press *04 on the telephone keypad. Press the Dial soft key, or line or SPEAKER button, or pickup the handset. Hang up the handset. Cisco 7960/7940 Telephone User Guide System Telephone Features 620-05600070B... -
Page 56: End Call
7960 SCCP phone one long-short-long ring sounds from the phone speaker. This occurs whether you are using the handset or the speakerphone, and is to remind you that you have a call on hold. System Telephone Features Cisco 7960/7940 Telephone User Guide 620-05600070B... -
Page 57: Hold-On Queuing
If you park a call, the phone will emit a short ring after 1 minute to remind you that the call is still parked. If you do not answer the callback, the caller will be sent to voice mail. Cisco 7960/7940 Telephone User Guide System Telephone Features 620-05600070B... -
Page 58: Parking A Call
Notes on Intercom Calls • Intercom calls are announced by a brief dial-tone followed by the intercom tones. A tone is played every 60 seconds during active intercom calls (except for MGCP phones). System Telephone Features Cisco 7960/7940 Telephone User Guide 620-05600070B... -
Page 59: Meet-Me Conference
Joining a conference call is done by dialing the correct number and entering the Moderator or Guest ID. The system provides helpful prompts when dialing in too early or entering an incorrect ID. Only Moderators may extend a meet-me conference call. Cisco 7960/7940 Telephone User Guide System Telephone Features 620-05600070B... -
Page 60: To Join A Meet-Me Conference
NOTE: As participants leave the conference call, a “ding” sound will alert the moderator and all remaining participants that someone has left the conference call. System Telephone Features Cisco 7960/7940 Telephone User Guide 620-05600070B... -
Page 61: Silencing Announcements
Soon announcement. when silence was started. The conference bridge You will hear the Starts state changes for some Soon, First Caller or Ends reason. Soon announcement depending on the conference reservation state. Cisco 7960/7940 Telephone User Guide System Telephone Features 620-05600070B... -
Page 62: Dialing In Too Early
*2. All conference call participants will hear: “There are (n) people in the conference. The following people have joined the conference. (System plays the name of each participant as recorded.) Roll call complete.” System Telephone Features Cisco 7960/7940 Telephone User Guide 620-05600070B... -
Page 63: Adding More Ports To An Active Meet-Me Conference
(i.e., the moderator can still talk to conference members). When a meet-me conference is muted, all parties in the conference hear an announcement that the conference has been muted. Cisco 7960/7940 Telephone User Guide System Telephone Features 620-05600070B... -
Page 64: Locking A Conference Call
If dialing internally, dial the Meet-Me Schedule number (default is 523). Otherwise, dial the ten-digit conference access number. You may need to press the Dial softkey to complete dialing. System Telephone Features Cisco 7960/7940 Telephone User Guide 620-05600070B... -
Page 65: Canceling A Meet-Me Conference
You may need to press the Dial softkey to complete dialing. Press 2 to cancel a conference call. Enter the Moderator ID of the conference you wish to cancel followed by the # key. Cisco 7960/7940 Telephone User Guide System Telephone Features 620-05600070B... -
Page 66: Modifying A Meet-Me Conference
(day of week, date), at (time) with a duration of (X) minutes and (X) ports.” 11. Press the # key if the information is correct, otherwise press 1 to re-enter the conference call parameters. System Telephone Features Cisco 7960/7940 Telephone User Guide 620-05600070B... -
Page 67: Getting A List Of Meet-Me Conferences
Hang up. Retrieving a Parked Call NOTE: You can retrieve parked calls using any phone in the system. Pick up the handset or press the speaker button (if available). Cisco 7960/7940 Telephone User Guide System Telephone Features 620-05600070B... -
Page 68: Music On Hold
8:00 am – 5:00 pm Main Number Monday – Friday Mode 2 Any other time Auto Attendant NOTE: These modes are defined by the service provider and can be configured for different time periods. System Telephone Features Cisco 7960/7940 Telephone User Guide 620-05600070B... -
Page 69: On-Hook Dialing
Return to *Night disappears from **Night disappears Normal phone display from phone display Indication On-hook Dialing You can dial a number while the handset is on-hook by doing one of the following: Cisco 7960/7940 Telephone User Guide System Telephone Features 620-05600070B... -
Page 70: One-Touch Transfer
After you answer the call, inform the caller that you are transferring the call. Press more softkey until the one-touch transfer button is displayed. Press the one-touch transfer button (example: J Smith) to transfer the call. System Telephone Features Cisco 7960/7940 Telephone User Guide 620-05600070B... -
Page 71: Permanent Caller Id Block Release
NOTE: Once you have assigned your phone number to your phone, you may be required to change your password. If not, it is recommended that you change it for security. Cisco 7960/7940 Telephone User Guide System Telephone Features 620-05600070B... -
Page 72: Ip Address/Phone Number Announcement
Changing the Extension Number The extension number assigned to a phone may be changed using Phone Configurator. To change the extension number, dial 588 and follow the instructions. System Telephone Features Cisco 7960/7940 Telephone User Guide 620-05600070B... -
Page 73: Unassigning The Extension Number
Press *61. NOTE: On the 7960 MGCP phone, you may skip the next step. Press the Dial soft key, or line or SPEAKER button, or pickup the handset. Cisco 7960/7940 Telephone User Guide System Telephone Features 620-05600070B... -
Page 74: Adding Members To The Priority Call List
Repeat the previous two steps until you have heard as many of the numbers as you want. System Telephone Features Cisco 7960/7940 Telephone User Guide 620-05600070B... -
Page 75: Deleting Priority Call Members
1 to delete it, # to hear the next number or * to return to the Pri- ority Call menu. 10. Press # until you find the number you wish to delete. 11. Press 1 to delete the number. Cisco 7960/7940 Telephone User Guide System Telephone Features 620-05600070B... -
Page 76: Queue/Acd (Automatic Call Distribution)
When a call from the queue is distributed to your phone, the phone will ring. You MUST press the queue button to answer calls from the ACD queue. Otherwise, you will activate your prime line and hear dial tone. System Telephone Features Cisco 7960/7940 Telephone User Guide 620-05600070B... -
Page 77: Viewing Calls-In-Queue Information
If the code will be used for an individual, you might want to use the phone number most commonly used by that person. If it Cisco 7960/7940 Telephone User Guide System Telephone Features... -
Page 78: Caller Actions
The system records whatever is spoken during the 5 seconds, which can be either the caller’s name or silence. If the caller does not record a name, no name will be spoken when you answer the call. System Telephone Features Cisco 7960/7940 Telephone User Guide 620-05600070B... -
Page 79: Answering A Privacy Guard Call
Press *88 on the telephone keypad. NOTE: On the 7960 MGCP phone, you may skip the next step. Press the Dial soft key, or line or SPEAKER button, or pickup the handset. Cisco 7960/7940 Telephone User Guide System Telephone Features 620-05600070B... -
Page 80: Managing The Access Code
A voice prompt tells you whether Privacy Guard is enabled or disabled and then gives the menu choices. Press 3 to hear the 3-digit Access Code. Listen to the Access Code. Select a menu item or hang up. System Telephone Features Cisco 7960/7940 Telephone User Guide 620-05600070B... -
Page 81: Managing The Selective Caller List
Press # to hear the next number. Continue pressing # until you have heard all the numbers. When you reach the end of the list, the system will take you back to the beginning of the list. Cisco 7960/7940 Telephone User Guide System Telephone Features 620-05600070B... -
Page 82: Deleting From The List
If you pressed 3, all numbers in the list are immediately deleted and you return to the main menu. C A U T I O N There is no confirmation for deleting all numbers in the Selective Call List. System Telephone Features Cisco 7960/7940 Telephone User Guide 620-05600070B... -
Page 83: Redial
EXAMPLE: 9723353421# or 9723352100*2001# for Non-DID numbers. Enter the phone’s password, followed by the # key If you have your phone forwarded to another phone, your current forwarding number is announced. Cisco 7960/7940 Telephone User Guide System Telephone Features 620-05600070B... -
Page 84: Canceling Remote Forwarding
If you dial an emergency number (such as 911) from the remote phone while it is in remote mode (the phone will be playing on-hold music), an announcement tells you that number is not allowed from Remote System Telephone Features Cisco 7960/7940 Telephone User Guide 620-05600070B... -
Page 85: Dial-In Setup Of Remote Phone
The remote phone feature can be activated via the Web Portal by selecting Options > Remote. You must check the box labeled Enable Remote User, then enter the phone number of the remote phone (for example, a cell phone or hotel phone number). Cisco 7960/7940 Telephone User Guide System Telephone Features 620-05600070B... -
Page 86: Deactivating Remote Phone Via Web Portal
VoIP phone is in Remote Phone mode, and you have Find-Me set up, first the call will try ringing the remote phone. If it is not answered, the Find-Me function takes over and will try the next numbers in your Find-Me list. System Telephone Features Cisco 7960/7940 Telephone User Guide 620-05600070B... -
Page 87: Selective Call Forward
A voice prompt tells you whether Selective Call Forward is enabled or dis- abled and then gives the menu choices. Press 1 to enable Selective Call Forward if it is disabled or to disable the feature if it is enabled. Cisco 7960/7940 Telephone User Guide System Telephone Features 620-05600070B... -
Page 88: Entering The Forwarding Destination Number
Press the Dial soft key, or line or SPEAKER button, or pickup the handset. A voice prompt tells you whether Selective Call Forward is enabled or dis- abled and then gives the menu choices. System Telephone Features Cisco 7960/7940 Telephone User Guide 620-05600070B... -
Page 89: Listing Forwarded Phone Numbers
Press 6 to delete telephone numbers from the list of numbers which will be forwarded. The voice prompt provides options for deleting members including: Cisco 7960/7940 Telephone User Guide System Telephone Features 620-05600070B... -
Page 90: Speaker
16. Select another menu item or hang up. Speaker Press the SPEAKER button to turn on your speakerphone to select your default prime line or to hang up the phone during a speakerphone conversation. System Telephone Features Cisco 7960/7940 Telephone User Guide 620-05600070B... -
Page 91: Speed Dial
To double check the accuracy of the tag, you may want to follow one of these other procedures. Modifying a Speed Dial Number From the phone, repeat the procedure for programming a speed dial number. Cisco 7960/7940 Telephone User Guide System Telephone Features 620-05600070B... -
Page 92: Deleting A Speed Dial Number
Press the Does Not not wish to are on other line Resume Answer leave voice different line buton and softkey mail butons use the scroll button to select the original call System Telephone Features Cisco 7960/7940 Telephone User Guide 620-05600070B... - Page 93 Answer call transfer to the called party’s voice mail C A U T I O N Pressing the EndCall soft key will hang up both parties (the calling and the called). Cisco 7960/7940 Telephone User Guide System Telephone Features 620-05600070B...
- Page 94 Transfer System Telephone Features Cisco 7960/7940 Telephone User Guide 620-05600070B...
-
Page 95: Voice Mail Features (Default Menu)
Greeting List” on page 85) Record personal greetings (for options see “Voice Mail Personal Greeting List” on page 85) Access personal distribution groups (for options see “Voice Mail Distribution List” on page 85) Cisco 7960/7940 Telephone User Guide Voice Mail Features (Default Menu) 620-05600070B... - Page 96 Fast Forward to the End Skip to Previous Menu Options NOTE: If you are listening to the introductory message and you press *, you will exit from voice mail. Voice Mail Features (Default Menu) Cisco 7960/7940 Telephone User Guide 620-05600070B...
- Page 97 Change message (re-record) Review message (listen to recorded message) Set message options (for options see “Voice Mail Message Options List” on page 86) Return to main voice mail menu (star) Cisco 7960/7940 Telephone User Guide Voice Mail Features (Default Menu) 620-05600070B...
-
Page 98: Accessing Your Voice Mail
Any touchtone phone outside your office. • The email program on your PC (password required) …from your phone Press the messages button or dial *09 to access your voice mail system. Voice Mail Features (Default Menu) Cisco 7960/7940 Telephone User Guide 620-05600070B... -
Page 99: From Any Other Internal Phone
NOTE: If your system is set up for direct voice mail access, dial the telephone number you have been given for voice mail system access by your system administrator. Enter your extension number. Cisco 7960/7940 Telephone User Guide Voice Mail Features (Default Menu) 620-05600070B... -
Page 100: Dialing Your Telephone
You may then dial extension numbers to reach internal parties or access any other feature available from the auto attendant. …from the email program on your PC Open your email reader. Voice Mail Features (Default Menu) Cisco 7960/7940 Telephone User Guide 620-05600070B... -
Page 101: Using Controls While Playing Messages
If you want to return to the beginning of the message: • Press 77. Fast Forward to the End of a Message If you want to forward to the end of a message: Cisco 7960/7940 Telephone User Guide Voice Mail Features (Default Menu) 620-05600070B... -
Page 102: Pause Play Of A Message
Press 2 to mark the message as private • Press 3 to mark the message as return receipt requested (you want to be notified when the recipient access the message) Voice Mail Features (Default Menu) Cisco 7960/7940 Telephone User Guide 620-05600070B... -
Page 103: Marking A Message As Urgent
Otherwise listen to your messages and then follow the above steps. Skipping the Mail Menu to Hear Messages To immediately begin listening to voice mail, press # during the voice mail menu announcement. Cisco 7960/7940 Telephone User Guide Voice Mail Features (Default Menu) 620-05600070B... -
Page 104: Returning To The Auto Attendant Or Operator
If you pressed 2, listen to the announcement that your default custom operator has been restored. If you pressed *, listen to the voice mail main menu. Voice Mail Features (Default Menu) Cisco 7960/7940 Telephone User Guide 620-05600070B... -
Page 105: Replaying A Message
(date, time, etc.) remains in the inbox listing until you exit voice mail. Forwarding a Message to Another Mailbox To forward a voice mail message to another mailbox, follow these steps: Cisco 7960/7940 Telephone User Guide Voice Mail Features (Default Menu) 620-05600070B... -
Page 106: Replying To A Message
• Press 3 to review reply. • Press 9 to mark urgent and reply. • Press * to cancel the reply and re-record. You hear the message options again. Voice Mail Features (Default Menu) Cisco 7960/7940 Telephone User Guide 620-05600070B... -
Page 107: Dialing Back A Caller
TIP: When you create your greeting be sure to tell the caller they can dial zero (0) to reach either the automated attendant or the person you have pro- grammed to answer “zero out” calls. Cisco 7960/7940 Telephone User Guide Voice Mail Features (Default Menu) 620-05600070B... -
Page 108: Recording Personalized Mailbox Greetings
• Cell phones support voice streaming. • Some cell phone models can receive text-only e-mails. • E-mail pagers can accept text-only e-mail messages. You may choose to be alerted: Voice Mail Features (Default Menu) Cisco 7960/7940 Telephone User Guide 620-05600070B... -
Page 109: What You Receive On Your Pager/Cell Phone
The “Everyone” group is updated whenever a mailbox assigned to the customer partition is added or deleted. The following options are available when you access the distribution groups menu item: Cisco 7960/7940 Telephone User Guide Voice Mail Features (Default Menu) 620-05600070B... -
Page 110: Creating A New Group
Enter the number of the group to be edited. Press a number to select an option from the edit menu: • List all members - press 1 • Add a member - press 2 Voice Mail Features (Default Menu) Cisco 7960/7940 Telephone User Guide 620-05600070B... -
Page 111: Listing All Group Members
Press the # sign. • The extension number you entered is played back to you for confirmation. Press the # key to delete the user or * key to cancel. Cisco 7960/7940 Telephone User Guide Voice Mail Features (Default Menu) 620-05600070B... -
Page 112: Playing The Group Name
Press # to finish the delete or press * to cancel the delete process and return to the distribution group menu. NOTE: To delete group (corporate or company) distribution lists, you must be in the mailbox for your company's main number. Voice Mail Features (Default Menu) Cisco 7960/7940 Telephone User Guide 620-05600070B... -
Page 113: Listening To A List Of Distribution Groups
NOTE: To list all group (corporate or company) distribution lists, you must be in the mailbox for your company's main number. Exiting the Voice Mail System To exit the voice mail system, simply hang up. Cisco 7960/7940 Telephone User Guide Voice Mail Features (Default Menu) 620-05600070B... - Page 114 Exiting the Voice Mail System Voice Mail Features (Default Menu) Cisco 7960/7940 Telephone User Guide 620-05600070B...
-
Page 115: Voice Mail Features (Option A Menu)
Record personal greetings (for options see “Voice Mail Personal Greeting List” on page 106) Access personal distribution groups (for options see “Voice Mail Distribution List” on page 106) Change password Cisco 7960/7940 Telephone User Guide Voice Mail Features (Option A Menu) 103 620-05600070B... - Page 116 Replay message Forward Delete Reply Save Call originator Table 11: Voicemail Message Handling Controls Before Mail After Mail During Mail Feature Message Message Message Rewind Rewind to beginning Voice Mail Features (Option A Menu) Cisco 7960/7940 Telephone User Guide 620-05600070B...
- Page 117 Go to Next Message Rewind Rewind to the beginning Pause/Resume Fast Forward Fast Forward to the end 33 or # Replay message Forward Delete Reply Save Call originator Cisco 7960/7940 Telephone User Guide Voice Mail Features (Option A Menu) 620-05600070B...
- Page 118 Change message (re-record) Review message (listen to recorded message) Set message options (for options see “Voice Mail Message Options List” on page 107) Return to main voice mail menu (star) Voice Mail Features (Option A Menu) Cisco 7960/7940 Telephone User Guide 620-05600070B...
-
Page 119: Accessing Your Voice Mail
Any touchtone phone outside your office. • The email program on your PC (password required) …from your phone Press the messages button or dial *09 to access your voice mail system. Cisco 7960/7940 Telephone User Guide Voice Mail Features (Option A Menu) 620-05600070B... -
Page 120: From Any Other Internal Phone
NOTE: If your system is set up for direct voice mail access, dial the telephone number you have been given for voice mail system access by your system administrator. Enter your extension number. Voice Mail Features (Option A Menu) Cisco 7960/7940 Telephone User Guide 620-05600070B... -
Page 121: Dialing Your Telephone
You may then dial extension numbers to reach internal parties or access any other feature available from the auto attendant. …from the email program on your PC Open your email reader. Cisco 7960/7940 Telephone User Guide Voice Mail Features (Option A Menu) 620-05600070B... -
Page 122: Using Controls While Playing Messages
Repeat the process to further rewind or fast forward. Rewind to the Beginning of a Message If you want to return to the beginning of the message: • Press 11. Voice Mail Features (Option A Menu) Cisco 7960/7940 Telephone User Guide 620-05600070B... -
Page 123: Fast Forward To The End Of A Message
• If you pressed 4, go to step 8. Press a number to set any message delivery options. • Press 1 to mark the message as urgent Cisco 7960/7940 Telephone User Guide Voice Mail Features (Option A Menu) 620-05600070B... -
Page 124: Marking A Message As Urgent
NOTE: If you have messages in your voice mail box, but you want to skip them and change your password, press * to get the main menu, then follow the above steps. Otherwise listen to your messages and then follow the above steps. Voice Mail Features (Option A Menu) Cisco 7960/7940 Telephone User Guide 620-05600070B... -
Page 125: Skipping The Mail Menu To Hear Messages
Press * to return to the voice mail main menu, see step 7. If you pressed 1, enter your custom operator number, press # and listen to the confirmation announcement. Cisco 7960/7940 Telephone User Guide Voice Mail Features (Option A Menu) 620-05600070B... -
Page 126: Replaying A Message
Press ### while.listening to the message header • Press ## while.listening to the message. • Press # while.listening to the message handling options. Deleting a Message To delete a voice mail message, press 7. Voice Mail Features (Option A Menu) Cisco 7960/7940 Telephone User Guide 620-05600070B... -
Page 127: Forwarding A Message To Another Mailbox
Press 2 to reply to the message. You hear a prompt to record your reply. Record your reply message. Press # to accept your message. Your voice mail system gives you the following options: Cisco 7960/7940 Telephone User Guide Voice Mail Features (Option A Menu) 620-05600070B... -
Page 128: Dialing Back A Caller
Do Not Disturb feature (if this feature is provided on your telephone) • when you are talking on the phone (the “Busy” greeting) Additional features include the ability to: Voice Mail Features (Option A Menu) Cisco 7960/7940 Telephone User Guide 620-05600070B... -
Page 129: Recording Personalized Mailbox Greetings
You must set this service up with your system administrator or via Web Portal. Mobile devices support different types of alerts: Cisco 7960/7940 Telephone User Guide Voice Mail Features (Option A Menu) 620-05600070B... -
Page 130: What You Receive On Your Pager/Cell Phone
Voice messaging distribution groups can be created as either personal or corporate groups. Up to 20 personal groups can be created by individuals for their own use while up to 70 corporate groups can be created. Voice Mail Features (Option A Menu) Cisco 7960/7940 Telephone User Guide 620-05600070B... -
Page 131: Creating A New Group
# key. NOTE: To create group (corporate or company) distribution lists, you must be in the mailbox for your company's main number. Cisco 7960/7940 Telephone User Guide Voice Mail Features (Option A Menu) 620-05600070B... -
Page 132: Editing Or Modifying A Group
If you press # and the member already exists, you will hear “The member already exists in this group, please try again.” • If you press *, you will be asked to reenter the extension number to add. Voice Mail Features (Option A Menu) Cisco 7960/7940 Telephone User Guide 620-05600070B... -
Page 133: Delete Group Member
Press 4 to delete a group. Enter the number of the group to be deleted. Press # to confirm this is the correct group or * to reject the group. Cisco 7960/7940 Telephone User Guide Voice Mail Features (Option A Menu) 620-05600070B... -
Page 134: Listening To A List Of Distribution Groups
NOTE: To list all group (corporate or company) distribution lists, you must be in the mailbox for your company's main number. Exiting the Voice Mail System To exit the voice mail system, simply hang up. Voice Mail Features (Option A Menu) Cisco 7960/7940 Telephone User Guide 620-05600070B... -
Page 135: Voice Mail Features (Option B Menu)
Compose a message (for options see “Voice Mail Compose List” on page 125) Mailbox Options (for options see “Voice Mail Malbox Options List” on page 126) Exit the voice mail system Cisco 7960/7940 Telephone User Guide Voice Mail Features (Option B Menu) 123 620-05600070B... - Page 136 Return to main voice mail menu Return to main voice mail menu (star) Table 21: Voice Mail Distribution List Access Code Function Hear a list of all distribution groups Voice Mail Features (Option B Menu) Cisco 7960/7940 Telephone User Guide 620-05600070B...
- Page 137 NOTE: Occassionally a return receipt may be returned without the recipient hearing the message if your message is the first new message and the recipient hangs up or skips to the next message before listening to the message. Cisco 7960/7940 Telephone User Guide Voice Mail Features (Option B Menu) 620-05600070B...
-
Page 138: Accessing Your Voice Mail
Voice Mail Features (Option B Menu) Cisco 7960/7940 Telephone User Guide 620-05600070B... -
Page 139: From Any Other Internal Phone
Otherwise, you are prompted with choices to play your saved messages, change your password, playback your greet- ings, record new greetings, or exit the voice mail system. Cisco 7960/7940 Telephone User Guide Voice Mail Features (Option B Menu) 620-05600070B... -
Page 140: Dialing Your Telephone
Your default media player will open. Voice Mail Features (Option B Menu) Cisco 7960/7940 Telephone User Guide 620-05600070B... -
Page 141: Using Controls While Playing Messages
If you want to forward to the end of a message: • Press 44. Pause Play of a Message To pause play of a message or to resume play of a paused message: • Press *. Cisco 7960/7940 Telephone User Guide Voice Mail Features (Option B Menu) 620-05600070B... -
Page 142: Composing Messages Before Sending
Marking a Message as Urgent To mark a message as urgent, which places it in the recipient(s) voice mailbox before any regular messages, follow these steps: Record a message. Press #. Voice Mail Features (Option B Menu) Cisco 7960/7940 Telephone User Guide 620-05600070B... -
Page 143: Changing Your Password
When you reach the main voice mail menu, press 9 to transfer to the main number or operator. Cisco 7960/7940 Telephone User Guide Voice Mail Features (Option B Menu) -
Page 144: Zeroing Out To A Custom Operator
You will receive an error message if you enter an invalid number or are not allowed to enter a long distance number as your custom operator. Voice Mail Features (Option B Menu) Cisco 7960/7940 Telephone User Guide 620-05600070B... -
Page 145: Replaying A Message
• press ## if this is the only (or last) person to receive the forwarded message. You get a prompt to leave an introduction to the forwarded message: Cisco 7960/7940 Telephone User Guide Voice Mail Features (Option B Menu) 620-05600070B... -
Page 146: Replying To A Message
You can send a voice mail message directly to an extension without dialing their extension and having to wait for the call to roll to the voice mail system. Voice Mail Features (Option B Menu) Cisco 7960/7940 Telephone User Guide 620-05600070B... -
Page 147: Personal Greetings
• Press 3 to record the Busy greeting. • Press 4 to replace your personal greetings with the default greetings. • Press 5 to play your personal greetings. Cisco 7960/7940 Telephone User Guide Voice Mail Features (Option B Menu) 620-05600070B... -
Page 148: Listening To Your Greetings
E-mail pagers can accept text-only e-mail messages. You may choose to be alerted: • Each time you receive any voice message. • Only when you receive a message marked as urgent. Voice Mail Features (Option B Menu) Cisco 7960/7940 Telephone User Guide 620-05600070B... -
Page 149: What You Receive On Your Pager/Cell Phone
The following options are available when you access the distribution groups menu item: • List all distribution groups • Create a group • Edit a group Cisco 7960/7940 Telephone User Guide Voice Mail Features (Option B Menu) 620-05600070B... -
Page 150: Creating A New Group
Press a number to select an option from the edit menu: • List all members - press 1 • Add a member - press 2 • Delete a member - press 3 Voice Mail Features (Option B Menu) Cisco 7960/7940 Telephone User Guide 620-05600070B... -
Page 151: Listing Members Of A Group
Press the # key to delete the user or * key to cancel. • If you press # and the member exists, you will hear “The member has been successfully deleted from this group.” Cisco 7960/7940 Telephone User Guide Voice Mail Features (Option B Menu) 620-05600070B... -
Page 152: Play The Group Name
Press # to finish the delete or press * to cancel the delete process and return to the distribution group menu. NOTE: To delete group (corporate or company) distribution lists, you must be in the mailbox for your company's main number. Voice Mail Features (Option B Menu) Cisco 7960/7940 Telephone User Guide 620-05600070B... -
Page 153: Listening To A List Of Distribution Groups
NOTE: To list all group (corporate or company) distribution lists, you must be in the mailbox for your company's main number. Exiting the Voice Mail System To exit the voice mail system, simply hang up. Cisco 7960/7940 Telephone User Guide Voice Mail Features (Option B Menu) 620-05600070B... - Page 154 Exiting the Voice Mail System Voice Mail Features (Option B Menu) Cisco 7960/7940 Telephone User Guide 620-05600070B...
-
Page 155: Set Up Outlook For Tapi
Start Outlook (if not already running). Click the Contacts icon to switch to the Contacts listing. Right click on the contact you wish to call to bring up the Actions pop-up menu. Cisco 7960/7940 Telephone User Guide Set Up Outlook for TAPI 143 620-05600070B... - Page 156 The speaker on your telephone should be activated and you should hear ringing or a busy signal as the call is connected to the dialed number. Set Up Outlook for TAPI Cisco 7960/7940 Telephone User Guide 620-05600070B...
-
Page 157: Installing The Tapi Support Software
Select a method for the installation and click OK. This procedure uses the Save this program to disk option so that the install is available if needed again. Cisco 7960/7940 Telephone User Guide Set Up Outlook for TAPI 620-05600070B... - Page 158 Find the TAPI.EXE file (shown here on the PC desktop) and double-click it to run the install program. Set Up Outlook for TAPI Cisco 7960/7940 Telephone User Guide 620-05600070B...
- Page 159 Click Run to install or Cancel to not install TAPI. Click Next in the Welcome dialog box to install the TAPI program. Cisco 7960/7940 Telephone User Guide Set Up Outlook for TAPI 620-05600070B...
- Page 160 Installing the TAPI Support Software 10. Click Next to start the installation. 11. The Installing dialog box shows the progress of the installation. Set Up Outlook for TAPI Cisco 7960/7940 Telephone User Guide 620-05600070B...
- Page 161 Click Add to add your telephone number (the one that will be used with the TAPI-enabled program [such as Outlook]). 13. Enter your telephone number and password and click OK. Cisco 7960/7940 Telephone User Guide Set Up Outlook for TAPI 620-05600070B...
-
Page 162: Configuring Windows For Tapi
General Information The following notes apply to all TAPI-enabled programs: • The program must be set to use Tekelec T6000 Telephone Service Provider that must be installed on your PC. • The access codes required for outside calls (usually 9 or 8) must be configured. - Page 163 Click Edit (circled) in the Phone and Modem Options dialog box. Cisco 7960/7940 Telephone User Guide Set Up Outlook for TAPI 620-05600070B...
- Page 164 (see arrows). c. Set the outside access digits in the Dialing Rules section to the digit that must be dialed to make an outside call (circled). Set Up Outlook for TAPI Cisco 7960/7940 Telephone User Guide 620-05600070B...
- Page 165 Area Code Rules field will be empty. If you have setup Phone and Modem Options before for any device or application, the previously entered information will be displayed. Cisco 7960/7940 Telephone User Guide Set Up Outlook for TAPI 620-05600070B...
- Page 166 NOTE: Depending on whether you clicked New or Edit, the dialog box will say either New Area Code Rule or Edit Area Code Rule. If you clicked Edit, the area code you highlighted will be displayed in the Area Code field. Set Up Outlook for TAPI Cisco 7960/7940 Telephone User Guide 620-05600070B...
- Page 167 NOTE: If you need additional information about using Calling Card, please consult the Windows on-line help from the Start menu. Cisco 7960/7940 Telephone User Guide Set Up Outlook for TAPI 620-05600070B...
- Page 168 10. Click the Advanced tab to see the list of available telephone providers. 11. If you completed the T6000 setup as part of the TAPI install from Web Portal you should see the Tekelec T6000 Telephony Service Provider (circled) and can skip to “Configuring Outlook to Use TAPI”.
- Page 169 13. Select Tekelec T6000 Telephony Service Provider and click Add. 14. When the Tekelec dialog box appears, do the following: a. Enter the IP addresses provided by your system administrator in the Server IP Address 1 and 2 fields. b. Click Add to add your telephone number (the one that will be used with the TAPI-enabled program [such as Outlook]).
-
Page 170: Configuring Outlook To Use Tapi
If not already running, start Outlook (or the TAPI-enabled application). Click the Contacts icon to switch to the Contacts listing. Right click any contact to bring up the Actions shortcut menu. Set Up Outlook for TAPI Cisco 7960/7940 Telephone User Guide 620-05600070B... - Page 171 Click Dialing Options to open the Dialing Options dialog box. Click on the drop-down menu in the Connect using line field and scroll down any entries until you find your telephone number (circled). Cisco 7960/7940 Telephone User Guide Set Up Outlook for TAPI 620-05600070B...
- Page 172 You may call this contact or close the New Call dialog box. NOTE: Outlook (or your TAPI-enabled application) is now configured to place calls using your telephone number. Set Up Outlook for TAPI Cisco 7960/7940 Telephone User Guide 620-05600070B...
-
Page 173: Index
Index Option A Menu 113 Option B Menu 131 • • • • • • Automatic Call Distribution 64 Answer Calls 64 Find Out Queues 64 Log In 64 Abbreviated Dial 21 Log Out 64 Abbreviated Dial Code View Calls-In-Queue Info 65 Create 22 Delete 23 Modify 22... - Page 174 Reconnect to the First Call 9 Internal 11 Using the Answer soft key 9 Using the 7960 MGCP or 7960 SIP 11 Call Back Queuing 25 Using the 7960 SCCP 11 Call Block Change Voice Mail Distribution Group Name Add Members 27 Default Menu 100 Add Number of Last Call 26 Option A Menu 121...
- Page 175 Option B Menu 140 Option B Menu 141 Dial Tones 41 Modifying Dialing Back a Caller Default Menu 98 Default Menu 95 Option A Menu 120 Option A Menu 116 Option B Menu 138 Option B Menu 134 Play Name Direct Extension Assignment 42 Default Menu 100 Programming a Phone 42...
- Page 176 Intercom 46 Feature Notes 46 Feature Activation Digit 21 Making Calls 46 Features 21 Receiving Calls 46 Features Table 2 Internal Calls 11 Find-Me Using the 7960 MGCP or 7960 SIP 11 with Remote Phone 74 Using the 7960 SCCP 11 Forwarding a Voice Mail Message Internal Dial Tone 41 Default Menu 93...
- Page 177 Locking 52 Option A Menu 121 Lowering Hands 52 Option B Menu 140 Modify (Edit) 54 Moving Your Telephone 5 Muting 51 Multi Call Park 55 Raising Hands 52 Parking a call 55 Roll Call 50 Phone Feature Buttons 55 Schedule (Create) 52 Music on Hold 56 Silencing Announcements 49...
- Page 178 Descriptions 1 Remote Phone Phone Configurator 59 with Find-Me 74 Assigning Number 59 Remote VOISS Phone 72 Changing Number 60 Dial-in Support for Remote Phone 73 IP Address/Phone Number Announcement 60 Web Portal Support for Remote Phone 73 Unassigning Number 61 Replaying a Voice Mail Message Play Voice Mail Distribution Group Name Default Menu 93...
- Page 179 Web Services 16 Enabling 67 Stock Quote 16 Managing Access 68 Weather 17 Managing Access Codes Set Up Oulook for TAPI Changing the Code 68 Configuring Windows for TAPI Listening to Codes 68 Setting Up TAPI 150 Selective Call List 69 Installing TAPI 145 Adding Numbers 69 Using TAPI to Call from Outlook 143...
- Page 180 Enable 35 Locking 52 Call Pickup 36 Lowering Hands 52 Phone Feature Buttons 36 Modify (Edit) 54 Star Codes 37 Muting 51 Call Return 37 Raising Hands 52 Call Trace 38 Roll Call 50 Call Waiting 38 Schedule (Create) 52 Answering the Second Call 39 Silencing Announcements 49 Suspending 39...
- Page 181 Canceling Remote Forwarding 72 During a Call 18 Setting or Changing Remote Forwarding 71 Using TAPI to Call from Outlook 143 Selective Call Forward 75 Using the Speakerphone 19 Add Forwarded Numbers 76 Delete Forwarded Numbers 77 Disable 75 Voice Mail 14 Enable 75 Controls Enter Forward Number 76...
- Page 182 Option A Menu 119 Default Menu 95 Option B Menu 138 Option A Menu 116 Deleting a Message Option B Menu 135 Default Menu 93 Receiving Pager Notification Option A Menu 114 Default Menu 96 Option B Menu 133 Option A Menu 117 Deleting Voice Mail Distribution Group Option B Menu 136 Default Menu 100...
- Page 183 Option A Menu 117 Option B Menu 135 Volume Adjusting the Volume 8 Ringer 8 Web Services 16 Stock Quote 16 Weather 17 Windows Configuring for TAPI 150 Setting Up TAPI 150 Zero Out to Operator Default Menu 92 Option A Menu 113 Option B Menu 132 Index I-11...
- Page 184 I-12 Index...