Mitel 5312 User Manual
Hide thumbs
Also See for Mitel 5312:
- User manual (86 pages) ,
- Administrator's manual (47 pages) ,
- Quick reference sheet (5 pages)

Related Manuals for Mitel Mitel 5312


Summary of Contents for Mitel Mitel 5312
-
Page 1: User Guide
Mitel 5312 IP Phone: User Guide W I N N E R 0330 333 7323 | www.denwa.uk.com MEDIUM SIZED BUSINESS OF THE YEAR... - Page 2 M I T E L 5000 Communications Platform (CP) 5312/5324 IP Phone Title space availble here. Title space availble here. Title space availble here. Title space availble here. Title space availble here. (Frutiger 57Cn 16pt) User Guide...
-
Page 4: Feature Buttons
5312/5324 IP Phone Quick Reference Guide This guide provides information for frequently used Commonly Used Feature Codes features. For more information about these and other Contact your system administrator for more information features, refer to the user guide. For voice mail about system features. -
Page 5: Placing A Page Announcement
Answering Calls Placing Ad Hoc Conference Calls Lift the handset, or press (Speaker) to 1. While on the first call, press the Conf button to answer a call while using a headset or to answer place the call on hold. CALL NEXT PARTY TO a call in Handsfree Mode. -
Page 6: Table Of Contents
Contents Contents Getting Started Welcome ............... 1 About Your Phone . - Page 7 Contents Using Programmable Buttons ........... . 19 Default Access Codes .
- Page 8 Contents Call Features Using Handsfree Mode ............35 Using Ring Intercom Always .
- Page 9 Contents Using Configuration Assistant ........... . 50 Changing Your Station Passcode .
- Page 10 Contents Troubleshooting Contact Information............. 69 Error Messages .
- Page 12 Notice This guide is released by Mitel Networks Corporation and provides information necessary to use the 5312 and 5324 IP Phones. The guide contents, which reflect current Mitel standards, are subject to revision or change without notice. Some features or applications mentioned may require a future release and are not available in the initial release. Future product features and applications are subject to availability and cost.
-
Page 13: Safety Notices
Important Safety Instructions and Precautions Remember the following safety guidelines when using the IP phone. Programming Emergency Numbers Make sure to do the following when programming emergency numbers and/or making test calls to emergency numbers: Remain on the line and briefly explain to the dispatcher the reason for the call. ... -
Page 14: Power Requirements
Power Requirements CAUTION Phone Damage Hazard. To avoid damaging the IP phone, make sure the IP phone is connected to the proper power supply before powering on. Contact your system administrator for more information. The IP phone requires any one of the following power supplies: ... -
Page 15: Phone Usage
Phone Usage This equipment is not for connection to the telephone network or public coin phone service. It is only for use when connected to Mitel systems. WARNING When using your IP phone equipment, basic safety precautions should always be followed to reduce the risk of fire, electric shock and injury to persons, including the following: ... - Page 16 Notice to Canadian Customers The Class B digital apparatus complies with Canadian ICES-003. Notice to U.S. Customers This equipment has been tested and found to comply with the limits for a Class B digital device, pursuant to Part 15 of the FCC Rules.
-
Page 18: Getting Started
Getting Started Welcome The instructions in this guide are for using the Mitel 5312/5324 Internet Protocol (IP) Phone on the Mitel 5000 Communications Platform (CP). The Quick Reference Guide located at the beginning of this guide is an overview of frequently used features. -
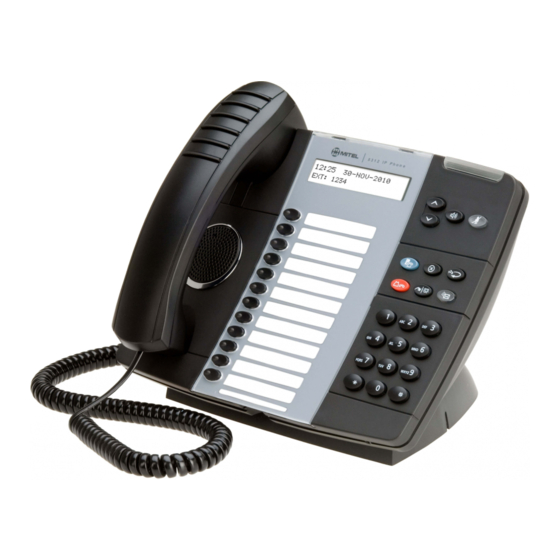
Page 19: 5312 Ip Phone Features
Getting Started 5312 IP Phone Features The 5312 IP Phone is shown here. See “Phone Feature Descriptions” on page 4 for more information about the IP phone features. 1 – Handset 5 – Dialpad buttons 2 – Display 6 – Programmable buttons 3 –... -
Page 20: 5324 Ip Phone Features
Getting Started 5324 IP Phone Features The 5324 IP Phone is shown here. See “Phone Feature Descriptions” on page 4 for more information about the IP phone features. 1 – Handset 5 – Feature buttons 2 – Display 6 – Dialpad buttons 3 –... -
Page 21: Phone Feature Descriptions
Getting Started Phone Feature Descriptions The following sections describe default configurations. Your IP phone may be programmed differently. Contact your system administrator for more information. See “5312 IP Phone Features” on page 2 and “5324 IP Phone Features” on page 3 for phone feature locations. -
Page 22: Feature Buttons
Getting Started Feature Buttons Feature buttons provide quick access to commonly used features. See the following table for descriptions. Button Action (Up) (Down) Provides volume control for the ringer, handset, and speaker. Scrolls through feature options. (Speaker) Activates Handsfree Mode (speakerphone). See “Using Handsfree Mode”... -
Page 23: Programmable Buttons
Getting Started Programmable Buttons The 5312 IP Phone has 12 programmable buttons.The 5324 IP Phone has 24 programmable buttons. The top seven buttons on both models are programmed by the system administrator and cannot be reprogrammed. However, you can program the remaining buttons for quick access to features or speed-dial entries. -
Page 24: Comfort And Safety Tips
Getting Started Comfort and Safety Tips Observe the following comfort and safety tips when using the IP phone: Do not cradle the handset: Prolonged use of the handset can lead to neck, shoulder, or back discomfort, especially if you cradle the handset between your neck and shoulder. If you frequently use the IP phone, you might find a headset more comfortable. -
Page 25: Using The 5310 Ip Conference Unit
Getting Started Using the 5310 IP Conference Unit Your 5324 phone can use the 5310 IP Conference Unit (shown below) for full-duplex, advanced IP conferencing. Use the Conference Controller touch screen to turn the Conference Unit on or off, to adjust the volume or to put the Conference Unit into Presentation mode. You can only run one Conference Controller session at a time. -
Page 26: Placing The Conference Unit In Presentation Mode
Getting Started Placing the Conference Unit in Presentation Mode Presentation Mode should be used when only one individual will be speaking into the Conference Unit. If another individual near the unit wishes to speak, you should disable Presentation Mode. Presentation Mode minimizes extraneous noise. To enable/disable Presentation Mode: Use the Presentation button on the optional remote control mouse. -
Page 27: Using The Line Interface Module (Lim)
Getting Started Using the Line Interface Module (LIM) The LIM is an optional device that adds an analog phone line capability to your 5324 phone. In the event of a network failure, the IP phone can be configured to use the public switched telephone network (PSTN) to provide continued basic telephony until service in restored. -
Page 28: Making And Answering Calls Using The Analog Button
Getting Started Making and Answering Calls Using the Analog Button To make a call using the Analog line: Lift the handset. Press the button you programmed as Analog Line. ANALOG CALL appears. Dial the number. When you make an external call over the analog line, a prefix dialing number is not required. -
Page 29: Making And Answering Calls Using The Failover Mode
Getting Started Making and Answering Calls Using the Failover Mode To make a call using the analog line during an IP connection failure: Lift the handset. IP FAIL: ANALOG CALL appears. Dial the number. To answer a call using the analog line during an IP connection failure: Lift the handset. -
Page 30: Personalizing Your Phone
Personalizing Your Phone Personalizing Your Phone This chapter describes features you can use to personalize your IP phone. Adjusting the Viewing Angle You can tilt the IP phone stand for a better view of the buttons and display. Press tabs on both sides to release and detach unit. -
Page 31: Installing Designation Cards
Personalizing Your Phone Installing Designation Cards If you program buttons on your 5324 IP Phone (see page 17), you can install a new paper designation card with the revised button labels. (Paper designation cards are provided by your system administrator.) You can usually slide the paper designation card out and replace it without removing the lens (if necessary, see the following instructions to remove the lens for either model). -
Page 32: Changing Volume Levels
Personalizing Your Phone Changing Volume Levels You can change the following volume levels: Ringer (alerting tone) Handset Headset Background music External speaker Turning the external speaker volume down to the lowest levels may prevent you NOTE from hearing the feature “warning tones”... -
Page 33: Changing The Language
Personalizing Your Phone Changing the Language Your system administrator can select two of the following languages as the primary and secondary languages to display text: American English British English Canadian French Mexican Spanish The language choices appearing on your display are controlled by system programming. For example, if your system administrator programmed your IP phone with American English as the primary language, American English is used for display text. -
Page 34: Using The Dialpad Buttons To Enter Characters
Personalizing Your Phone Using the Dialpad Buttons to Enter Characters You can use the dialpad buttons to enter text or numbers for features such as Do-Not-Disturb (see page 69) and Station Speed Dial (see page 38). The following are guidelines when entering dialpad characters: ... - Page 35 Personalizing Your Phone The following tables show the dialpad characters for the Canadian French and Mexican Spanish languages. Dialpad Characters — Canadian French Number of Times Dialpad Button is Pressed Button & À Â Æ Ç à â æ ç È...
-
Page 36: Using Programmable Buttons
Personalizing Your Phone Using Programmable Buttons For quick access, you can assign feature codes, extensions, speed-dial numbers, trunks, or other resources to your programmable buttons. You can then press the programmed buttons to activate features or place calls. See “Default Access Codes”... -
Page 37: Default Access Codes
Personalizing Your Phone Default Access Codes The following are default system access codes. If your system uses different codes, record the codes in the “New Code” column for reference. Outside Line Access Codes Code Type Code New Code Emergency Call 911 (999/112 Europe) Outgoing Call (Default) Select Line Group 1 to 208... -
Page 38: Default Feature Codes
Personalizing Your Phone Default Feature Codes The following table lists default feature codes. If your system administrator changes any of the default codes, you can record the new codes in the “New Code” column for reference. Most of the following feature codes work when your IP phone is idle. However, if NOTES you are on an active call or if the IP phone is off-hook, you may need to press (Special) before you enter the feature code to activate the feature. - Page 39 Personalizing Your Phone Feature Page Code New Code Do-Not-Disturb – On/Off Do-Not-Disturb – Override Dynamic Extension Express On Dynamic Extension Express Off Dynamic Extension Express On/Off Dynamic Extension Express Handoff Group Listen Handsfree – On/Off Headset – Off Headset – On Headset –...
-
Page 40: Viewing Button Assignments
Personalizing Your Phone Feature Page Code New Code Ring Intercom Always – On/Off Ring Tone Selection Station Monitor Station Speed Dial Station Speed Dial – Programming Steal Call System Forward – Off System Forward – On System Forward – On/Off System Speed Dial Switch Keymap Transfer To Hold... -
Page 41: Resetting The Ip Phone To The Default Settings
Personalizing Your Phone Resetting the IP Phone to the Default Settings Resetting the IP phone to the default settings does the following: Returns all volume settings to the default levels. See “Changing Volume Levels” on page Cancels Background Music. See “Listening to Background Music” on page ... -
Page 42: Answering And Placing Calls
Answering and Placing Calls Answering and Placing Calls The following instructions describe how to answer and place internal and external calls and how to use related features. By default, internal (intercom) calls are assigned to the IC button, and external calls NOTE are assigned to the Call buttons. -
Page 43: Redirecting Calls
Answering and Placing Calls Redirecting Calls You can redirect incoming calls to another extension or external number. To redirect calls: 1. While a call is ringing, dial 331. 2. Enter the extension number, or press the Outgoing button or enter the Outgoing Call access code (8), and then enter the external number. -
Page 44: Placing Calls
Answering and Placing Calls Placing Calls The following instructions describe how to place calls and related features. Placing Emergency Calls WARNING Contact your system administrator and your local Mitel provider for important information about dialing emergency services before using your IP phone. When dialing an emergency number (911 U.S. -
Page 45: Placing Internal Calls
Answering and Placing Calls Placing Internal Calls Internal calls are calls placed to other extensions in the system. Internal calls are assigned to the Intercom (IC) button on your IP phone. Contact your system administrator for a list of extension numbers. To place an internal call: With or without the handset lifted, dial the extension number. -
Page 46: Placing External Calls
Answering and Placing Calls Placing External Calls The following sections describe features used when placing external calls. To place an external call: 1. Press the Outgoing button, an unlit Call button, or enter the Outgoing Call access code (8 is the default code). 2. -
Page 47: Using Speed Dial
Answering and Placing Calls Using Speed Dial You can use speed dial to quickly dial stored phone numbers. Speed-dial numbers are either stored in the system (System Speed Dial), or in your IP phone (Station Speed Dial). Using System Speed Dial Your system administrator assigns System Speed-Dial location numbers, which are available to anyone in the system. -
Page 48: Deleting Station Speed-Dial Entries
Answering and Placing Calls Deleting Station Speed-Dial Entries To delete a Station Speed-Dial entry: 1. With the handset on-hook, dial 383. PROGRAM STN SPD (0-9) OR SCROLL appears. 2. Do one of the following: Press (Up) or (Down) to scroll through the speed-dial bins. ... -
Page 49: Using The Directory
Answering and Placing Calls Using the Directory You can use the Directory to find internal or external contacts or find and activate system features. The directory uses Intelligent Directory Search (IDS), which is similar to the “text on 9 keys” (T9) predictive search feature used for mobile phones. The Directory has the following three subdirectories: ... -
Page 50: Using Account Codes
Answering and Placing Calls Using Account Codes Account codes record information for phone record reports. You may be required to enter account codes when placing calls. Contact your system administrator for more information about using account codes. There are three types of account codes: ... -
Page 52: Call Features
Call Features Call Features The following sections describe call-related features. Using Handsfree Mode You can use Handsfree Mode to activate the speakerphone. The Ring Intercom Always feature prevents calls from being answered in Handsfree Mode (see the following section). NOTES You cannot use Handsfree Mode if you are using a headset, or if you have more than one phone assigned to an extension number. -
Page 53: Placing Calls On Hold
Call Features Placing Calls On Hold You can place calls on either Individual Hold or System Hold. Individual Hold: Places an internal or external call on hold at your IP phone. System Hold: Places an external call on hold in the system. You can then pick up the call from any phone that indicates a flashing Call button for the call, including the IP phone that placed it on hold. -
Page 54: Transferring Calls
Call Features Transferring Calls You can transfer calls to other extensions or external numbers. You can also transfer conference calls. See “Transferring a Conference” on page 42 for more information. Transferring Calls to Other Extensions To transfer a call to another extension: 1. -
Page 55: Viewing Caller Id Information
Call Features Viewing Caller ID Information If you are currently connected to an external caller with Caller ID, you can toggle between the caller’s name and number. If the name is unavailable, CANNOT ACCESS FEATURE appears. To show the outside party’s name/number: Press (Special), and then dial 379. -
Page 56: Using Dynamic Extension Express
Call Features Using Dynamic Extension Express When you enable Dynamic Extension Express (DEE) on your IP phone, your incoming calls are automatically routed to one or more preprogrammed associated destinations according to the routing steps programmed for you. Typically, your desk phone is configured to be your main extension. You may be programmed for up to ten associated destinations including: softphone, home IP phone, voice mail, mobile phone, home phone, desk phone 2, mobile phone 2, softphone 2, home IP phone 2, and home phone 2. -
Page 57: Using The Handoff - Push/Pull Feature
Call Features The following call types do not follow Dynamic Extension Express: Hunt group calls Hunt group announcement/overflow calls Transfer recalls, Hold recalls, Conference recalls, and Attendant recalls A recall occurs when a feature cannot be completed or the feature times out, and the call returns to the originating extension. -
Page 58: Receiving Message Waiting Indications
Call Features Receiving Message Waiting Indications If your main extension receives a message waiting indication (MWI) from voice mail or the system’s station messaging feature, the MWI is propagated (as applicable) to your other internal associated destinations. If any of your internal associated destinations responds to the MWI, then the MWI is cleared on all of them. -
Page 59: Placing Ad Hoc Conference Calls
Call Features Placing Ad Hoc Conference Calls You can place a Ad Hoc conference call with up to three internal or external parties (for a total of four parties, including yourself). To place a conference call: 1. While on the first call, press the Conf button to place the call on hold. CALL NEXT PARTY TO CNF appears. -
Page 60: Ending A Conference And Placing All Parties On Hold
Call Features Ending a Conference and Placing all Parties on Hold You can end a conference and place all conference parties on Individual Hold, allowing you to toggle between the held parties and speak to one party at a time. To end a conference and place all parties on Individual Hold: Press the Conf button, and then press (Hold). -
Page 61: Using Meet-Me Conferencing
Call Features Using Meet-Me Conferencing The Meet-Me Conferencing feature allows up to eight internal and/or external callers to dial into a conference instead of being manually added by an internal user, as is the case when using the system’s traditional “ad hoc” conferencing method. (See page 42 for details on using the traditional Ad Hoc Conferencing method.) -
Page 62: Joining A Meet-Me Conference
Call Features Joining a Meet-Me Conference You can join a conference with up to seven internal and/or external parties (for a total of eight parties, including yourself). To join a Meet-Me Conference: Dial (or ask to be transferred to) the Conference Assistant extension number. (See your administrator if you do not know the extension number.) You hear: “Welcome to the Conference Assistant. -
Page 63: Using Record-A-Call
Call Features Using Record-A-Call You can use Record-A-Call to record an ongoing call as a mailbox message. You can then retrieve the message from your voice mailbox. The Record-A-Call feature stays active after the other party hangs up, so you can add to the recorded call with your own message. Record-A-Call is not supported on peer-to-peer (P2P) calls. -
Page 64: Using Call Logging
Call Features Using Call Logging Your call logs are records of your most recent missed, received, and dialed calls. A maximum of 20 entries are stored in each call log. You can use Call Logging to: View recent call activity. ... -
Page 65: Using Secondary Extension Buttons
Call Features Using Secondary Extension Buttons .Secondary Extension buttons must be programmed by your system administrator. You can use programmable buttons as “secondary extensions.” Secondary Extensions are assigned to other extensions in the system (primary extensions). Because Secondary Extension buttons are programmed by the system administrator, you cannot change the buttons (for example, assign features to the buttons). -
Page 66: Using Hot Desking
Call Features Using Hot Desking The Hot Desking feature allows users to share phones or temporarily move to other phones and yet maintain their personal identity and preferred phone configuration settings. If your administrator has set you up with a Hot Desking Profile, you can log on to any Hot Desk- enabled base phone using the Hot Desk feature code (default is 348), your assigned Hot Desk Profile extension number, and your assigned Hot Desk Profile passcode. -
Page 67: Using Configuration Assistant
Call Features Using Configuration Assistant If Configuration Assistant is enabled for your system, you can access this voice guided configuration portal that provides easy-to-use, remote access to the following phone configuration options: Dynamic Extension Express (see page DND (see page ... -
Page 68: Accessing Configuration Assistant
Call Features Accessing Configuration Assistant Follow the instructions below to access Configuration Assistant. To access Configuration Assistant: Access the Configuration Assistant extension number from inside or outside the system dialing it from any phone in the system. being transferred to it. ... -
Page 69: Changing The Dnd Settings
Call Features Changing the DND Settings See “Using Do-Not-Disturb (DND)” on page 59 for more information about using DND. To change the DND settings using Configuration Assistant: Access Configuration Assistant as described in “Accessing Configuration Assistant” on page Follow the voice prompts to change your DND status (on or off). There is no option to provide a specific DND status message. -
Page 70: Managing Meet-Me Conferencing Access Codes
Call Features Managing Meet-Me Conferencing Access Codes See “Using Record-A-Call” on page 46 for more information about Meet-Me Conferencing. This feature is available only if Meet-Me Conferencing is enabled on your phone system. NOTES While using Configuration Assistant options, you can press the Star button (*) any time you wish to cancel the current operation and return to the main menu. -
Page 71: Using Remote Programming
Call Features Using Remote Programming If the Configuration Assistant feature is enabled for your system, Mitel recommends that you use Configuration Assistant instead of the Remote Programming feature described in this section. Configuration Assistant offers an enhanced, voice guided configuration portal that provides easy-to-use, remote access to the Call Forwarding, Dynamic Extension Express, and DND features. -
Page 72: Changing The Dnd Settings
Call Features Changing the DND Settings See “Using Do-Not-Disturb (DND)” on page 59 for more information about using DND. To turn on DND using Remote Programming: 1. Do one of the following: Call your DISA number (provided by your system administrator). If necessary, enter your DISA security code. -
Page 73: Changing Your Station Passcode
Call Features Changing Your Station Passcode You can use Remote Programming to change the station (phone) passcode. See page 50 details on setting up a station passcode for your extension. To change the station passcode using Remote Programming: 1. Do one of the following: ... -
Page 74: Messages
Messages Messages This section describes the following system messaging features: Inter-station messages: Inter-station messages are alerts sent to your IP phone by other internal parties, notifying you to contact the party who left the message. The (Message) button and Message/Ring Indicator flash to notify you of the new message. -
Page 75: Viewing And Responding To Messages
Messages Viewing and Responding to Messages When you have waiting messages, the (Message) button and Message/Ring Indicator flash and the display shows the number of waiting messages. If your handset or speakerphone is off-hook when you view a inter-station NOTE message, you automatically call the party who left the message. -
Page 76: Using Do-Not-Disturb (Dnd)
Messages Using Do-Not-Disturb (DND) You can use DND to stop calls and pages to your extension. When activated, internal calling parties see your selected DND message. DND does not block queue callbacks, recalls, and incoming external calls. The following table shows the 20 default DND messages. If your system administrator changes your DND messages, you can record the new messages in the “New Message”... -
Page 77: Using Reminder Messages
Messages Using Reminder Messages You can use Reminder messages to alert you at a selected time, up to 24 hours in advance. At the selected time, the Reminder message signals you with eight short tones and your display shows the message, even if you are on a call. The following table shows the 20 default Reminder messages. -
Page 78: Paging Other System Users
Messages Paging Other System Users You can place page announcements through phone speakers or external speakers (if applicable). Your system may use page zones to prevent announcements from transmitting through every phone in the system. Each page zone contains a different combination of extensions and external paging equipment. -
Page 80: Hunt Groups
Hunt Groups Hunt Groups Hunt groups are groups of internal parties (agents) who share a common (hunt group) extension number. Calls can either be placed to the hunt group (using the hunt group extension number) or to a specific agent (using the agent’s extension number). Hunt groups are programmed by the system administrator. -
Page 81: Logging Out Of Acd Hunt Groups
Hunt Groups Logging out of ACD Hunt Groups You can log out of all ACD hunt groups at once or log out of each hunt group one at a time. To log out of one or more ACD hunt group: Do one of the following: ... -
Page 82: Other Hunt Group Features
Hunt Groups Other Hunt Group Features The following features can be used by ACD or UCD hunt groups. Requesting Agent Help You can use Agent Help to request help from a designated “Agent Help Extension” (usually your supervisor) during a call. When your request call rings at the Agent Help Extension, the supervisor can join the call or reject the request. -
Page 83: Hunt Group Supervisor Features
Hunt Groups Hunt Group Supervisor Features The following features can be used by hunt group supervisors only. Accepting or Rejecting Agent Help Calls Supervisors can accept or reject Agent Help calls. To accept an Agent Help request: Answer as usual. Your microphone is automatically muted To reject an Agent Help request: Dial 376. -
Page 84: Using Barge-In
Hunt Groups Using Barge-In While monitoring a hunt group call, you can use Barge-In to join the call. To monitor and/or barge in on a call: To use the speakerphone: While on hook, dial 321. You hear a confirmation tone. ENTER EXT TO MONITOR appears. -
Page 86: Troubleshooting
Troubleshooting Troubleshooting The following sections can help you solve problems that you may be experiencing with your IP phone. Troubleshooting topics include: Contact Information: Information about system administrator contacts. Error Messages: Error messages and descriptions. Troubleshooting Tips: Possible problems and methods to solve them. Contact Information Your system administrator can help you with items such as changing your settings or modifying phone features. -
Page 87: Troubleshooting Tips
Troubleshooting Troubleshooting Tips The following table includes troubleshooting tips for phone and system features. You can often correct problems that you may be experiencing by resetting the IP NOTE phone to the default settings. See “Resetting the IP Phone to the Default Settings” page Problem Possible Solution... - Page 88 Troubleshooting Problem Possible Solution When I try to use the Dynamic The NO CALL TO HANDOFF display indicates that the Extension Express – Handoff feature call cannot be handed off because one of the following (388), the display shows NO CALL may have occurred: TO HANDOFF.
-
Page 90: Index
Index Index Symbols 5312 IP Phone Features 2 Background Music background 16 5324 IP Phone Features 3 listening 16 Barge-In, using 67 Button Assignments, viewing 23 About Your Phone 1 Access Code 44 Account Codes, using 33 Call Forward ACD Hunt Group Wrap-Up Timer, stopping 64 manual 38 ACD Hunt Groups system 38... - Page 91 Index Calls to External Numbers, transferring 37 Dynamic Extension Express enabling and disabling 39 Calls to Other Extensions, transferring 37 handoff - push/pull 40 Camp-On, using 28 meet-me conferencing access codes 53 Characters, entering dialpad 17 message waiting indications, receiving 41 Codes settings, changing 51, 54 account 33...
- Page 92 Index Hunt Group Calls diverting 65 stealing 66 Language, changing 16 Hunt Group Supervisor Features 66 Hunt Groups contrast, changing 15 accepting or rejecting Agent Help 66 display buttons 4 Agent Help, requesting 65 Line Interface Module (LIM), using 10 agent IDs 63 Logs, call 47 Automatic Call Distribution (ACD) 63...
- Page 93 Index Ring Message Indicator 4 Ring Tone, changing 15 Ring Tone, selecting 15 Off-Hook 6 Ring/Message Indicator 4 On-Hook 6 Other Hunt Group Features 65 Outgoing Call Access Code 27, 29 Outside Line Access Codes 20 Secondary Extension Buttons, using 48 Settings, returning to default 24 Signals, IP phone 6 Speaker 4...
- Page 94 Index Time and Date, system 70 Tips comfort and safety 7 troubleshooting 70 Viewing Angle, adjusting 13 Voice Mail User Guides 57 Voice messages deleting 58 leaving 57 listening to 58 Volume Levels 15 Volume Levels, changing 15 Welcome 1 Wrap-Up Timer, stopping 64 Page 77 Mitel...
- Page 97 Part No. 550.8035 Issue 3, February 2011 A661/9146A Global Headquarters U.S. EMEA CALA Asia Pacific Tel: +1(613) 592-2122 Tel: +1(480) 961-9000 Tel: +44(0)1291-430000 Tel: +1(613) 592-2122 Tel: +61(0) 2 9023 9500 Fax: +1(613) 592-4784 Fax: +1(480) 961-1370 Fax: +44(0)1291-430400 Fax: +1(613) 592-7825 Fax: +61(0) 2 9023 9501 For more information on our worldwide office locations, visit our website at www.mitel.com/offices www.mitel.com...