Table of Contents
Advertisement
Quick Links
Advertisement
Table of Contents

Related Manuals for Endress+Hauser analytikjena multi EA 5100


Summary of Contents for Endress+Hauser analytikjena multi EA 5100
- Page 1 Service Manual multi EA 5100 Elementary analyzer C/N/S/Cl...
- Page 2 Analytik Jena AG Manufacturer Konrad-Zuse-Str.1 07745 Jena Germany Phone + 49 3641 77 70 + 49 3641 77 92 79 Email info@analytik-jena.de Analytik Jena AG Service Konrad-Zuse-Str. 1 07745 Jena Germany Phone + 49 3641 77 7407 + 49 3641 77 7449 E-mail service@analytik-jena.de http://www.analytik-jena.com...
-
Page 3: Table Of Contents
multi EA 5100 Contents Content Basic information ....................... 9 Intended use ........................9 Areas of application for the analysis system ..............12 Safety ........................14 General notes ........................14 Safety labeling on the device ..................14 Requirements for the operating- and service personnel ..........15 Safety instructions for transport and commissioning .......... - Page 4 Contents multi EA 5100 EA error message in the software / cause / remedy ..........188 Error diagrams ......................201 Service equipment and testing devices ..............207 Notes on disposal ....................209 Annex ........................210 Spare parts list (table) ....................210 Consumables list (table) ....................
- Page 5 multi EA 5100 Figures Figures Fig. 1 Decontamination declaration form ............20 Fig. 2 BA ESD 50 operating instruction ..............22 Fig. 3 Protective equipment against electrostatic discharge ......23 Fig. 4 Connecting the cable to the safety plug ............ 23 Fig.
- Page 6 Figures multi EA 5100 Fig. 52 Membrane dryer in the multi EA 5100 ............. 93 Fig. 53 Valve assembly for measuring gas transfer ((horizontal mode) ..... 93 Fig. 54 Connection valve module – main board ............ 94 Fig. 55 N-MODULE 5100 (front and view from left without side wall) ....98 Fig.
- Page 7 multi EA 5100 Figures Fig. 105 Screwing in the screws ................219 Fig. 106 Connecting the connection cable ............. 219 Fig. 107 New ozone generator ................220 Fig. 108 New ozone generator (view from above) ..........220 Fig. 109 Rear of the N-MODULE 5100 ..............221 Fig.
- Page 8 Figures multi EA 5100...
-
Page 9: Basic Information
multi EA 5100 Basic information Basic information Training Required qualification of the service technician Authorization from AJ to service this device Instructions for actions which occur in chronological order are numbered and Conventions combined in action units. Warnings are indicated by a warning triangle and signal word. The type, source and consequences of the hazard are stated together with notes on preventing the hazard. - Page 10 Basic information multi EA 5100 Organic solids such as wax, polymers etc. Samples suitable Highly viscous organic liquids, gels and paste samples, e.g. natural oil, asphalt, for the multi EA 5100 bitumen, tar, etc. Organic gases and gas mixtures, e.g. natural gas, methane etc. ...
- Page 11 multi EA 5100 Basic information By connecting the corresponding detectors and sample feeding modules, the following Determinable parameters can be determined by the multi EA 5100 analyzer as sum parameters. Sum parameters Parameter Description Total sulfur Organically bound sulfur is detected. Inorganic sulfur compounds are only digested partially or not at all.
-
Page 12: Areas Of Application For The Analysis System
Basic information multi EA 5100 Areas of application for the analysis system With its state-of-the-art technology, and boasting a high degree of variability and flexibility, the multi EA 5100 analyzer can be used for a variety of applications. Petrochemical industry Analysis of aromatic and aliphatic hydrocarbons, lubrication, gear and −... - Page 13 multi EA 5100 Basic information Material inspection/Quality control Analyses for the certification of N, S, Cl standards −...
-
Page 14: Safety
Safety multi EA 5100 Safety General notes For your own safety and to ensure error-free and safe operation of the multi EA 5100, please read this chapter carefully before using the device. Observe all safety instructions listed in this service manual, as well as all messages and instructions displayed by the control and analysis software on the monitor. -
Page 15: Requirements For The Operating- And Service Personnel
multi EA 5100 Safety Warning Meaning Remark symbol Warning against UV In S module 5100 (basic, MPO) radiation Switch off the detection module before performing maintenance on the UV lamp. Caution (GHS07) On the absorber and chemical ozone decomposer of N module 5100 On the chemical ozone decomposer of S module 5100 MPO The cartridges contain hazardous... -
Page 16: Safety Instructions For Operation
Safety multi EA 5100 Insufficiently secured components pose a risk of injury. During transport, the components of the equipment must be secured in accordance with the instructions in the user manual. The combustion furnace, auto-protection valve assembly and combustion tube must be removed prior to transport. - Page 17 multi EA 5100 Safety 2.5.3 Safety instructions for electrical equipment Contact with live components may cause death, serious injury or painful electrical shock. Lethal voltages may occur in the analyzer! Observe the following: The power plug must be connected to a proper power outlet to ensure that the device meets protection class I (ground connector).
- Page 18 Safety multi EA 5100 Hazardous substances are used for the operation of the following detector modules: Detector module Hazardous substance Chlorine module Concentrated sulfuric acid Desiccant in a sulfuric acid container Acetic acid Preparation of the electrolyte solution Concentrated nitric acid Methanol Thymol Coulometric TS module...
- Page 19 multi EA 5100 Safety Observe the following: Never switch off a device subject to overpressure! Do not introduce any samples. Do not close multiWin. Do not switch off the modules. Do not switch off the gas supply. ...
-
Page 20: Professional Decontamination And Disposal Of Operating Materials
Safety multi EA 5100 Professional decontamination and disposal of operating materials Fig. 1 Decontamination declaration form Work may only commence on the device once a completed decontamination declaration has been presented. The document may be downloaded via Extranet. Disposal of the auxiliary and operating materials must be carried out in accordance with the regional regulations. -
Page 21: Danger Due To Gases In The Device
multi EA 5100 Safety Danger due to gases in the device All pipes, hoses and screw connections must be checked regularly as part of the annual maintenance for leaks and externally visible damage. Leaks and damaged must be repaired without delay. ... -
Page 22: Fig. 2 Ba Esd 50 Operating Instruction
Safety multi EA 5100 Fig. 2 BA ESD 50 operating instruction In order to protect the device electronics against electrostatic discharge (ESD) when repairs are being carried out, operating instruction "BA-ESD 50 (ESD Protection Management for Service)” must be observed. The following parts for the protection against electrostatic discharge are available from AJ Service (see Chapter 9 Service equipment and testing devices): ... -
Page 23: Fig. 3 Protective Equipment Against Electrostatic Discharge
multi EA 5100 Safety Shoes (ESD-protected) Fig. 3 Protective equipment against electrostatic discharge The following ESD protective measures must be carried out at the workplace: Connect the grounding cable (anti-static mat and grounding armband) with the grounding module (yellow safety plug) (see Fig. 4) Insert grounding module into the plug socket Unfold the anti-static mat and connect the grounding cable to one of the pushbuttons (see Fig. - Page 24 Safety multi EA 5100 A corresponding video tutorial is available on the AJ Extranet (Link to the video).
-
Page 25: Technical Data And Parameters
multi EA 5100 Technical data and parameters Technical data and parameters General characteristics Designation/type multi EA 5100 analyzer (basic module) Basic device dimensions (W 510 x 470 x 550 mm x H x D) Mass approx. 25 kg Procedural data Digestion principle Pyrolysis followed by thermal oxidation Digestion temperature... - Page 26 Technical data and parameters multi EA 5100 Sample volume TS, TN, TX*, TC Liquids 1 ... 100 µl (horizontal with ABD) 1 ... 500 µl (vertical with MMS or TOC module 5100 and direct manual dosing) 0.001 – 110 mg Solids 1 ...
- Page 27 multi EA 5100 Technical data and parameters * X = Cl-,Br-,I- ; result relates to chloride Sampling modules Liquids Multi matrix sampler (automated) Auto-injector (semi-automatic) Solids Automatic boat drive (ABD) (semi-automatic) ABD with Multi Matrix sampler (automated) Gas, non-pressurized Gas sampling system - GSS Gas, pressurized GSS/LPG combination module Gas sampling system –...
- Page 28 Technical data and parameters multi EA 5100 Location Heat-resistant and acid-proof surface Free from vibration and impact Away from electromagnetic sources of interference Laboratory atmosphere Free from hydrocarbons, sulfur and halogen Low in nitrogen oxide and dust Free from corrosive vapors, strong temperature fluctuations and draft ...
-
Page 29: Technical Description
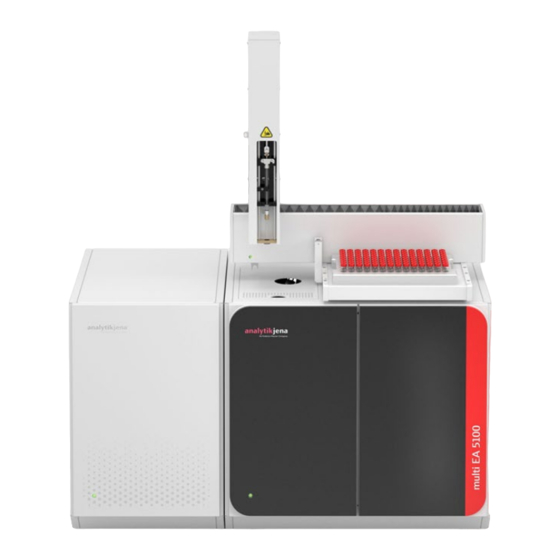
multi EA 5100 Technical description Technical description Fig. 6 Overview of components N detector Multi Matrix sampler 5100 C or S or Cl detector ABD (automatic boat drive) multi EA 5100 Functional principle (analytical) The multi EA 5100 is a modular analyzer for the detection of sulfur, nitrogen, chlorine and carbon content in solid, liquid, paste-like, viscous and gaseous samples. -
Page 30: Fig. 7 Vertical Mode Of The Multi Ea 5100
Technical description multi EA 5100 Fig. 7 Vertical mode of the multi EA 5100 When operated in horizontal mode, the Automatic Boat Drive (ABD) is used to transfer Horizontal operation solids and liquids on boats to the multi-purpose combustion tube. Gases and LPG are mode dosed directly via the injection port of the ABD sample sluice. - Page 31 multi EA 5100 Technical description R* - H +O R* - N +O + CO R* - S +O + CO R* - X** +O HX** + CO R* carbonic substance X** F , Cl , Br Digestion for TOC detection takes place in vertical mode through thermocatalytic oxidation in the oxygen flow at 700 °C.
-
Page 32: Block Diagram (Electrical)
Technical description multi EA 5100 Block diagram (electrical) Fig. 9 Block diagram... -
Page 33: Power Supply
multi EA 5100 Technical description Power supply 4.3.1 Task The analyzer is protected by two 10 AT fuses, found in the power input module on the inlet side. A 24 V DC/3A power supply unit supplies the power. The operating voltage is measured at the X1 input connection on the main board. -
Page 34: Fig. 10 Power Supply (Diagram)
Technical description multi EA 5100 4.3.2 Layout Fig. 10 Power supply (diagram) -
Page 35: Fig. 11 Main Board Power Supply
multi EA 5100 Technical description Fig. 11 Main board power supply Control electronics power supply Fuse for control electronics power supply (2.0 Temperature control power supply Unused Service Fuse for temperature control power supply (6.3 AT) -
Page 36: Fig. 12 X20 Service Connector
Technical description multi EA 5100 4.3.3 Testing (measuring points) The most important service measuring points on the main board are measured at the X20 service connector X20 service connector. Fig. 12 X20 service connector The main power supply for the control electronics is measured directly at the power 24 V power supply unit supply unit. -
Page 37: Fig. 14 48 V Power Supply Unit (Furnace Heating)
multi EA 5100 Technical description Fig. 14 48 V power supply unit (furnace heating) 4.3.4 Adjustment/calibration There is no adjustment/calibration required. - Page 38 Technical description multi EA 5100 4.3.5 Installation and removal Depiction Description Pull the power cable out of the power input module. Replacement of input fuses Pull the fuse drawer out of the power input module. The fuses can now be replaced.
- Page 39 multi EA 5100 Technical description Depiction Description Installation/removal of the power input module Remove screws. Remove cable. Remove power input module. Points 1.-10. Installation/removal of the 24V/6.3A power supply unit Points 11.-18. Installation/removal of the 48 V/5.0 A main power supply unit Depiction Description Remove M4 screws.
- Page 40 Technical description multi EA 5100 Remove M3 screw. Remove cover. Remove M3 screws. Remove connectors from connection panel. Remove power supply unit. 11. Remove M3 screw. 12. Remove cover.
-
Page 41: Main Board, Firmware Controller, Temperature Controller, Circuit Diagrams
multi EA 5100 Technical description 13. Remove screws. 14. Keep hold of component. 15. Remove power supply from the board. 16. Remove screws. 17. Remove connectors. 18. Remove power supply unit. Main board, firmware controller, temperature controller, circuit diagrams 4.4.1 Task The main board guarantees the remaining power supply and signal distribution for the internal component assemblies (firmware controller unit, temperature controller, gas... - Page 42 Technical description multi EA 5100 (A0….B7) diaphragm pump 8 x input port Monitoring of switching states (C0….C7) 4 x 2 AD converter Temperature controller, gas flow of MFM, housing temperature, analysis of power supply voltages 10 x interface (RS232) multiWin (analysis software) Temperature controller, gas box Samplers, detectors...
-
Page 43: Fig. 15 Main Board With Interfaces
multi EA 5100 Technical description 4.4.2 Layout Fig. 15 Main board with interfaces Power in control electronics Service Gas box HPG Auto-protection valve assembly Lock-in LED Heated transfer line Fan 1 Not used Fan 2 Relay furnace power supply Pump (purge flow membrane dryer) X24a Control furnace power supply Power in temperature controller... -
Page 44: Fig. 16 Main Board With Leds
Technical description multi EA 5100 Fig. 16 Main board with LEDs 4.4.3 Testing (measuring points) The input and output ports of the control computer can be tested via the measuring points at the corresponding connectors or is shown via LEDs. Valve Multi EA5100 Display... - Page 45 multi EA 5100 Technical description LED_20 LED_21 COM change over NDIR (TOC) LED_22 Pressure sensor (L=OK ) [gas X2/Pin 7 (gas box) box] Manual feeder (L=present) X28/Pin 11 Furnace X27/Pin 1 (H=vertical/L=horizontal) Status TOC (L=present) X28/Pin 12 Flame sensor (L=present) X25/Pin 4 (flame sensor) Table 1 Table AD/DA converter + interface selection...
- Page 46 Technical description multi EA 5100 Temperature controller Gas box 4.4.4 Adjustment/calibration There is no adjustment/calibration required. 4.4.5 Installation and removal Control electronics Depiction Description Remove M3 screws. Remove cover. Remove M3 screws. Place cover beside the device.
-
Page 47: Auto-Injector
multi EA 5100 Technical description Remove M3 screws. Remove all connectors from the main board. Remove protection relay. Remove all plugs from the main board. Remove M3 screws using T7984 screwdriver. 10. Remove main board. The installation and removal of the heating system for the power supply (48V/5.0A Heating power supply main power supply unit) is described in section 4.3.5. -
Page 48: Fig. 17 Auto Injector
Technical description multi EA 5100 4.5.2 Installation (exploded view) Auto-injector Fig. 17 Auto injector Union nut Auto-injector Syringe Auto injector coupling Syringe adapter and contacts in the auto injector Fig. 18 Auto injector pin assignment Fig. 19 Auto injector pin assignment (main device) -
Page 49: Fig. 20 Auto Injector Ai-Ea (Front View)
multi EA 5100 Technical description The auto injector has optical sensors which facilitate the detection of a syringe (end position + volume). A stepper motor in the auto injector guarantees the speed- controlled injection of the sample. The power is supplied to the auto injector with 24 VDC via the AI connection (X3:1/5). -
Page 50: Fig. 21 Auto Injector Ai-Ea (Rear View)
Technical description multi EA 5100 Fig. 21 Auto injector AI-EA (rear view) Mounting plate Power supply and communication cable (RS 232) Auto injector (control unit) Syringe 4.5.3 Testing (measuring points) Connection of auto injector at "AI” connection of the main device Power supply ... -
Page 51: Multi Matrix Sampler 5100
multi EA 5100 Technical description Connection of auto injector at "AI” connection of the main device Initialization/communicat Switching on the analysis system Starting the multiWin program Implementation of basic initialization Placement of auto injector (with extended syringe following prompt in multiWin program) Auto injector is shown in the multiWin status window with syringe size 4.5.4... -
Page 52: Fig. 23 Mms 5100 (Connections On Rear Of The Device)
Technical description multi EA 5100 4.6.2 Installation (exploded view) Fig. 22 MMS 5100 Injector head with syringe drive Base unit Guide arm Rack support Fig. 23 MMS 5100 (connections on rear of the device) Connection socket for external power Connection socket for boat sensor (optional) supply unit Equipment switch Connection socket for interface cable... -
Page 53: Fig. 24 Serial Communication Of Sampler
multi EA 5100 Technical description The Multi Matrix sampler uses magnetic sensors in the sampler for its syringe and sample rack detection (volume/size). A boat sensor (optional) can monitor the removal of the sample boat in horizontal mode. The boat sensor detection takes place during initialization of the sampler. - Page 54 Technical description multi EA 5100 Install syringe + set up rack. Communication Directly connect device test program with sampler via null modem cable. Switch on sampler. Self-initialization of the sampler then takes place. Start the device test program. Select interface. Select MMS device.
-
Page 55: Abd
multi EA 5100 Technical description 4.7.1 Task The ABD is intended for the horizontal operating mode of the multi EA 5100 (basic module). The ABD can be used to introduce solid or liquid samples that have been placed in quartz glass boats into the analyzer's combustion system. Via the injection port of the sample sluice, it is also possible to introduce gaseous samples. - Page 56 Technical description multi EA 5100 4.7.3 Testing (measuring points) Switch on ABD. Power supply LED (far right "ready”) on the front panel lights up. Self-initialization running: Hook feeder travels a few millimeters to the left, then to the right and into its null position. Start the device test program.
- Page 57 multi EA 5100 Technical description 4.7.4 Adjustment/calibration All electrical and mechanical adjustments are included in the ABD service manual. 4.7.5 Installation and removal A description of how to replace the hardware components is included in the ABD service manual.
-
Page 58: Gss
Technical description multi EA 5100 4.8.1 Task The extension of the basic module multi EA 5100 with the GSS gas metering module permits the feeding of uncompressed gases. By connecting the appropriate detectors it is then possible to determine the sulfur, nitrogen, chlorine and/or carbon content in gases. -
Page 59: Fig. 28 Gss Module (Rear Side)
multi EA 5100 Technical description Fig. 28 GSS module (rear side) Mains switch Waste RS232 interface Argon connection RS485 interface (for compEAct) RS485 interface (for compEAct) 4.8.3 Testing (measuring points) Switch on GSS. Power supply Connect GSS directly to PC (device test program) using a null modem cable Communication Start the device test program. -
Page 60: Lpg 2.0
Technical description multi EA 5100 4.8.4 Adjustment/calibration All electrical and mechanical adjustments are included in the GSS service manual. 4.8.5 Installation and removal A description of how to replace the hardware components is included in the corresponding service manual. LPG 2.0 4.9.1 Task The expansion of the elemental analyzer multi EA 5100 with the LPG 2.0 allows for... -
Page 61: Fig. 29 Lpg 2.0 (Front Side)
multi EA 5100 Technical description 4.9.2 Installation (exploded view) Fig. 29 LPG 2.0 (front side) Sample cylinder stand Service hatch Purge unit (purging gas metering valve) Needle valve for LPG flow adjustment Purging gas connection Bubble vessel LPG sample cylinder connection LPG Manometer The module must be connected to the EA5100 via RS232. - Page 62 Technical description multi EA 5100 Abb. 30 GSS/LPG combination module or LPG 2.0 (rear side) RS 232 interface for the multi EA 5100 DIP switch for bus termination (behind cover) Argon connection RS 485 interface for the compEAct Argon connection Power connection "Waste”...
- Page 63 multi EA 5100 Technical description Select interface. Select LPG/GSS device. Read out firmware with <V> command LPG 2.0 response (from ser. no.: N77-200): <LPG V1NP 1.0.4 CT15HT80> (or higher version) Start the temperature control with the <U 41> command Temperature control ...
-
Page 64: Fig. 31 Lpg 2.0 Pcb
Technical description multi EA 5100 Fig. 31 LPG 2.0 PCB 4.9.4 Adjustment/calibration All electrical and mechanical adjustments are included in the LPG 2.0 service manual. 4.9.5 Installation and removal A description of how to replace the hardware components is included in the LPG 2.0 service manual. -
Page 65: Gss/Lpg Combination Module
multi EA 5100 Technical description GSS/LPG combination module 4.10.1 Task The expansion of the basic module multi 5100 with the GSS/LPG combination module permits the supply of pressurized liquid gases (LPG) or pressurized gases (GSS). A GSS module has been integrated in addition to the LPG module. Pressurized gases and liquid gases can be metered: LPG: max. -
Page 66: Fig. 32 Gss/Lpg Combination Module (Front Side)
Technical description multi EA 5100 4.10.2 Installation (exploded view) Fig. 32 GSS/LPG combination module (front side) GSS connection mount Purging gas connection for connection to the LPG or GSS sample cylinder GSS filtration unit 10 Needle valve for GSS flow adjustment GSS sample cylinder connection 11 Service hatch GSS Manometer... -
Page 67: Fig. 33 Gss/Lpg Combination Module (Rear Side)
multi EA 5100 Technical description Fig. 33 GSS/LPG combination module (rear side) RS 232 interface for the multi EA 5100 DIP switch for bus termination (behind cover) Argon connection RS 485 interface for the compEAct Argon connection Power connection "Waste” gas outlet for connection to an extractor 10 Fuse holder with explosion protection Gas outlet "sample out”... - Page 68 Technical description multi EA 5100 GSS/LPG combination module response (from ser. no.: N76-240): <LPG V3NP 1.1.13 CT15HT80> (or higher version) Start temperature control with <U 41> command. Temperature control Controller pcb: ‘LED heater’ on Controller pcb: ‘LED peltier’ on Analyze actual temperatures after 30 minute warm-up with <s>...
-
Page 69: Fig. 34 Gss/Lpg Combination Module Pcb
multi EA 5100 Technical description Fig. 34 GSS/LPG combination module PCB 4.10.4 Adjustment/calibration All electrical and mechanical adjustments are included in the GSS/LPG combination module service manual. 4.10.5 Installation and removal A description of how to replace the hardware components is included in the LPG/GSS service manual. -
Page 70: Combustion System
Technical description multi EA 5100 Combustion system 4.11.1 Task The combustion system is connected with several other components. These include the sampler, ABD, gas supply, measuring gas transfer, electronics/internal device control, S/N/C mode pump and the auto-protection valve assembly. The multi EA 5100 includes a combustion module. The resistance-heated furnace works at temperatures between 700 °C and 1100 °C. -
Page 71: Fig. 36 Position Of Multi-Purpose Combustion Tube (With Details)
multi EA 5100 Technical description Fig. 36 Position of multi-purpose combustion tube (with details) Argon supply connection Screw cap with septum (for vertical operation only) Connection for flame sensor Connection for oxygen supply Fig. 37 Position of membrane dryer (required for CLD and UVFD) 4.11.3 Testing (measuring points) The temperature in the combustion tube is measured using an external temperature Temperature... -
Page 72: Fig. 38 Position Of Thermocouple In The Furnace
Technical description multi EA 5100 The switching voltage of the furnace power supply unit amounts to 0 V in Operating Switching voltage of the mode (On) and 12 VDC in Off mode and can be measured at the X24-2 connection. furnace power supply unit The output voltage of the power supply unit is changed by the software via a control Control voltage of furnace... - Page 73 multi EA 5100 Technical description Adjustment of furnace temperature control Start analysis system + multiWin and initialize analysis system. Activate a method with 1050 °C. Guide the external temperature sensor, connected to an external thermometer (RS1313), from the right-hand side to the mechanical stop, into the vaporization pipe of the combustion tube.
- Page 74 Technical description multi EA 5100 Switch on the analyzer. A= Select "Adjust Device”. 10. 7 = Select "multi EA 5000”. 11. A = Select "Adjust Furnace”. 12. 1 = Select "Thermocouple Pt/Rh 10”. 13. Pull the plug of the thermocouple. 14.
- Page 75 multi EA 5100 Technical description 18. A = Select "Adjust Furnace”. 19. 5 = Select "Set Offset” to correct the furnace temperature shown. 20. Enter correction coefficients. Example: Display: 1050 °C measurement: 1060°C 1050-1060=-10 Correction value read out: 40 New correction value 50 21.
- Page 76 Technical description multi EA 5100 4.11.5 Installation and removal Furnace unit Press on the ring of hose "11” and unplug the hose. Release hose "8” by rotating the Fingertight connector. Release the connection to the membrane dryer by rotating the screw twice (optional).
- Page 77 multi EA 5100 Technical description Disconnect tube. Rotate furnace into vertical position. Disconnect grounding (1). Disconnect power supply (2). Remove thermocouple plug (3).
-
Page 78: Gas Box/Gas Supply/Gas Flows
Technical description multi EA 5100 Gas box/gas supply/gas flows 4.12.1 Task The connection between the individual components is made with labeled hoses. The Hose diagrams encircled numbers and letters in the hose diagram correspond to the labels on the hoses in the multi EA 5100. Fig. -
Page 79: Fig. 41 Hose Diagram For Vertical Mode
multi EA 5100 Technical description Fig. 41 Hose diagram for vertical mode The gas connections are located on the rear of the device. The gas supplies for oxygen Gas connections at the and argon must be connected via the connection hoses included in the scope of rear of the device delivery (6 x 4 mm) to the connections "IN O ”... -
Page 80: Fig.42 Gas Connections At The Rear Of The Device
Technical description multi EA 5100 Fig.42 Gas connections at the rear of the device Gas outlet Ar/O2 to ABD Purge gas outlet of the membrane dryer with filter Gas inlet for oxygen (O2) Gas outlet to N/S/C module Gas inlet for Argon (Ar) The two process gases argon and oxygen are controlled via the gas box in the multi EA Gas connections on the 5100. -
Page 81: Fig. 44 Gas Flow Diagram, Vertical
multi EA 5100 Technical description 4.12.2 Layout Gas flow diagram, vertical Fig. 44 Gas flow diagram, vertical Gas flow diagram, horizontal Fig. 45 Gas flow diagram, horizontal... -
Page 82: Fig. 46 Position Of Gas Box And Gas Connections
Technical description multi EA 5100 Gas box HPG Fig. 46 Position of gas box and gas connections "main” – Oxygen supply to the combustion tube (hose 3) "inlet” – Argon supply to the combustion tube (hose 4) "seal” – Argon connection for the seal of the auto-protection valve assembly (hose 11) "dryer”... -
Page 83: Fig. 47 Measurement Of Main O2 Gas Flow Rate, Vertical
multi EA 5100 Technical description multiWin status window: 200 ± 5 ml/min /min Target value: 216 ± 15 ml/min (external measuring device) Fig. 47 Measurement of Main O2 gas flow rate, vertical Fig. 48Measurement of Main O2 gas flow rate, horizontal 1. -
Page 84: Fig. 49 Measurement Of Inlet Ar/O
Technical description multi EA 5100 multiWin status window: 100 ml/min ± 5 ml/min (V) and 200 ml/min ± 5 ml Target value: 121 ± 10 ml/min or 244± 10 ml/min (external measuring device)) Fig. 49 Measurement of Inlet Ar/O gas flow rate, vertical Fig. - Page 85 multi EA 5100 Technical description Activate post-combustion in component test (multiWin). Measurement of Inlet- O gas flow Measure Inlet O gas flow rate at the gas box (4/ABD). multiWin status window: 100 ± 5 ml/min Target value: 108 ± 10 ml/min (external measuring device) Measure pressure at "seal”...
- Page 86 Technical description multi EA 5100 Select: Flow calibration Select: Set main flow Set gas flow rate for main O with Set: 200 ml/min (standard) Confirm entry with OK and save. The Inlet O gas flow rate is adjusted in the method settings (multiWin). Inlet O gas flow setting (gas box)
- Page 87 multi EA 5100 Technical description 1. Start multiWin. MFM gas flow setting (TS/TN) 2. Log in to program: Login: Service Password: ajidc@03677 Initialize analysis system. Run bypass hose between "main O2” gas box outlet and "MFM in”. Disconnect tube 8 Connect the external flowmeter to the "sample out N/S/C”...
- Page 88 Technical description multi EA 5100 Select: C ALIBRATE CONTROL FLOW 10. Start MFM calibration with [S TART 11. Measure the total flow at "sample out N/S/C” outlet (here 645 ± 10 ml should be measured with the external flow meter) 12.
- Page 89 multi EA 5100 Technical description 4.12.5 Installation and removal Gas box Switching off the analyzer Remove the left side door Remove the gas supply line (1) Remove M4 screws (2) Remove lines to gas box (3) Pull the plugs. Remove gas box.
- Page 90 Technical description multi EA 5100 HPG2 non-return valves Switch off analyzer. Remove the left side door. Remove hose "3” (main) and hose "4” (inlet) from their connections. Remove the block lid using a 5 mm Allen key. Replace the control filters for "main” and "inlet”...
-
Page 91: Auto-Protection Valve Assembly
multi EA 5100 Technical description Unscrew the input filter using a 5 mm Allen key. Installation of the filters and input connectors is carried out in reverse order to their removal. Auto-protection valve assembly 4.13.1 Task The auto-protection valve assembly has the following functions: ... -
Page 92: Fig. 51 Toggle Switch To Lock/Release Combustion Tube
Technical description multi EA 5100 Toggle switch down: Combustion tube sealed Toggle switch up: Combustion tube released (e.g. for dismantling) Fig. 51 Toggle switch to lock/release combustion tube The change-over valve is used to switch the measuring gas flow between the two Switching valve measuring gas branches: ... -
Page 93: Fig. 52 Membrane Dryer In The Multi Ea 5100
multi EA 5100 Technical description Fig. 52 Membrane dryer in the multi EA 5100 4.13.2 Installation (exploded view) Fig. 53 Valve assembly for measuring gas transfer ((horizontal mode) Coupling with integrated filter and pneumatic Knob of the clamping mount seal Transfer pipe connection to Cl module Hose 8 (argon for bypass purging) Membrane dryer connection... -
Page 94: Fig. 54 Connection Valve Module - Main Board
Technical description multi EA 5100 4.13.3 Testing (measuring points) Electrical testing of the valve assembly is carried out by measuring the voltages at the Electrical testing X21 connector of the control electronics. (11.3) The heating of the valve assembly is supplied with 24 VDC via pin 1/2 At pin 3/4 the temperature sensor voltage can be measured, which is 100 °C = 1000 mV (10mv/°C) at target temperature. - Page 95 multi EA 5100 Technical description 4.13.5 Installation and removal Press on the ring of hose "11” and unplug the hose. Release hose "8” by rotating the Fingertight connection. Release the connection to the membrane dryer by rotating the screw twice (optional). Disconnect the heated transfer line of the CO module (optional).
-
Page 96: N-Modul 5100
Technical description multi EA 5100 N-MODUL 5100 4.14.1 Task The extension of the multi EA 5100 basic module with the N-MODULE 5100 facilitates the detection of the nitrogen content in solids, liquids and gases using chemiluminescence. Organic nitrogen compounds can be determined as a TN sum parameter with the analysis system. - Page 97 multi EA 5100 Technical description Component Function Thermal and chemical ozone Decomposition of excess ozone (O decomposer Diaphragm pump Conveyance of the measuring gas through the detector Differential pressure sensor Regulation of the pressure compensation between the variable measuring gas flow and the fixed suction flow of the membrane pump.
-
Page 98: Fig. 55 N-Module 5100 (Front And View From Left Without Side Wall)
Technical description multi EA 5100 Fig. 55 N-MODULE 5100 (front and view from left without side wall) Fig. 56 N-MODULE 5100 – Rear panel of device Gas inlet for oxygen supply "O ” RS 232 interface - Connection at basic module Gas inlet for sample gas "sample in”... - Page 99 multi EA 5100 Technical description Value 150 ... 450 ppb Temperature exhaust: 380 … 420 °C (corresponds to target temperature set) Pressure differential: 400 … 600 mbar Temperature sensor: -10 … 15 °C Temperature sensor box: 5 to 20 °C Connect PC and N-MODULE 5100 interface using a null modem cable.
-
Page 100: S-Module 5100 (Basic, Mpo)
Technical description multi EA 5100 4.14.4 Adjustment/calibration All electrical and mechanical adjustments are included in the N-MODULE 5100 service manual. 4.14.5 Installation and removal A description of how to replace the hardware components is included in the corresponding service manual. S-MODULE 5100 (basic, MPO) 4.15.1 Task The extension of the multi EA 5100 basic module with the S-MODULE 5100 facilitates... -
Page 101: Fig. 57 S-Module 5100 (Front And View From Left Without Side Wall)
multi EA 5100 Technical description The diagram on the rear explains the connector allocation. The equipment switch for switching the S-MODULE 5100 on and off is (viewed from the front) at the top right of the device’s rear panel. The device fuse and power connection are located beneath it. - Page 102 Technical description multi EA 5100 Sample inlet "sample in” Power supply connection Sample outlet "sample out” Fuse holder Service interface and programming button Device switch Interface to "S-UVF” basic module 4.15.3 Testing (measuring points) The technical parameters of the S-MODULE 5100 are tested by analyzing the values Testing using component shown in the component test: test (multiWin)
- Page 103 multi EA 5100 Technical description Connect PC and UVFD interface of main device using a null modem cable. Simulation of the UVFD interface at the FW Start program <gerätetest.exe>. controller (main unit) Select: S >>>UVFD 5000. IMULATION using <devicetest.exe> Start analysis system. Start multiWin and initialize the analysis system.
-
Page 104: Chlorine Module
Technical description multi EA 5100 Chlorine module 4.16.1 Task The extension of the multi EA 5100 basic module with the chlorine module facilitates Function/Measuring the detection of the chlorine content in solid, liquid, paste-like, viscous and gaseous principle samples. When doing so, the device will determine the bromine and iodine content as proportions of the total chlorine of the sample as well. -
Page 105: Fig. 59 Chlorine Module (Without Measuring Cell)
multi EA 5100 Technical description Fig. 59 Chlorine module (without measuring cell) Safety attachment Sulfuric acid container Stirrer/cooling block Connections for electrodes, measuring cells The wide-range coulometer of the chlorine module has 3 operative ranges. A special measuring cell is used for each application range: ... -
Page 106: Fig. 60 Measuring Cell "Sensitive" With Lid
Technical description multi EA 5100 The unmarked opening is used for direct injection into the measuring cell or to connect to the exhaust unit. Fig. 60 Measuring cell "sensitive” with lid Opening for combined electrode Opening for direct injection and exhaust connection Fig. -
Page 107: Fig. 62 Combined Electrode For "Sensitive" And "High Concentration" Measuring Cells
multi EA 5100 Technical description Fig. 62 Combined electrode for "sensitive” and "high concentration” measuring cells Connector plug Generator cathode (Pt) Indicator electrodes (Ag) Gas inlet to measuring cell Measuring gas connection (hose 20) The "high concentration” measuring cell has the same function as the "sensitive” Measuring cell "high measuring cell but provides an elevated electrolyte volume. -
Page 108: Fig. 64 Measuring Cell "High Sensitive" With Lid
Technical description multi EA 5100 The small unmarked opening is used for the direct injection in the cell. It is sealed with a plug when the gas from the combustion furnace is introduced. Fig. 64 Measuring cell "high sensitive” with lid Opening for the platinum electrode Opening for the silver electrode Opening for the gas inlet tube... -
Page 109: Fig. 66 Reference Electrode And Sensor Electrode
multi EA 5100 Technical description The sensor and reference electrode are always inserted into the measuring cell together. Sensor and reference The sensor electrode has a chlorinated sensor pin which is inserted into the measuring electrodes cell, and a gold contact. The sensor pin is touch-sensitive. Scratch protection is applied to it for storage. -
Page 110: Fig. 67 Platinum Electrode With Salt Bridge
Technical description multi EA 5100 Fig. 67 Platinum electrode with salt bridge Platinum electrode with salt bridge, Salt bridge complete Platinum electrode with screw-on cap and sealing ring Fig. 68 Silver electrode (generator anode) The green LED at front of the chlorine module illuminates after the module has been Connection switched on. -
Page 111: Fig. 69 Connections On The Rear Of The Chlorine Module
multi EA 5100 Technical description Fig. 69 Connections on the rear of the chlorine module Interface to the basic module Gas outlet Power connection Fuse holder Equipment switch The electrical connections for the measuring cells and the electrodes are located on the inside of the chlorine module's rear panel. -
Page 112: Fig. 70 Terminal On The Internal Wall Of The Chlorine Module
Technical description multi EA 5100 Fig. 70 Terminal on the internal wall of the chlorine module Combined electrode connection Connection for measuring cells "sensitive” and "high concentration” Platinum electrode connection Silver electrode connection Sensor and reference electrode connection (via pre-amplifier) A heated gas transfer line is used to transfer the measuring gas. -
Page 113: Fig. 72 Gas Inlet Tube With Ptfe Screw Joint
multi EA 5100 Technical description connection for connecting the measuring gas hose is used to introduce the gas to the measuring cell "high sensitive”. Fig. 72 Gas inlet tube with PTFE screw joint Fig. 73 Gas inlet in "sensitive” measuring cell 4.16.3 Testing (measuring points) The voltage 24 V (23.8 ... - Page 114 Technical description multi EA 5100 The technical parameters of the CI module are checked by analyzing the values shown Testing using component in the component test after the end point routine: test (multiWin) Switch on the analysis system with filled "high sensitive” measuring cell. Checking the generator current Connect a multimeter to the silver electrode power circuit (using a connection...
- Page 115 multi EA 5100 Technical description Connect PC and chlorine module interface of main device using a null modem Simulation of the CI cable. interface at the FW controller (main unit) Start program <gerätetest.exe>. with <devicetest.exe> Select: S >>> C >>>M IMULATION OULOMETER ICROCOUL...
- Page 116 Technical description multi EA 5100 4.16.5 Installation and removal Service position Depiction Description Remove screws. Remove side walls and front door. Control electronics Remove the four nuts. Remove control electronics.
- Page 117 multi EA 5100 Technical description Cooling module Place the device on its side. Remove the three screws. Remove cooling module.
-
Page 118: Coulometric Ts Module
Technical description multi EA 5100 Coulometric TS module 4.17.1 Task Expansion of the basic module with the detection module allows the determination of Function/Measuring the sulfur content in solids, liquids, and gases via microcoulometric titration. principle The organic sulfur compounds are incinerated into a mixture of sulfur dioxide (SO and sulfur trioxide (SO ) in the basic module. -
Page 119: Fig. 74 Coulometric Sulfur Detector With Measuring Cell (Without Door)
multi EA 5100 Technical description 4.17.2 Layout The detection module consists of the following main components: Measuring cell with electrodes NOx and HX absorbers for gas purification Gas inlet tube Magnetic mixer Interface to the basic module A easily-opened door for changing the electrolyte solution is installed on the front of the detection module. -
Page 120: Fig. 75 Coulometric Sulfur Detector Without Measuring Cell
Technical description multi EA 5100 Fig. 75 Coulometric sulfur detector without measuring cell Measuring gas hose from the basic module Measuring gas hose to the measuring cell (hose 71) (hose 72) HX absorber Hose 73 Magnetic mixer with controls Magnetic mixer connection NOx absorber Measuring cell The measuring cell is equipped with electrodes for generation and indication. -
Page 121: Fig. 76 Coulometric Measuring Cell
multi EA 5100 Technical description Fig. 76 Coulometric measuring cell Indicator electrodes (black) Gas inlet tube Port for manual dosing Electrolyte solution filling height Cathode (red) Anode (yellow) Gas outlet Electrodes A diaphragm is located between the electrodes for generation (anode and cathode). The diaphragm is only permeable for sulfations. -
Page 122: Fig. 77 Generator And Indicator Electrodes, Gas Inlet Tube
Technical description multi EA 5100 Fig. 77 Generator and indicator electrodes, gas inlet tube Generator electrodes (with union nut) Cathode (inside) Diaphragm Anode (outside) Platinum electrodes Gas inlet tube Indicator electrodes To clean the measuring gas, two absorbers are installed in the detection module. The Absorber absorbers remove elements from the measuring gas that could disrupt the analysis. -
Page 123: Fig. 78 Nox Absorber And Hx Absorber
multi EA 5100 Technical description Fig. 78 NOx absorber and HX absorber NOx absorber HX absorber Hose diagram Labeled hoses connect the measuring cell with the other components in the detection module. The numbers in the hose diagram correspond to the labels on the hoses. Fig. -
Page 124: Fig. 80 Rear Of Coulometric Sulfur Detector
Technical description multi EA 5100 The electrical connection and the interface to the basic module can be found on the rear Connection of the detection module. The device switch for switching the detection module on and off is located on the top right of the rear of the device (when viewed from the front). - Page 125 multi EA 5100 Technical description Connect PC and chlorine module interface of main device using a null modem Simulation of the TS cable. coulometer interface at the FW controller (main Start program <gerätetest.exe>. unit) Select: D >>>C >>> EVICE CHOICE OULOMETER SULFUR using <devicetest.exe>...
- Page 126 Technical description multi EA 5100 Control electronics Remove screws. Remove control electronics.
-
Page 127: C Module 5100
multi EA 5100 Technical description C module 5100 4.18.1 Task Expansion of the basic module with the detection module allows determination of the Function/Measuring carbon content in solid, liquid, paste-like, viscous and gaseous samples. principle The detection module contains a wide-range NDIR detector. The carbon content in organic compounds can be determined as TC and EC/OC sum parameters with the detection module. -
Page 128: Fig. 82 Rear Panel Of The Carbon Detector
Technical description multi EA 5100 The detection module can be used to determine TC and EC/OC. TC determination can be performed in both the multi-purpose combustion tube (standard tube) and the special EC/OC combustion tube. EC/OC determination requires the use of the EC/OC combustion tube. For the EC/OC detection, Analytik Jena AG also offers special boats with holding-down clamps which are used, for example, for the examination of diesel-exhaust particulate samples on quartz fiber filters. -
Page 129: Fig. 83 Checking The Ndir Detector (Component Test)
multi EA 5100 Technical description 4.18.3 Testing (measuring points) The 24 V voltage (23.8 ... 24.2 V) can be measured at the connector of the power Testing the power supply supply unit. The NDIR detector is tested during the component test of the multiWin program by Testing using component checking the analog values. - Page 130 Technical description multi EA 5100 In the multiWin status window, the TC module is shown after detection. 4.18.4 Adjustment/calibration...
- Page 131 multi EA 5100 Technical description 4.18.5 Installation and removal Service position Depiction Description Remove screws. Remove side walls and front door. NDIR detector Undo electrical connections and hose connections. Remove the four screws. Remove NDIR detector.
-
Page 132: Toc Module
Technical description multi EA 5100 TOC module 4.19.1 Task The detection module contains a wide-range NDIR detector. Expansion of the basic Function/Measuring module with the detection module allow determination of the following sum principle parameters: Sum parameters Samples Basic module configuration Organic liquids, solids and Vertical/horizontal gases... -
Page 133: Fig. 84 Toc Detector, Door Open
multi EA 5100 Technical description Condensate pump Halogen trap and water traps for drying and cleaning the measuring gas. NDIR detector (in the rear part of the detector) Indicator and control elements, connections Fig. 84 TOC detector, door open Water traps Measuring gas hose from the basic module (hose 80) -
Page 134: Fig. 85 Components In Basic Module
Technical description multi EA 5100 Fig. 85 Components in basic module TOC combustion tube injection port Spherical joint (fasten with forked clamp) Condensation coil The TOC combustion tube (reactor) is used to determine the TC, TOC and NPOC TOC combustion tube parameters in water samples. -
Page 135: Fig. 87 Tube Holder For Toc Combustion Tube
multi EA 5100 Technical description Screw the screw cap with the septum on the top opening of the combustion tube. Connect the condensation coil with the aid of a fork type clamp to the spherical joint on the lateral outlet. The oxygen gas supply (hose 3 of the basic module) is connected via a FAST connector at the lateral outlet directly under the screw cap. -
Page 136: Fig. 88 Condensation Coil
Technical description multi EA 5100 Fig. 88 Condensation coil FAST connector Spherical joint The detection module is equipped with the TIC condensation unit. The TIC condensation unit consists of the following components: Component Task TIC reactor TIC determination Gas-liquid separator Separation of the liquid phase (condensate, waste solution from TIC determination) Cooling block... -
Page 137: Fig. 89 Hose Diagram For Toc Detector
multi EA 5100 Technical description Fig. 89 Hose diagram for TOC detector Straight and angled FAST connectors are used to fasten hose connections. The device switch for switching the detection module on and off is located on the top Connection right of the rear of the device (when viewed from the front). -
Page 138: Fig. 90 Reverse Side Of Toc Detector
Technical description multi EA 5100 Fig. 90 Reverse side of TOC detector "External (out)" connection socket (25-pin) "C-NDIR" interface cable connection (9-pin) "External (in)" interface cable connection "Sample in" measuring gas inlet (25-pin) "Sample out" measuring gas outlet "Waste" waste outlet Power switch, fuse holder, power connection 8 Holder for the NPOC purging hose Communication with the basic module is performed via a 2 interfaces:... - Page 139 multi EA 5100 Technical description TC determination can be performed in both the multi-purpose combustion tube (standard tube) and the special EC/OC combustion tube. EC/OC determination requires the use of the EC/OC combustion tube. For the connection to the basic module, hose 82 is removed from the "sample in" measuring gas inlet on the rear of the detection module.
- Page 140 Technical description multi EA 5100 The firmware version and the analog values of the detector can be read out. 4.19.4 Adjustment/calibration 4.19.5 Installation and removal Service position Depiction Description Remove screws Remove hoses Remove side walls and front door. NDIR detector Undo electrical connections and hose connections.
- Page 141 multi EA 5100 Technical description Control electronics Remove the four screws. Remove control electronics.
-
Page 142: Software And Firmware
Software and firmware multi EA 5100 Software and firmware Network environment and system requirements PC with MS Windows 8.1 or MS Windows 10 (32- or 64-bit) Graphics resolution 1280x1024 or higher (1024x768 with restrictions possible) Mouse/trackball/keyboard USB 2.0 interface ... -
Page 143: Update
multi EA 5100 Software and firmware corresponding field), the installation is canceled. In this case, inform your systems administrator. 4. Select the installation scope via the drop-down menu in the installation window. 5. Click on [INSTALL SOFTWARE]. If you select a complete installation, the OracleXE database is installed first. This may take a few minutes. - Page 144 Software and firmware multi EA 5100 NOTE If the installation program does not start automatically, open the CD-ROM drive in your file explorer. Select the multiWin_Startinstall.exe file and execute it. The system prerequisites and user rights are checked. If the check is successful, the installation window opens.
- Page 145 multi EA 5100 Software and firmware 5. Select the analyzer (ANALYZERPSoC). Click [ NEXT 6. Select the current firmware (cyacd format) from the folder on the FIRMWARE installation CD or from the installation directory of multiWin.
- Page 146 Software and firmware multi EA 5100 7. Follow the step-by-step instructions on the screen. Use the [N ] and [B buttons to navigate.
- Page 147 multi EA 5100 Software and firmware The data transfer may take a few minutes (step 2 approx. 15 min). If communications should fail during the update, proceed as follows: Exit the UpdateCenter with [CANCEL]. Restart the PC, the analyzer and the multiWin program. ...
- Page 148 Software and firmware multi EA 5100 A message appears stating that the firmware update was performed successfully. 8. Exit the UpdateCenter with [OK]. 9. Restart the PC, the analyzer and the multiWin program.
-
Page 149: Service Software / Special Service Functions
multi EA 5100 Software and firmware Service software / special service functions 5.4.1 Device test The <geraetetest.exe> service program is used to check individual modules and their Layout interfaces. In addition, a module/component can be simulated in simulation mode to check the corresponding interface of the main device. - Page 150 Software and firmware multi EA 5100 To select the module for the test mode, click [D ] and select the appropriate Selecting the module for EVICE CHOICE device. the test mode...
- Page 151 multi EA 5100 Software and firmware After the device has been selected, the test mode is started via [S Test mode TART Necessary device configurations (e.g., MMS, configuration, sample rack choice) can be made in the start window. The individual commands found in the help and in the corresponding service manual of the module/component are entered in the [I ] window and confirmed by NPUT...
- Page 152 Software and firmware multi EA 5100 Communication configurations (e.g., MMS: Rack type) must be made in the S IMULATION window. In addition, the communication while in simulation mode can be recorded. Set [R ] to [Y ] for this. ECORDING...
- Page 153 multi EA 5100 Software and firmware 5.4.2 Terminal program The <ServiceTerminal.exe> terminal program included in the multiWin software CD or Configuration software download is used for direct control and for recording the communication with the control computer. Connect the RS232 interface of the PC (terminal program) with the COM 5 interface of the control computer in the main device (rear side: "Service”...
- Page 154 Software and firmware multi EA 5100 Select [A] for "Adjust device". Direct control Select [7] for multi EA5x00 and press [Enter]. Perform the following checks and settings: A= Adjust furnace = Temperature control settings (see the section on the combustion system)
- Page 155 multi EA 5100 Software and firmware C= Check temperature = Display the 4 temperature channels of the temperature controller...
- Page 156 Software and firmware multi EA 5100 D= Valve I/O check = Check the switching states of the output and input ports of the firmware controller here in a similar manner to the component test in multiWin. E= Flow check = Check the gas box here by switching gas flows. ...
- Page 157 multi EA 5100 Software and firmware K= Select device = Select another device here. Q= End = End direct control of the firmware controller here. Finally, switch the basic module on and off again. In the normal operating mode of the analyzer, the communication between the control Recording the computer and the multiWin evaluation program can be recorded.
-
Page 158: Log Files
Software and firmware multi EA 5100 If an error occurred during measurement operation, initialize this machine again, and then press [S ] to end recording of communication This file should be sent by email to service@analytik-jena.de together with the error description for more detailed error analysis. - Page 159 multi EA 5100 Software and firmware You can activate or deactivate recording of the device-specific ULTI multiWin_Comm.log or the multiWin_Flow.log files via the ULTI checkbox. The communication between multiWin and the analysis device is saved in the multiWin_Comm.log file. Event logging is performed in the multiWin_Flow.log file.
-
Page 160: Installation And Commissioning
Installation and commissioning multi EA 5100 Installation and commissioning A requirement for installation of the multi EA5100 analysis system is a completed and signed "Declaration of readiness for installation" form provided in the Extranet. Installation location requirements For the requirements for the climatic conditions of the installation site, see chapter Ambient conditions 3 "Technical data and parameters Test mode (on) >>>”. - Page 161 multi EA 5100 Installation and commissioning For the electrical connection data, see section "Technical data and parameters”. The operator is responsible for the gas supply and the corresponding connections and Gas supply pressure reducers. The connection hoses with outer diameter 6 mm and inner diameter 4 mm are included with the delivery.
-
Page 162: Fig. 92 Device Layout In Horizontal Operation
Installation and commissioning multi EA 5100 Fig. 92 Device layout in horizontal operation... -
Page 163: Electrical Installation
multi EA 5100 Installation and commissioning Fig. 93 Device layout in vertical operation Electrical installation Install the electrical connections (for communication and power supply) in accordance with the descriptions provided in the installation protocol. Gas installation Install the gas supply connections (for sample gas and gas supply) in accordance with the descriptions provided in the installation protocol. -
Page 164: Functional Test
Installation and commissioning multi EA 5100 Import the methods corresponding to the device configuration from the method library into the multiWin program. Initialize the analysis system! Switch on the main device, the samplers and detectors Basic initialization ... - Page 165 multi EA 5100 Installation and commissioning Check the multiWin software version via the H menu Software and firmware NFO ABOUT MULTI item. version check The current software and firmware versions are listed in an overview document provided in the Extranet under Service>EA>Software>Software Download and also available for download there.
- Page 166 Installation and commissioning multi EA 5100 incorrect. Perform a 3-fold determination (3 out of 4) with a suitable method settings for each. This could be: TN: TN_liquid_H or TN_liquid_V TS-UV basic: TS-UV-basic_liquid_V or TS-UV-basic_liquid_H TS-UV MPO: TS-UV-MPO_liquid_V or TS-UV-MPO_liquid_H TS coulometric: TS-coul_liquid_V or TS-coul_liquid_H TC: TC_liquid_V or TC_liquid_H Cl with "high sensitive”: TCl_hs4_liquid_H or TCl_hs4_liquid_H Cl with "sensitive”: TCl_s_liquid_H or TCl_s_liquid_V...
- Page 167 multi EA 5100 Installation and commissioning 500 µl 10 mg/l 5,100…9,000 6.5.3 Advanced analytical function test (with calibration) Perform the following measurements in horizontal or vertical mode depending on the Preparation installed device configuration. Perform measurement of the blank values after a warm-up time of at least 12 hours.
- Page 168 Installation and commissioning multi EA 5100 Measurement conditions (vertical mode) Determinations: 3 of 4 RSD: <5 % Furnace temperature: 1050 °C Argon inlet: 100 ml/min Oxygen inlet: 100 ml/min Post-combustion time: 60 s Injection speed 0.5 µl/s Measurement conditions (horizontal mode) ...
- Page 169 multi EA 5100 Installation and commissioning Measurement: Carbon calibration (TC module) Use isooctane (p.a. quality), the carbon content is 84.11 wt-% (580.359 g/l) − Use the variable volume at constant concentration calibration type (unsuitable − for use with the auto-injector) Measure the following volumes: 10 µl;...
- Page 170 Installation and commissioning multi EA 5100 Oxygen inlet: 100 ml/min Post-combustion time: 60 s Injection speed (vertical) 0.5 µl/s Measurement conditions (horizontal mode) Determinations: 3 of 4 RSD: <5 % Furnace temperature: 1050 °C ...
- Page 171 multi EA 5100 Installation and commissioning The standard solution must be identical to that used during calibration and be filled into a new sample vessel. Target value: 0.5 mg/l ± 0.05 mg/l Measurement: Chlorine calibration check (high sensitive measuring 100 μl injection volume −...
-
Page 172: Maintenance And Care
Maintenance and care multi EA 5100 Maintenance and care Maintenance intervals Basic module Maintenance Measure interval Daily Check gas flow Check system tightness Weekly Clean and care of the analyzer Check all hose connection for proper fit; replace loose connections Monthly Check fastening screws for proper fit;... - Page 173 multi EA 5100 Maintenance and care Measuring cells "sensitive” and "high concentration” Change the electrolyte, wipe out measuring cell after each electrolyte replacement Measuring cell "high sensitive”: Refill electrolyte Electrolyte replacement only if crystalline deposits form, if the electrolyte has become opaque or the measurement sensitivity is reduced ...
-
Page 174: Maintenance Instructions
Maintenance and care multi EA 5100 Maintenance interval Maintenance task Check hoses for cracks, replace as necessary Check hose connections for tight fit Quarterly Check the TOC combustion tube for cracks and damage Check the TIC reactor for cracks and damage. Check the condensation coil for cracks and damage Check the condensate pump for leaks Check the dosing syringe for leaks... - Page 175 multi EA 5100 Maintenance and care Visually check the special seal (auto- Visually check for damage 402-889.583 protection valve assembly) Check the heating of the auto-protection Read out the temperature in the test mode 402-889.527 valve assembly (target value 100 °C) of the FW controller = [Test mode on] + ["I"...
- Page 176 Maintenance and care multi EA 5100 Lubricate the two gear rods (Z-drive) Lubrication with long-life grease 702-886.289 702-886.288 Check the firmware version of the autosampler Update the firmware of the autosampler Check the autosampler using test software ...
- Page 177 multi EA 5100 Maintenance and care Check/replace the sealing ring in the ABD [coupling Visually check for damage 402-815.838 piece (quartz glass) connection in the ABD] Visually check for damage and 402-889.039 Check/replace the quartz glass boat and adsorption contamination material ...
- Page 178 Maintenance and care multi EA 5100 7.2.5 LPG 2.0 module Maintenance activity Description Order number Visually check for damage and 702-520.211 Check/replace the sample inlet filter contamination Check the tightness of the Swagelok inlet Check with the "Sniffer" gas detector connector (LPG sample cylinder) while the sample cylinder is connected Check/replace the injection head to the...
- Page 179 multi EA 5100 Maintenance and care Check the tightness of Swagelok inlet Check with the "Sniffer" gas detector connectors (LPG sample cylinder / while the sample cylinder is compressed gas sample cylinder) connected Visually check for damage 402-889.180 Check/replace the injection head to the combustion tube (complete with hose) ...
- Page 180 Maintenance and care multi EA 5100 Set a target room temperature (-5 °C) 702-889.568 Measure the temperature in the measuring cell Check the cell cooling holder Measure the cooling unit current (>1.5 A) Check the measuring cell with the magnetic stirrer ...
- Page 181 multi EA 5100 Maintenance and care 7.2.7.2 for the "sensitive” and/or "high concentration” measuring cells Maintenance activity Description Order number Check/clean the titration cell Visually check for damage and contamination 702-889.562 Replace the measuring cell body or the silver bottom electrode ...
- Page 182 Maintenance and care multi EA 5100 See the "Maintenance and care" section in the 402-889.301 Check/clean/replace the two sensor electrodes user manual See the "Maintenance and care" section in the 402-889.302 Check/clean/replace the anode assembly user manual ...
- Page 183 multi EA 5100 Maintenance and care Read the operating hours of the ozone generator (terminal program: <OG>) Reset the operating hours of the ozone generator if the ozone generator has previously been replaced (terminal program: <OGCLR>) Read the operating hours of the ozone decomposer (terminal program: <KO>) Reset the operating hours of the ozone decomposer if the ozone decomposer has previously been...
-
Page 184: Wear Parts Overview (Replacement Intervals)
Maintenance and care multi EA 5100 Visually check for damage and contamination 402-889.657 Check/clean/replace the cooling coil including hose connection to the TIC reactor Clean with distilled water Check for pump hose damage 402-884.005 Check/clean/replace the waste or condensate pump and its hose connections ... - Page 185 multi EA 5100 Maintenance and care UVFD 5000 Component (order number) Replacement interval S module 5100 Lamp, UVFD 5000 (11-0402-001-21) 16000 operating hours basic/MPO Chemical ozone decomposer + filter kit (11-0402-010-12) 24 months MPO unit (11-0903-003-14) 24 months Filter holder, complete, with filter (11-0401-040-11) 24 months CLD 5000/ Component (order number)
- Page 186 Maintenance and care multi EA 5100 17 mm septa set (402-889.557) 12 months Screw cap, with hole (402-889.306) 24 months Septum, TIC vessel (402-889.659) 12 months Halogen absorber filling, for 11 mm U tube (402-810.050) 12 months 24 months Pump hose for peristaltic pump, waste (402-884.005) Water trap (402-881.228) 12 months TC prefilter (402-881.229)
-
Page 187: Functional Test
multi EA 5100 Maintenance and care The basic kits for wear parts (WP) are listed in section 11.2.1, and the basic kits for Basic maintenance kits replacement parts (RP) in section 11.1.1. (WP and RP) Functional test The technical function test and an analytical function test (simple or advanced) must be performed after all maintenance. -
Page 188: Troubleshooting
Troubleshooting multi EA 5100 Troubleshooting EA error message in the software / cause / remedy Error Error message Remedy code Cause No firmware response! multi EA 5100 not switched on Switch on the multi EA 5100 multi EA 5100 not connected to ... - Page 189 multi EA 5100 Troubleshooting Undefined multiWin exit Exit multiWin Switch off the multi EA 5100 Detach the USB cable and re-connect after approx. 10 s Restart the operating system (PC) Switch on the multi EA 5100 ...
- Page 190 Troubleshooting multi EA 5100 Communication problems Exit multiWin Check the USB cable connection! Extension of the USB cable is not permitted!!! Switch off the multi EA 5100 Switch on the multi EA 5100 Restart multiWin ...
- Page 191 multi EA 5100 Troubleshooting Timeout during operation (device Acknowledge message not ready to measure) Initialize Exit multiWin Switch off the multi EA 5100 incl. samplers and detectors Detach the USB cable and re-connect after approx. 10 s ...
- Page 192 Troubleshooting multi EA 5100 HCl addition required Access [S ] - [C YSTEM OMPONENT TEST Manually add 10 µl HCl (10 mg/l) to the cell SO2 addition required * SO2 addition required Add 2 µl Na (1000 mg/l) to the cell Exception during measurement Exception during measurement ...
- Page 193 multi EA 5100 Troubleshooting Initialization incorrect Exit multiWin Switch the multi EA 5100 off and on again Start multiWin Initialize No response from PC * PC not responding to firmware Exit multiWin commands Switch off the multi EA 5100 ...
- Page 194 Troubleshooting multi EA 5100 C detector: Analog values out of range (rough) The analog values of the detector Check the quality of the carrier gas are outside the operating range Initialize Check the analog values in the component test (via [SYSTEM] - [COMPONENT TEST] - [OPTICAL BANK]) C detector: Inactive Detector type transmission failed...
- Page 195 multi EA 5100 Troubleshooting Communication to the chlorine Acknowledge message module interrupted Switch the chlorine module on/off Initialize Cl sensor Indicator error Indicator value out of range after Acknowledge message titration start (measurement Initialize cannot start) ...
- Page 196 Troubleshooting multi EA 5100 CL detector update error Repeat update Gas box: No connection Communication error Acknowledge message Check the gas box power supply (24 V, ON) (4.3.3) Initialize Gas box: Error when setting the target flow Communication to gas box ...
- Page 197 multi EA 5100 Troubleshooting Argon pressure missing Argon gas flow insufficient Check the Ar connection Check the Ar gas inlet pressure in the gas box Sampler: no connection Communication faulty after MMS Acknowledge message 5100 was detected during ...
- Page 198 Troubleshooting multi EA 5100 Sampler target position not Switch off the sampler reached Replace rack Move the injector head to pos. xx and check for mechanical obstructions Switch on the sampler, self-initialization of the sampler is performed (4.6.3) ...
- Page 199 multi EA 5100 Troubleshooting Flame sensor calibration failed Check the flame sensor cable connection (multi EA 5100 to ABD) Check the flame sensor resistance (see ABD service manual) Switch the device on and off Record firmware communication via the terminal program ...
- Page 200 Troubleshooting multi EA 5100 Auto-injector syringe: Runtime exceeded Communication error Check the auto-injector power supply (4.5.3) Completion message at dosing end Check the contacts of the auto-injector and the auto-injector holder not received for corrosion. Clean with a contact cleaning spray. ...
-
Page 201: Error Diagrams
multi EA 5100 Troubleshooting Communication error Switch the GSS off and on again Syringe pump faulty Check the GSS power supply Check the serial connections of the samplers via T-cable (4.6.2) Check communication via <geraetetest.exe> (4.8.3) ... -
Page 202: Fig. 94 Error 0011 - No Response To Signal
Troubleshooting multi EA 5100 8.2.1 Electrical errors Power supply/control electronics Fig. 94 Error 0011 - No response to signal... -
Page 203: Fig. 95 Target Temperature Not Achieved
multi EA 5100 Troubleshooting Temperature control Fig. 95 Target temperature not achieved... -
Page 204: Fig. 96 Error 130 - No Communication With Cl Module
Troubleshooting multi EA 5100 Detector Fig. 96 Error 130 – No communication with Cl module... -
Page 205: Fig. 97 Mfc Not Ok
multi EA 5100 Troubleshooting 8.2.2 Flow error Gas supply Fig. 97 MFC not OK 8.2.3 Dosing error Remedying this error type is described in detail in the user manual in section 13, "Troubleshooting". 8.2.4 Analytical errors Remedying this error type is described in detail in the user manual in section 13, "Troubleshooting". -
Page 206: Fig. 98 No Tn Signal
Troubleshooting multi EA 5100 8.2.5 Various errors Fig. 98 No TN signal... -
Page 207: Service Equipment And Testing Devices
multi EA 5100 Service equipment and testing devices Service equipment and testing devices To service the multi EA 5100, standard tools are required, consisting of various slotted, Phillips, Allen and Torx screwdrivers, pliers and wrenches The special tools and measuring devices are listed in the following table Order number Description Device/detector... - Page 208 Service equipment and testing devices multi EA 5100 Order number Description Device Link/contact 702-011.032 Null-modem cable General parts@analytik-jena.de 11-0111-017-11 Threading aid for tubings General parts@analytik-jena.de 702-889.856 Face wrench, 2 mm, adjustable parts@analytik-jena.de CLD; 11-810.078 Indicator paper (ozone) parts@analytik-jena. UVFD-MPO...
-
Page 209: Notes On Disposal
multi EA 5100 Notes on disposal Notes on disposal At the end of its service life the multi EA 5100 and all its electronic components must be disposed of in accordance with the applicable regulations as electronic waste. -
Page 210: Annex
Annex multi EA 5100 Annex Spare parts list (table) Please use the current spare parts list in the AJ Extranet. (AJ E > S > EA > XTRANET ERVICE EA 5100 > S > S _EA_5100_ MULTI PARE PARTS PARE ARTS MULTI XLSX... - Page 211 multi EA 5100 Annex LPG module 2.0 Order number Description 401,781 Fuse, T4 AH Line filter assembly, 0.5 μm 702-520.231 702-889.462 Heating unit, LPG, complete, for LPG 2.0 702-889.550 Serial data cable for autosampler LPG/GSS combination Order number Description module 401,781 Fuse, T4 AH Line filter assembly, 0.5 μm...
-
Page 212: Consumables List (Table)
Annex multi EA 5100 11-0401-040-11 Filter holder, complete, with filter Reactor 11-0408-001-11 702-823.116 Service kit, membrane pump S module basic/MPO Order number Description 11-0401-040-11 Filter holder, complete, with filter S module, coulometric Order number Description 11-801.309 Fuse, 1.0A, time-lag C module 5100 Order number Description 702-889.469... -
Page 213: Fig. 22 Mms 5100
multi EA 5100 Annex 1 x hook for ABD 2 x septum, 12.5 mm, set of 5 1 x ABD guide tube 2 x FAST connector 1 x Auto-protection filter, set of 5 MMS 5100/ 450-889.306/ Consumables and wear parts kits for the MMS 5100 / MMS-T liquid MMS-T 450-889.314 sampler... - Page 214 Annex multi EA 5100 S module 5100 MPO 450-889.318 Consumables and wear parts kits for the S module 5100 MPO Scope of delivery: 6 x FAST connector 1 x chemical ozone decomposer 1 x replacement hose set 1 x UV lamp S module 5100 450-889.319 Consumables and wear parts kits for the S module 5100 coulometric...
-
Page 215: Drawings
multi EA 5100 Annex 450-889.322 Consumables and wear parts kits for the type AI-EA auto-injector Auto-injector Scope of delivery: 3 x adjustable special cannula, for AI-EA, RN 0.64 (G23s), l: 58 mm, set of 3 1 x cannula cleaning wire, set of 12 450-889.323 Consumables and wear parts kits for the type AI auto-injector Scope of delivery:... -
Page 216: Current Service Information
Annex multi EA 5100 Current service information 11.4.1 Replacing the ozone generator on the N module 5100 The ozone generator on the N module can be replaced by authorized service personnel General as of serial number N7C-0500/AU. The new ozone generator has the following serial number: ... -
Page 217: Fig. 101 Removing The Side Panels
multi EA 5100 Annex Replace the ozone generator as follows: 1. Switch off the N-MODULE 5100 via the power switch and disconnect the power Removing the old ozone supply. generator 2. Remove 4 screws from both the left and right side panels with a 3 mm Allen key, remove the side panels toward the top and disconnect the protective conductors from the side panels. -
Page 218: Fig. 103 Removing The "In" Hose
Annex multi EA 5100 Fig. 103 Removing the "IN" hose 5. Remove the "OUT" hose (C) marked with "-3-" and replace the connector (see Fig. 102) 6. Remove the ozone generator power supply connector (D) (marked in red) from the PCB (see Fig. -
Page 219: Fig. 105 Screwing In The Screws
multi EA 5100 Annex 1. Screw in the two slotted screws with washers with a slotted screwdriver (see Fig. Installing the VM ozone 105). generator 2. Screw in the combination screw with 2-3 turns of a 2.5 mm Allen key (G) (see Fig. 105). -
Page 220: Fig. 107 New Ozone Generator
Annex multi EA 5100 6. Connect the gas connections to the ozone generator. Connect the hose marked in blue with the "IN" connection (L) (also marked in blue on the ozone generator) (see Fig. 107). 7. Connect the "OUT" hose (H) (see Fig. 107). 8. -
Page 221: Fig. 109 Rear Of The N-Module 5100
multi EA 5100 Annex 1. Connect the N module 5100 to the basic module and switch on the analysis system. 2. Start the analyzer normally, activate a suitable TN method and wait for the device to be ready for operation (ca. 45 min). 3. -
Page 222: Fig. 110 Readout Of The Operating Hours
Annex multi EA 5100 The system is once again ready for operation. 5. After the system is once again put into operation by the user, its calibration must be checked with the aid of the daily factors, or alternatively via the AQS function (preferably a concentration in the middle of the calibration range). -
Page 223: Fig. 112 Claims Form (Example)
multi EA 5100 Annex 4. Document the hours in the corresponding claims form (see the AJ Extranet). If the system has failed repeatedly, please also refer to the Diagnosis Guide (see the AJ Extranet). Fig. 112 Claims form (example) - Page 224 Annex multi EA 5100...