Endress+Hauser analytikjena Biometra TOne Operating Manual
Hide thumbs
Also See for analytikjena Biometra TOne:
- Operating manual (101 pages) ,
- Short manual (2 pages)

Related Manuals for Endress+Hauser analytikjena Biometra TOne


Summary of Contents for Endress+Hauser analytikjena Biometra TOne
- Page 1 Operating Manual Biometra TOne High-performance thermal cycler for DNA amplification by PCR...
- Page 2 Manufacturer Analytik Jena GmbH Konrad-Zuse-Straße 1 07745 Jena, Germany Phone: +49 3641 77 70 Fax: +49 3641 77 92 79 E-mail: info@analytik-jena.com Technical Service Biometra GmbH Rudolf-Wissell-Straße 15 37079 Göttingen / Germany Phone: +49 3641 77 7407 Fax: +49 3641 77 9279 E-mail: service@analytik-jena.com For a proper and safe use of this product follow the instructions.
-
Page 3: Table Of Contents
Biometra TOne Table of contents Table of contents 1 Basic information ..............................About this manual ............................Intended use ..............................2 Security ................................. Safety labeling on the device ........................... Requirements for the operating personnel..................... 10 Safety instructions for transport and commissioning..................10 Safety instructions: during operation ...................... - Page 4 Table of contents Biometra TOne 5.6.1 Opening a program template for editing ......................32 5.6.2 Assigning program names ..........................32 5.6.3 Defining the temperature and the preheating function of the heated lid ............ 33 5.6.4 Graphical or spreadsheet programming......................33 5.6.5 Editing, adding or deleting steps ........................
- Page 5 Biometra TOne Table of contents 10.2 General characteristics ............................. 68 11 Revision history Manuals ............................. 70 Index ..................................71...
- Page 6 Table of contents Biometra TOne...
-
Page 7: Basic Information
Biometra TOne Basic information Basic information About this manual Content The operating manual describes the thermal cycler Biometra TOne with all its 2 models. In this text, these models are collectively referred to as the device. Any differences be- tween the models are explained in the relevant section. The device is intended to be operated by qualified specialist personnel who must ob- serve all instructions given in the operating manual. -
Page 8: Intended Use
Basic information Biometra TOne Intended use The device Biometra TOne is an end-point thermal cycler. The device is designed to am- plify nucleic acids by iteration cycles of heating and cooling using DNA polymerases in a PCR reaction. The thermal cycler is a device for general laboratory use. The device combines modern design and user-friendly software. -
Page 9: Security
Biometra TOne Security Security For your own safety and to ensure error-free and safe operation of the device, please read this chapter carefully before commissioning. Observe all safety instructions listed in this user manual and all messages and infor- mation displayed on the monitor by the control and analysis software. Safety labeling on the device Warning and mandatory action labels have been attached to the device and must al- ways be observed. -
Page 10: Requirements For The Operating Personnel
Security Biometra TOne Requirements for the operating personnel The device must only be operated by qualified specialist personnel instructed in the use of the device. This instruction also include teaching the contents of this user manual and of the user manuals of the connected system components. We recom- mend training by qualified employees of Analytik Jena or its representatives. -
Page 11: Safety Instructions - Protection Against Explosion And Fire
Biometra TOne Security The ventilation equipment on the device must be in good working condition. ¡ Covered ventilation grilles or slots etc. may cause the device to break down or may cause damage to it. ¡ Modifications, conversions and extensions to the device are only permitted after consultation with Analytik Jena. -
Page 12: Handling Hazardous Substances
Security Biometra TOne Do not operate the device near sources of strong electromagnetic radiation such ¡ as an unshielded, deliberately operated high-frequency source. Strong electro- magnetic fields can interfere with the proper operation of the device. 2.4.4 Handling hazardous substances The operator is responsible for the selection of substances used in the process as well as for their safe handling. -
Page 13: Behavior During Emergencies
Biometra TOne Security Use only original spare parts, wear parts and consumables. These have been ¡ tested and ensure safe operation. Behavior during emergencies If there is no immediate risk of injury, switch off the device and the connected system components immediately in hazardous situations or in the event of an accident and/ or disconnect the power plugs from the power outlets. -
Page 14: Function And Design
Function and design Biometra TOne Function and design Principle of operation Developed in 1983 by Kary Mullis, PCR (polymerase chain reaction) now is a common and indispensable technique used in medical and biological research laboratories. The end-point thermal cycler amplifies nucleic acids by repeated cycles of heating and cooling using DNA polymerases reaction. -
Page 15: Design
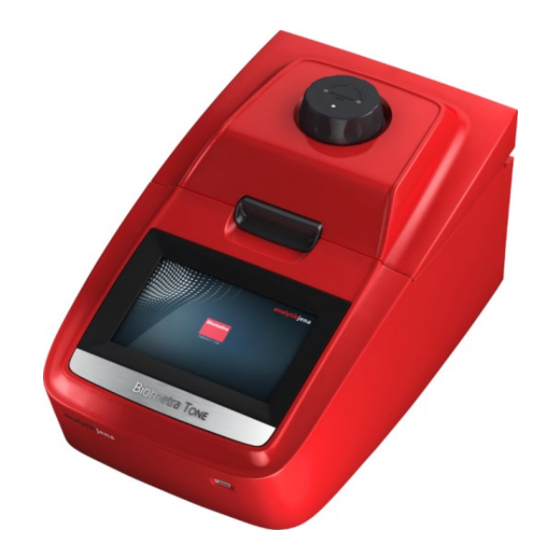
Biometra TOne Function and design Design Fig. 1 Device configuration 1 Wheel for exerting the contact pressure 2 Lid sealing button 3 Display 4 USB port The device is controlled via a 7" touch screen display and the easy-to-use user interface. The touch screen is installed at a flat angle. -
Page 16: Thermal Block
Function and design Biometra TOne 3.2.1 Thermal block The device is equipped with a thermal block. Fig. 2 Opened device with thermal block The thermal blocks are made of aluminum and coated with a special alloy. Aluminum blocks offer high heating and cooling rates for fast protocol run times. Once the lid is closed, the rubber seal of the heated lid ensures that the space around the sample block is encapsulated. -
Page 17: Heated Lid
Biometra TOne Function and design The optional gradient function allows you to optimize the temperature program for new primer pairs in a single run. To do this, use the Linear Gradient Tool to set a tempera- ture difference between the columns of the sample block. The temperature difference from one column to the next within a particular sample block is always the same. -
Page 18: Models
Function and design Biometra TOne Models The following models are available for the thermal cycler Biometra TOne: Model Block format Thermal block Gradient function Biometra TOne 96 Aluminum Biometra TOne 96 G Aluminum Gradient function Control software GLP compliance The software can manage up to 90 user directories. At each system start, the device per- forms an initial self test. -
Page 19: Consumables And Reagents
Biometra TOne Function and design Consumables and reagents With regard to consumables and reagents, the device is an open system: Depending on the sample block, you can use single tubes, strips or plates. ¡ PCR plates can have a “high profile” or a “low profile”. The plates can either have a ¡... -
Page 20: Installation And Commissioning
Installation and commissioning Biometra TOne Installation and commissioning Installation conditions 4.1.1 Ambient conditions Climatic conditions The requirements for the ambient conditions at the installation location are set out in the specifications. If required, ensure that the room is temperature-controlled. Requirements with regard to ¡... -
Page 21: Setting The Operating Voltage
Biometra TOne Installation and commissioning NOTICE Keep the original packaging Transport damage can only be avoided if the device is transported in its original packag- ing. ¡ Keep the original packaging for transport, e.g., in case the device must be returned to the manufacturer for repair. -
Page 22: Connecting The Device To A Network
Installation and commissioning Biometra TOne } If required, adjust the operating voltage to the mains voltage. To do so, switch off the device and disconnect the mains plug from the electric socket. } Place the device on its side. } Use a coin or other round object to turn the slot on the voltage selector switch and adjust it to the correct operating voltage. -
Page 23: Opening And Closing The Device
Biometra TOne Installation and commissioning } Open the device menu on the thermal cycler and enter a suitable static IP address (e.g. 192.168.0.2) and a subnet mask (e.g. 255.255.255.0). } Enter a suitable static IP address (e.g. 192.168.0.1) and a subnet mask (e.g. 255.255.255.0) matching the above device settings in the network settings on your computer. -
Page 24: Fitting Samples Into The Device
Installation and commissioning Biometra TOne Fitting samples into the device The intensity of the contact pressure is designed for a fully populated block. When using only a few samples in the block, place an additional two (empty) tubes of the same height in the four corner positions of the block. -
Page 25: Operation
Biometra TOne Operation Operation Using the software (general) The touch screen display is resistive. You must apply slight pressure to trigger the func- tion of a particular button. Just slightly touching the display as with the capacitive touch screen of a smartphone or tablet is not enough. The software will display an alphanumeric or numeric keypad when selecting an input field: ¡... -
Page 26: Starting The Software
Operation Biometra TOne Starting the software After switching the device on, the software is started automatically and performs an ini- tial self test. The device stores the test result in the Power On Log File. During the test, the device shows the home screen. After completing the initial self test, the software shows the login screen. -
Page 27: Home Screen
Biometra TOne Operation Home screen After logging in, the software shows the Home screen. Quick Start Block 1 28.0°C Free Programs Incubate Tools User: John Doe Logout dd.mm.yyyy hh:ss Fig. 7 Home screen The Home screen provides the following functions: Option Icon Description Quick Start Block... -
Page 28: Quick-Starting Programs
Operation Biometra TOne Block status The software shows the block status in the login screen and in the Home screen. If one block is free, you can use the button to open the quick-start function for programs. Option (color) Display Description Free (green) The block is free. -
Page 29: Incubating Samples At Constant Temperature
Biometra TOne Operation See also 2 Creating or editing PCR programs [} 30] Incubating samples at constant temperature Incubation mode allows you to incubate samples for any period of time at any tempera- ture meaning that you could, e.g., also keep samples at a constant low temperature over night. -
Page 30: Creating Or Editing Pcr Programs
Operation Biometra TOne Creating or editing PCR programs Quick reference guide } Tap Programs on the Home screen. } Edit an existing program or create a new program based on a program template: – Select an existing program on the page Program overview. Tap on the button Edit to edit the program. - Page 31 Biometra TOne Operation } Use the input field Lid Temperature: to set the temperature for the heated lid. You also have the option to enable the preheating function for the heated lid by tapping on the button On. } You can use the buttons Insert and Delete to insert additional steps or to delete ex- isting steps in the program.
-
Page 32: Opening A Program Template For Editing
Operation Biometra TOne 5.6.1 Opening a program template for editing } Tap Programs on the Home screen. ü The Program overview page opens. The directory of the current user is prese- lected. } Tap New from template. ü The system opens the Program templates page containing different program templates. -
Page 33: Defining The Temperature And The Preheating Function Of The Heated Lid
Biometra TOne Operation } Use Save as to amend the program name when saving the program. Confirm your entry by tapping the green check mark. Tap Save to save the program. 5.6.3 Defining the temperature and the preheating function of the heated lid Temperature of the heated lid ð... -
Page 34: Fig. 13 Graphical Programming
Operation Biometra TOne Graphical programming The currently selected step is highlighted in blue during the programming process. The graphical view divides each step into heating phase and holding time. Some parameters are only displayed by symbols (see table). User: John Doe dd.mm.yyyy hh:mm Name: Three-step... -
Page 35: Fig. 14 Spreadsheet Programming
Biometra TOne Operation Program parameters Display Description (example) ΔR ! (in red) Adjust the average heating and cooling rate for the selected step The maximum heating and cooling rate de- pends on the device model. Degrees Increase or decrease the block temperature 55.0 +1.0 column by column by the temperature incre-... -
Page 36: Editing, Adding Or Deleting Steps
Operation Biometra TOne Program parameters Display Description (example) GoTo Define program loops: ¡ Enter the step number to which the pro- Cycles gram shall return ¡ Define the number of iteration cycles (max. 999) ΔT(°C) 10.0 Increase or decrease the block temperature in each cycle by the temperature increment (Temp. -
Page 37: Programming A Loop
Biometra TOne Operation Step GoTo 30x Step Temperature: Hold Time: Go To: Cycles: Grad Fig. 15 Defining all parameters for a step } For gradient-enabled models, define a gradient as required: – Tap on the block temperature field in the graphical or spreadsheet view. Tap on the button Degrees on the numeric keypad. -
Page 38: Programming A Temperature Increment
Operation Biometra TOne } Use the filed Go To: to enter the step to which the program shall return in the loop. } Use the field Cycles: to enter the number of cyclical reiterations. } Confirm the entries by tapping the green check mark. } Save the program after completing the changes. -
Page 39: Programming A Time Increment
Biometra TOne Operation } Tap the button ΔT in the graphical view. Tap on the field for the step in the line un- derneath the diagram for which you want to set a temperature increment. The step must be within a loop. } Or: Tap on the field for the step in the column ΔT of the spreadsheet view for which you want to set a temperature increment. -
Page 40: 5.6.10 Programming A Gradient
Operation Biometra TOne ü You have adjusted the heating or cooling rate for one or for all program steps. For this step (or for all steps) the graphical view displays the symbol ! (in red). 5.6.10 Programming a gradient The gradient function is only available on gradient-enabled models. Use the gradient function to find the ideal annealing temperature for a new primer pair. -
Page 41: Fig. 19 Linear Gradient Tool (Mono Block)
Biometra TOne Operation Step Gradient Annealing Temp.: Lin. Std. Column Grad. incr.: Col. Fig. 19 Linear Gradient Tool (mono block) } Linear Gradient Tool: Enter the required annealing temperature in the field Anneal- ing Temp.:. – The annealing temperature that was entered is applied to a specific column of the sample block. -
Page 42: 5.6.11 Saving The Program
Operation Biometra TOne ü You have created a temperature gradient for a program. 5.6.11 Saving the program ð Prerequisite: You have opened an existing program or a program template for edit- ing. You want to save the program after making all the required changes. } Tap Done on the graphical or spreadsheet programming screen. -
Page 43: Executing A Pcr Run
Biometra TOne Operation } Tap Save as to save programs under a new name. ü You have created a copy of one or of all programs. You can edit the copied programs to create different versions for frequently used pro- grams. -
Page 44: Fig. 21 Program Overview With Preview
Operation Biometra TOne Program overview User: Admin dd.mm.yyyy hh:mm User Programs Preview users in directory Program information Name Lin-grad-dag Block Type: Gradient 96 Lid: 99 °C Preheat Lid: Program Runtime: 01h 15m 22s Admin Step GoTo John Doe Step New from Home Copy Delete... -
Page 45: Understanding The Graphical, Spreadsheet And Gradient View
Biometra TOne Operation Display Examples Description Name Three-step Program name For programs with gradient: Display ¡ (Degrees) behind the program names Estimated End 17:49:46 Expected completion time of the program Remain. Time 01h 26m 11s Expected remaining run time Block Temp. 59.5°C Current block temperature For programs with gradient: Display of the... -
Page 46: Fig. 24 Spreadsheet View During A Program Run
Operation Biometra TOne Program parameters Display Description (example) Time increment Δt The holding time is increased by the time in- crement in each cycle. Heat.-/Cool rate The heating and cooling rate for the selected step was adjusted in the program. Gradient The block temperature increases or de- 55.0... -
Page 47: Pausing Or Stopping Executed Programs, Skipping Steps
Biometra TOne Operation Program parameters Display Description (example) Heat.-/Cool rate Between the steps, the device will heat or cool the sample block by the specified aver- age heating or cooling rate [°C/s]. Gradient The block temperature increases or de- 55.0 +1.0 creases column by column by the tempera- (at Block Temp. -
Page 48: Tools
Operation Biometra TOne Tools The page Tools can be accessed via the Home screen. On the page Tools you can use the following tools: Option Icon Description Settings Adjust software settings such as date and time or ¡ the brightness of the screen Connecting the device to a network ¡... -
Page 49: Fig. 26 Network Settings
Biometra TOne Operation Option Icon Description Touch screen Calibrate the touchscreen calibration To do this, follow the instructions and touch three dif- ferent spots on the screen If the calibration was successful, a small cross is dis- played at the end. Factory settings Reset the software to factory settings Attention! After confirming the corresponding prompt,... -
Page 50: Viewing The Documentation
Operation Biometra TOne Network users The software logs all users who access the device via the network. These users are listed in chronological order in a table. The table allows you to check if only authorized per- sons access the device via the network. See also 2 Connecting the device to a network [} 22] 2 Performing a backup [} 53]... -
Page 51: Fig. 27 Documentation Of Self Tests
Biometra TOne Operation Viewing and exporting a Run The function keys allow you to view a log file and to export log files to a USB flash drive. Log File Option Icon Description Selected Log File to USB Save the highlighted log file on a USB flash drive All files to USB Save all log files on a USB flash drive... -
Page 52: Performing An Extended Self Test
Operation Biometra TOne 5.9.3 Performing an extended self test During the extended self test, the device checks the most important device functions and components. The software will prompt you to carry out an extended self test at regular intervals. } The following conditions must be met for the software to generate reproducible test results: –... -
Page 53: Creating A Service Info File For Troubleshooting
Biometra TOne Operation Test Description Regulation Tests whether the control unit correctly controls the sample block. The test result for each individual test can either be Passed or Error. While carrying out a self test, you cannot start any other program on the device. Tap Cancel Self Test to abort a self test while it is running. -
Page 54: 5.10 User Management
Operation Biometra TOne 5.10 User management You can use the menu option Tools|User-Managment to access the user management. The user management allows you to manage up to 90 user directories. On page User Management you will find a table containing all users including their names, initials and group assignments. -
Page 55: 5.10.1 Editing A User
Biometra TOne Operation 5.10.1 Editing a user } Select the user from the table on the page User Management. } Tap Edit. } On the next page you have the option to change the user name and/or the language setting for the software interface. You cannot change the initials of the user. -
Page 56: 5.10.2 Creating New Users
Operation Biometra TOne 5.10.2 Creating new users } Tap New User on the login screen or on the page User Management. } On the next page, enter a user name, initials and, if required, a password for the user: – Username: Enter up to 13 characters or figures using the alphanumeric keypad. –... -
Page 57: Troubleshooting
Biometra TOne Troubleshooting Troubleshooting Heating and cooling process take too long The device is equipped with strong fans that remove the heat from the heat sink. The air inlet to these fans is located on the underside of the device. The air inlet may be ob- structed by soiling or objects such as a piece of paper that is drawn in by the fan’s draft. - Page 58 Troubleshooting Biometra TOne } Select the field USB in the column User. } Use Save to save the programs on the USB flash drive. } Start the second thermal cycler and insert the USB flash drive into the USB port of this device.
-
Page 59: Mirror Programs On Multiple Devices
Biometra TOne Troubleshooting Mirror programs on multiple devices You can use the backup function to mirror devices. During this process, you will use the user management to copy the users and their programs from one device to another. You do not have to create every single user or program one by one. To be able to use this procedure, both devices must use the same software version. - Page 60 Troubleshooting Biometra TOne } Carefully turn the lid wheel counterclockwise until it moves without resistance and you can hear no more clicking. } Release the pin and keep turning the lid further up in counterclockwise direction until the pressure is completely relieved. } Press the lid sealing button to open the lid.
-
Page 61: Maintenance And Care
Biometra TOne Maintenance and care Maintenance and care The device is mostly maintenance-free. The care and maintenance tasks which can be performed by the user are limited to the cleaning and disinfection of the housing and the sample block. The operator may not undertake any service or maintenance work to this device and its components other than that specified in these instructions. -
Page 62: Disinfecting The Device
Maintenance and care Biometra TOne } Clean the ventilation slots on the underside and at the rear of the device with a vac- uum cleaner. Disinfecting the device WARNING Risk of electric shock ¡ Always switch off the device and disconnect the power plug before performing maintenance work. -
Page 63: Firmware Update
Biometra TOne Maintenance and care Firmware update Please contact the customer service or your local distributor if you wish to update the firmware. -
Page 64: Transport And Storage
Transport and storage Biometra TOne Transport and storage Transport When transporting the device, observe the safety instructions in the "Safety instructions" section. Avoid the following during transport: Impact and vibration ¡ Risk of damage due to shock, impact or vibration! Large temperature fluctuations ¡... -
Page 65: Returning A Device
Biometra TOne Transport and storage Fig. 30 Packaging instructions 8.1.3 Returning a device WARNING Risk of damage to health due to improper decontamination ¡ Decontaminate the device professionally and document the cleaning measures be- fore returning the device to Analytik Jena GmbH. ¡... -
Page 66: Storage
Transport and storage Biometra TOne } Enclose a sheet with the following data: – Name and address of the sender – Name and telephone number of a contact for inquiries – A detailed description of the fault, the precise conditions and situations under which the fault occurs Storage NOTICE... -
Page 67: Disposal
Biometra TOne Disposal Disposal The operator is responsible for correct disposal of biological samples in accordance with statutory regulations. At the end of its service life, the device and its electronic components must be dis- posed of as electronic waste in accordance with the applicable regulations. -
Page 68: Specifications
Specifications Biometra TOne Specifications 10.1 Model-specific data Models Biometra TOne 96 (without gradient function) Biometra TOne 96 G (with gradient function) Capacity 96 x 0.2 ml tubes, 96-well micro plates or 8-well strips Block material Aluminum (Al) coated with special alloy Block format 96-well (12 columns) Number of blocks... - Page 69 Biometra TOne Specifications Process control Operation Stand-alone operation via color touch screen 7" Remote control application for control and monitoring via tablet PC Minimum requirements of the iOS 8.0; Android ≥4.4 (API 19) application regarding the oper- ating system Minimum requirements of the Software version V1.43 to V1.44 application regarding the ther- mal cycler...
- Page 70 Revision history Manuals Biometra TOne Revision history Manuals Ver- Effective Changes sion date 2021-01 First Version Note: New version labeling after introduction of the Document Management System (A, B, etc.) 2021-11 Minor corrections to software description 2022-05 Adoption of the manual in the content management system Reduction and restructuring of the software description...
- Page 71 Biometra TOne Index Index automatic deactivation 33 closing 23 acoustic signal 48 opening 23 preheating before PCR run 33 setting the temperature 33 unlocking a deadlock 59 backup 53 backup of data 53 block status 28 incubation 29 initialization 26 Chinese 56 configuration...
- Page 72 Index Biometra TOne program creating 56 continuing 47 deleting 56 copying 42 editing 55 creating 30 logging in 26 deleting 42 recovering 53 deleting program steps 37 rights 54 display during run 44 roles 54 editing 30 user management 54 editing steps 36 entering a name...
- Page 73 Biometra TOne List of figures List of figures Fig. 1 Device configuration ............................15 Fig. 2 Opened device with thermal block........................16 Fig. 3 Device rear................................17 Fig. 4 Fitting samples into the device ........................... 19 Fig. 5 Voltage selector switch at the bottom of the device..................22 Fig.