Table of Contents
Advertisement
Quick Links
Advertisement
Table of Contents

Related Manuals for Olympus CAMEDIA E-20N


Summary of Contents for Olympus CAMEDIA E-20N
- Page 1 Reference Manual I Thank you for purchasing this digital Olympus camera. I Before you use this camera, read this manual carefully. I We recommend that you spend some time taking test shots and experimenting with all of the features before you take...
- Page 2 For Customers in USA Declaration of Conformity Model Number : E-20 Trade Name : OLYMPUS Responsible party : Olympus America Inc. Address : 2 Corporate Center Drive, Melville, New York 11747-3157 U.S.A. Telephone number : 631-844-5000 Tested to comply with FCC standards FOR HOME OR OFFICE USE This device complies with Part 15 of the FCC rules.
- Page 3 Features, How to Use This Manual Read This First! Caring for Your Camera, Important Parts and Names ○ ○ ○ ○ ○ ○ ○ ○ ○ ○ ○ ○ ○ ○ ○ ○ ○ ○ ○ ○ ○ ○ ○ ○...
- Page 4 CAMEDIA E-20 Features Here is a quick summary of this camera’s most exciting features for professional photographers, publishers, advertisers, or anyone experienced with an SLR camera who wants to make the transition to a digital camera. High Quality Images • High Quality CCD with approximately 4,950,000 pixels (effective pixels). •...
- Page 5 How to Use This Manual The sample page below shows you how to use this manual. Procedures Move the mode Follow the numbered dial to align the procedures. The numbers mark with in the illustrations on the left Mode Dial Setting correspond to the step Tells you the possible numbers on the right.
- Page 6 Caring for Your Camera Lens • Purchase a standard camera lens blow brush and use it to keep the lens clean. • For dust and foreign matter difficult to remove with a blow brush, use a cleaning cloth, or lens tissue, intended only for use with camera lenses to prevent scratching the lens.
-
Page 7: Table Of Contents
Contents CAMEDIA E-20 Features ....................2 How to Use This Manual ....................3 Caring for Your Camera ...................... 4 Important Parts and Names ....................9 Getting Started ....................13 Box Contents: Make Sure You Have Everything ............14 Attaching the Camera Strap ..................15 Inserting Batteries and Attaching the Optional AC Adapter ........ - Page 8 Contents (continued) Taking Pictures: Distance and Focus ............. 63 Using Autofocus (AF) ....................64 Using Manual Focus (MF) ..................68 Taking Pictures: Brightness (Exposure) (Aperture and Shutter Speed) ..Setting the Shooting Mode ..................70 Setting the Aperture Value and Shutter Speed Automatically (P Mode) ....71 Setting the Aperture Value (A Mode) .................
- Page 9 Setting Up Index Printing ..................168 Selecting Pictures for Date or Time Stamping ............ 170 Printing with Olympus Printers ................. 172 Transferring Pictures to a Computer ............173 Transferring Images between the Camera and Computer via a Direct Connection ..................... 174...
- Page 10 Contents (continued) Monitor Menus ....................185 Monitor Menus ....................186 Appendices ..................... 189 Appendix 1: Specifications ..................190 Appendix 2: Troubleshooting ..................192 Appendix 3: Camera Error Messages ..............199 Glossary of Selected Terms ................201 Index ....................... 206...
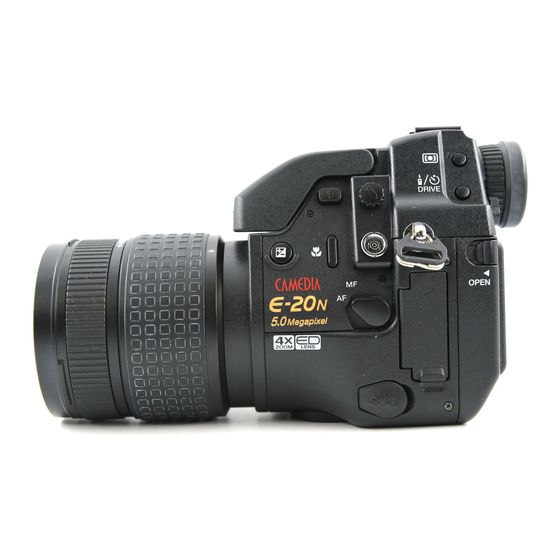
- Page 11 Important Parts and Names Metering mode button* ➝ 83 Flash mode button* ➝ 90 Drive button* button* ➝ 108 ➝ 120, 121, 122 Record mode Control panel Remote cable Sub dial ➝ See “Main dial jack➝ 124 Hot shoe and Sub dial” below. ➝...
- Page 12 Important Parts and Names (continued) Monitor button ➝ 35 Press to switch monitor off/on. In P, A, S, or M mode press twice rapidly to enter playback mode, press again to leave playback mode. Menu button ➝ 186 Press to open menu in the monitor.
- Page 13 Control panel Flash control ➝ 42, 89 Record mode • displays ➝ When the PS mode is set (➝ 80) or (flash suppression) mark TIFF*, SHQ, sharpness/contrast setting is not set displays when the built-in flash is HQ, or SQ to NORMAL (➝...
- Page 14 Important Parts and Names (continued) Viewfinder Spot metering area ➝ 83 AF target mark ➝ 34 Position this mark on the subject that Indicates the area employed for spot metering when camera is in spot metering mode you want to focus. Metering mode ➝...
-
Page 15: How To Use This Manual
Getting Started After you remove the camera from the box, first make sure that you have everything, then attach the camera strap and install the batteries provided with the camera. In this chapter, you will also learn how to install optional batteries not provided with the camera and how to connect and use the optional AC adapter which allows you to power the camera with house current. -
Page 16: Box Contents: Make Sure You Have Everything
• SmartMedia instructions • Software Installation Guide (Included in the Software CD pack in some regions) • SmartMedia card (1) • Olympus RAW File Import Plug-in Installation Guide • SmartMedia Static-free case (1) • SmartMedia labels (2) • SmartMedia protect seals (4) •... -
Page 17: Attaching The Camera Strap
• Please make sure that the strap is connected securely to the camera. Not attaching the strap, or attaching it incorrectly, could cause you to drop and damage the camera. Olympus can assume absolutely no responsibility for damages resulting from incorrectly attaching or not attaching the... -
Page 18: Inserting Batteries And Attaching The Optional Ac Adapter
Inserting Batteries and Attaching the Optional AC Adapter The following five types of batteries can be used with this camera, or you can use the optional AC adapter to connect the camera to a household power outlet. Battery Type Battery Set Rechargeable Lithium battery pack CR-V3 (provided with camera) AA (R6) Ni-MH batteries (sold separately) - Page 19 Inserting the lithium battery pack (CR-V3) Two lithium battery packs are required. Caution ○ ○ ○ ○ ○ ○ ○ ○ ○ ○ ○ ○ ○ ○ ○ ○ ○ ○ ○ ○ ○ ○ ○ ○ ○ ○ ○ ○ ○ ○ ○ ○ ○ ○ ○ ○ ○ ○ ○ ○ ○ •...
- Page 20 Inserting Batteries and Attaching the Optional AC Adapter (continued) Remove the battery holder. Battery holder Insert a battery into the battery holder as shown in the illustration. Gently press down on the battery in the direction of the arrow until Do not remove you hear it lock in place.
- Page 21 Inserting commercially available AA (R6) Ni-MH, Ni-Cd, or Alkaline batteries Be sure to use four batteries of the same type. Before inserting Ni-MH or Ni-Cd batteries, make sure that they are fully charged. Insert the batteries as described in the previous section for lithium battery packs (CR-V3).
- Page 22 Inserting Batteries and Attaching the Optional AC Adapter (continued) Inserting the optional lithium polymer battery (B-12LPB/B-10LPB) The rechargeable lithium polymer battery (sold separately) can power the camera for long periods. The lithium polymer battery is inserted into a power battery holder (B-HLD10) (sold separately) attached to the camera.
- Page 23 Using the AC adapter (sold separately) An optional Olympus CAMEDIA-brand AC adapter allows you to power your digital camera from a common AC wall outlet. Be sure to use the specified AC adapter. Use an AC adapter designed to operate on the AC voltage in the area the camere is being used.
- Page 24 Contact your dealer or an Olympus service center for assistance. Frequently inspect the AC adapter power cord. If you notice that the cable covering or plug is damaged in any way, immediately contact your dealer or an Olympus service center. • Connecting and disconnecting the AC adapter Always make sure that the camera is switched off before you connect/disconnect the AC adapter to/from the camera.
-
Page 25: Taking Pictures (Shooting And Viewing Basics)
Taking Pictures (Shooting and Viewing Basics) In this chapter you will learn how to insert a memory card, take a picture, and view the picture. This chapter describes only the basic procedures for taking and viewing pictures. For more details about camera operation, refer to the later chapters. -
Page 26: Inserting A Memory Card
Protect area SmartMedia (SM) provided CompactFlash (CF) (sold Microdrive (sold separately) separately) You can use Olympus or any A hard disk, based on the CF Can be used same as other brand 3V (3.3V) Type II standard, that can be SmartMedia to store images. - Page 27 Lift up the card cover lock while pressing the round release button under it. The card cover opens. Card cover lock Card cover While pressing here, slide up. Insert the card. • SmartMedia card Taking care not to touch the electrical contacts, hold the SmartMedia card with the notched corner down, and then insert it into the slot closest to you.
- Page 28 Inserting a Memory Card (continued) To close the card cover, press it gently until you hear it click and lock. Removing a SmartMedia card Gently push in on the installed SmartMedia card to release it, and then pull it out of the camera. Removing a CompactFlash/Microdrive card Gently press the eject button to release the card.
- Page 29 Caring for the Microdrive • Do not write on the label. • Do not peel off the label. • Do not paste anything over the label. • Always transport or store the Microdrive in its specially designed protective case. • The Microdrive could become warm during prolonged use, so handle it carefully. •...
-
Page 30: Setting The Shooting Mode And Switching The Camera On
Setting the Shooting Mode and Switching the Camera On Switch the camera on. If the lens cap is attached, remove Press the latches inward and pull the cap off. Turn the mode dial to align P (Program mode) with the mark. -
Page 31: Checking The Battery
Checking the Battery In this section we provide a general Control panel explanation of how to read and understand the battery check display. When the battery check shows that the batteries are low, replace the batteries with fresh batteries, or recharge the Ni-MH, Ni-Cd batteries or the lithium polymer battery. -
Page 32: Checking The Number Of Storable Pictures
Checking the Number of Storable Pictures When you switch the camera on, the number of storable pictures is displayed in the control panel. If you see the number 12, for example, this means 12 more pictures can be taken and stored on the memory card. Control panel Selected card Number of storable pictures... - Page 33 Storage capacities of other MB cards The storage capacity of a memory card is roughly calculated based on the file sizes of the images. However, please understand that due to variables in data handling by the camera, file compression, memory management, and so on, the estimation of the number of storable picture may not always be precise.
-
Page 34: When The Number Of Storable Pictures Is Not Displayed
When the Number of Storable Pictures Is Not Displayed 0 and blinking in the control panel? The card is full and can no longer store pictures, do one of the following: • If a SmartMedia and CompactFlash/Microdrive card are both inserted, select the other card. (© 129) •... -
Page 35: Attaching The Lens Hood
Attaching the Lens Hood Attach a lens hood to the camera to prevent the occurrence of the flare or ghost effect in your pictures. Attaching the Lens Hood When Camera is Not Used Flash button Metering mode button White dot White dot White arrow mark... -
Page 36: Holding The Camera
Holding the Camera In this section you will learn how to hold the camera when shooting pictures. Framing a picture with the viewfinder Diopter adjustment ring AF target mark Adjust the viewfinder display for your own eyesight. Look at the AF target mark in the viewfinder. - Page 37 Framing a picture with the monitor Press the monitor button You can see the same view in the monitor and the viewfinder. (However, framing pictures through the monitor consumes more battery power than when using the viewfinder.) Eyepiece shutter To prevent light from behind the lever camera entering the viewfinder, lower the eyepiece shutter lever.
-
Page 38: Pushing The Shutter Button
Pushing the Shutter Button Grasp the grip on the camera firmly and use the flat of your finger (not your fingertip) to press the shutter button gently. Applying too much pressure could cause camera shake and spoil your shot by blurring the image. The shutter is released in two steps, first with a half-press and second with a full-press. - Page 39 Gently press the shutter button Half-press half way. The camera emits a small beep and the AF correct mark in the lower left corner of the viewfinder lights green when the subject is completely in focus. Keep the AF target mark Viewfinder button pressed halfway and go to Step 2.
-
Page 40: If You Cannot Take A Picture
If You Cannot Take a Picture Message displayed in the viewfinder? Viewfinder If you see Card 0 blinking in the viewfinder The memory card is full and you cannot continue taking pictures with the card. In order to continue shooting with the card, you will have to remove some pictures from the card. - Page 41 The AF correct mark in the viewfinder/monitor is blinking, or the picture is out of focus Set the focus mode switch to AF (© 28). In most cases, the camera focuses on the subject automatically by half-pressing the shutter button. However, if the subject is difficult for the camera to focus on, the mark blinks in the viewfinder and monitor.
-
Page 42: Using The Zoom And Macro Functions
Using the Zoom and Macro Functions Magnifying the subject (Zoom) By moving the zoom ring you can enlarge or reduce the size of the subject in the viewfinder. Twist the zoom ring to the left to enlarge the size of the subject (T: telephoto), or turn it to the right to reduce the size of the subject (W: wide-angle). - Page 43 Shooting distance and range With the widest angle setting, you can approach up to 20 cm (approx. 8 in.) and shoot a subject about the size of a business card (approx. 76 x 57 mm) (3 x 2.3 in.) Zoom Shooting Range Shooting Area Width x Height (Reference Values) 60 cm (23.5 in.) 629 x 465 mm (25 x 18.6 in.)
-
Page 44: Using The Built-In Flash
Using the Built-in Flash If the incident light on the subject is too low, when you half-press the shutter button you will see the low light warning blinking intermittently in the lower left part of the viewfinder. If this occurs, press the flash button to raise the built-in flash. - Page 45 Flash working range Max. WIDE (WIDE Limit) Max. TELE (TELE Limit) AUTO 0.6 (2 ft.) - 8.9 m (29.4 ft.) 0.5 (1.7 ft.) - 7.4 m (24.4 ft.) 0.6 (2 ft.) - 6.3 m (20.8 ft.) 0.5 (1.7 ft.) - 5.2 m (17.2 ft.) 0.9* (3 ft.) - 8.9 m (29.4 ft.) 0.7*...
-
Page 46: Viewing Pictures (Playback)
Viewing Pictures (Playback) In this section, you will learn how to view the pictures that you have taken. You can view the pictures that you have taken one by one. You can enlarge the single- image display, or even display several images at once with the index display. Set the mode dial to playback The last picture taken is displayed on the monitor. - Page 47 With the mode dial set to playback , use the main dial or sub dial to enlarge the image, or switch to the index display and display several images at one time in the monitor. 1 Frame Index Display Enlarged Display Display This feature is convenient This feature is convenient...
- Page 48 Viewing Pictures (Playback) (continued) Enlarged display Set the mode dial to playback , and turn the main dial to the magnifying glass mark (or turn the sub dial clockwise) to enlarge the image in the monitor. Move the main dial to the magnifying glass mark (or move the sub dial clockwise).
- Page 49 Index display Set the mode dial to playback , and then turn the main dial to the index mark turn the sub dial counterclockwise) to display several images at one time in the monitor. Turn the main dial to the index mark (or turn the sub dial counterclockwise).
-
Page 50: Protecting Pictures
Protecting Pictures After you protect a picture, it is protected from accidental erasure from the memory card. After protected images are copied to a computer, they are stored as read-only files but are not protected from accidental erasure. Enter the playback mode and display the picture that you want to protect. -
Page 51: Deleting Single Pictures
Deleting Single Pictures You can delete one by one pictures that you do not want to keep. Deleting unneeded pictures creates more space on the selected card and increases the number of pictures that you can store on the card. Enter the playback mode and display the picture that you want to delete. -
Page 52: Switching The Camera Off
Switching the Camera Off Always switch the camera off immediately after every shooting session. If you leave the camera on while it is not being used, it will automatically enter the sleep mode and then automatically switch itself off after one hour. (© 136) Always switch the camera off before changing batteries or before storing the camera in a case or bag. -
Page 53: Shooting Techniques: General Introduction
Shooting Techniques: General Introduction This chapter briefly introduces some basic techniques you can apply to different situations and shoot beautiful professional looking pictures to achieve the effects that you want, even if you have little experience using a camera. Portraits. You can vary the aperture setting to blur portrait background, adjust flash, and select a different metering mode to create artistic effects in portraits. -
Page 54: Shooting Portraits (Focused Subject, Blurred Background)
Shooting Portraits (Focused Subject, Blurred Background) When you shoot a portrait, you can create the effect of the subject floating against a blurred background. In order to achieve the effect of a floating subject, set the aperture to a small value such as f2.4 (large aperture opening) and use the zoom at telephoto to take the picture. -
Page 55: Shooting Portraits (Shooting Backlit Subjects)
Shooting Portraits (Shooting Backlit Subjects) By lighting the subject from behind, you can add highlight to the hair. With this method you can take a picture of a sharply outlined subject in sparkling light. If the face of the subject appears dark, use exposure compensation and the flash to take the picture. Position the spot meter mark on The camera can be set to adjust automatically for a the center of the subject’s face... -
Page 56: Shooting A Subject In Daylight Shadow (Daylight Synchro)
Shooting a Subject in Daylight Shadow (Daylight Synchro) Even with sufficient light on the subject (when the flash warning is not blinking in the viewfinder), you can set the flash to fire and reduce unwanted shadows on the subject and take a beautiful picture. When you see shadows on your subject in strong daylight, use the fill-in flash mode to reduce the shadows. -
Page 57: Shooting The Subject And Background Both In Focus
Shooting the Subject and Background Both in Focus Select a large aperture value such as f8 to have both your subject and the background scenery in focus. Set the mode dial to A (Aperture priority mode) and then select a large aperture value by turning the main dial. -
Page 58: Shooting Moving Subjects
Shooting Moving Subjects When you shoot a moving subject like a runner or a moving vehicle, you can vary the shutter speed to achieve the desired effect. With a fast shutter speed, you can capture a momentary facial expression or freeze a subject in motion. -
Page 59: Shooting Close-Up
Shooting Close-up For close-up shots, use the macro mode which allows you to bring the camera as close as 20 cm (8 in.) from the subject. For example, you could accurately capture the details of a flower’s petals, pistils, and stamens. To set the camera in the macro mode, press and hold down the macro button , turn the main dial or sub... -
Page 60: Shooting Night Scenes
Shooting Night Scenes When shooting night scenes or other dark subjects, mount the camera on a tripod and select a slow shutter speed (1/2 sec. or more). If you select any mode where the exposure is set automatically (P or A) and raise the built-in flash, the shutter speed cannot be set slower than 1/30 and you cannot achieve the correct exposure of a night scene. -
Page 61: Shooting A Night Scene (Noise Reduction)
Shooting a Night Scene (Noise Reduction) Shooting a night scene at a slow shutter speed to increase exposure time could cause noise in the photo image. When you need to increase the exposure time, set the camera in the noise reduction mode to reduce noise and achieve a more attractive image. The noise reduction function operates only when you are shooting with the shutter speed set slower than 1/2 sec. -
Page 62: Shooting A Subject Against A Night Scene Background (Slow Synchronization)
Shooting a Subject Against a Night Scene Background (Slow Synchronization) When you shoot a subject with a flash against a night background, you can use slow shutter speeds to achieve a variety of artistic effects. This technique is called slow synchronization. -
Page 63: Shooting Sunsets And Fireworks
Shooting Sunsets and Fireworks By switching the white balance setting from Auto to a preset setting manually, you can enhance the beauty of colors in a sunset or a fireworks display. In the Auto white balance mode, white is used as the base color for reference in reproducing the colors of sunsets and fireworks, so the colors in a sunset may not appear red and the colors in... -
Page 65: Taking Pictures: Distance And Focus
Taking Pictures: Distance and Focus In this section you will learn how to use both focusing methods: autofocusing and manual focusing. -
Page 66: Using Autofocus (Af)
Using Autofocus (AF) When autofocusing operates, the camera focuses the subject automatically. When the subject is in focus, the AF correct mark in the viewfinder lights. Set the focus mode switch to AF (autofocus), as shown by the arrow in the illustration on the left. Look through the viewfinder and point the camera to cover the subject with the AF target mark in... - Page 67 Focusing subjects not in the center of the viewfinder The camera focuses on the subject covered by the AF target mark in the viewfinder. When you need to focus on a subject that is not under the AF target mark in the center of the picture, point the camera and cover the subject with the AF target mark in the viewfinder, half-press the shutter button, and then while holding down the shutter button, compose the picture again.
- Page 68 Using Autofocus (AF) (continued) Difficult to focus subjects The autofocus feature of this camera is effective for most subjects. However, subjects like the ones described below could be difficult to focus with the autofocus feature. If focusing with the CCD is not successful, after you half-press the shutter button, the AF correct mark in the lower left corner of the viewfinder blinks.
- Page 69 Subject without vertical lines The camera cannot focus on a subject with only horizontal lines. Hold the camera vertically, half-press the shutter button, and then hold it down to lock the focus. Re-position the camera horizontally, compose the picture, and then fully-press the shutter button to shoot the picture.
-
Page 70: Using Manual Focus (Mf)
Using Manual Focus (MF) By setting the camera in the manual focus mode, you can focus the subject manually within the range 20 cm to ∞ (8 in. to ∞) by turning the manual focus ring. Manual focus ring Set the focus mode switch to MF (manual focus), as shown by the arrow in the illustration on the left. -
Page 71: Taking Pictures: Brightness (Exposure) (Aperture And Shutter Speed)
Taking Pictures: Brightness (Exposure) (Aperture and Shutter Speed) In this section we will show you how to adjust aperture and shutter speed to achieve the best exposure in your pictures for normal or special effects. The camera uses the aperture value and shutter speed to determine the brightness (exposure) of an image. -
Page 72: Setting The Shooting Mode
Setting the Shooting Mode Select and set one of the four available shooting modes for the prevailing conditions or the effect that you want to create in your pictures. P (Program mode) The camera automatically selects the best aperture value and shutter speed according to the brightness of the subject. -
Page 73: Setting The Aperture Value And Shutter Speed Automatically (P Mode)
Setting the Aperture Value and Shutter Speed Automatically (P Mode) When the mode dial is set to P (Program mode) the camera automatically selects the aperture value and shutter speed according to the brightness of the subject so you can take the picture without adjusting the exposure. -
Page 74: Setting The Aperture Value (A Mode)
Setting the Aperture Value (A Mode) With the mode dial set to A (Aperture priority mode), you can select the aperture value for your shots. Because adjusting the physical size of the aperture determines the amount of light allowed to enter the camera through the lens, the aperture setting expresses the actual size of the aperture. - Page 75 Set the mode dial to A (Aperture Large Small aperture aperture priority mode). Turn the main dial or sub dial as shown in the illustration to change the aperture value. Turn the dial to adjust the aperture value in 1/3 steps. The aperture value you select is displayed in the viewfinder and the control panel.
-
Page 76: Setting The Shutter Speed (S Mode)
Setting the Shutter Speed (S Mode) With the mode dial set to S (Shutter priority mode), you can set the shutter speed for the movement of the subject and take a picture. For example, if you take a picture of an athlete in motion you can freeze the subject for a sharp picture or show the subject moving through an arc of blurred movement for artistic effect. - Page 77 Set the mode dial to S (Shutter Slow Fast priority mode). Turn the main dial or sub dial as shown in the illustration to select a shutter speed. For every movement of the dial, the shutter speed is changed. Setting range: 1/640 - 2 sec. (PS mode: 1/4000 - 2 sec.
-
Page 78: Setting The Aperture Value And Shutter Speed Manually (M Mode)
Setting the Aperture Value and Shutter Speed Manually (M Mode) With the mode dial set to M (Manual mode), you can manually select both the aperture and the shutter speed. In this shooting mode, you can also set the camera in the bulb mode for long exposures. - Page 79 Viewfinder Exposure level Turning the main dial to the right increases the size of the aperture and moving it to the left decreases the size of the aperture. The selected exposure is displayed in the exposure indicator in the viewfinder and the control panel.
-
Page 80: Using The Is (Interlace Scan) Mode
Using the IS (Interlace Scan) Mode This is the normal shooting mode in which the camera operates and uses the mechanical shutter. With a mechanical shutter, the shutter speed can be adjusted up to 1/640 sec. An ND filter may be required with the aperture wide open in bright light. In the IS mode the maximum resolution (4.95 effective megapixels) of the CCD is possible. - Page 81 Press the button. The IS mode is selected, and the green highlight moves to (To cancel the setting, press the menu button instead of the button.) Press the button again to close the menu. Check the record mode indicator in the control panel.
-
Page 82: Using The Ps (Progressive Scan) Mode
Using the PS (Progressive Scan) Mode In the PS (Progressive Scan) mode, the camera operates with the electronic shutter. The electronic shutter speed can be adjusted as follows: • P and A modes: up to 1/4000 sec. • S and M modes: up to 1/4000 sec. and 1/18000 sec. This mode can be used when a very fast shutter speed is required without an ND filter with the aperture wide open. - Page 83 On the arrow pad, press to move the green highlight to (To jump to the above icon, press first.) On the arrow pad, press move the green highlight to PS mode. Press the button. The PS mode is selected, and the green highlight moves to (To cancel the setting, press the menu button...
-
Page 84: Selecting The Brightness Adjustment Method (Monitor Preview Mode) (Only For M Mode)
Selecting the Brightness Adjustment Method (Monitor Preview Mode) (Only for M Mode) The brightness of the monitor can be changed according to the shutter speed and aperture setting, or adjusted according to the incident light falling on the subject, when you are shooting in the M (manual) mode. -
Page 85: Selecting The Metering Method
Selecting the Metering Method Select the method to meter the brightness of the subject. Three metering methods are available: digital ESP metering, center weighted averaging metering, and spot metering. The camera is set for digital ESP metering when you purchased the camera. Center Center weighted weighted... -
Page 86: Using Exposure Compensation
Using Exposure Compensation With the mode dial set to P (Program mode), A (Aperture priority mode), or S (Shutter priority mode), you can press the exposure compensation button to manually increase or decrease the exposure automatically selected by the camera in order to create a darker or brighter image. -
Page 87: Ae Lock
AE Lock Normally the camera automatically meters the focus and the exposure when you half- press the shutter button and locks the AF (automatic focus) and AE (automatic exposure) at the same time. However, you can lock the exposure by pressing the button before pressing the shutter button. -
Page 88: Bracketing A Shot With Three Automatic Exposures
Bracketing a Shot with Three Automatic Exposures With the mode dial set to P (Program mode), A (Aperture priority mode), or S (Shutter priority mode), if you switch on autobracketing in the menu you can take three rapid multiple exposures of the same picture with different (bracketed) exposure settings. One shot will be taken at normal exposure, one shot at a lower exposure setting for a darker picture, and one shot at a higher setting for a brighter picture. - Page 89 Press the button. This completes setting the camera for autobracketing. In the control panel, you will see BKT and the sequential mode mark displayed. This confirms that the camera is set for both autobracketing and shooting multiple exposures. (When shooting in the single-frame mode, hold down the drive button and turn the Control panel...
-
Page 90: Changing The Iso Setting
Changing the ISO Setting The sensitivity can be adjusted with the ISO setting. This ISO setting is the equivalent of the ISO settings performed with traditional SLR cameras which employ film. Three ISO settings are available with this camera: 80, 160, and 320. Although you can increase the sensitivity by raising the ISO setting to take pictures of dark subjects, this could cause the pictures to appear grainy. -
Page 91: Taking Pictures: Using A Flash
Taking Pictures: Using a Flash In this section you will learn how to use the built-in flash and external dedicated flash FL-40. The built-in and external flash can be used separately or together. We also describe the limitations on using other external flash units not designed exclusively for this camera. -
Page 92: Selecting A Flash Mode
Selecting a Flash Mode The flash mode selection determines how the flash is fired to achieve various effects. Flash mode selections and features Auto Flash The camera automatically fires the flash at the appropriate intensity when shooting in dark conditions or against strong backlighting. In dark environments, the camera fires the flash as necessary to keep the shutter speed to 1/30 sec. - Page 93 Fill-in Flash Use fill-in flash when you want the flash always to fire, regardless of the light conditions. For example, if the subject’s face appears dark in front of strong backlighting, if a tree or other large object is casting a shadow on the subject’s face, or when shooting under fluorescent or other artificial lighting to achieve the best color reproduction, you should use the fill-in flash mode.
- Page 94 Selecting a Flash Mode (continued) To select the flash mode, press and hold down the flash mode button and turn the main dial or sub dial. Turn the main dial or sub dial to the right to display the available settings in the order indicated by the arrow in the table below.
- Page 95 Press the flash button The built-in flash opens. If the built-in flash is not raised, the flash mode remains set at OFF and cannot be changed. Press and hold down the flash mode button , and then turn the main dial or the sub dial. Continue to turn the dial until you see the desired combination of flash control setting marks, and then...
-
Page 96: Using Flash Control Compensation
Using Flash Control Compensation The camera can automatically adjust the flash intensity according to the brightness of the subject, light reflected from the subject, and the camera-to-subject distance, and because of this the image of a subject could appear too bright or too dark. In such cases you can use flash control compensation to capture images that are not too bright or too dark. - Page 97 Press the button. The green highlight returns to the flash control mark and the setting is stored. When any value other than zero (0) is selected, the flash control mark displayed in the control panel. Please remember that this setting is retained even after the camera is switched off and switched on again.
- Page 98 Using the Optional Dedicated External Flash FL-40 The dedicated external flash FL-40 increases the amount of light and can illuminate subjects which are beyond the range of the built-in flash. You can also use the dedicated external flash to bounce light onto the subject from another direction, allowing more variety in the use of lighting.
- Page 99 Remove the hot shoe cover from the camera and attach the FL-40 external flash unit. Slide the hot shoe cover toward the back of the camera. Attach the dedicated external flash unit to the hot shoe. For details about attachment, refer to the dedicated external flash FL-40 and each accessary’s instructions.
-
Page 100: Using Other Flash Units With The Camera
Using Other Flash Units with the Camera An external flash unit not designed for this camera can be connected to either the hot shoe or the synchro socket on the left side of the camera and used, provided that it meets the conditions described below. - Page 101 Using a non-dedicated flash unit Hot shoe An external flash can be attached to the camera at the hot shoe or at the flash synchro socket. Set the mode dial to M (Manual mode). Select the shutter speed and aperture value.
-
Page 103: Taking Pictures: Color And Quality
Taking Pictures: Color and Quality In this section we will show you how to set up white balance, select the record mode, and use the sharpness, contrast, noise reduction, and histogram options to enhance the image to be shot. There can be great differences in the way the camera reproduces color in images taken in natural or artificial light, especially under fluorescent lights. -
Page 104: Achieving Natural Color (White Balance)
Achieving Natural Color (White Balance) The source of incident light on the subject affects color. For example, the same sheet of white paper held under sunlight may appear tinged with red when held under an incandescent light. Because the human eye adapts to the colors of source light, it perceives the sheet as white in both cases. - Page 105 Preset white balance settings and color temperature The spectral balance of different white light sources is rated numerically by color temperature—a concept of physics that, with incandescent lighting, corresponds roughly to the absolute filament temperature of an incandescent lamp, expressed on the Kelvin (K) temperature scale. The higher the color temperature, the richer the light in bluish and the poorer in reddish;...
-
Page 106: Using White Balance
Using White Balance With the camera in the auto white balance mode, the camera automatically registers the whitest part of the subject framed in the viewfinder and uses this as a base to balance other colors in the picture. Auto white balance mode not selected Control panel Viewfinder... -
Page 107: Using Quick Reference (One Touch) White Balance
Using Quick Reference (One Touch) White Balance Before you take a picture, point the camera at a white sheet of paper or other white surface, and then register and lock the white balance reference at the touch of a button. button Under the same light source where you intend to take the picture,... - Page 108 Using Quick Reference (One Touch) White Balance (continued) Press and hold the white balance mode button , then turn the main dial or sub dial to zero for the color temperature setting. The color temperature setting is displayed at the shutter speed position in the control Control panel panel.
-
Page 109: Using Preset White Balance
Using Preset White Balance Use preset white balance to select the color temperature (measured on the Kelvin temperature scale “K”) for the light source. (© 103) Control Panel Color Temperature Monitor Display Comment Display The camera selects the whitest portion of the picture AUTO, -A- framed in the viewfinder. -
Page 110: Selecting Image Quality (Record Mode)
Selecting Image Quality (Record Mode) You can select the quality of the image with the record mode button and the dials. In addition to the four record mode settings, [TIFF, SHQ, HQ, and SQ (from highest quality to lowest)], the RAW mode is provided to record the image just as it is output from the CCD. - Page 111 Press and hold down the record Record mode button mode button , and then turn the main dial or sub dial until you see the desired quality setting in the control panel. Control panel (e.g. IS mode) Control panel (e.g. PS mode) Control panel display Record Resolution...
- Page 112 Selecting Image Quality (Record Mode) (continued) RAW Data Shooting Data output straight from the CCD is in the format 10 bits/channel. This data, called RAW data, is saved as a file with an “.orf” file extension. Because a file with the “.orf” extension is a special file, it cannot be used by most software applications.
-
Page 113: Customizing The Record Mode
Customizing the Record Mode You can change the resolution and compression combination corresponding to each record mode. The resolution and compression settings can be selected as shown in the table below. Record Resolution Compression mode 2560 × 1920 pixels (FULL) 1:1 (not compressed) TIFF unchangeable... - Page 114 Customizing the Record Mode (continued) Press the button to select the setting. The selection is saved, and the green highlight moves to the mark. Press the button again to close the menu. This step does not set the camera to the customized record mode.
-
Page 115: Selecting Sharpness
Selecting Sharpness Three settings are available for adjusting sharpness: HARD, NORMAL, and SOFT. HARD sharpens the contrast at edges to maximize the clarity of the image. NORMAL The default when you purchase the camera. Defines borders to achieve best focus for printing the image. HARD Greatly enhances and sharpens edges. -
Page 116: Selecting The Contrast
Selecting the Contrast The contrast option allows you to adjust the amount of gradation between areas of different brightness in the image. Three settings are available: HIGH, NORMAL, and LOW. HIGH Creates a starkly contrasted image. Light areas may wash out white and darker areas may turn black, creating a reverse film (slide film) effect. -
Page 117: Using The Noise Reduct (Noise Reduction Mode)
Using the Noise Reduct (Noise Reduction Mode) Use this mode to reduce the amount of noise that appears in images when shooting night scenes or other shots that require a long exposure time. The noise reduction function operates only when you are shooting with the shutter speed set slower than 1/2 sec. - Page 118 Using the Noise Reduct (Noise Reduction Mode) (continued) Press the button. The Noise Reduct is selected, and the green highlight moves to Check that the icon blinks in the control panel. Control panel Take a picture. The noise reduction function does the exposure twice and starts the noise reduction procedure.
-
Page 119: Displaying The Histogram
Displaying the Histogram A histogram can display the distribution of brightness of the image displayed for playback. The histogram feature is switched on with a menu selection. The histogram allows you to confirm the balance of a photo image after shooting. Switching the histogram display on and off Follow this procedure to switch the histogram display on or off. - Page 120 Displaying the Histogram (continued) To display the histogram during playback During playback you can display a histogram, a bar graph which illustrates the brightness of the displayed image so you can determine how to adjust exposure compensation. The horizontal axis of the histogram represents the brightness of the image, on a scale of 0 - 255 (reading from left to right), and the vertical axis measures the number of pixels for each bar.
-
Page 121: Taking Pictures: Special Features
Taking Pictures: Special Features In this section we will describe some other important camera features. • Taking sequential exposures (burst mode). With one press on the shutter button, you can shoot up to 4 rapid exposures in the sequential mode. •... -
Page 122: Taking Sequential Exposures (Burst Mode)
Taking Sequential Exposures (Burst Mode) With the burst mode, press and hold down the shutter button to take rapid shots. In IS mode you can take up to three or four sequential shots (depending on the record mode) (© 79). In PS mode you can take up to seven sequential shots (© 81). Set the mode dial to P, A, S, or M. -
Page 123: Using The Self-Timer
Using the Self-Timer With the self-timer set, the shutter release will be delayed for 12 seconds after you press the shutter button. Set the mode dial to P, A, S, or M. Press and hold down the drive button , and then turn the main dial or the sub dial until you see the self-timer mark appear in the... -
Page 124: Using The Camera Remote Unit Rm-1
Using the Camera Remote Unit RM-1 With the camera in the remote mode, you can release the shutter without touching the camera using the RM-1 remote control. The shutter will release 2 seconds after pressing the transmit button on the remote unit. Set the mode dial to P, A, S, or M. - Page 125 Pull down the eyepiece shutter lever to prevent light entering the viewfinder from behind the camera. Pull down the eyepiece shutter lever on the left of the viewfinder. Light entering the viewfinder from behind the camera could wash out the picture with Remote control white light.
-
Page 126: Using The Remote Cable Rm-Cb1 (Optional)
Using the Remote Cable RM-CB1 (Optional) When you are shooting and need a smooth steady vibration free release of the shutter, you can mount the camera on a tripod and use the optional RM-CB1 remote cable. Using this remote cable prevents camera shake caused by pressing the shutter button with your finger. - Page 127 To take the picture, press the shutter button at the end of the remote cable. Even with the remote cable connected to the camera you can still release the shutter by pressing the shutter button. Note • The remote cable jack on the camera can only be used with the Remote Cable RM-CB1.
-
Page 128: Using Time-Lapse Photography
Using Time-Lapse Photography You can use the menu to switch on the time lapse mode and select the timer interval between automatic exposures. For example, if you set the time interval for 5 minutes, you can capture each stage of a flower opening in the morning. You can set the time interval in minutes for the shooting session within the range 1 minute up to 24 hours. - Page 129 Hours Minutes Select the hour or minute setting that you want to change, and then press to raise or lower the number. • Hours With the setting you want displayed, press the button to shift to the Minutes setting. • Minutes With the setting you want displayed, press the button.
- Page 130 Using Time-Lapse Photography (continued) Actual time interval The time interval set in the menu is the time when the next picture will be taken after the camera enters the sleep mode, so there is some additional time lapse until the camera enters the sleep mode before the time interval actually takes effect.
-
Page 131: Selecting A Card For Storing Pictures
Selecting a Card for Storing Pictures The pictures that you take are stored on the selected memory card. The mark selects the SmartMedia card and the mark selects the CompactFlash/Microdrive card. You can easily select either card for storing images. Press and hold down the SM/CF memory card button, and then slowly turn the main dial or sub... -
Page 132: Selecting The Shutter Sound Type And Volume
Selecting the Shutter Sound Type and Volume You can use the menu to select the type and volume of the sound emitted by the camera when the shutter is released, or you can switch off the sound. For the sound type, you can select the camera or camera mark. - Page 133 On the arrow pad, press No sound High move the green highlight to the volume setting bar. On the arrow pad, press select the desired setting. Press the button. The type and volume of the sound are selected and the green highlight returns to the shutter sound mark Press the button again to close the...
-
Page 134: Setting The Warning Sound
Setting the Warning Sound The camera issues beeps to let you know that it has focused your shot and to alert you to various other conditions. If you do not wish to hear these beeps, you can use the following procedure to switch the beep function off. Set the mode dial to P, A, S, or M. -
Page 135: Setting The Rec View Time
Setting the Rec View Time You can set the length of time that the picture is displayed on the monitor immediately after it is taken. Three settings are available for viewing the shot immediately after it is taken. Previous shot is not displayed. Previous shot is displayed for as long AUTO as it takes for the image to be stored... -
Page 136: Setting The Date And Time
Setting the Date and Time Follow this procedure to set the camera clock. When you take a picture, the current date and time are recorded with the image. When you take a picture, the current date and time are recorded with the image as file information (not “printed” on the image). You can select one of the following date formats. - Page 137 On the arrow pad, press to move the green highlight to the date display. Two pointers appear above and below the first setting. Set the year, month, day, hours, and minutes with 2-digit numbers. Year Month Day Hour Min. On the arrow pad, press increase or decrease the number, then press for the next setting.
-
Page 138: Setting The Idle Time For The Sleep Mode
Setting the Idle Time for the Sleep Mode When the camera is set in the P, A, S, or M shooting mode, if it remains idle for a specified length of time, it will enter the sleep mode automatically and switch off the monitor, control panel, and viewfinder displays to conserve the batteries. - Page 139 Set the mode dial to the setup/ connection mode Press the menu button The menu is displayed on the monitor. On the arrow pad, press to move the green highlight to the sleep mode mark On the arrow pad, press move the highlight to the right.
-
Page 140: Restoring All Default Settings
Restoring All Default Settings Pressing and holding down the flash mode and record mode buttons together releases selected settings and restores their factory default settings. This procedure restores the following factory default settings. Drive mode Single-frame mode (not Metering mode Digital ESP White balance mode Auto... -
Page 141: Using An Optional Conversion Lens
Using an Optional Conversion Lens The conversion lenses listed below can be attached to this camera. When you use a conversion lens, set the zoom setting (TELE or WIDE) on the camera and make sure that the mark is displayed in the control panel. With the mark displayed, the camera can use the correct methods to set the focus and exposure for the conversion lens. - Page 142 Using an Optional Conversion Lens (continued) Using the macro button to select close up photography with a conversion lens With the factory mode settings, the camera cannot be set in the conversion lens mode by holding down the macro button and rotating the main dial, so follow the procedure below to set the camera for taking close-up pictures with a conversion lens.
- Page 143 • When the camera is in the conversion lens mode, AF (automatic focus) is conducted only by the CCD. For more details about the shooting distances and ranges for conversion lenses used with this camera, please refer to the Olympus web site. • When a conversion lens is attached, the camera-to-subject distance ( 68) displayed in the monitor is not correct.
-
Page 144: Pixel Mapping
Pixel Mapping Pixel Mapping checks the image processing circuit and adjusts the CCD. This checking and adjustment is performed at the factory before shipping. Pixel Mapping needs to be performed at least once a year. For the best effect, one minute interval after shooting or playback is needed prior to Pixel Mapping. - Page 145 On the arrow pad, press move the green highlight to YES. Press the button. “STARTING PIXEL MAPPING...” is displayed. Mapping requires about 10 seconds, then the display switches off. Warning display If a warning is displayed, close the eyepiece shutter then perform the procedure again from Step 1.
-
Page 147: Playing Back Images For Viewing
Playing Back Images for Viewing This chapter describes how to play back and view images, play back images automatically in a slide show, adjust the monitor brightness, and how to play images on a TV screen connected to the camera. With the mode dial set for playback , you can play back and view the pictures in the monitor that you have taken and stored as images on a... -
Page 148: Displaying Image Information
Displaying Image Information While viewing images you can select one of four methods to display information about the settings used to take the pictures (record mode, date and time, shutter speed, aperture setting, etc.) in the monitor. Set the mode dial to playback If you leave the mode dial set to P, A, S, or M, you can also rapidly press the monitor button... - Page 149 Histogram display Press While pressing While pressing , turn right. , turn left. Press The histogram is displayed if it set to display. (© 118) Protected Selected for printing Memory card Resolution, compression Shutter speed, aperture value Exposure compensation Folder name/ White balance setting file name ISO (When set to AUTO, the ISO value...
-
Page 150: Automatic Playback (Slide Show)
Automatic Playback (Slide Show) You can play back in order all the images stored on a memory card as a continuous slide show. Starting from the currently selected image, each succeeding image is displayed for 5 seconds. After the last image is displayed, the automatic slide show will start again from the first image stored on the card and continue to show all the pictures until you switch this feature off. -
Page 151: Displaying Images On A Tv Screen
Displaying Images on a TV Screen After connecting the camera to a television with the provided video cable, you can use the TV screen to display images of pictures taken with the camera. To conserve battery power, we recommend connecting the optional AC adapter to the camera when the camera is connected to a TV. -
Page 152: Adjusting Monitor Brightness
Adjusting Monitor Brightness The brightness of the monitor can be adjusted. Set the mode dial to playback Press the menu button The menu is displayed on the monitor. On the arrow pad, press to move the green highlight to the monitor mark On the arrow pad, press The image is displayed and the camera... -
Page 153: Managing Stored Pictures
Managing Stored Pictures In this chapter we describe copying and deleting images, and formatting a memory card. Copying images to another card. You can copy all or selected images from one memory card to another in the camera to create backup copies of important pictures that you do not want to lose. -
Page 154: Copying Images To Another Card
Copying Images to Another Card With two types of cards installed in the camera at the same time, you can copy images from one card to the other. The copied images are not deleted from the original card after copying is completed. Copying all images to another card You can copy all images from a source card, provided the target card has sufficient space to store the copied images. - Page 155 Copying from a SmartMedia to On the arrow pad, press a CompactFlash card move the green highlight to YES. Press the button. A progress bar is displayed as the images are copied. After copying is completed, the first displayed image appears. Cannot copy? •...
- Page 156 Copying Images to Another Card (continued) Copying only selected images Images can be copied one by one between the two types of memory cards installed in the camera. Follow Steps 1 - 5 for copying all images. (© 152) The copy mark is highlighted green.
- Page 157 Cannot copy? • NO CARD displayed? The destination card is not inserted in the camera. Insert the destination card. • CARD FULL displayed? Storage space on the destination card is insufficient. Create more space on the destination card by deleting images. •...
-
Page 158: Deleting All Images
Deleting All Images With one procedure you can quickly delete all images stored on a card. Make sure that the card with the pictures that you want to delete is inserted in the camera. (© 24) Make sure that the card selection mark for the card with the pictures to be deleted, for the... - Page 159 On the arrow pad, press move the green highlight to YES. Press the button. The delete icon and message are displayed on the monitor while the images are being deleted. Images which have been protected are not deleted. The card access lamp blinks while the images are being deleted and then goes off after all the images have been deleted.
-
Page 160: Formatting A Memory Card
Formatting a Memory Card Memory cards which have been formatted on a computer or other external device, or cards of another manufacturer, may have a different format. Such cards should be formatted before they are used with the camera. Formatting a used card deletes all the images stored on the card, so you should frequently copy images to a computer where they can be stored safely. - Page 161 On the arrow pad, press move the green highlight to YES. Press the button. The format icon and message are displayed on the monitor while the selected card is being formatted. All images, including images which have been protected, are deleted from the card. The card access lamp blinks while the card is formatting and then goes off after formatting has been completed.
-
Page 162: Naming Image Files
Naming Image Files When you take a picture, the camera assigns it a unique file name and saves it in a folder. The folder and file name can later be used for file handling on a computer. File names are assigned as shown in the illustration below. - Page 163 Set the mode dial to the setup/ connection mode Press the menu button The menu opens in the monitor. On the arrow pad, press move the green highlight to the FILE NAME mark On the arrow pad, press move the green highlight to the right.
-
Page 165: Selecting Pictures For Printing
Selecting Pictures for Printing This chapter describes how to select pictures for printing on a DPOF (Data Print Order Format) printer or by a DPOF printing service. To print the pictures taken with this camera, you can remove the memory card with the stored pictures from the camera and print them on a DPOF printer, or have them printed by a DPOF printing service. -
Page 166: Selecting Pictures And Number Of Copies For Printing
Selecting Pictures and Number of Copies for Printing You can select all or single pictures for printing and specify the number of copies for printing. With the memory card in the camera, you can select one or more pictures for printing and specify the number of copies for each print. - Page 167 On the arrow pad, press Specifying the number of copies to move the green highlight to the number of copies that you want to print for the selected picture. Press the button. The picture selected for printing is marked with the print reserve mark followed by a “x”...
-
Page 168: Selecting All Pictures On A Card For Printing
Selecting All Pictures on a Card for Printing You can select all pictures stored on a card to print one by one. Memory card Insert the memory card that with pictures to contains the pictures that you want be selected for to select for printing. - Page 169 On the arrow pad, press move the green highlight to YES. Press the button. The print reserve icon and message are displayed on the monitor while the images are being selected for printing. When the print reserve selection is completed, the first displayed image appears.
-
Page 170: Setting Up Index Printing
Setting Up Index Printing You can select all pictures stored on card for index printing. Memory card Insert the memory card that with pictures contains the pictures that you want to be selected for printing to select for printing. (© 24) Check the control panel display and make sure that the mark for the source card, SmartMedia... - Page 171 Press the button. The print reserve icon and message are displayed on the monitor while the images are being selected for printing. When the print reserve selection is completed, the first displayed image appears. Taking a picture after selecting index printing If you take more pictures after selecting all the pictures on a card for index printing, the exclamation mark will appear to warn you that not all pictures on the card are selected for index printing.
-
Page 172: Selecting Pictures For Date Or Time Stamping
Selecting Pictures for Date or Time Stamping You can set images selected for printing to be stamped with the date or time (not both) when they are printed. When this setting is applied, it applies to all pictures selected for printing. - Page 173 On the arrow pad, press to move the green highlight to the date/time stamp mark On the arrow pad, press to move the green highlight to the right. On the arrow pad, press to move the green highlight to DATE or TIME.
- Page 174 Printing with Olympus Printers The table below describes to what extent Olympus printers are compatible with the DPOF format. Olympus Printers and DPOF Compatibility Printer 1 Frame Multiple Index Trimming Rotation Date Name Select Frame Select Printing P-200 P-330(E) P-330N(E)
-
Page 175: Transferring Pictures To A Computer
Transferring Pictures to a Computer This chapter describes what you need to transfer images from a memory card to an IBM compatible computer or Macintosh. Setting up computer connection. An included computer connection kit can be used to connect the camera directly to your computer. Options for reading images from memory cards. -
Page 176: Transferring Images Between The Camera And Computer Via A Direct Connection
Transferring Images between the Camera and Computer via a Direct Connection With the camera connected to a personal computer via a direct connection with a USB cable, the computer can read image data directly from a card set in the camera. The computer may require setting up for the operating system in use the first time it is started up with the camera connected. - Page 177 Checking Your System Before connecting the camera to your computer, take a few minutes to check some important information about your computer operating system. Depending on what system you are using, the first time you start up with the camera connected, the system may behave differently.
- Page 178 Transferring Images between the Camera and Computer via a Direct Connection (continued) Connecting the Camera to a Computer (only for Windows Me, Windows 2000, and Macintosh OS9.0 - 9.1) Use the provided USB cable to connect the camera to a personal computer. To prevent the battery from running down while the camera is connected to the computer, check the capacity of the battery before connection.
- Page 179 Set the camera mode dial to (Setup/Connection mode). After a few moments, the following are displayed according to the operating system: Windows Me, Windows 2000 The USB driver is installed automatically. When the installation is completed, a message is displayed on the screen. Macintosh OS 9.0-9.1 An icon labeled “untitled”...
- Page 180 Transferring Images between the Camera and Computer via a Direct Connection (continued) Reading Image Files with a Computer When the camera is connected correctly to a computer running Windows, Windows will recognize the memory card in the camera as “Removable Disk.” If the computer is a Macintosh, a new icon labeled “untitled”...
- Page 181 PC/AT or Compatible Computer with Windows Connect the camera and the computer. (©176) The card installed in the camera is recognized as a folder by the computer. Double-click the My Computer icon. Double-click the “Removable Disk” icon labeled for the camera. A window including the DCIM folder opens.
- Page 182 Transferring Images between the Camera and Computer via a Direct Connection (continued) Macintosh Connect the camera and the computer. (©176) An icon labeled “untitled” appears on the desktop. Double-click the untitled icon. A window opens with a folder titled DCIM. Double-click the DCIM folder.
- Page 183 Disconnecting the USB cable Follow this procedure to remove the memory card and disconnect the USB cable from the camera. Incorrect procedure could cause the computer to hang up. If the system does hang up, disconnect then connect the USB cable again, or re-start the computer. Windows 98/98SE Confirm that the card access lamp on the camera is off.
- Page 184 Transferring Images between the Camera and Computer via a Direct Connection (continued) Windows 2000/Me Follow one of the procedures below. (1) Single-clicking the icon on the Taskbar. 1 Click the Unplug or Eject Hardware icon on the Taskbar in the lower right corner of the desktop.
- Page 185 Confirm that the card access lamp on the camera is off, and then set the camera power switch to OFF. Disconnect the USB cable. Note • To avoid problems, never change the camera’s mode or switch the camera off and on while the camera is connected to the computer, especially when images are being transferred from the camera to the computer.
-
Page 186: Optional Devices For Card Reading
Writer) to read images from memory cards if you are using a computer that is not equipped with a USB port, or is not fully guaranteed for USB operation. For more details and the most recent information about these devices, contact an Olympus authorized service center. -
Page 187: Monitor Menus
Monitor Menus Use the monitor menu to set up camera operation and perform important functions like formatting a memory card. - Page 188 Monitor Menus Use the monitor menus to set up camera operation and perform important functions like formatting a memory card. Four different menus are available, with the menu display determined by the setting of the mode dial: • Shooting mode menu (P, A, S, or M) •...
- Page 189 Shooting mode menus for P (Program mode), A (Aperture Default priority mode), S (Shutter priority mode), and M (Manual mode) Page Setting after pressed at the same time Delete all images from selected © 156 − SmartMedia or CompactFlash/ © 158 Microdrive card, and format a card.
- Page 190 Monitor Menus (continued) Default Page Setting after Playback mode menu pressed at the same time Slide show − © 148 (Automatic playback). − © 152 Copy images card-to-card. © 156 Delete all images from card, − © 158 format card. ±0 ∗...
-
Page 191: Appendices
Appendices These appendices provide some reference materials that summarize menus, important specifications, additional options available for the camera, some important details about files, and how to troubleshoot minor problems. 1. Specifications 2. Troubleshooting Troubleshooting camera operation Troubleshooting image problems 3. Camera Error Messages... -
Page 192: Appendix 1: Specifications
Auto (full TTL), Preset (7 steps), Quick Reference (one-touch) Lens Olympus 9 mm - 36 mm, f/2.0 - f/2.4, 14 elements in 11 groups (equivalent to 35 mm - 140 mm lens on standard SLR 35 mm camera) Filter diameter... - Page 193 Flash recharge time Approx. 7 sec. at normal temperature with new batteries (CR-V3) Flash working range (ISO 80) WIDE 0.6 m - 6.3 m (2 ft. - 20.8 ft.) (from lens surface) TELE 0.5 m - 5.2 m (1.7 ft. - 17.2 ft.) Flash modes Auto (auto activated in low light, backlight) Red-eye reduction...
-
Page 194: Appendix 2: Troubleshooting
Appendix 2: Troubleshooting Operational problems Cannot operate the camera, monitor and control panel blank. Problem Solution Page © 28 White mark on the power switch at the ON Move the power switch toward you and position? position it at the ON position. ©... - Page 195 Camera does not operate when you press the shutter button? Problem Solution Page © 32 Is “0” and the mark blinking in the control The card is full. Replace the card with a fresh panel? card, or you can delete unneeded images on the card to create more storage space on the card, or you can transfer all the images to a computer, and then delete all the images, or format the...
- Page 196 Appendix 2: Troubleshooting (continued) The monitor and viewfinder displays are different. Problem Solution Page © 35 Did you press the monitor button Press the monitor button to switch on the monitor. © 70 Set the mode dial to P, A, S, or M. Is the mode dial set for playback , print reserve mode...
- Page 197 Built-in flash does not fire. Problem Solution Page © 42 Is the built-in flash raised? Press the flash button to raise the flash unit. © 91 Is the subject brightly lit? If there is sufficient incident light, the flash will not fire. If you must use the flash, use the fill-in flash mode.
- Page 198 Appendix 2: Troubleshooting (continued) Pictures unsatisfactory Pictures blurred, out of focus, not sharp. Problem Solution Page Subject difficult to focus? Autofocus may not operate correctly for some subjects. Follow the suggestions described in “Difficult to focus subjects.” Did you release the shutter button and move If you move the camera while pressing down the camera? the shutter button, the picture may be...
- Page 199 Pictures are too bright. Problem Solution Page © 90 Is the flash mark displayed in the control When the flash mark is displayed, the flash panel? will fire if the camera is in the fill-in flash mode, even on a well lighted subject. Switch off the flash mark, or close the built-in flash.
- Page 200 Appendix 2: Troubleshooting (continued) Colors are odd. Problem Solution Page © 90 Color from the light source? Open the built-in flash, and set the camera in the fill-in flash mode ( displayed in the control panel) and then take the picture with the flash.
-
Page 201: Appendix 3: Camera Error Messages
Appendix 3: Camera Error Messages If a problem occurs with a memory card, a message will be displayed in the control panel and the monitor. When a memory card error message is displayed, first remove the card and then insert it again. If the error message occurs again, refer to the table below to solve the problem. - Page 202 Appendix 3: Camera Error Messages (continued) Control Viewfinder Monitor Explanation Solution Panel CARD FULL Card is full and you Replace the card with a fresh card, or (Card is full. cannot continue delete images that you do not need, No space for shooting.
-
Page 203: Glossary Of Selected Terms
Glossary of Selected Terms A mode Denotes Aperture priority mode . In the A mode you choose the aperture for the effect you want to create in the picture, and the camera selects the shutter speed. AC adapter The alternate power source for the camera. Connect the AC adapter to the DC IN jack on the camera, and then plug the adapter into a common household wall outlet. - Page 204 Glossary of Selected Terms (continued) color temperature The spectral balance of different white light sources is rated numerically by color temperature—a concept of theoretial physics that, with incandescent lighting, corresponds roughly to the absolute lamp filament temperature, expressed on the Kelvin (K) temperature scale. The higher the color temperature, the richer the light in bluish and the poorer in reddish;...
- Page 205 Fill-In flash Fires flash regardless of the metered light reading. Use to shoot dark subjects in front of strong backlight. FlashPath Floppy Disk Adapter A small device which holds a SmartMedia card and is then inserted into the floppy disk drive of the computer in order to copy images from the SmartMedia card to the computer.
- Page 206 Refers to raw data, data which has not been enhanced with a camera option like white balance, sharpness, contrast, etc. This file format has been developed by Olympus for viewing and processing with our own software. You may not be able to open or process these files with other graphics software applications, and these files cannot be selected for DPOF printing.
- Page 207 remote control Allows you to trigger shutter release from a distance so you can include yourself in the picture. With this camera you can use an electronic remote unit or a remote cable attached to the camera. S mode Denotes Shutter priority mode . You choose the shutter speed for the effect you want to create in the picture, and the camera automatically selects the aperture with the autoexposure feature.
-
Page 208: Index
Index subject not centered in viewfinder .. 65 number of storable pictures ..30 substitute focusing ....55, 65 protecting ........48 AA (R6) Ni-Cd using ........... 64 reading devices for ....184 inserting ........19 with shutter button ....36, 37 removing ........ - Page 209 aperture ........73 selected pictures from card ..49 naming ........160 aperture value ......11 RESET naming ......160 difficult subject auto bracket ........ 11 selecting AUTO naming ... 161 autofocus ........66 automatic power off ....29 selecting RESET naming ..161 center glare ........
- Page 210 Index (continued) frame number methods ........83 selecting method ......83 displaying current setting ..147 lens spot ..........83 cleaning ........4 metering mode location ........10 mark in control panel ....11 group pictures lens cap mark in viewfinder ...... 12 subjects, background both in focus ..
- Page 211 time-lapse photography .... 126 selecting ........109 selected memory card viewing pictures ......44 SHQ ......... 108 mark in control panel ....11 with histogram ......118 SQ ..........108 self-timer storage capacity ......30 portraits cancelling ......... 121 TIFF .......... 108 aperture value ......
- Page 212 Index (continued) shutter release storage capacity TV screen operation ......36, 37 table ..........30 connecting to camera ....149 sound emitted on release ..130 displaying images on ....149 strap shutter sound attaching to camera ....15 setting ........130 provided with camera ....
- Page 213 WRITE PROTECT monitor message ....153, 155 zoom using ........... 40 zoom ring location ......... 9 using ........... 40...
- Page 216 Phone customer support: Tel. 1-888-553-4448 (Toll-free) Our phone customer support is available from 8 am to 10 pm (Monday to Friday) ET E-Mail: distec@olympus.com Olympus software updates can be obtained at: http://olympus.com/digital/ Adobe [Photoshop] Support Adobe software updates and technical information can be obtained at: http://www.adobe.com/support/...