
Related Manuals for Henny Penny FlexFusion FGG-615


Summary of Contents for Henny Penny FlexFusion FGG-615
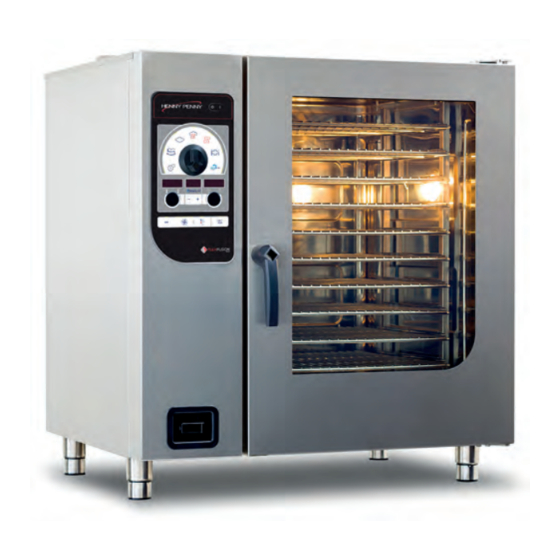
- Page 1 Operating Read the operating instructions prior to commissioning manual FlexFusion® GAS GOLD COMBI Model FGG-615 FGG-621 FGG-115 FGG-121 FGG-215 FGG-221 FM05-117-C en-US...
- Page 2 Operating and display elements a On Off "I O" button j "START STOP" button k Ready2Cook button b Selection range c Select knob l Fan speed button d HandClean symbol m "STEP" button e WaveClean symbol n Indicator light f Right display o Left knob g Right knob p Left display...
- Page 3 Henny Penny Corporation P.O.Box 60 Eaton,OH 45320 Phone +1 937 456-8400 Fax +1 937 456-8402 Toll free in USA Phone +1 937 417-8417 Fax +1 937 417-8434 www.hennypenny.com Operating instructions...
-
Page 4: Table Of Contents
Directory of contents 1 Introduction ................. 7 1.1 About this manual ................ 7 1.1.1 Explanation of signs .................. 8 1.2 Intended use .................. 9 1.3 Warranty .................... 9 2 Safety instructions ............ 10 3 Rules of conduct when the smell of gas is detected .. 13 4 Description of the unit ............. 14 4.1 Overview of the unit ... - Page 5 Directory of contents 5.3.4 Closing the 2-step door lock .............. 29 5.4 Loading and emptying the unit ............. 29 5.4.1 Loading and emptying ................ 29 5.4.2 Loading and emptying with a tray rack trolley ......... 30 5.4.3 Loading and emptying with a tray trolley .......... 31 5.5 Making the basic settings .............. ...
- Page 6 Directory of contents 5.12.5 Canceling Ready2Cook ................. 45 5.13 Pausing and ending operation ............ 46 5.13.1 Performing a hygiene flush after an extended period of idleness .. 46 6 Cleaning and caring for the unit ........ 47 6.1 Preventing corrosion .............. 47 6.2 Removing rust spots .............. 47 6.3 Cleaning the housing ...
-
Page 7: 1 Introduction
Introduction 1 Introduction 1.1 About this manual The operating instructions are part of the unit and contain information: • on safe operation, • on cleaning and care • on remedial actions in case of faults. Observe the following notes and adhere to them: •... -
Page 8: Explanation Of Signs
Introduction 1.1.1 Explanation of signs Imminent danger DANGER Failure to comply will lead to death or very severe injuries. Potential danger WARNING Failure to comply can lead to death or very severe injuries. Dangerous situation CAUTION Failure to comply can lead do slight to moderately severe injuries. Property damage NOTICE Failure to comply can cause property damage. -
Page 9: Intended Use
Introduction 1.2 Intended use This unit is intended to be used solely for commercial purposes, particularly in commercial kitchens. • As set-down area in or on the unit This unit may only be used with suitable accessories and for the cooking of food. -
Page 10: 2 Safety Instructions
Safety instructions 2 Safety instructions The unit complies with applicable safety standards. Residual risks associated with operation or risks resulting from incorrect operation cannot be ruled out and are mentioned specifically in the safety instructions and warnings. The operator must be familiar with regional regulations and observe them. - Page 11 Safety instructions • Allow only qualified personnel to repair the unit. Escaping gas or exhaust Risk of asphyxiation and explosion from escaping gas • Follow the rules of conduct when the smell of gas is detected (see "Rules of conduct when the smell of gas is detected"). Risk of asphyxiation and poisoning from exhaust gases •...
- Page 12 Safety instructions • Take appropriate protective measures when handling aggressive cleaning agents. Risk of falling on wet and slippery ground • Keep the floor in front of the unit clean and dry. Risk of injury from improper cleaning • Clean the cooking chamber carefully. The cooking chamber sensor protrudes into the cooking chamber.
-
Page 13: 3 Rules Of Conduct When The Smell Of Gas Is Detected
Rules of conduct when the smell of gas is detected 3 Rules of conduct when the smell of gas is detected Risk of asphyxiation and explosion from escaping gas DANGER Rules of conduct when the smell of gas is detected. •... -
Page 14: 4 Description Of The Unit
Description of the unit 4 Description of the unit The unit is a hot-air steamer suitable for most cooking methods used in commercial kitchens. Selectable use of hot air, unpressurized live steam, individually, in succession or combined with moist and dry heat. - Page 15 Description of the unit Image: Unit with tray trolley a Tray rack j Hand shower b Insulating disk k Nameplate c Door handle l Unit leg d Cooking chamber door m Operating unit e Guide rail (right) n Housing f Tray trolley o Air inlet nozzle g Handle bar p Waste gas connection...
-
Page 16: Countertop Unit
Description of the unit 4.1.1 Countertop unit Image: Unit with tray rack trolley a Tray rack j Hand shower b Insulating disk k Nameplate c Door handle l Base frame (optional) d Cooking chamber door m Unit leg e Tray rack trolley (optional) n Operating unit f Vapor drainage channel, door o Housing... -
Page 17: Floor-Standing Unit
Description of the unit 4.1.2 Floor-standing unit Image: Unit with tray trolley a Tray rack j Hand shower b Insulating disk k Nameplate c Door handle l Unit leg d Cooking chamber door m Operating unit e Guide rail (right) n Housing f Tray trolley o Air inlet nozzle... -
Page 18: Usb Port
Description of the unit • Two-step door lock (optional); this feature is standard on size 20 units • Power optimization system (optional) • Cooking chamber door hinged at right • Cooking chamber door hinged at left (optional) • HandClean • WaveClean (optional) 4.2.2 USB port The unit is equipped with a USB port (USB 2.0). -
Page 19: Operating And Cooking Modes
Description of the unit 4.3 Operating and cooking modes 4.3.1 Operating modes Manual cooking In the Manual cooking mode, individual cooking programs and unit functions can be activated directly. The various types of cooking and unit functions can be adapted individually. Automatic cooking In the Automatic cooking mode, stored cooking programs can be actuated and adapted as necessary. -
Page 20: Core Temp. Measurement
Description of the unit Start-time selection When using start time selection, temperatures that promote the growth of INFORMATION harmful microorganisms on the food being cooked can occur in the cooking chamber. Observe food processing regulations. Start-time preselection can be used to set a waiting period until the program starts. - Page 21 Description of the unit Symbol Operating and display element Function Steaming symbol • Indicates that the Steaming cooking mode can be se- lected here Combisteaming symbol • Indicates that the Combisteaming cooking mode can be selected here Hot air symbol •...
-
Page 22: Abbreviations In The Displays
Description of the unit Symbol Operating and display element Function Fan speed button • On Model 6.10: Sets the fan speed Ready2Cook button • Starts and stops the heating or cooling process "START STOP" button • Starts and stops the cooking programs or the clean- START STOP Indicator light... -
Page 23: Loading Capacities
Description of the unit 4.5 Loading capacities 4.5.1 Loading capacity Tray rack trolley and tray trolley Version Per shelf maximum (kg (lb)) Per unit maximum (kg (lb)) FPG-615 22,5 (49,6) 54 (119,1) FPG-621 30 (66,2) 72 (158,8) FPG-115 22,5 (49,6) 90 (198,5) FPG-121 30 (66,2) -
Page 24: Core Temperature Standard Setting
Description of the unit 4.6.2 Core temperature standard setting The adjustment range for the core temperature depends on the cooking mode. Cooking mode Standard value Setting range Change increments (°C (°F)) (°C (°F)) (°C (°F)) Steaming 70 (158 ) 0 (32 ) - 99 1 (33,8 ) (210,2 ) Combisteaming... - Page 25 Description of the unit Basic setting Parameter Standard Range of Explanation value adjustment Unit of volume 0 = ml Milliliter (ml) 1 = fl.oz Fluid ounce (fl.oz.) 0 = Imperial Imperial fluid ounce (fl.oz.) 1 = U.S. (fl.oz.) U.S. fluid ounce Audible signal Duration of audible 0 –...
-
Page 26: 5 Operating The Unit
Operating the unit 5 Operating the unit Blockage of the drain in the cooking chamber NOTICE Food debris, skin and bones can clog the drain and pump. • For very fatty food, place a sieve or perforated GN container in the lowest rack. -
Page 27: Switching The Unit On And Off
Operating the unit 5.2 Switching the unit on and off 5.2.1 Switching on Press the On Off "I O" button to "I". The unit is now on. 5.2.2 Switching off Press the On Off "I O" button to "O". The unit is now off. 5.3 Opening and closing the cooking chamber door The 1-step door lock is standard on sizes 6 and 10. -
Page 28: Closing The 1-Step Door Lock
Operating the unit 5.3.2 Closing the 1-step door lock Image: Closing the 1-step door lock Prerequisite Door handle in initial position Close the cooking chamber door with pressure. The cooking chamber door is closed. 5.3.3 Opening the 2-step door lock Image: Opening the 2-step door lock On size 6 and size 10, first rotate the door handle counterclockwise. -
Page 29: Closing The 2-Step Door Lock
Operating the unit 5.3.4 Closing the 2-step door lock Image: Closing the 2-step door lock Prerequisite Door handle in initial horizontal position 1. Close the cooking chamber door with pressure. The cooking chamber door latches. 2. Rotate the door handle downwards. Cooking chamber door is locked. -
Page 30: Loading And Emptying With A Tray Rack Trolley
Operating the unit 4. Leave the cooking chamber door slightly ajar. This extends the service life of the door seal. No moisture builds up in the cooking chamber. 5.4.2 Loading and emptying with a tray rack trolley Image: Loading and emptying with a tray rack trolley a Tray rack e Tray rack trolley b Handle bar... -
Page 31: Loading And Emptying With A Tray Trolley
Operating the unit Emptying with a tray rack trolley 1. Open cooking chamber door. 2. Position the tray rack trolley at the unit. Lock the casters to prevent the trolley's rolling away. 3. Insert the tray rack support plate and secure the tray rack on the plate. -
Page 32: Making The Basic Settings
Operating the unit 3. Retract the tray trolley. 4. Remove all leftover foodstuff from the drainage sieve. 5. Leave the cooking chamber door slightly ajar. This extends the service life of the door seal. No moisture builds up in the cooking chamber. 5.5 Making the basic settings The basic settings for operation can be displayed and changed by entering the password "111". -
Page 33: Basic Functions
Operating the unit 5. Press the "START STOP" button. Accept changes. 6. Press the "STEP" button twice to leave the Settings menu without changes. 7. Press and hold the "STEP" button for 3 seconds. Changes are saved. "OPt" flashes on the left display. The centre display shows "Stor". -
Page 34: Setting The Cooking Chamber Humidity Level
Operating the unit 5.6.3 Setting the cooking chamber humidity level 00:45 ° Image: Cooking chamber humidity set Prerequisite Cooking mode selected Press the Plus button or the Minus button. The cooking chamber humidity level is increased or decreased. The center display shows the cooking chamber humidity. 5.6.4 Setting the cooking time The cooking time can be set for up to 23 hours and 59 minutes in 1-minute in- INFORMATION... -
Page 35: Displaying Actual Values
Operating the unit Prerequisite Cooking mode selected Turn the right rotary knob to the left beyond continuous operation to core temperature. The right display shows the standard value for the core temperature. Turn the right rotary knob. Turning clockwise increases the core temperature. Turning counterclockwise lowers the core temperature. -
Page 36: Inserting And Removing The Usb Stick
Operating the unit 3. Create a folder with the name "FCBrowserFiles". Data exchange of texts in HTML format. 4. Create a folder with the name "FCImport". Data exchange of cookbooks. 5. Create a folder with the name "MMIContent". Data exchange of additional imported content. 6. -
Page 37: Using The Core Temperature Sensor
Operating the unit 2. Press the "START STOP" button. The left display shows the lowest log number. "HAC" appears on the center display. The right display flashes the highest log number. 3. Turn the left and right rotary knobs and select the log range. 4. -
Page 38: Measuring With A 4-Point Core Temperature Sensor
Operating the unit A core temperature measurement is always possible, if the core temperature INFORMATION sensor is inserted in the food being cooked. Also before or after a cooking process or during a time-controlled cooking step. 5.7.1 Measuring with a 4-point core temperature sensor Image: Core temperature sensor with four measuring points Insert the core temperature sensor fully into the food to be cooked. -
Page 39: Measuring The Core Temperature When Cooking Frozen Food
Operating the unit When food with a bone is being cooked, insert the core temperature sensor close to the bone. When cooking longer pieces of food, insert the core temperature sensor across the food to avoid a hole in the center of the slice. When cooking fowl, insert the core temperature sensor into the inside of the leg. -
Page 40: Ending The Cooking Mode
Operating the unit 7. If necessary, insert the core temperature sensor into the food being cooked. 8. Press the "START STOP" button. The indicator light for the "START STOP" button flashes. The number of indicator lights above the Fan speed button shows the speed level. -
Page 41: Saving User's Own Cooking Program
Operating the unit To correct the settings, press the "STEP" button several times to return to the INFORMATION desired cooking step. Set the values again. 5.9.2 Saving user's own cooking program Prerequisite Cooking program entered 1. Press the "Programs" button for 3 seconds. "Pro"... -
Page 42: Automatic Cooking
Operating the unit 5.10 Automatic cooking 5.10.1 Selecting the cooking program Prerequisite No cooking program selected Rotate the Select operating knob to the Programs symbol. "Pro" appears on the left display. The right display shows the number of the saved cooking program or it shows "1"... -
Page 43: Canceling The Cooking Program
Operating the unit 2. Press the "START STOP" button or open the cooking chamber door. The signal is switched off. 5.10.4 Canceling the cooking program 1. Press the "START STOP" button. The cooking program is cancelled. The indicator light for the selected cooking mode illuminates. The left display shows the preset cooking temperature. -
Page 44: Multi-Step Cooking Program
Operating the unit 5.11 Multi-step cooking program 5.11.1 Starting Prerequisite Multi-step cooking program entered Press the "START STOP" button to start the cooking program. The START STOP indicator light flashes until the end of the last program step. The STEP indicator light illuminates. The indicator light for the cooking mode used in the currently active program step illuminates. -
Page 45: Canceling Start Time Selection
Operating the unit 4. Press the "START STOP" button. The start time selection timer starts. The indicator light for the "START STOP" button illuminates. The right display shows the remaining time before starting and the colon in the time display flashes. After the remaining time before starting has expired, the set cooking program starts automatically. -
Page 46: Pausing And Ending Operation
Operating the unit 5.13 Pausing and ending operation Switch off the unit during pauses and at end of operation. 5.13.1 Performing a hygiene flush after an extended period of idleness For reasons of hygiene, flush the water lines in the unit and on-site water lines before using the unit. -
Page 47: 6 Cleaning And Caring For The Unit
Cleaning and caring for the unit 6 Cleaning and caring for the unit Risk of burns from hot surfaces CAUTION • Allow surfaces to cool prior to cleaning. Risk of chemical burns from cleaning agent CAUTION • Follow the instructions of the cleaning agent manufacturer. •... -
Page 48: Cleaning The Housing
Cleaning and caring for the unit 6.3 Cleaning the housing Prerequisite Unit switched off and cooled down Clean the housing with warm water and a commercially available detergent. 6.4 Cleaning the door handle, operating elements and control panel Risk of property damage from improper cleaning NOTICE •... -
Page 49: Cleaning The Steam Outlet
Cleaning and caring for the unit Risk of property damage from improper cleaning of the surface NOTICE • Do not use abrasive cleaners or cloths. • Do not use grill cleaners. Risk of property damage from improper cleaning NOTICE • Do not clean the surface with abrasive or chemically aggressive cleaning agents. -
Page 50: Removing Calcium Deposits From The Unit
Cleaning and caring for the unit Risk of injury from sharp edges CAUTION • Wear protective gloves. Image: Cleaning the condensation hood Prerequisite Unit and hood disconnected from the electric supply mains Unit and hood cool 1. Clean the housing daily with warm water and a commercially available cleaner. -
Page 51: Cleaning The Cooking Chamber Automatically With Waveclean (Optional)
Cleaning and caring for the unit 6.10 Cleaning the cooking chamber automatically with WaveClean (optional) Risk of chemical burns CAUTION Keep the cooking chamber door closed during the cleaning cycle. Risk of chemical burns CAUTION Place the preheat bridge on the lower edge of the cooking chamber opening on models 20.15 and 20.21 when there is no tray trolley in the combisteamer. -
Page 52: Preparing For Cleaning
Cleaning and caring for the unit If the automatic forced rinse is canceled, it starts again from the beginning. INFORMATION It is not possible to start a cooking program before the forced rinse run to com- pletion. 6.10.1 Preparing for cleaning Risk of property damage from improper cleaning NOTICE •... -
Page 53: Inserting The Cleaning Cartridge
Cleaning and caring for the unit 3. Press the "START STOP" button. If the cooking chamber temperature is too high, "HOt" appears on the right display; if the cooking chamber temperature is too low, "--:--" appears on the right display. The indicator light for the Ready2Cook button flashes. -
Page 54: Starting Automatic Cleaning
Cleaning and caring for the unit Requirements Cleaning cartridges sealed and undamaged 1. Open the cooking zone door. 2. Open the lid of the cartridge. 3. Insert the cartridge into the holder on the air diverter or into the holder on the tray trolley. 4. -
Page 55: Cleaning The Cooking Chamber Semi-Automatically
Cleaning and caring for the unit 4. Close the cooking zone door. After the cooking chamber door is closed, the cleaning program is completed. 5. Empty any droplets of the cleaning water from the collection container of the tray trolley and flush it afterwards with a gentle stream of water. -
Page 56: Rinsing The Cooking Chamber
Cleaning and caring for the unit 3. Use the left rotary knob to select CLE on the display. The indicator light illuminates. "CLE" flashes on the center display. 4. Press the "START STOP" button. The cleaning program starts. The cooking chamber is heated or cooled. -
Page 57: Drying The Cooking Chamber
Cleaning and caring for the unit 6.11.4 Drying the cooking chamber Prerequisite Cooking chamber door closed 1. The drying process starts automatically. The indicator light over the Convection symbol illuminates. The right display indicates the remaining time. The cooking chamber is heated. INFORMATION 2. -
Page 58: Inspecting The Unit
Cleaning and caring for the unit 4. Loosen the center fastener; present only in size 20. 5. Swing the air diverter toward the back wall. Swinging back the air diverter 1. Swing back the air diverter along the side wall. 2. -
Page 59: 7 Transporting The Unit
Transporting the unit 7 Transporting the unit Risk of tipping of the unit due to damaged casters WARNING If the casters are damaged, the unit can tip over and cause serious injuries. • Do not move the unit with the parking brake applied. •... -
Page 60: 8 Troubleshooting
Troubleshooting 8 Troubleshooting Image: Left, center and right displays If an error occurs during operation, the error group and the error number within the group are displayed. • The left display shows the error group. • The right display flashes the error number. For a remedy, give customer service the error group and error number displayed. - Page 61 Troubleshooting Error Error no. Failure Possible causes Remedy group Top cooking chamber • Sensor failure • The second cooking zone sensor defective sensor is used as a sub- stitute sensor Bottom cooking chamber • Sensor failure • Contact Customer service sensor defective Emergency operation due to •...
-
Page 62: Nameplate
Troubleshooting Error Error no. Failure Possible causes Remedy group 7 / 8 / 9 No gas fan / at top / at • Contact Customer service bottom 10 / 11 / Wiring fault in flame / at top / • Contact Customer service at bottom 13 / 14 / Wiring fault in gas solenoid... -
Page 63: 9 Carrying Out Maintenance
Carrying out maintenance 9 Carrying out maintenance The manufacturer recommends professional cleaning of the unit by trained technical personnel in 12-month intervals. With a heavier use, a maintenance interval of 6 months is recommended. Operating instructions... -
Page 64: 10 Disposing Of Unit In An Environmentally Responsible
Disposing of unit in an environmentally responsible manner 10 Disposing of unit in an environmentally responsible manner The unit has been designed to provide a lifetime of 10 years with average use. Do not dispose of unit or the unit's components together with non- recyclable waste. - Page 68 Henny Penny Corporation P.O.Box 60 Eaton,OH 45320 Phone +1 937 456-8400 Fax +1 937 456-8402 Toll free in USA Phone +1 937 417-8417 *FM05-117-C* Fax +1 937 417-8434 www.hennypenny.com Henny Penny Corp., Eaton, Ohio 45320, Revised 8/16/2022...