Table of Contents
Advertisement
Quick Links
Advertisement
Table of Contents

Related Manuals for Iwatsu Omegatrek PS6

Summary of Contents for Iwatsu Omegatrek PS6
- Page 2 Owner’s Manual. SAFETY INFORMATION: The PS6 Portable Station is a low power radio transmitter and receiver. When it is on, it receives and sends out radio frequency (RF) signals. The design of the PS6 Portable Station complies with the FCC 96-326 guidelines for RF emissions from mobile and portable devices.
-
Page 3: Table Of Contents
PS6 Digital Wireless Portable Station Feature Locator ....... . 1... - Page 4 PS6 Portable Station Ringer ........
-
Page 5: Chapter 1 - Introduction
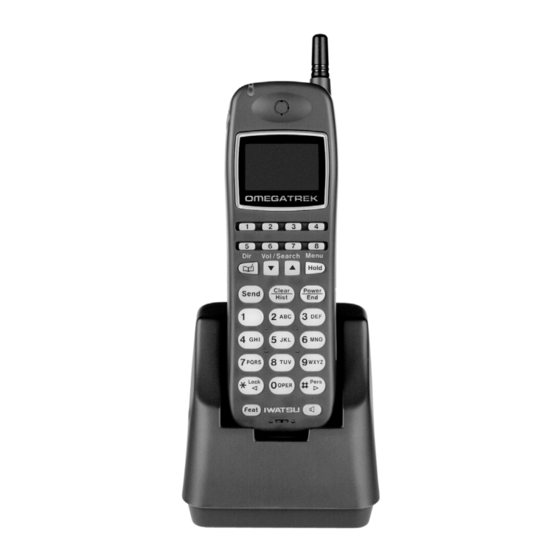
PS6 Digital Wireless Portable Station Feature Locator The PS6 Digital Wireless Portable Station enables users to carry a small, lightweight unit within a large service area, no longer confining them to their desks to make or receive intercom or outside line calls. -
Page 6: Digital Wireless Portable Station Features
Receiver 2 • Omegatrek Owner’s Manual Description Incoming Call Indicator - This lamp flashes red when a new call rings at your PS6 portable station. Battery Charging Status - This lamp indicates the charging status of the battery when the portable station is in the cradle. - Page 7 Clear - Use this key to correct alphanumeric characters you have entered that appear on the Alphanumeric Display. History - When the PS6 Portable Station is idle press to access the outgoing and incoming call history list. Connect the PS6 to a PC using the IX-PSCB Cable.
-
Page 8: Lcd Display Icon Map
• Introduction PS6 Digital Wireless Portable Station Features Feature Speaker Key Microphone Speaker Figure 2. LCD Display Icon Map 4 • Omegatrek Owner’s Manual Description While on a call press to listen to audio through the PS6 portable station speaker (incoming audio only). - Page 9 Flashes while the personal station is trying to establish Icon a communication with a base station. Displays steady once a communication channel is established and dur- ing a call. Does not display when the PS6 is idle. Speaker Indicates that the speaker is on. Signal Shows the signal strength.
- Page 10 LCD Display Icon Map Display Information Personal Ringing Mode Call History List 6 • Omegatrek Owner’s Manual Description Indicates that Personal Ringing Mode is enabled on your PS6 Portable Station. Indicates there are new entries in your Incoming/Out- going Call History List.
-
Page 11: Chapter 2 - Getting Started
Chapter 2 Getting Started You Cannot Use Your Portable Station When: 1. You do not see the Antenna icon. (Refer to LCD Display). When the Portable Station is outside the service area or receiving a weak signal in the service area, you cannot place or receive phone calls. - Page 12 3. Replace the battery cover over the battery compartment. CAUTION: Replace the battery with an Iwatsu IX-PSBP only. Use of another battery may present a risk of fire or explosion. There is a danger of explosion if battery is incorrectly replaced.
-
Page 13: Charging The Battery
Charging the Battery Use the supplied IX-PSCG charger only. 1. Plug the charger into an AC outlet. 2. Place the Portable Station snugly into the charger. The Charge Lamp will light red while charging. Leave the Portable Station in place for at least seven hours before use. -
Page 14: Hand Strap Installation
• If the battery is not being charged properly, the Charge lamp flashes red. Pick up the PS6 Portable Station and place it back in the charger. This indication will also occur if the battery needs to be replaced. -
Page 15: Operating Menus
Figure 5. Hand Strap Installation Operating Menus The PS6 has a number of menu options available that allow you to customize the operation of your Portable Station. These options allow you to customize the operation of your Portable Station. To access these menu items, press the [Menu] key and the corresponding menu number. -
Page 16: Searching Through The Operating Menus
• Press [End] to exit from any menu screen to the idle state. PS6 Operating Menus Option Locator The tables on the following pages list the function of each PS6 Menu Option. For more information on each of the options described please reference the associated feature description located in this manual. - Page 17 Operating Menus Option Locator Programming Menu Item Extension Verify your PS6 Portable Station Number extension number. Alarm Clock Set the PS6 Portable Station Alarm Clock feature. System Select Allows the PS6 Portable Station to operate in multiple ADIX systems. This can be enabled...
- Page 18 Enable or disable the PS6 Portable Station capability to produce an audible indication when you place the PS6 in the Battery Charger. Program time and calendar that appears on the PS6 Alphanumeric Display.
-
Page 19: Extension Number Display
Operating Menus Option Locator Programming Menu Item Quick Dial Register a phone number to a Quick Dial Key Combination. Edit or delete a phone number assigned to a Quick Dial Key Combination. Help Display Browse a list of programming items. NOTES: •... -
Page 20: Signal Strength
• Getting Started When the Battery icon is fully charged, the icon will display two bars within the Battery icon. As the charge decreases, so will the number of visible bars within the Battery icon.When your battery charge level has become too low, the Battery icon will be empty. - Page 21 so you can enter the current time, or the time you wish your portable unit to reflect. NOTE: Hours are denoted in military time (24-hour cycle). 4. Press [MENU] once you have entered the revised time and/or date. The LCD Display will inform you ‘TIME COMPLETED’ and you will hear two tones (unless personal ring is on) to confirm.
- Page 22 • Getting Started 18 • Omegatrek Owner’s Manual...
-
Page 23: Chapter 3 - Basic Features
Chapter 3 Basic Features Additional Features By combining the Feature key and a code, you can access an advanced feature that is not assigned to an individual key. Press [Feat][Feat]+Code to access a feature. The list of codes is shown below. -
Page 24: Call Forwarding (For Outside Line And Intercom)
• Basic Features Call Forwarding (for Outside Line and Intercom) This feature allows you to send incoming calls to another extension or external line using Personal Speed Dial numbers 90-99. You can also separate call forward destinations for intercom calls and outside line calls. For instance, you could set all intercom calls to your cell phone, and all outside line calls to be forwarded to your voice mail. -
Page 25: Forward Cancel
Forward Cancel You may cancel the forwarding of all calls, outside line calls only, or Intercom calls only. 1. Press [Send] or press the Speaker key for more than one second. 2. Press [FWD][*]. 3. Enter the Call Type number you wish to cancel. •... -
Page 26: Adding Another Extension To An Outside Line Call
• Basic Features Adding Another Extension to an Outside Line Call 1. When you are on an outside line call, press TRAN. Wait for the intercom dial tone. The line key slowly flashes and the [Send] key lights up intermittently blinking. 2. -
Page 27: Group Park
NOTES: • When you place a call on Exclusive Hold, the corresponding line keys on the other phones indicate “busy”. Group Park By placing a call on Group Park, all extensions with the appearance of that Group Park key will have a flashing indication and be able to pick up that call. The Group Park key needs to be assigned to a line key in database programming. -
Page 28: Idle State Indicators
PS6 handsets. In order for Common Keys to be active, you must be within the area of a sub cell group in which your PS6 is enabled. Common Keys must be programmed on your PS6 by your system administrator. If your PS6 is not programmed with Common Keys, your PS6 will never display “G”. -
Page 29: Intercom Call
Intercom Call Your Omegatrek PS6 Portable Unit is comes with the ability to place and receive hands-free Intercom Calls. Placing an Intercom Call 1. Lift the Portable Station from the charger and press [Send]. The [Send] key lights up and intermittently flashes. -
Page 30: Outside Line Calling
• Optimized Routing Access • Dialing an Outside Line Access Code. One or more of the Multipurpose Keys on the PS6 Portable Station may be programmed for one-touch outside line access. 1. Press the desired Outside Line, Outside Line Group, or Optimized Routing Access Key ([LINE], [OUT], [FLT]), or dial an Outside Line Access Code followed by the [SEND] key. -
Page 31: Receiving An Outside Line Call
(See Figure 1) will flash and a ringing indication (either audible and/or visual on the LCD) will be generated at the PS6. To answer the call: 1. Lift the Portable Station from the charger and press the flashing line key. -
Page 32: Paging Call (Station Origination Only)
• Basic Features NOTES: • If the Portable Station is specified in database programming to ring for incoming calls received on a particular line, you can also answer incoming calls just by pressing [Send] (without pressing the line key). • When the Any Key Answer feature (menu 54) is ON you can answer incoming calls by pressing any dial pad key. -
Page 33: Ps6 Portable Station Key Labels
• The ‘All Call’, ‘Group Call’ and ‘Zone’ access codes are assigned in database programming. Please ask your System Administrator for these codes. • PS6 Portable Stations cannot receive pages. PS6 Portable Station Key Labels The Portable Station includes a set of adhesive labels that can be used to label assigned keys with functions that you have programmed. -
Page 34: Portable Station Key Labels
• Basic Features Figure 6. Portable Station Key Labels 30 • Omegatrek Owner’s Manual... -
Page 35: Chapter 4 - Advanced Features
Option 32 is used as the Alarm Clock Tone. • The alarm tone volume is the same as the ringer volume. An alarm tone may or may not be heard if your PS6 Portable Station Omegatrek Owner’s Manual • 31... -
Page 36: Any Key Answer
You can select and redial a phone number from the list. Up to 24 digits can be recorded as a phone number. Incoming Call History - Your Omegatrek PS6 Portable Unit stores the 10 most recent calls you received on your Portable Station. This Incoming Call History can be accessed by pressing your [HIST] key twice. -
Page 37: Dialing Phone Numbers From The Call History List
Dialing Phone Numbers from the Call History List When you receive an incoming call or make an outgoing call, the phone number is recorded in either the Incoming or Outgoing Call History. The last ten incoming and outgoing phone numbers are recorded. 1. -
Page 38: Deleting An Item From The Call History
• Advanced Features Deleting an Item from the Call History 1. Select the item you wish to delete from the Incoming Call History. 2. Press [Menu]. Confirm that DELETE is selected. 3. Press [Menu] again. You will hear a confirmation tone to indicate that the selected item has been deleted. - Page 39 NOTES: • To enter a character, press the dial pad key (repeatedly, if necessary) on which the character is displayed. When the character is displayed, press another dial pad key. • If you have incorrectly entered a character, press [Clear] to delete it. The cursor will move back by one character.
-
Page 40: Charger Tone
Dial Lock If you activate the Dial Lock feature, you can prevent unauthorized individuals from making calls using your PS6 Portable Station. The password required to invoke the Dial Lock feature is programmed using Menu [5][5]. To activate the Dial Lock feature: 1. -
Page 41: Disabling Dial Lock
Portable Station will go back to the idle state. If you enter the wrong password, you will hear a warning tone. Disabling Dial Lock 1. Enter the four-digit password. 2. Press [Menu]. You will hear a confirmation tone to indicate that the Dial Lock feature has been successfully disabled. -
Page 42: Directory
• Advanced Features Directory Your Omegatrek PS6 Portable Station has the ability to manage up to 500 contacts, including contact name and number. There are many ways you can customize these directories which are described in the following section of this document. -
Page 43: Making An Entry In Directory
NOTES: • Press [End] if you would like to cancel the Directory Lock feature. • If you press [Dir] while the Directory Lock feature is ON, the words DIRCTRY LOCK will appear on the display. • If the Key Lock feature or the Dial Lock feature is activated along with the Directory Lock feature, you need to first deactivate the Key Lock feature or the Dial Lock feature before deactivating the Directory Lock feature. -
Page 44: Editing An Entry In The Directory
• Advanced Features 8. Press the up or down arrow to select ENTRY or EDIT, then press [Menu]. You hear two quick tones when the entry has been successfully made. Selecting EDIT takes you back to Step 2. Press [End] when you have finished entering data. -
Page 45: Deleting A Directory Entry
4. Use [* <] or [# >] to move the cursor over a character and then insert another character on the left. You can also move the cursor over a character and then press [Clear] to delete it. 5. Press [Menu]. The previously entered phone number will be displayed. If you do not have to edit the phone number, skip to Step 7. -
Page 46: Deleting All Entries In A Directory
Portable Station will return to the idle state. Directory Group Name You can name up to ten directory groups to further customize your PS6 Portable Station. The Directory groups are numbered 0-9. 1. When the Portable Station is idle, press [Menu] [5] [8] to display the Directory Group Name menu. -
Page 47: Registering A Phone Number From The Call History To The Directory
Registering a Phone Number from the Call History to the Directory You can register phone numbers recorded in the Call History into the Directory. 1. Select the data you wish to register. 2. Press [Menu]. 3. Press an up or down arrow to select SAVE. 4. -
Page 48: Inserting A Pause When Registering A Phone Number
• Advanced Features 4. Enter the number (e.g., 201) you wish to add to the phone number. Press [Send] to dial the combined numbers. Inserting a Pause When Registering a Phone Number 1. Press [Feat] [Menu] and a digit (1-9) to register a pause time in seconds. 2. -
Page 49: Headset Operation
2. All PS6 feature operation remains the same. Headsets equipped with a hookswitch allow calls to be answered and disconnected by pressing the switch for three seconds. To answer a call, press [Send] on the PS6 Portable Station. To end a call, press [End] on the PS6 Portable Station. -
Page 50: Disabling Key Lock
PS6 Portable Station Ringer You can program your PS6 Portable Unit to further customize its operations. Several options are available for the type and tone of ringing for your PS6 Portable Unit. Ringing Options You can program your PS6 Portable Unit to have different ringing tones depending on the type of call your PS6 Portable Station is receiving. - Page 51 Ringing tone for incoming calls on an outside line. PBX/CEX Ringing tone for incoming calls from a network system or Centrex line. Alarm Ringing tone for the Omegatrek PS6 Alarm Clock. Door Ringing tone for calls from a doorphone. Phone Ringing Tone Options...
-
Page 52: Vibrate Alert
• Advanced Features Vibrate Alert Use the Vibrate Alert feature to have your PS6 Portable Station vibrate when you receive a new call. This feature has no effect on the ringing tone selected. Your PS6 will ring and vibrate simultaneously. -
Page 53: Disabling Personal Ringing Mode
Disabling Personal Ringing Mode 1. When the Portable Station is in the Personal Ringing mode, press and hold [#] for one second. You will hear a confirmation tone to indicate that the Personal Ringing mode has been successfully disabled. The Portable Station will go back to the idle state. -
Page 54: Quick Dial
The Quick Dial feature may be used to register frequently dialed numbers for quick access without opening the PS6 Directory. The Quick Dial feature works by pressing the [Feat] Key plus a digit from 0-9 that has been programmed with an outside or internal phone number. -
Page 55: Deleting A Phone Number From A Quick Dial Key Combination
6. Enter the phone number you wish to register. You will hear a confirmation tone to indicate that the registration has been successfully made. The Portable Station will go back to the idle state. 7. Press [Menu]. You will hear a confirmation tone to indicate that the registration has been successfully made. -
Page 56: Registering A Phone Number From A Directory To A Quick Dial Key Combination
• Advanced Features 3. Press the up or down arrow to select In One Touch then press [Menu]. 4. Press the up or down arrow to select the desired Quick Dial key combination then press [Menu]. NOTE: • If the Quick Dial key combination you selected is already in use, the display will show OCCUPIED and go back to Step 4. -
Page 57: Quick Mode
PS6 Portable Station from the Charging Cradle. If you have accessed intercom dial tone using Quick Mode and do not press a key for 20 seconds after you pick up the Portable Station from the charger, the PS6 will generate a warning tone. -
Page 58: Range Notify
• Advanced Features NOTE: • This setting has no effect on Quick Mode operation enabled for intercom dial tone. Range Notify If you walk out of the service area with the Portable Station while the Range Notify feature is ON, the Portable Station sends a warning tone. 1. -
Page 59: Speaker Feature
Speaker Feature The PS6 Portable Station is equipped with a speaker that allows you to listen to voice announcements, voice messages, and to hear station tones and signals. You may also use the speaker when on a call to hear the outside party in an orator mode. -
Page 60: System Select
• Asterisks will replace the digits you enter. System Select If enabled, the PS6 Portable Station will function on up to nine Omegatrek systems. If you move from one system to another, the Portable Station switches over automatically. If the service area of two or more systems overlap, you can select one of them as follows. - Page 61 NOTES: • If you select AUTO, a system is automatically selected. • When the Range Notify feature (Menu 42) in ON, you hear a warning tone when walking out of the service area. • The eight line keys can be assigned to various functions with database programming.
-
Page 62: User Name
• Advanced Features User Name You may program a user name to display on the LCD when the PS6 is idle. 1. When the Portable Station is idle, press [Menu] [5][7] to display the User Name menu. 2. Press [Menu].