Table of Contents
Advertisement
Quick Links
Advertisement
Table of Contents

Related Manuals for Roland SP-404MK2


Summary of Contents for Roland SP-404MK2
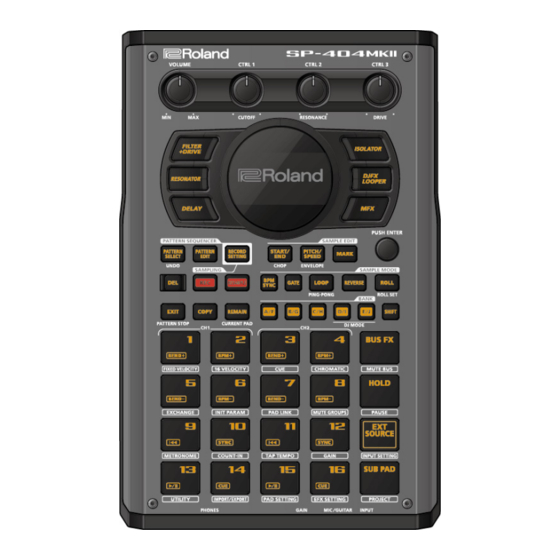
- Page 1 SP-404MK2 (Version 2.00) Reference Manual...
-
Page 2: Table Of Contents
Table of contents Table of contents Using a Marker to Split and Assign a Sample to a Pad (CHOP) ....................46 Introduction ................. 4 Making Fade-in/Fade-out Settings (ENVELOPE) ....47 What You Should Know About This Unit (How Data is Changing the Pitch or Playback Speed of a Sample Organized) ................ - Page 3 Table of contents Customizing the Screen Saver ..........89 SBF ....................117 Preparing a Screen Saver Image ..........89 Stopper ..................117 Enabling a Custom Screen Saver ..........89 Tape Echo ..................117 Saving the Screen Saver Image to a Project ......90 TimeCtrlDly ...................
-
Page 4: Introduction
Introduction Introduction The SP-404MK2 lets you do everything from audio sampling to editing, creating your own songs and performing... all in one unit. This Reference Manual assumes that your unit is using software version 2.00 or later. What You Should Know About This Unit (How Data is Organized) The SP-404MK2 handles a large amount of data, including audio materials and data used to create songs. -
Page 5: Banks And Projects
A collection of 16 patterns is a called a “bank”, and you can store up to 10 banks (A–J). Banks and Projects The 10 banks of samples and 10 banks of patterns are collectively managed as a “project”. The SP-404MK2 can store 16 different projects. -
Page 6: Getting Things Ready
Introduction Getting Things Ready Now, let’s get ready to use the SP-404MK2. This section explains how to prepare and connect to external equipment for outputting sound, as well as the different ways to power this unit. Connecting External Equipment To prevent malfunction and equipment failure, always turn down the volume, and turn off all the units before making any connections. - Page 7 You can transmit and receive audio and MIDI data by connecting a USB cable from your computer or mobile device (smartphone or tablet) to the SP-404MK2. You don’t need to install a device driver on your computer or other device to do this (the SP-404MK2 supports USB Audio Device Class 2.0 specs).
-
Page 8: About The Power Supply
Introduction About the Power Supply Connect the included adaptor to the DC IN jack of this unit, and plug the adaptor into an AC outlet. ● You can also use this unit without an adaptor, such as by supplying power to the USB port or by using batteries. Powering the Unit via USB Port Using Batteries →... - Page 9 When supplying power to this unit via the USB port, be sure to use a cable with USB Type-C® connectors on both ends. No other USB cables can be used, as they cannot provide enough power to operate the SP-404MK2. Also note that even when using cables that have a USB Type-C®...
-
Page 10: Turning The Power On/Off
Introduction The USB port on the device from which this unit draws power must supply 5 V of output voltage and at least 1.5 A of output current. When not enough power is supplied to the USB port In the event that not enough power is supplied to the USB port of this unit (such as when you try to supply power from a USB Type-A connector or when the output current is less than 1.5 A), the message “Switch to batteries”... -
Page 11: Playing Back Samples (Sample Mode)
SAMPLE)(P.101)”. About the sample mode display (top screen) The top screen is shown once you turn on the power of the SP-404MK2 and the unit is ready to play. Selecting a Sample Bank Select the bank to use from the 10 available banks (A–J). -
Page 12: Adjusting The Volume For All Banks (Bank Volume)
Playing Back Samples (SAMPLE MODE) When bank A–E is selected, the bank [A/F]–[E/J] button lights up. When bank F–J is selected, the bank [A/F]–[E/J] button blinks. Adjusting the Volume for All Banks (BANK VOLUME) Adjusts the volume for the specified bank overall. This lets you adjust the volume if the volume varies between banks. Hold down the [SHIFT] button and press the bank [A/F]–[E/J] buttons. -
Page 13: Playing Back A Sample To The Tempo Of A Song (Bpm Sync)
Playing Back Samples (SAMPLE MODE) Playing Back a Sample to the Tempo of a Song (BPM SYNC) You can synchronize the tempo (playback speed) of one sample with another sample. You can also synchronize the tempo of a sample with that of an external device that’s playing, such as a musical instrument or computer. -
Page 14: Playing Back Only While A Pad Is Pressed (Gate)
Playing Back Samples (SAMPLE MODE) Playing Back Only While a Pad is Pressed (GATE) This switches the gate function on/off. When the [GATE] button is on, samples play back only while the pads are pressed (gate playback). When the [GATE] button is off, samples begin playing back each time a pad is pressed. You can also use the gate function with the [EXT SOURCE] button. -
Page 15: Playing Back Samples Repeatedly (Loop)
Playing Back Samples (SAMPLE MODE) Playing Back Samples Repeatedly (LOOP) Use the loop function to make a sample play back repeatedly. The loop settings can be made per sample. When the [LOOP] button is turned on, the loop switches between playback and stopping with each press of the pad (trigger playback). -
Page 16: Playing Back A Sample In Reverse (Reverse)
Playing Back Samples (SAMPLE MODE) Playing Back a Sample in Reverse (REVERSE) You can use the reverse function to play back samples in reverse (from end to start). Press pads [1]–[16] to select the sample you want to play back in reverse. Press the [REVERSE] button to turn reverse playback on (the button lights up). -
Page 17: Playing Back Samples In Detailed Steps (Roll)
Playing Back Samples (SAMPLE MODE) Playing Back Samples in Detailed Steps (ROLL) You can use the roll function to repeatedly play back samples at a set interval. Hold down the [ROLL] button and press pads [1]–[16]. The sample plays back as a roll. You can play back up to four samples at the same time as a roll. - Page 18 Playing Back Samples (SAMPLE MODE) When the roll interval is set to 1/64–1/8, the sample plays back as a roll. When the roll interval is set to 1/4, the sample plays back in a loop. Making the roll playback interval shorter (faster) partway through You can shorten the roll interval while it is playing back.
-
Page 19: Setting A Fixed Sample Volume (Fixed Velocity)
Playing Back Samples (SAMPLE MODE) Setting a Fixed Sample Volume (FIXED VELOCITY) You can set the sample’s velocity so that it always plays back at 127 (the maximum). Hold down the [SHIFT] button and press the pad [1]. “FIXED VELOCITY ON” is shown. The sample velocity is fixed at 127. To cancel this setting, hold down the [SHIFT] button again and press pad [1]. -
Page 20: Changing The Sample Volume For Playback (16 Velocity)
Playing Back Samples (SAMPLE MODE) Changing the Sample Volume for Playback (16 VELOCITY) You can use the 16 VELOCITY function to change a sample’s velocity (volume) in steps when it plays back. Press pads [1]–[16] to select the sample you want to use with the 16 VELOCITY function. Hold down the [SHIFT] button and press the pad [2]. -
Page 21: Playing Back Samples In Scale Pitches (Chromatic)
Playing Back Samples (SAMPLE MODE) Playing Back Samples in Scale Pitches (CHROMATIC) You can play back samples (changing their pitches) as a chromatic scale with the pads. Press pads [1]–[16] to select the sample to use in chromatic mode. Hold down the [SHIFT] button and press the pad [4]. The unit enters chromatic mode. -
Page 22: Muting The Playback Of A Sample (Pad Mute)
Playing Back Samples (SAMPLE MODE) Muting the Playback of a Sample (PAD MUTE) You can momentarily mute (silence) the playback of a sample. By using part mute on a sample that’s playing back, you can create a break. Press a pad to play its sample. You can mute individual samples, either one or more than one, or mute individual samples when a pattern is playing back. -
Page 23: Playing Back Multiple Pads At The Same Time (Pad Link Groups)
Playing Back Samples (SAMPLE MODE) Playing Back Multiple Pads at the Same Time (PAD LINK GROUPS) The PAD LINK GROUPS function lets you group multiple pads (up to four) into one group. By setting a group ahead of time, you can make all the pads in the group play back just by operating a single pad within that group. -
Page 24: Preventing Samples From Playing Back At The Same Time (Mute Group)
Playing Back Samples (SAMPLE MODE) Preventing Samples from Playing Back at the Same Time (MUTE GROUP) The MUTE GROUP function lets you group together all the samples that should not play at the same time (in other words, the samples you don’t want to layer). When you try and play the samples within that group all at the same time, only the sample that started playing back last is heard. -
Page 25: Stopping All Sample Playback (Stop)
Playing Back Samples (SAMPLE MODE) Stopping All Sample Playback (STOP) You can make all samples and patterns that are currently playing back stop. Press the [EXIT] button quickly four times. All samples and patterns that are playing back stop. You can also press the [EXIT] button while holding down the [SHIFT] button to stop all samples and patterns that are playing back. -
Page 26: Disabling Buttons That Are Not Used When Playing Live (Live Mode)
Playing Back Samples (SAMPLE MODE) Disabling Buttons that Are Not Used When Playing Live (LIVE MODE) Normally, the buttons related to features like sampling and editing are not used when you are playing live. Accidentally pressing these buttons while you’re performing live might be a show-stopper. By turning live mode on, you can disable these buttons and avoid such accidents. -
Page 27: Using The Effects
You can use the built-in effects on the SP-404MK2 to process the audio in unique ways. Use the built-in effects on the SP-404MK2 by assigning them to a bus (an audio routing inside the SP-404MK2). With BUS 1 and BUS 2, you can apply the effects that are appropriate for your performance, per sample. BUS 3 and BUS 4 are mainly used to apply effects to the overall sound output from the SP-404MK2. -
Page 28: Assigning Effects To Bus 1 And Bus 2
Using the Effects Press the effect buttons. Press the buttons of the effects you want to apply, including the [FILTER+DRIVE] button, the [RESONATOR] button, the [DELAY] button, the [ISOLATOR] button, the [DJFX LOOPER] button, and the [MFX] button. This turns the effects on. Press pads [1]–[16] to play back the samples. -
Page 29: Deciding On Effects To Use For Each Sample
Using the Effects You can assign the built-in effects of this unit to BUS 3 or BUS 4. Up to four effects are available. To assign an effect to BUS 3 or BUS 4, change the settings in the effect setting screen. →“Configuring the Effect Settings (EFX SET)(P.93)”... - Page 30 Using the Effects You can also use pads [1]–[16] instead of the [VALUE] knob or the [CTRL 3] knob to select an effect. To use pads [1]–[16] to select effects from #17 and up, hold down the [MFX] button and the [DJFX LOOPER] button at the same time.
-
Page 31: Editing The Effects
Using the Effects Editing the Effects When you press an effect button (such as the [FILTER+DRIVE] button) to turn the effect on, the effect edit screen appears. Turn the [CTRL 1]–[CTRL 3] knobs while the effect edit screen is displayed to edit the main parameters of the effect. You may be able to access the sub-parameters by holding down the [VALUE] knob, depending on the effect. -
Page 32: Turning Effects On/Off At The Desired Timing
Using the Effects Turning Effects On/Off at the Desired Timing You can make effects apply only while you hold down the effect buttons (EFFECT GRAB). This lets you quickly turn an effect on/off in time with what you play. Play back a sample. While holding down the [VALUE] knob, press an effect button (such as the [FILTER+DRIVE] button). -
Page 33: Temporarily Output Only The Effect Sound (Mute Bus)
Using the Effects Temporarily Output Only the Effect Sound (MUTE BUS) You can temporarily mute the audio (the sample playback sound or the audio coming into the INPUT jack) that’s sent to a bus, and output only the sound of the effect. This lets you output just the sound of reverberation or delay feedback to create a break when you’re playing. - Page 34 Using the Effects Individually selecting the bus to mute with MUTE BUS When MUTE BUS is turned on, you can individually select the buses on which audio is muted. For details, refer to the “Mute Bus” parameter listing in the “EFX SET(P.111)”.
-
Page 35: Sampling (Sampling)
Sampling (SAMPLING) Sampling (SAMPLING) You can sample (record) the sound that’s inputted into this unit to create your own samples (audio data materials). Configuring the Sampling Settings (RECORD SETTING) Here you can configure the settings for sampling, such as the recording level, as well as apply input effects to the sound input from an external source. - Page 36 Sampling (SAMPLING) Use the [VALUE] knob to move the cursor to the parameter that you want to edit. Use the [CTRL 1]–[CTRL 3] knobs to adjust the parameters. For details on the various effect parameters, refer to “MFX List(P.114)”. Some effect parameters may be shared in common, depending on the bus to which the effect is assigned. For details, see “About the effect parameter save specifications and sharing(P.31)”.
-
Page 37: Sampling
Sampling (SAMPLING) Sampling This shows how to sample (record) the audio that’s inputted into this unit to create your own samples. Press the [REC] button. Empty pads to which samples haven’t been assigned blink red. The metronome sounds when the “Metronome:REC” parameter is “ON” (the SYSTEM parameter “CLICK(P.109)”). Press pad [9] while holding down the [SHIFT] button to turn the metronome sound on/off. - Page 38 Sampling (SAMPLING) Empty pads to which samples haven’t been assigned blink red. Press the [START/END] button. END Snap is enabled. “END Snap ON” is displayed, and the [START/END] button lights up. To disable END Snap, press the [START/END] button again. “END Snap OFF” is displayed, and the [START/END] button blinks. Sample by following steps 2 and onward in “...
-
Page 39: Resampling A Sample (Resample)
Sampling (SAMPLING) Resampling a Sample (RESAMPLE) Resampling means sampling a sample itself while it’s playing back. You can sample the sound of a sample to which effects are applied, or sample the sound of multiple samples that are playing back at the same time, creating a single sample. Also, by turning the pattern sequencer on beforehand (the [PATTERN SELECT] button lights up), you can resample a pattern in the same way as you would resample a sample. -
Page 40: Sampling What You Previously Played (Skip-Back Sampling)
Sampling (SAMPLING) Sampling What You Previously Played (SKIP-BACK SAMPLING) You can sample what you played up to 25 seconds ago (default) using the skip-back sampling function, which works even if you hadn’t started sampling. This lets you “go back in time” to sample a passage you played well during repeated practice, or to sample a phrase you played well when you were just improvising. - Page 41 Sampling (SAMPLING)
-
Page 42: Editing A Sample (Sample Edit)
Editing a Sample (SAMPLE EDIT) Editing a Sample (SAMPLE EDIT) You can edit the playback speed, waveform and other parameters for the samples. Setting the Playback and Loop Regions (START/END) You can prevent unnecessary parts of a sample from playing, such as silence or noise at the beginning or at the end. This shows you how to set the start point (where a sample begins playing back) and the end point (where a sample stops playing back). -
Page 43: Processing A Sample
Editing a Sample (SAMPLE EDIT) Processing a Sample You can use the start point and end point settings to process a sample. Note that this operation directly processes the original sample data. Once you process a sample in this way, it cannot be restored. -
Page 44: Marking And Splitting Samples (Mark)
Editing a Sample (SAMPLE EDIT) Marking and Splitting Samples (MARK) You can split a sample up into multiple smaller samples. To split a sample, you must first mark the locations where the sample is to be split using markers. Here we explain about the different ways to add markers. Adding a marker at the desired location You can choose where to place a marker (the location where the sample is to be split) while looking at the sample’s waveform. - Page 45 Editing a Sample (SAMPLE EDIT) The sample plays back. Press the pads [2]–[16] that are blinking blue, at the timing where you want to add a marker. This adds the marker to the sample. You can press pads [1]–[16] to preview the audio at the corresponding marker. Automatically adding markers based on conditions (AUTO MARK function) You can use the AUTO MARK function to automatically add markers based on certain conditions you specify.
-
Page 46: Using A Marker To Split And Assign A Sample To A Pad (Chop)
Editing a Sample (SAMPLE EDIT) All markers are deleted, even if you exit the sample edit screen. Using a Marker to Split and Assign a Sample to a Pad (CHOP) Splits the sample at the marker positions, and assigns the resulting samples to separate pads. Follow the steps in “... -
Page 47: Making Fade-In/Fade-Out Settings (Envelope)
Editing a Sample (SAMPLE EDIT) Making Fade-in/Fade-out Settings (ENVELOPE) This shows how to set the changes in volume when playing back a sample. You can use fade-in settings (making the volume gradually get louder) and fade-out settings (making the volume gradually get softer). - Page 48 Editing a Sample (SAMPLE EDIT) Controller Parameter Value Explanation [CTRL 3] RELEASE 0–127 Sets the fade-out time. When you set this to 127, the fade-out time is three seconds. knob When you change the following parameters while holding down the [COPY] button, you can change the parameters of other samples registered to the same mute group simultaneously.
- Page 49 Editing a Sample (SAMPLE EDIT)
-
Page 50: Changing The Pitch Or Playback Speed Of A Sample (Pitch/Speed)
Editing a Sample (SAMPLE EDIT) Changing the Pitch or Playback Speed of a Sample (PITCH/SPEED) Here’s how to change the pitch (key) or playback speed of a sample. You can independently edit the pitch and playback speed, or make a sample’s length match that of the tempo. Press the [PITCH/SPEED] button. - Page 51 Editing a Sample (SAMPLE EDIT) When you change the following parameters while holding down the [COPY] button, you can change the parameters of other samples registered to the same mute group simultaneously. ● SPEED ● PITCH ● VOLUME ● ● ●...
-
Page 52: Displaying Parameters Set In A Sample
Editing a Sample (SAMPLE EDIT) Displaying Parameters Set in a Sample Hold down the [REMAIN] button to show the sample parameters assigned to the currently selected pad. -
Page 53: Initializing The Sample Parameters (Init Param)
Editing a Sample (SAMPLE EDIT) Initializing the Sample Parameters (INIT PARAM) This restores the parameters set in a sample (such as the start point, end point, tempo and so on) to their default values. Hold down the [SHIFT] button and press the pad [6]. A confirmation message appears. -
Page 54: Organizing The Samples
Editing a Sample (SAMPLE EDIT) Organizing the Samples This section explains the functions for making effective use of the samples. Exchanging (Swapping) Samples Between Pads Here’s how to exchange (swap) the samples that are assigned to two different pads. Hold down the [SHIFT] button and press the pad [5]. The EXCHANGE PAD screen appears. -
Page 55: Protecting A Sample (Protect)
Editing a Sample (SAMPLE EDIT) Hold down the [COPY] button and press the [EXIT] button. The COPY BANK PAD screen appears. Press the bank [A/F]–[E/J] buttons to select the bank to copy (source). Turn the [VALUE] knob clockwise to move the cursor. Press the bank [A/F]–[E/J] buttons to select where to copy the bank (destination). - Page 56 Editing a Sample (SAMPLE EDIT) If you want to keep your data or make sure it doesn’t get accidentally modified, we recommend that you follow the steps “Backing up Your Data (BACKUP)(P.105)” to create regular backups. Deleting all samples in a bank at once Hold down the [DEL] button and press the [EXIT] button.
-
Page 57: Combining Samples To Create A Pattern (Pattern Sequencer)
Combining Samples to Create a Pattern (PATTERN SEQUENCER) Combining Samples to Create a Pattern (PATTERN SEQUENCER) You can record the order in which the samples play back, so that multiple samples play back at the timing you choose. The data in which the playback order is recorded is called a “pattern”. -
Page 58: Creating A New Pattern (Real-Time Recording)
Combining Samples to Create a Pattern (PATTERN SEQUENCER) Creating a New Pattern (Real-time Recording) Here’s how to create a pattern by recording what you play on the keyboard and how you operate the controllers, just as-is. Press the [PATTERN SELECT] button. Press the [REC] button. -
Page 59: Adding A Count-In Before Recording A Pattern
Combining Samples to Create a Pattern (PATTERN SEQUENCER) ● You can press the [REC] button while a pattern is playing back to switch to pattern recording. Note that recording starts at the beginning of the pattern. If you’ve pressed the [REC] button in the middle of the pattern, the message “Wait for REC” appears. -
Page 60: Creating A New Pattern (Tr-Rec)
Combining Samples to Create a Pattern (PATTERN SEQUENCER) Creating a New Pattern (TR-REC) Here’s how to create a pattern by setting the sample playback timing at the position you like on the steps. This method of recording is suitable for creating drum patterns. Press the [PATTERN SELECT] button. - Page 61 Combining Samples to Create a Pattern (PATTERN SEQUENCER) Controller Parameter Value Explanation 1–32, LAST Sets the step length used for sample playback. HOLD STEP * This is enabled when MODE is “HOLD STEP”. PITCH -12–+12 Sets the sample pitch. Press the [VALUE] knob at this time to select the scale. [CTRL 2] knob Hold down the [VALUE] knob while turning this knob to select the note (root) for the scale.
- Page 62 Combining Samples to Create a Pattern (PATTERN SEQUENCER) Controller Explanation [DEL] button + [A/F] Deletes the notes (for one measure) corresponding to the selected pad. button [DEL] button + [B/G] Deletes the notes (for one measure) corresponding to all pads. button [HOLD] button Plays back only the selected pad.
-
Page 63: Resampling A Pattern (Resample)
Combining Samples to Create a Pattern (PATTERN SEQUENCER) Resampling a Pattern (RESAMPLE) You can resample the performance you recorded to a pattern, and turn it into a sample. Press the [PATTERN SELECT] button. Press the [RESAMPLE] button. The metronome sounds when the “Metronome:REC” parameter is “ON” (the SYSTEM parameter “CLICK(P.109)”). Press pad [9] while holding down the [SHIFT] button to turn the metronome sound on/off. -
Page 64: Selecting A Pattern Bank
Combining Samples to Create a Pattern (PATTERN SEQUENCER) Selecting a Pattern Bank Select the bank to use from the 10 available banks (A–J). Press the bank [A/F]–[E/J] buttons. The bank switches. Each time you press the bank [A/F] button, the bank switches between A and F. When bank A–E is selected, the bank [A/F]–[E/J] button lights up. -
Page 65: Playing Back Patterns In Order (Pattern Chain)
Combining Samples to Create a Pattern (PATTERN SEQUENCER) Playing Back Patterns in Order (PATTERN CHAIN) Pattern chain is a function that lets you play back patterns you’ve created with the pattern sequencer, in a specified order. You can record and play back up to 16 patterns with a single pattern chain. Up to 16 pattern chains can be stored per project. Creating a pattern chain Use the pattern sequencer to create patterns beforehand ( Creating a New Pattern (Real-time... - Page 66 Combining Samples to Create a Pattern (PATTERN SEQUENCER) The unit enters pattern sequencer mode. While holding down the [HOLD] button, press pads [1]–[16] to select the pattern chain number to play back. The PATTERN CHAIN screen appears. Press the [SUB PAD] button. The selected pattern chain plays back.
- Page 67 Combining Samples to Create a Pattern (PATTERN SEQUENCER) Press the [SUB PAD] button. Sampling begins when the selected pattern chain starts playing back. If you decide to cancel sampling, press the [EXIT] button. When pattern chain repeat is set to “REPEAT Off”, sampling ends at the same time as pattern chain playback ends. To exit sampling, press the [REC] button.
-
Page 68: Editing A Pattern (Pattern Edit)
Editing a Pattern (PATTERN EDIT) Editing a Pattern (PATTERN EDIT) You can change the length of a pattern or change the range within which it plays back. You can also copy and chain patterns, and delete unwanted sections of a pattern. Press the [PATTERN SELECT] button. -
Page 69: Cropping Unnecessary Sections From A Pattern (Crop)
Editing a Pattern (PATTERN EDIT) Cropping Unnecessary Sections from a Pattern (CROP) This deletes all the sections from a pattern except for the range you select. Press the [PATTERN SELECT] button. Press the [PATTERN EDIT] button. Press pads [1]–[16] to select the pattern you want to edit. The pattern edit screen appears. -
Page 70: Organizing The Pattern Data
Editing a Pattern (PATTERN EDIT) Organizing the Pattern Data This section explains the functions for making effective use of the patterns. Exchanging (Swapping) Patterns Between Pads Here’s how to exchange (swap) the patterns that are assigned to two different pads. You can’t perform the following operations while a pattern is playing back. -
Page 71: Protecting A Pattern (Protect)
Editing a Pattern (PATTERN EDIT) Performing this operation overwrites (erases) the pattern in the copy destination pad. Copying all patterns in a bank to another bank This is how to copy all the patterns in a bank to another bank. You can’t perform the following operations while a pattern is playing back. - Page 72 Editing a Pattern (PATTERN EDIT) The DELETE screen appears. Press the pad containing the pattern that you want to delete. If you decide to cancel deleting, press the [EXIT] button. Press the [VALUE] knob or [DEL] button. The pattern for that pad is deleted. You can’t restore a pad’s pattern after it has been deleted.
-
Page 73: Setting The Tempo
Setting the Tempo Setting the Tempo You can set the tempo data for samples and patterns. This tempo data can be used to change the sample playback speed and pitch, so that you can play in tempo with other songs. Here we explain about the different tempo data used by this unit. -
Page 74: Setting The Tempo Data In A Sample
Setting the Tempo Setting the Tempo Data in a Sample You can add tempo data to a sample to make the sample play back in sync with the tempo. Setting the tempo in AUTO mode Here’s how to detect and set the tempo of a sample. Press the [PITCH/SPEED] button. -
Page 75: Setting The Tempo For A Bank Or Project
Setting the Tempo Setting the Tempo for a Bank or Project By assigning a tempo to a bank, the same tempo is used for all patterns within the same bank or project during playback. The tempo you set becomes the base tempo when playing back samples using BPM SYNC. Hold down the [SHIFT] button and press the pad [11]. -
Page 76: Setting The Tempo In Time With The Rhythm (Tap Tempo)
Setting the Tempo Setting the Tempo in Time with the Rhythm (Tap Tempo) This feature lets you set the tempo in an intuitive way by tapping the pad in time, as if you were clapping out the beat. This is useful function when you want to play in time with other instruments or to the rhythm of a song. The tap tempo function is enabled when the [SUB PAD] button is blinking orange. -
Page 77: Mixing The Samples (Dj Mode)
Mixing the Samples (DJ MODE) Mixing the Samples (DJ MODE) You can assign two samples to CH1 and CH2 and mix them freely. Press the bank [D/I] button and the [E/J] button simultaneously. The unit enters DJ MIXER mode. Select the samples to respectively assign to CH1 and CH2. Press the [VALUE] knob. - Page 78 Mixing the Samples (DJ MODE) Controller Parameter Action CH2: Pad [4] CH1: Pad [6] BPM- Slows down the tempo. CH2: Pad [8] CH1: [DEL] button + Resets the tempo to the default value. Pad [2] + Pad [6] CH2: [DEL] button + Pad [4] + Pad [8] CH1: Pad [1] BEND+...
- Page 79 Mixing the Samples (DJ MODE) Controller Action [CTRL 2] knob (when the Moves the loop point. loop is on) [CTRL 3] knob Moves the end point. [SHIFT] button + [CTRL] Zooms the area around each point in/out. knob (turn) [VALUE] knob (turn) Zooms the area in/out around each point you just manipulated.
-
Page 80: Monitoring With Headphones (Cue)
Monitoring with Headphones (CUE) Monitoring with Headphones (CUE) Adjusts the balance of the audio output from the PHONES jack. When the sample audio is sent to CUE, the audio is only output from the PHONES jack (and is not output to the LINE OUT jack or USB port). -
Page 81: Inputting Sound From An Electronic Musical Instrument, Mic Or Guitar
Inputting Sound from an Electronic Musical Instrument, Mic or Guitar You can connect your electronic musical instrument, mic or guitar to the SP-404MK2 for audio input. Connect an electronic musical instrument to the LINE IN jack(s) on the rear panel. When using a mic or guitar, plug them into the INPUT jack on the front panel. -
Page 82: Inputting Audio From A Computer Or Mobile Device (Usb Audio)
Inputting Audio from a Computer or Mobile Device (USB AUDIO) The SP-404MK2 can receive audio input from a computer or mobile device (such as a smartphone or tablet). Configuring the OS audio settings You must make the appropriate settings on your computer when inputting audio from a computer to the SP-404MK2. -
Page 83: Selecting A Project
Selecting a Project Selecting a Project Here’s how to recall a project (1–16). Once a project is recalled, the unit is ready to play back samples and create patterns. Hold down the [SHIFT] button and press the [SUB PAD] button. The SELECT PROJECT screen appears. -
Page 84: Organizing Projects
Organizing Projects Organizing Projects On this unit, you can copy projects and delete projects you no longer need. Copying a Project Here’s how to copy a project. Hold down the [SHIFT] button and press the [SUB PAD] button. The SELECT PROJECT screen appears. Press the [COPY] button. -
Page 85: Deleting A Project
Organizing Projects Deleting a Project Here’s how to delete projects you don’t need. Hold down the [SHIFT] button and press the [SUB PAD] button. The SELECT PROJECT screen appears. Press the [DEL] button. The project deletion screen appears. Press pads [1]–[16] to select the project to delete. If you decide to cancel deleting, press the [EXIT] button. -
Page 86: Customizing This Unit
Customizing This Unit Customizing This Unit You can customize the design of this unit to match your tastes. Attaching/Removing the Faceplate of This Unit You can remove the faceplate of this unit to customize the top panel. ● Make sure you don’t cut your fingers on the edges when removing or attaching the faceplate. ●... - Page 87 Customizing This Unit To attach the faceplate, follow the steps for removing the top panel in reverse order. Use a commercially available hex wrench (2 mm) to attach the two screws (at the far side of the unit) circled in red. Install the two screws (at the front of the unit) circled in blue.
-
Page 88: Customizing The Opening Screen
Customizing This Unit Customizing the Opening Screen You can use your own custom images for the opening screen. Two opening images can be registered per project. Steps for setting your custom image data as the opening image You must perform the following operations (summarized) to use your custom image data as the opening image. Create your custom image ( (P.89)). -
Page 89: Customizing The Screen Saver
Customizing This Unit Customizing the Screen Saver You can set your own custom image as the screen saver image. A maximum of 16 screen saver images can be registered per project. Steps for using your custom images as the screen saver You must perform the following operations (summarized) to use your custom images as the screen saver. -
Page 90: Saving The Screen Saver Image To A Project
Customizing This Unit Press the [EXIT] button. Saving the Screen Saver Image to a Project Here’s how to save your custom image to a project. As an example, the following shows how to edit the custom image for the screen saver of project 01. Prepare the image to use for the screen saver, and edit the settings to use a custom screen saver (“... -
Page 91: Configuring The Various Settings (Utility)
Configuring the Various Settings (UTILITY) Configuring the Various Settings (UTILITY) This menu lets you edit the parameters and view information related to the overall unit. Editing the Settings Related to this Unit (System) Here’s how to configure the overall settings for this unit. Hold down the [SHIFT] button and press the pad [13]. -
Page 92: Configuring The Pad-Related Settings (Pad Setting)
Configuring the Various Settings (UTILITY) Configuring the Pad-related Settings (PAD SETTING) The pad setting screen lets you configure various pad-related settings. Hold down the [SHIFT] button and press the pad [13]. The UTILITY MENU screen appears. Use the [VALUE] knob to select “PAD SET”, and press the [VALUE] knob. The pad setting screen appears. -
Page 93: Configuring The Effect Settings (Efx Set)
Configuring the Various Settings (UTILITY) Configuring the Effect Settings (EFX SET) This shows how to edit the routing (connection order) for the effects built into this unit, and how to configure the effects to use. Hold down the [SHIFT] button and press the pad [13]. The UTILITY MENU screen appears. -
Page 94: Adding Effects To The Overall Sound (Bus 3, Bus 4)
Configuring the Various Settings (UTILITY) From the top screen, you can also make this screen appear by pressing pad [16] while holding down the [SHIFT] button. Use the [CTRL 3] knob to select “FAVORITE”, and press the [VALUE] knob. The position of the effect assigned to BUS 1 and BUS 2 changes each time you press the [VALUE] knob (“Using the Effects(P.27)”). -
Page 95: Editing The Effects For Bus 3 And Bus 4
Configuring the Various Settings (UTILITY) Use the [VALUE] knob to select “EFX SET”, and press the [VALUE] knob. The effect setting screen appears. From the top screen, you can also make this screen appear by pressing pad [16] while holding down the [SHIFT] button. Turn the [CTRL 3] knob to select “FAVORITE”. -
Page 96: Assigning The Desired Effect To An Effect Button (Direct Fx)
Configuring the Various Settings (UTILITY) From the top screen, you can also make this screen appear by pressing pad [16] while holding down the [SHIFT] button. Use the [CTRL 3] knob to select “BUS 3” or “BUS 4”. Select the bus whose effect you wish to change. To edit BUS 3 and BUS 4, you must select a favorite from “FAVORITE 1”... -
Page 97: Configuring The Input Effects (Input Fx)
Configuring the Various Settings (UTILITY) Effect button to assign Parameter [FILTER+DRIVE] button Direct FX1 [RESONATOR] button Direct FX2 [DELAY] button Direct FX3 [ISOLATOR] button Direct FX4 [DJFX LOOPER] button Direct FX5 You can also press an effect button to change its assigned effect. Press the [VALUE] knob. -
Page 98: Sending The Audio Input From The Input Jack To A Bus
Configuring the Various Settings (UTILITY) Parameter Value Bypass, Auto Pitch(*), Vocoder(*), Harmony(*), Gt Amp Sim(*), Chorus, JUNO Chorus, Reverb, TimeCtrlDly, EFX Type Chromatic PS, Downer, WrmSaturator, 303 VinylSim, 404 VinylSim, Cassette Sim, Lo-fi, Equalizer, Compressor ● Effects marked with an (*) are for INPUT FX only. ●... -
Page 99: Importing/Exporting (Using The Sd Card)
Configuring the Various Settings (UTILITY) Importing/Exporting (Using the SD Card) Using a SD card lets you import the samples you like into the SP-404MK2, or exchange patterns and other data between different SP-404MK2 units. To work with data on the SD card, the SD card folder structure must be set up as shown below. - Page 100 Configuring the Various Settings (UTILITY)
-
Page 101: Importing Samples (Import Sample)
Configuring the Various Settings (UTILITY) Some memory card types or memory cards from some manufacturers may not record or play back properly on the unit. Importing Samples (IMPORT SAMPLE) You can use an SD card to import commercially available audio material or audio material created on your computer. Using your computer or similar device, save the samples you wish to import to the “IMPORT”... -
Page 102: Exporting Samples (Export Sample)
Exporting Samples (EXPORT SAMPLE) You can export the samples to an SD card to use on your computer or on a different SP-404MK2. Insert the SD card to which the samples are to be exported into the SD card slot of this unit. -
Page 103: Importing A Project (Import Project)
Never turn off the power or remove the SD card while the screen indicates “Working...”. Importing a Project (IMPORT PROJECT) You can import a project into this unit that was created on a different SP-404MK2 and exported to an SD card. Follow the steps in “... -
Page 104: Exporting A Project (Export Project)
Exporting a Project (EXPORT PROJECT) You can export projects to an SD card if you want to use them on another SP-404MK2. Insert the SD card to which the samples are to be exported into the SD card slot of this unit. -
Page 105: Backing Up Your Data (Backup)
Never turn off the power or remove the SD card while the screen indicates “Working...”. Backing up Your Data (BACKUP) By backing up the data on this unit, you can transfer your data to another SP-404MK2 or restore your data in the event that something happens to it. -
Page 106: Formatting An Sd Card
Configuring the Various Settings (UTILITY) The UTILITY MENU screen appears. Use the [VALUE] knob to select “BACKUP”, and press the [VALUE] knob. The UTILITY / BACKUP RESTORE screen appears. Use the [VALUE] knob to select “RESTORE”, and press the [VALUE] knob. The backup number selection screen appears. -
Page 107: Restoring The Factory Settings (Factory Reset)
Configuring the Various Settings (UTILITY) Restoring the Factory Settings (FACTORY RESET) This operation restores the sample and pattern data as well as the system settings saved on this unit to their factory defaults. Doing this causes all data saved on this unit to be lost. To save the data of this unit, use the backup function to make a backup (Backing up Your Data (BACKUP)(P.105)). -
Page 108: Appendix
Appendix Appendix Parameter Guide SYSTEM GENERAL Parameter Value Explanation This sets how the values change when you move the knobs. When you move a knob, control data is only outputted when the position of the knob reaches or “catches up” to the value of its internal parameter. Edit Knob CATCH ●... - Page 109 Appendix Parameter Value Explanation This selects the point (time) at which reverse playback begins when you press the [REVERSE] button during sample playback. Starts reverse playback at the sample’s end point. This works the same as the SP- Reverse Type 404SX.
-
Page 110: Pad Set
Appendix Parameter Value Explanation The inputted MIDI signals are also transmitted to the internal sound module at that time. GAIN Parameter Value Explanation OFF, ON When this is ON, the gain of the audio input from the LINE IN jacks is lowered. Attenuator Turn the Attenuator on when the LINE IN input seems to be distorting. -
Page 111: Efx Set
Appendix Parameter Value Explanation 1–10 Sets the brightness of the indicators on the buttons and pads. This sets the brightness when the Brightness buttons or pads are highlighted. 1–10 Sets the brightness of the indicators on the buttons and pads. This sets the brightness when the LED Glow buttons or pads are not highlighted. - Page 112 Appendix BUS 3, BUS 4 Parameter Value Explanation Bypass, 303 VinylSim, 404 VinylSim, Cassette Sim, Lo-fi, Downer, Compressor, Selects the effects Equalizer, Isolator, Super Filter, Filter+Drive, WrmSaturator, Overdrive, Distortion, assigned to BUS 3 or Crusher, Ring Mod, SBF, Resonator, Hyper-Reso, Chromatic PS, Reverb, Ha-Dou, Zan- BUS 4.
- Page 113 Appendix Parameter Value Explanation Audio is not sent through BUS 1–BUS 4 (no effects are applied). Routing Audio is inserted just before BUS BUS3 3. The BUS 3 and BUS 4 effects are applied.
-
Page 114: Mfx List
Appendix MFX List Filter+Drive This is a filter with overdrive. It cuts the specified frequencies and adds distortion. Parameter Value Explanation CUTOFF 20–16000 (Hz) Sets the cutoff frequency range in which the filter works. 0–100 Adjusts the filter’s resonance level. RESONANCE The larger the value, the more that the frequency range set in CUTOFF is emphasized. -
Page 115: Djfx Looper
Appendix DJFX Looper This effect loops the sound in short cycles. You can vary the playback direction and playback speed of the input sound to get a turntable-type effect. Parameter Value Explanation 0.230–0.012 Sets the length of the loop. LENGTH (sec) -100–100 Sets the playback direction and playback speed. -
Page 116: Ko-Da-Ma
Appendix Ko-Da-Ma This creates a reverberating audio effect. Parameter Value Explanation 1/32, 1/16T, 1/32D, 1/16, 1/8T, 1/16D, Sets how much the effect sound is delayed. TIME 1/8, 1/4T, 1/8D, 1/4, 1/2T, 1/4D, 1/2, 1/1T, 1/2D, 1/1 FEEDBACK 0–99 (%) Adjusts how much the effect sound is repeated. SEND 0–100 Adjusts the volume of sound sent to the effect. -
Page 117: Sbf
Lowers the volume according to the playback speed. Tape Echo This is a virtual tape echo effect that gives a realistic tape delay sound. The effect simulates the tape echo section of a Roland RE-201 Space Echo. Parameter Value Explanation 10–800 (ms) -
Page 118: Super Filter
Appendix Parameter Value Explanation 630, 800, 1000, 1250, 1600, 2000, 2500, 3150, 4000, 5000, H DAMP F 6300, 8000, 10000, 12500, FLAT (Hz) OFF, ON When this is ON, the effect sound synchronizes SYNC with the tempo. Super Filter This is a filter with an extremely sharp slope (attenuation characteristics). The cutoff frequency can be varied cyclically. Parameter Value Explanation... -
Page 119: Cassette Sim
Appendix Parameter Value Explanation FREQUENCY 0–100 Sets the frequency characteristics of the playback system. NOISE 0–100 Adjusts the volume of the noise. WOW FLUT 0–100 Sets the inconsistencies (wow/flutter) heard when the analog record “rotates”. Cassette Sim This effect simulates the sound of a cassette tape playing. Parameter Value Explanation... -
Page 120: Juno Chorus
Appendix JUNO Chorus This effect models the chorus section of the Roland JUNO-106 and JX series. Parameter Value Explanation JUNO 1, JUNO 2, JUNO12, JX-1 1, Sets the type of effect. MODE JX-1 2 NOISE 0–100 Adjusts the volume of noise generated by the effect. -
Page 121: Slicer
Appendix Parameter Value Explanation Applies the effect over a narrow frequency range. OFF, ON When this is ON, the effect sound synchronizes with the SYNC tempo. Slicer This slices the sound up into small pieces, creating the impression that a backing phrase is being played. This slices up the sound at certain intervals into 16 parts (16 steps), breaking the sound into a rhythm that follows the sequence pattern (a pattern used for slicing up the sound). -
Page 122: Ring Mod
Appendix Parameter Value Explanation -17– -1, 1–18 Sets which note in the chromatic scale should resonate, counting from the NOTE root of the SCALE value. UNISON, TINY, SMALL, Sets the octave of the resonator. SPREAD MEDIUM, HUGE CHARACTER 0–100 Adjusts the brightness and detuning of the sound. SCALE C maj–B maj, C min–B min Sets the composite notes (chord) to resonate. -
Page 123: Equalizer
Appendix Parameter Value Explanation 100-0–0-100 Adjusts the volume balance between dry (the original sound) and effect sound. BALANCE LEVEL 0–100 Adjusts the volume of the effect sound. Equalizer This is a three-band equalizer. Parameter Value Explanation -15–15 (dB) Adjusts the amount of boost/cut of the low- LOW GAIN frequency range. -
Page 124: Cloud Delay
Appendix Cloud Delay Adds multiple delays to the dry sound, as well as reverberations for a thick “cloudy” effect. Parameter Value Explanation 0–100 Adjusts the interval for the delayed sound. WINDOW Larger settings produce a deeper reverberation. PITCH -12–+12 Adjusts the volume of the pitch shifter for the effect sound. BALANCE 100-0–0-100 (%) Adjusts the volume balance between the dry (original) sound and effect sound. -
Page 125: Harmony
* This is enabled with INPUT FX. Parameter Value Explanation Selects the guitar amp type. Models the sound of a Roland JC-120. TWIN Models a Fender Twin Reverb. AMP TYPE Models a lead guitar sound played using a MESA/Boogie combo amp. -
Page 126: Control Change Messages And Corresponding Effects
Appendix Control change messages and corresponding effects You can use a control change message (CC#83) to select the effects. The effects (selectable effects) corresponding to the respective CC#83 values are shown below. BUS1 (MIDI ch 1), BUS2 (MIDI ch 2) Value of CC#83 Effect name (OFF) - Page 127 Appendix Value of CC#83 Effect name Downer Compressor Equalizer Isolator Super Filter Filter+Drive WrmSaturator Overdrive Distortion Crusher Ring Mod Resonator Hyper-Reso Chromatic PS Reverb Ha-Dou Zan-Zou Sync Delay TimeCtrlDly Ko-Da-Ma Tape Echo Chorus JUNO Chorus Flanger Phaser Slicer Tremolo/Pan To-Gu-Ro DJFX Looper Scatter SX Reverb...
-
Page 128: List Of Shortcut Keys
Appendix List of Shortcut Keys You can quickly recall a desired function or screen by pressing a button or pad while holding down the [SHIFT] button. Shortcuts that use the [SHIFT] button While holding down Function Explanation the [SHIFT] button BANK VOLUME Adjusts the volume for the specified bank overall. - Page 129 Appendix While holding down Function Explanation the [SHIFT] button →“Setting the Tempo in Time with the Rhythm (Tap Tempo)(P.76)” GAIN Displays the UTILITY MENU > SYSTEM > GAIN tab. Pad [12] →“GAIN(P.110) tab” UTILITY Displays the UTILITY MENU screen. Pad [13] →“Configuring the Various Settings (UTILITY)(P.91)”...
- Page 130 Appendix While holding down the [DEL] button Function (explanation) Deletes all samples or patterns in a bank. [EXIT] button →“Deleting the Sample from a Pad(P.55)” “Deleting the Pattern from a Pad(P.71)” Shortcuts that use the [COPY] button While holding down the [COPY] button Function (explanation) Copies all samples or patterns in a bank to a different bank.
-
Page 131: Error Messages
Appendix Error Messages Error messages Explanation Action The batteries are nearly depleted. Replace the batteries, or switch to an AC adaptor. Battery Low! “About the Power Supply(P.8)” → The file type is not supported on this unit. Check the file extension, format and folder directory. Unsupported FILE “Importing/Exporting (Using the SD... -
Page 132: Audio Diagram
Appendix Audio Diagram... -
Page 133: Main Specifications
Skip back sampling time sampling/resample) Data format 16-bit linear WAV, AIFF, MP3 import supported. Import format *SP-404MK2 App supports WAV, AIFF, MP3, FLAC, M4A. Sample rate 48 kHz Resolution: 480 ticks per quarter note Pattern length: 1 to 64 bars Pattern sequencer... -
Page 134: Midi Implementation Chart
Appendix MIDI Implementation Chart Model: SP-404MK2 Date: Jun. 30, 2022 Version: 2.00 Function Transmitted Recognized Remarks Basic Channel Default × *1 × *1 *2 *3 Changed × × Mode Default × Mode 3 Messages × × Altered – × Note Number 35–51 (B1–E³3, CH 1–... - Page 135 Appendix Function Transmitted Recognized Remarks *5: Enabled when this unit is in remote mode (when a tempo signal is received from an external device). *6: All samples stop playing back when the MIDI cable is unplugged. *7: Enabled when playing samples in chromatic mode (MIDI CH 16). MIDI channel CH 1: BUS 1 CH 2: BUS 2...
- Page 136 Appendix SP-404MK2 (Version 2.00) Reference Manual Roland Corporation ©2021 Roland Corporation...