Invacare Aquatec Ocean E-VIP User Manual
Shower and toilet commode
Hide thumbs
Also See for Aquatec Ocean E-VIP:
- User manual (224 pages) ,
- Service manual (206 pages) ,
- Manual (37 pages)
Table of Contents
Advertisement
Available languages
Available languages
Quick Links
This manual must be given to the user of the product.
Before using the product, read this manual and safe it
for future reference!
Aquatec® Ocean E-VIP
en
Shower and Toilet Commode
User Manual
de
Dusch- und Toilettenrollstuhl
Gebrauchsanweisung
fr
Fauteuil/chaise pour douche/toilettes
Mode d'emploi
it
Carrozzina da doccia e WC
Istruzioni per l'uso
es
Silla de ducha y WC
Manual de instrucciones
nl
Douche- en toiletrolstoel
Gebruiksaanwijzing
Advertisement
Chapters
Table of Contents

Related Manuals for Invacare Aquatec Ocean E-VIP


Summary of Contents for Invacare Aquatec Ocean E-VIP
- Page 1 Aquatec® Ocean E-VIP Shower and Toilet Commode User Manual Dusch- und Toilettenrollstuhl Gebrauchsanweisung Fauteuil/chaise pour douche/toilettes Mode d’emploi Carrozzina da doccia e WC Istruzioni per l‘uso Silla de ducha y WC Manual de instrucciones Douche- en toiletrolstoel Gebruiksaanwijzing This manual must be given to the user of the product. Before using the product, read this manual and safe it for future reference!
- Page 2 ©Aquatec Operations GmbH Every effort has been made to ensure that the contents of this publication are fully up-to-date at the time of going to print. As part of its ongoing improvement of products, Aquatec Operations GmbH reserves the right to modify existing models at any time. Aquatec dealers will be notified of any such modifications.
-
Page 3: Table Of Contents
Contents english General Operation General information Safety information Symbols in this user manual Turning the armrests Warranty Turning the footrests Standards and regulations Control Intended use Engaging the directional locking device Product service life Transport Safety Safety information Safety information Maintenance Safety information on electromagnetic compatibility Maintenance and servicing... -
Page 4: General Information
Should you require further information, please contact the relevant IMPORTANT Invacare® subsidiary in your country (contact addresses are provided on the back of this user manual). Indicates a dangerous situation which could lead to damage if not avoided. -
Page 5: Product Service Life
Safety Shower and Toilet Commode Ocean E-VIP 1.6 Product service life If the product is used as intended and in accordance with the safety (2x) regulations, the expected product life is years. The effective service life can vary, however, depending on the frequency and intensity of use. Safety 2.1 Safety information (3x) -
Page 6: Identification Label
Shower and Toilet Commode Ocean E-VIP Assembly and installation 3.2 Identification label Assembly and installation The identification label contains important information: 4.1 Safety information IMPORTANT ▸ Check the parts for transport damage before commissioning and contact the dealer if required. ▸... -
Page 7: Fitting The Headrest
Assembly and installation Shower and Toilet Commode Ocean E-VIP 5. Attach a safety clip C on the inside. 11. Insert the 23 mm bolt B into the holes from the outside and attach safety clip C on the inside. 4.3 Fitting the headrest 6. -
Page 8: Fitting The Chest Belt
Shower and Toilet Commode Ocean E-VIP Assembly and installation 4.4 Fitting the chest belt Adjusting the chest belt position IMPORTANT ▸ Adjust the position of the chest belt to suit the user. ▸ Adjust the position of the two mounting brackets equally on both sides. -
Page 9: Fitting The Seat Plate
Assembly and installation Shower and Toilet Commode Ocean E-VIP 4.6 Adjusting the backrest cover 1. Undo the screw with hand knob A. 2. Select the length of chest belt E. 3. Use the screw with the hand knob to screw the chest belt onto the mounting bracket. -
Page 10: Setting The Armrest Height
Shower and Toilet Commode Ocean E-VIP Assembly and installation 1. Open the belt buckle on the backrest cover which is passed on the inside of the backrest frame. 2. Open the belt buckle of belt C on the backrest cover, which is above the armrest. -
Page 11: Fitting The Footrests
Assembly and installation Shower and Toilet Commode Ocean E-VIP 4.8 Fitting the footrests IMPORTANT ▸ When installing a footrest, make sure that the Velcro® IMPORTANT fastener of the heel strap faces backwards. ▸ The right and left footrest are each installed in the same way. -
Page 12: Removing The Battery Pack
Shower and Toilet Commode Ocean E-VIP Assembly and installation 4. Fold safety bar B forward. 5. Remove the long connector cable C (180 mm) between the battery pack and electronics box. 6. Attach short connector cable D (110 mm). 7. Fold the safety bar back again. 8. -
Page 13: Charging The Battery
Assembly and installation Shower and Toilet Commode Ocean E-VIP The battery can be charged with the electronics cover attached or detached and when the battery pack is removed. WARNING ▸ Never throw the battery pack into the fire or store it near naked flames. -
Page 14: Operation
Shower and Toilet Commode Ocean E-VIP Operation 1. Detach cap C from socket B on battery pack A. WARNING Risk of slipping and rolling ▸ Before use, make sure that the seat is securely fastened to IMPORTANT the seat frame. When the electronics cover is fitted, the charging socket is to ▸... -
Page 15: Turning The Footrests
Operation Shower and Toilet Commode Ocean E-VIP 5.3 Turning the footrests Seat height Seat tilt over 600 mm no forward movement up to 35° backwards Mounting position/dismounting position: 1. Draw footrest A in guide B upwards slightly, until the groove is no longer engaged in the pin of clip C. -
Page 16: Engaging The Directional Locking Device
Shower and Toilet Commode Ocean E-VIP Transport Tilting the seat frame and backrest 1. Press button A on the right side of chassis B. The seat frame can be tilted backwards approx. 35° and forwards IMPORTANT approx. 5°. ▸ If the seat frame has been lowered using the emergency lowering mechanism, have the shower and toilet commode 1. -
Page 17: Cleaning And Disinfection
Maintenance Shower and Toilet Commode Ocean E-VIP Cleaning the seat frame and chassis WARNING ▸ Never carry out unauthorized repairs or other work on the CAUTION Risk from electric current spindles or electric components. If a spindle is damaged or ▸... -
Page 18: Maintaining The Performance Of The Battery Pack
Shower and Toilet Commode Ocean E-VIP After use 7.5 Changing the drives 2. Wash the cover in a washing machine at max. 60°C using a mild detergent. WARNING There is a risk of injury if the drives are not IMPORTANT Risk of damage correctly fitted. -
Page 19: Troubleshooting
Troubleshooting Shower and Toilet Commode Ocean E-VIP Troubleshooting 9.1 Identifying and repairing faults The following table provides information on malfunctions and their possible causes. If you cannot correct the malfunction using the remedies named, please contact your dealer directly. Fault Possible cause(s) Remedy ▸... -
Page 20: Technical Data
Shower and Toilet Commode Ocean E-VIP Technical data Fault Possible cause(s) Remedy ▸ Max. load 150 kg The seat frame will not move Weight limit exceeded upwards ▸ Insert the cable correctly Cable not correctly inserted ▸ Connector strip connected (engaged) Connector strip not connected The seat frame will not move ▸... -
Page 21: Dimensions And Weight
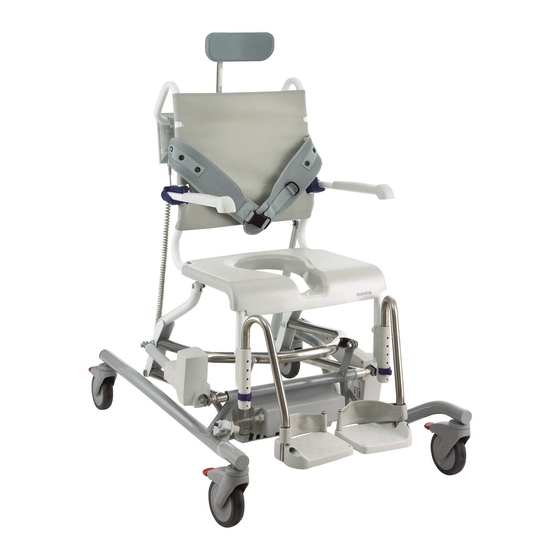
Technical data Shower and Toilet Commode Ocean E-VIP 10.1 Dimensions and weight 10.2 Electronic data Operating voltage 24 V A Total width 730 mm Rated input power 170 VA Depth (without footrests) 1010 mm Battery type Lead acid C Height (without headrest) 1070 –... - Page 22 Inhaltsverzeichnis deutsch Allgemeines Bedienung Allgemeine Informationen Sicherheitsinformationen Symbole in dieser Gebrauchsanweisung Armlehnen schwenken Garantie Fußstützen schwenken Normen und Verordnungen Steuern Bestimmungsgemäße Verwendung Richtungsfeststeller einrasten Produktlebensdauer Transport Sicherheit Sicherheitsinformationen Sicherheitsinformationen Wartung Sicherheitsinformationen zur elektromagnetischen Wartung und Inspektion Verträglichkeit Reinigung und Desinfektion Beschreibung Leistungserhaltung der Batteriebox Komponenten...
-
Page 23: Allgemeines Informationen
Die Warnsymbole sind neben einer Überschrift abgebildet, DIN EN 60601-1-2 (Elektromagnetische Verträglichkeit). die auf die Gefährlichkeit hinweist. Invacare® arbeitet kontinuierlich daran, zu gewährleisten, dass der WARNUNG Einfluss des Unternehmens auf die Umwelt lokal und global auf ein Mi- Weist auf eine gefährliche Situation hin, die bei Nichtbeach- nimum reduziert wird. -
Page 24: Sicherheit
Dusch- und Toilettenrollstuhl Ocean E-VIP Sicherheit 1.6 Produktlebensdauer Beschreibung Wenn das Produkt gemäß den Sicherheitsvorschriften bestimmungs- 3.1 Komponenten gemäß verwendet wird, beträgt die zu erwartende Produktlebensdauer Im Lieferumfang sind folgende Komponenten enthalten: Jahre. Die effektive Lebensdauer kann jedoch, abhängig von der Häufigkeit und Intensität des Gebrauchs, variieren. -
Page 25: Typenschild
Montage und Installation Dusch- und Toilettenrollstuhl Ocean E-VIP 3.2 Typenschild Montage und Installation Dem Typenschild können Sie wichtige Informationen entnehmen: 4.1 Sicherheitsinformationen WICHTIG ▸ Vor der Inbetriebnahme die Teile auf Transportschäden prüfen und ggf. Fachhändler kontaktieren. ▸ Bei der Montage die richtige Lage der Teile zueinander beachten. -
Page 26: Kopfstütze Montieren
Dusch- und Toilettenrollstuhl Ocean E-VIP Montage und Installation 5. Auf der Innenseite einen Sicherungsclip C aufstecken. 9. Die beiden Bolzen mit der Länge von 35 mm G an den Aufnahmen H von außen einsetzen, ganz eindrücken und die Sicherungsclips I innen aufstecken. -
Page 27: Brustgurt Montieren
Montage und Installation Dusch- und Toilettenrollstuhl Ocean E-VIP 4. Die Haltestange C von oben in die Ausfräsungen des Bügels 5. Die beiden Teile der Befestigungsschelle mit der Schraube C am stecken. Rückenlehnengestell in der gewünschten Position befestigen. 5. Die Schraube mit Sterngriff F festziehen, bis die Haltestange fixiert 6. -
Page 28: Sitzplatte Montieren
Dusch- und Toilettenrollstuhl Ocean E-VIP Montage und Installation Länge des Brustgurtes einstellen Abnehmen: 1. Die Sitzplatte an beiden Seiten nach oben ziehen. WICHTIG 4.6 Rückenlehnenbezug einstellen ▸ Die Länge des Brustgurtes an den Benutzer anpassen. Die Länge des Brustgurtes wird über den Gurtverschluss am Brustgurt angepasst. -
Page 29: Höhe Der Armlehnen Einstellen
Montage und Installation Dusch- und Toilettenrollstuhl Ocean E-VIP WICHTIG ▸ Die Höhe der Armlehnen an den Benutzer anpassen. ▸ Die Höhe der Armlehnen auf beiden Seiten gleichmäßig verändern. ▸ Die Höhe der rechten und linken Armlehne auf die gleiche Weise einstellen. 1. -
Page 30: Fußstützen Montieren
Dusch- und Toilettenrollstuhl Ocean E-VIP Montage und Installation Fersenband abnehmen/anbauen WICHTIG 1. Den Klettverschluss am Fersenband D öffnen. Das Einstellen der Armlehnen auf die untere Position erfolgt in gleicher Weise. 2. Die Schraube C von der Unterseite der Fußplatte herausdrehen. ▸... -
Page 31: Batteriebox Abnehmen
Montage und Installation Dusch- und Toilettenrollstuhl Ocean E-VIP 3. Klemmleiste A abnehmen. 11. Den vorderen Teil A der Elektronikabdeckung aufstecken und mit den Sicherungsclips B am Rohr befestigen. 4. Sicherungsbügel B nach vorn klappen. 5. Langes Verbindungskabel C (180mm) zwischen Batteriebox und Elektronikbox entfernen. -
Page 32: Akku Laden
Dusch- und Toilettenrollstuhl Ocean E-VIP Montage und Installation 3. Den Sicherungsbügel B nach vorn klappen und den Stecker C aus 5. Mit einer Hand die Entriegelungsleiste B oben an der Batteriebox der Batteriebox A herausziehen. C nach hinten drücken. 6. Mit der anderen Hand die Batteriebox ca. 5 mm anheben und ca. -
Page 33: Bedienung
Bedienung Dusch- und Toilettenrollstuhl Ocean E-VIP 4. Den Netzstecker F des Ladegerätes in eine vorschriftsmäßige VORSICHT Stromschlaggefahr! Steckdose stecken. ▸ Den Akku nur in trockenen Räumen und nie im Badezim- Die Ladezeit beträgt ca. 5 Stunden. Während dieser Zeit leuchtet die mer aufladen. -
Page 34: Armlehnen Schwenken
Dusch- und Toilettenrollstuhl Ocean E-VIP Bedienung 2. Die Fußstütze zur Seite schwenken. WARNUNG Kippgefahr Fahrposition: ▸ Vor dem Einsteigen oder vor dem Aufstehen die Fußstüt- zen zur Seite schwenken oder die Fußplatten nach oben VORSICHT Unfallgefahr durch lose Fußstütze klappen. ▸... -
Page 35: Richtungsfeststeller Einrasten
Bedienung Dusch- und Toilettenrollstuhl Ocean E-VIP Not-Aus WICHTIG WICHTIG Falls der Akku in der Batteriebox nicht mehr ausreichend geladen ist, leuchtet die Kontroll-Leuchte D am Handbedien- Rote STOP-Taste am Handbedienteil nur dann drücken, teil A gelb und es ertönt während des Fahrens ein Piepton. wenn das Gerät nach dem Loslassen einer Taste nicht sofort Nach dem Aufleuchten der Kontroll-Leuchte sind noch fünf stehen bleibt (z. -
Page 36: Transport
Dusch- und Toilettenrollstuhl Ocean E-VIP Transport Transport 7.2 Reinigung und Desinfektion Das Produkt ist mit handelsüblichen Mitteln reinig- und desinfizierbar. 6.1 Sicherheitsinformationen WICHTIG Das Produkt kann zum Transport in die Teile des Lieferum- fangs (Kapitel 3.1 Komponenten) zerlegt werden. Die Hygiene ist in dem sensiblen Bereich der Toilette beson- ▸... -
Page 37: Leistungserhaltung Der Batteriebox
Wartung Dusch- und Toilettenrollstuhl Ocean E-VIP 6. Die Teile mit warmem Wasser abbrausen. Ladegerät und Batteriebox reinigen 7. Die Teile mit einem Lappen abtrocknen. VORSICHT Gefahr durch elektrischen Strom 8. Den Dusch- und Toilettenrollstuhl wieder zusammenbauen. ▸ Vor dem Reinigen des Ladegeräts immer den Netzstecker VORSICHT Verbrennungsgefahr aus der Steckdose ziehen. -
Page 38: Nach Dem Gebrauch
Dusch- und Toilettenrollstuhl Ocean E-VIP Nach dem Gebrauch Nach dem Gebrauch 8.1 Lagerung WICHTIG Beschädigungsgefahr ▸ Produkt in trockenen Räumen bei einer Temperatur zwi- schen 0 °C und 40 °C, einem Luftdruck von 795 - 1060 hPa und einer Luftfeuchtigkeit von 30 - 75 % lagern. ▸... -
Page 39: Störungen Beheben
Störungen beheben Dusch- und Toilettenrollstuhl Ocean E-VIP Störungen beheben 9.1 Störungen erkennen und beheben Die folgende Tabelle gibt Ihnen Hinweise auf Störungen und deren mögliche Ursachen. Können Sie die Störung anhand der genannten Abhilfen nicht beseitigen, wenden Sie sich bitte direkt an Ihren Fachhändler. Störung Mögliche Ursache(n) Abhilfe... -
Page 40: Technische Daten
Dusch- und Toilettenrollstuhl Ocean E-VIP Technische Daten Störung Mögliche Ursache(n) Abhilfe ▸ Belastung max. 150 kg Sitzgestell fährt nicht nach oben Lastgrenze überschritten oder ▸ Kabel richtig einstecken Kabel nicht richtig eingesteckt Sitzgestell fährt nicht nach unten ▸ Steckerleiste aufstecken (rastet ein) Steckerleiste (Kamm) nicht aufgesteckt oder ▸... -
Page 41: Abmessungen Und Gewicht
Technische Daten Dusch- und Toilettenrollstuhl Ocean E-VIP 10.1 Abmessungen und Gewicht 10.2 Elektronische Daten Betriebsspannung 24 V A Gesamtbreite 730 mm Nennaufnahmeleistung 170 VA Tiefe (ohne Fußstützen) 1010 mm Akkutyp Blei-Säure C Höhe (ohne Kopfstütze) 1070 – 1620 mm Typische Betriebsdauer 40 Zyklen D Sitzbreite 480 mm... - Page 42 Table des matières français Informations générales Fonctionnement Informations générales Informations relatives à la sécurité Symboles figurant dans le présent manuel d’utilisation 43 Rotation des accoudoirs Garantie Rotation des repose-pieds Normes et réglementations Commande Utilisation conforme Enclenchement du dispositif de blocage directionnel Durée du produit Transport Sécurité...
-
Page 43: Informations Générales
Ces pictogrammes sont accompagnés d‘un en- DIN EN 60601-1-2 (compatibilité électromagnétique). tête indiquant le niveau de danger. Invacare® s‘efforce sans relâche de réduire au minimum l‘impact de AVERTISSEMENT l‘entreprise sur l‘environnement, localement et à l‘échelle mondiale. Nous respectons la législation en vigueur en matière d‘environnement Indique une situation dangereuse qui pourrait provoquer des (directives DEEE et RoHS p. -
Page 44: Durée Du Produit
Fauteuil/chaise pour douche/toilettes Ocean E-VIP Sécurité 1.6 Durée du produit Description 3.1 Composants La durée de vie escomptée du produit, lorsqu‘il est utilisé dans le respect des instructions de sécurité, est de ans. La durée effective Les composants suivants sont inclus lors de la livraison de l‘Aquatec peut varier, toutefois, en fonction de la fréquence et de l‘intensité... -
Page 45: Autocollant D'identification
Montage et installation Fauteuil/chaise pour douche/toilettes Ocean E-VIP 3.2 Autocollant d‘identification Montage et installation L´autocollant d´identification contient également des informations 4.1 Informations relatives à la sécurité importantes : IMPORTANT ▸ Avant la mise en service, vérifiez les pièces afin de vous assurer qu´elles n´ont pas été... -
Page 46: Fixation De L'appui-Tête
Fauteuil/chaise pour douche/toilettes Ocean E-VIP Montage et installation 4. Insérez la vis E (35 mm) dans les orifices de l‘extérieur et 8. Insérez les deux côtés du cadre d‘assise F dans les récepteurs H enfoncez-la. sur le châssis J. 5. Fixez un clip de sécurité C à l‘intérieur. 9. -
Page 47: Réglage De La Ceinture Pectorale
Montage et installation Fauteuil/chaise pour douche/toilettes Ocean E-VIP 4. Placez la section externe B du support de montage avec la vis à IMPORTANT filetage interne dans l‘orifice de la section interne. Lorsque vous insérez le support, la courbe de la plaque doit 5. -
Page 48: Fixation De La Plaque D'assise
Fauteuil/chaise pour douche/toilettes Ocean E-VIP Montage et installation Réglage de la longueur de la ceinture pectorale 3. Avec la main à plat, appuyez sur les côtés, puis sur l´avant et l´arrière de la plaque jusqu´à ce qu´elle s´enclenche dans le cadre IMPORTANT d‘assise. -
Page 49: Réglage De La Hauteur De L'accoudoir
Montage et installation Fauteuil/chaise pour douche/toilettes Ocean E-VIP 1. Au niveau de la toile de dossier, ouvrez la boucle de la sangle qui passe à l´intérieur du cadre du dossier. 2. Ouvrez la boucle de la sangle C sur la toile de dossier, qui passe au-dessus de l‘accoudoir. -
Page 50: Réglage Des Repose-Pieds
Fauteuil/chaise pour douche/toilettes Ocean E-VIP Montage et installation 4.8 Réglage des repose-pieds IMPORTANT IMPORTANT ▸ Lors de l´installation d'un repose-pied, assurez-vous que la bande Velcro® de la sangle talonnière est orientée vers ▸ Réglez les repose-pieds droit et gauche exactement de la l´arrière. -
Page 51: Retrait Du Bloc-Batterie
Montage et installation Fauteuil/chaise pour douche/toilettes Ocean E-VIP 4. Pliez la barre de protection A vers l‘avant. 11. Attachez la section avant A au capot électronique et fixez-la sur le tube avec les clips de sécurité B. 5. Retirez le câble long du connecteur B (180 mm) entre le bloc- batterie et le boîtier électronique. -
Page 52: Chargement De La Batterie
Fauteuil/chaise pour douche/toilettes Ocean E-VIP Montage et installation 1. Retirez le capot électronique, voir 4.9 Fixation/retrait du capot 5. Utilisez une main pour repousser la languette de déblocage B sur le électronique. haut du bloc-batterie C . 6. De l‘autre main, soulevez le bloc-batterie de 5 mm environ et IMPORTANT sortez-la de 10 mm environ. -
Page 53: Fonctionnement
Fonctionnement Fauteuil/chaise pour douche/toilettes Ocean E-VIP Fonctionnement 5.1 Informations relatives à la sécurité AVERTISSEMENT ▸ Utilisez uniquement la chaise pour douche/toilettes sur une surface plane et à l´intérieur. ▸ Respectez les spécifications de l´autocollant d'identification. Ne surchargez pas la chaise pour douche/toilettes. ▸... -
Page 54: Rotation Des Accoudoirs
Fauteuil/chaise pour douche/toilettes Ocean E-VIP Fonctionnement 5.2 Rotation des accoudoirs La chaise s‘arrêtera immédiatement dans la position où elle se trouve dès que vous aurez relaché sur les boutons correspondants. ATTENTION Risque de se prendre les doigts dans le Pour des raisons de sécurité, certaines plages de commandes sont mécanisme de pliage bloquées : ▸... -
Page 55: Enclenchement Du Dispositif De Blocage Directionnel
Transport Fauteuil/chaise pour douche/toilettes Ocean E-VIP ATTENTION Danger de pincement des doigts ▸ Ne placez pas vos doigts entre le cadre d‘assise et le cadre tubulaire avant du châssis lorsque vous inclinez ou que vous abaissez la chaise. IMPORTANT Si vous inclinez le cadre d‘assise vers l'avant, vous pouvez régler la hauteur du siège à... -
Page 56: Maintenance
Fauteuil/chaise pour douche/toilettes Ocean E-VIP Maintenance 1. Désinfectez le produit en essuyant toutes les surfaces généralement IMPORTANT Risque de détérioration accessibles avec du désinfectant (après démontage du produit, si ▸ Transportez le produit dans un endroit sec à une tempéra- possible). -
Page 57: Maintenance De La Performance Du Bloc-Batterie
Après utilisation Fauteuil/chaise pour douche/toilettes Ocean E-VIP 2. Essuyez le bloc-batterie avec un chiffon humide et séchez-le avec un ATTENTION Risque de brûlure chiffon sec. ▸ Laissez refroidir la chaise pour douche/toilettes avant de la 7.3 Maintenance de la performance du bloc-batte- nettoyer. -
Page 58: Élimination
Fauteuil/chaise pour douche/toilettes Ocean E-VIP Résolution des problèmes 8.3 Élimination L‘élimination et le recyclage de produits et d‘emballages utilisés doit se faire conformément aux règlements obligatoires. Le fabricant peut gérer une élimination correcte et complète du produit. Ce produit contient une batterie plomb rechargeable. Les batteries usées peuvent contenir des substances dangereuses qui peuvent être préjudiciables pour l‘environnement et la santé... - Page 59 Résolution des problèmes Fauteuil/chaise pour douche/toilettes Ocean E-VIP Défaillance Cause(s) possible(s) Solution ▸ Chargez la batterie (voir Section 4.11) ou utilisez Le mécanisme d'abaissement Batterie à plat d'urgence ne fonctionne pas une batterie de remplacement ▸ Insérez complètement le câble Le câble n'est pas complètement inséré...
-
Page 60: Données Techniques
Fauteuil/chaise pour douche/toilettes Ocean E-VIP Données techniques 10.1 Dimensions et poids Mise en oeuvre d‘une réinitialisation 1. Maintenez simultanément enfoncés les trois boutons suivants pen- A Largeur totale 730 mm dant trois secondes environ sur la télécommande : Bouton rouge ARRÊT E, bouton Avant C et Bouton Haut H. -
Page 61: Données Électroniques
Données techniques Fauteuil/chaise pour douche/toilettes Ocean E-VIP 10.2 Données électroniques 10.3 Matériel Tension de fonctionnement 24 V Châssis Acier inoxydable, poudré Puissance d'entrée nominale 170 VA Plaque de siège Polypropylène Type de batterie Plomb-acide Toile de dossier Nylon, enduit PVC Temps de fonctionnement type 40 cycles Repose-pieds... - Page 62 Contenuto italiano Informazioni generali Funzionamento Informazioni generali Informazioni di sicurezza Simboli in questo manuale d’uso Rotazione dei braccioli Garanzia Rotazione dei poggiapiedi Norme e regolamenti Controllo Uso previsto Innesto del dispositivo di blocco direzionale Durata del prodotto Trasporto Sicurezza Informazioni di sicurezza Informazioni di sicurezza Manutenzione Informazioni di sicurezza sulla compatibilità...
-
Page 63: Informazioni Generali
AVVERTENZA conformi alla direttiva REACH. Indica una situazione pericolosa che, se non evitata, potrebbe In caso servissero ulteriori informazioni, contattare la filiale Invacare® causare lesioni di lieve entità. competente nel paese in questione (gli indirizzi di contatto sono ripor- tati sul retro del presente manuale d‘uso). -
Page 64: Durata Del Prodotto
Se il prodotto viene utilizzato per l‘impiego previsto e in modo confor- me alle normative sulla sicurezza, la durata prevista del prodotto è di Aquatec Ocean E-VIP viene fornito con i componenti seguenti: (2x) anni. Tuttavia, la durata effettiva può variare a seconda della frequenza e dell‘intensità... -
Page 65: Etichetta Modello
Montaggio e installazione Carrozzina da doccia e WC Ocean E-VIP 3.2 Etichetta modello Montaggio e installazione L‘etichetta modello riporta anche informazioni importanti: 4.1 Informazioni di sicurezza IMPORTANTE ▸ Prima della messa in servizio controllare che le parti non presentino danni dovuti al trasporto e, se necessario, con- tattare il rivenditore. -
Page 66: Montaggio Del Poggiatesta
Carrozzina da doccia e WC Ocean E-VIP Montaggio e installazione 4. Inserire il bullone E (35 mm) nei fori dall‘esterno e spingerlo com- 9. Inserire i due bulloni da 35 mm G nei ricevitori H dall‘esterno, pletamente all‘interno. inserire completamente e fissare i fermacavi di sicurezza I sul lato interno. -
Page 67: Posizionamento Della Cintura Toracica
Montaggio e installazione Carrozzina da doccia e WC Ocean E-VIP 4. Inserire la barra di ritenuta C dall‘alto negli incavi del tubo tensore. 6. Fissare la cintura toracica E con la vite mediante la manopola A alle staffe di montaggio. 5. -
Page 68: Montaggio Della Piastra Del Sedile
Carrozzina da doccia e WC Ocean E-VIP Montaggio e installazione 4.6 Regolazione del rivestimento dello schienale La lunghezza della cintura toracica viene regolata mediante la fibbia situata su di essa. Se l‘intervallo di regolazione della fibbia non è suffici- ente, regolare la lunghezza sulle staffe di montaggio nel modo seguente: 1. -
Page 69: Impostazione Dell'altezza Dei Braccioli
Montaggio e installazione Carrozzina da doccia e WC Ocean E-VIP IMPORTANTE ▸ Regolare l'altezza dei braccioli secondo le esigenze dell'utilizzatore. ▸ Regolare l'altezza dei braccioli allo stesso livello su entrambi i lati. ▸ L'altezza del bracciolo sinistro viene regolata allo stesso modo. -
Page 70: Montaggio Dei Poggiapiedi
Carrozzina da doccia e WC Ocean E-VIP Montaggio e installazione 4. Regolare il secondo poggiapiedi all‘altezza desiderata in base alle IMPORTANTE proprie esigenze. I braccioli sono regolati nella posizione inferiore nello stesso Rimozione/collegamento dei cinturini per caviglie modo. ▸ Durante la regolazione nella posizione abbassata, la cintura 1. - Page 71 Montaggio e installazione Carrozzina da doccia e WC Ocean E-VIP 9. Scambiare la spina blu A della presa di carica con la spina con il foro B. 10. Inserire il connettore C sulla copertura dei componenti elettronici nella presa di carica D del gruppo batterie. IMPORTANTE ▸...
-
Page 72: Rimozione Del Gruppo Batterie
Carrozzina da doccia e WC Ocean E-VIP Montaggio e installazione 4.10 Rimozione del gruppo batterie 4. Inserire il cavo del connettore nel porta cavi A. 5. Con l‘ausilio di una mano spingere indietro la linguetta di sblocco B 1. Rimuovere la copertura dei componenti elettronici, vedere la sulla parte superiore del gruppo batterie C . -
Page 73: Funzionamento
Funzionamento Carrozzina da doccia e WC Ocean E-VIP La ricarica richiede circa 5 ore. La spia gialla G sulla pulsantiera si illu- AVVERTENZA Rischio di scosse elettriche! mina. Dopodiché, una carica di compensazione (carica a impulsi) viene ▸ Ricaricare la batteria solo in ambienti asciutti e mai in bagno. applicata per circa 3 ore. -
Page 74: Rotazione Dei Braccioli
Carrozzina da doccia e WC Ocean E-VIP Funzionamento 2. Ruotare il poggiapiedi lateralmente. ATTENZIONE Pericolo di ribaltamento Posizione di guida: ▸ Ruotare lateralmente i poggiapiedi prima di sedersi o di alzarsi o prima di piegare le pedane verso l'alto. AVVERTENZA Pericolo di incidenti a causa del poggiapie- ▸... -
Page 75: Innesto Del Dispositivo Di Blocco Direzionale
Funzionamento Carrozzina da doccia e WC Ocean E-VIP Arresto di emergenza IMPORTANTE IMPORTANTE Se la batteria nel gruppo batterie non è sufficientemente carica, la spia gialla D sulla pulsantiera A si illumina e viene Premere il pulsante di arresto sulla pulsantiera solo se emesso un segnale acustico durante il movimento. -
Page 76: Trasporto
Carrozzina da doccia e WC Ocean E-VIP Trasporto Trasporto IMPORTANTE In bagno, l'igiene è particolarmente importante. 6.1 Informazioni di sicurezza ▸ Tenere il prodotto pulito lavandolo regolarmente. Il prodotto può essere smontato per il trasporto in tutti i suoi 1. Disinfettare il prodotto strofinando tutte le superfici generalmente componenti (Sezione 3.1 Componenti). -
Page 77: Prestazioni Costanti Del Gruppo Batterie
Manutenzione Carrozzina da doccia e WC Ocean E-VIP Pulizia del caricabatteria e del gruppo batterie 6. Risciacquare con acqua calda. 7. Asciugare le parti con un panno. AVVERTENZA Pericolo di corrente elettrica 8. Rimontare il rialzo per doccia e WC. ▸... -
Page 78: Dopo L'uso
Carrozzina da doccia e WC Ocean E-VIP Dopo l‘uso Dopo l‘uso 8.1 Conservazione IMPORTANTE Pericolo di danneggiamento ▸ Conservare il prodotto in un luogo asciutto a una tempera- tura compresa tra 0 °C e 40 °C, una pressione atmosferica compresa tra 795 e 1060 hPa e un'umidità dal 30 al 75%. ▸... -
Page 79: Risoluzione Dei Problemi
Risoluzione dei problemi Carrozzina da doccia e WC Ocean E-VIP Risoluzione dei problemi 9.1 Identificazione e riparazione dei guasti La tabella seguente fornisce informazioni sui malfunzionamenti e le possibili cause. Qualora non fosse possibile correggere il malfunzionamento mediante i rimedi indicati, contattare direttamente il proprio rivenditore. - Page 80 Carrozzina da doccia e WC Ocean E-VIP Risoluzione dei problemi Guasto Cause possibili Rimedio ▸ Carico massimo 150 kg Il telaio del sedile non si sposta Limite di peso superato verso l'alto ▸ Inserire il cavo correttamente Cavo non inserito correttamente ▸...
-
Page 81: Dati Tecnici
Dati tecnici Carrozzina da doccia e WC Ocean E-VIP 10 Dati tecnici K Altezza, dai poggiapiedi al sedile 345 - 465 mm Profonditàpedana 155 mm M Larghezza, incavo igienico 205 mm N Profondità, incavo igienico 320 mm Regolazione altezza variazione continua Diametro ruota 127 mm Peso... -
Page 82: Materiali
Carrozzina da doccia e WC Ocean E-VIP Dati tecnici 10.3 Materiali Telaio In acciaio inox, verniciato a polvere Piastra del Polipropilene sedile Rivestimento Nylon, rivestito in PVC dello schienale Poggiapiedi Polipropilene, rinforzato con fibra di vetro Braccioli Polipropilene Ruote Parti in plastica e in acciaio inox Tutti i componenti del prodotto sono resistenti alla corrosione e privi di lattice. - Page 83 Contenido español Información general Funcionamiento Información general Información de seguridad Símbolos en este manual del usuario Giro de los reposabrazos Garantía Giro de los reposapiés Estándares y normativas Control Uso previsto Activación del dispositivo de bloqueo direccional Vida útil del producto Transporte Seguridad Información de seguridad...
-
Page 84: Información General
REACH. como consecuencia lesiones leves. Si necesita más información, póngase en contacto con la filial de Invacare® correspondiente a su país (las direcciones de contacto se IMPORTANTE incluyen en la contraportada de este manual del usuario). -
Page 85: Vida Útil Del Producto
Seguridad Silla de ducha y WC Ocean E-VIP 1.6 Vida útil del producto Descripción Si el producto se utiliza correctamente y de acuerdo con las normas de 3.1 Componentes seguridad, su vida útil prevista es de años. La vida útil del producto pue- Los componentes siguientes se incluyen con la entrega: de variar, no obstante, en función de la frecuencia y la intensidad del uso. -
Page 86: Placa De Identificación
Silla de ducha y WC Ocean E-VIP Montaje e instalación 3.2 Placa de identificación Montaje e instalación La placa de identificación incluye también información importante: 4.1 Información de seguridad IMPORTANTE ▸ Antes de poner el dispositivo en funcionamiento, comprue- be que las piezas no se hayan dañado durante el transporte. Si es necesario, póngase en contacto con el distribuidor. -
Page 87: Montaje Del Reposacabezas
Montaje e instalación Silla de ducha y WC Ocean E-VIP 4. Introduzca el tornillo E (35 mm) en los orificios desde el exterior y 8. Introduzca los dos lados del chasis del asiento F en los espacios H presione para que quede totalmente dentro. del chasis J. -
Page 88: Colocación Del Cinturón Pectoral
Silla de ducha y WC Ocean E-VIP Montaje e instalación 4. Coloque la sección exterior B del soporte de montaje con el tor- IMPORTANTE nillo con rosca interna dentro del orificio de la sección interior. Al insertar el soporte, la curva de la placa debe estar total- 5. -
Page 89: Colocación De La Placa Del Asiento
Montaje e instalación Silla de ducha y WC Ocean E-VIP Ajuste de la longitud del cinturón pectoral Desmontaje: 1. Tire de la placa hacia arriba por los dos lados. IMPORTANTE 4.6 Ajuste de la funda del respaldo ▸ Ajuste la longitud del cinturón pectoral para que se adapte al usuario. -
Page 90: Ajuste De La Altura Del Reposabrazos
Silla de ducha y WC Ocean E-VIP Montaje e instalación IMPORTANTE ▸ Ajuste la altura de los reposabrazos para mayor comodidad del usuario. ▸ Ajuste la altura de los reposabrazos al mismo nivel en ambos lados. ▸ La altura de los reposabrazos izquierdo y derecho se ajusta de la misma manera. -
Page 91: Ajuste De Los Reposapiés
Montaje e instalación Silla de ducha y WC Ocean E-VIP Retirada/colocación de las correas para el talón IMPORTANTE Los reposabrazos se ajustan en la posición más baja del mismo 1. Abra el cierre de Velcro® de la correa para talón D. modo. -
Page 92: Retirada De La Batería
Silla de ducha y WC Ocean E-VIP Montaje e instalación 11. Conecte la sección delantera A a la cubierta de componentes elec- 4. Baje la barra de seguridad A. trónicos y fíjela en el tubo con horquillas de seguridad B. 5. -
Page 93: Carga De La Batería
Montaje e instalación Silla de ducha y WC Ocean E-VIP 1. Quite la cubierta de componentes electrónicos, consulte 4.9 Colo- 5. Con una mano, empuje hacia atrás la lengüeta de desbloqueo B cación/retirada de la cubierta de componentes electrónicos. situada en la parte superior de la batería C . 6. -
Page 94: Funcionamiento
Silla de ducha y WC Ocean E-VIP Funcionamiento Funcionamiento 5.1 Información de seguridad ADVERTENCIA ▸ Utilice la silla de ducha y WC solamente en una superficie plana y en interiores. ▸ Respete las especificaciones de la placa de identificación. No coloque un peso excesivo sobre la silla de ducha y WC. -
Page 95: Giro De Los Reposabrazos
Funcionamiento Silla de ducha y WC Ocean E-VIP 5.2 Giro de los reposabrazos 5.4 Control El producto se controla por medio del mando manual. PRECAUCIÓN Peligro de pillarse los dedos en el meca- nismo de plegado La silla se detendrá inmediatamente en su posición actual en cuanto se dejen de pulsar los botones correspondientes. -
Page 96: Activación Del Dispositivo De Bloqueo Direccional
Silla de ducha y WC Ocean E-VIP Transporte PRECAUCIÓN Peligro de pillarse los dedos ▸ No ponga los dedos entre el chasis del asiento y la estructu- ra tubular frontal del chasis al inclinar o bajar el asiento. IMPORTANTE Si el chasis del asiento se inclina hacia delante, al altura del asiento puede ajustarse a un máximo de 600 mm. -
Page 97: Mantenimiento
Mantenimiento Silla de ducha y WC Ocean E-VIP 1. Para desinfectar el producto, utilice un paño con desinfectante en IMPORTANTE Riesgo de daños todas las superficies generalmente accesibles (si es posible, después ▸ Durante el transporte, tenga el producto en un entorno del desmontaje). -
Page 98: Mantenimiento Del Rendimiento De La Batería
Silla de ducha y WC Ocean E-VIP Mantenimiento Limpieza del cargador y de la batería PRECAUCIÓN Riesgo de quemaduras ▸ Deje que la silla de ducha y WC se enfríe después de lavarla. PRECAUCIÓN Riesgo derivado de la corriente eléctrica ▸... -
Page 99: Después Del Uso
Después del uso Silla de ducha y WC Ocean E-VIP Después del uso 8.1 Almacenamiento IMPORTANTE Riesgo de daños ▸ Guarde el producto en una zona seca a una temperatura entre 0 °C y 40 °C, a una presión atmosférica entre 795 y 1060 hPa y a una humedad entre el 30 y el 75%. -
Page 100: Solución De Problemas
Silla de ducha y WC Ocean E-VIP Solución de problemas Solución de problemas 9.1 Identificación y reparación de fallos En la siguiente tabla se incluye información sobre funciona- mientos incorrectos y sus posibles causas. Si no puede corregir el mal funcionamiento con las soluciones indicadas, póngase en contacto directamente con su distribu- idor. - Page 101 Solución de problemas Silla de ducha y WC Ocean E-VIP Fallo Posible causa o causas Solución ▸ Carga máxima 150 kg El chasis del asiento no se eleva Se ha superado el límite de peso ▸ Inserte bien el cable El cable no está...
-
Page 102: Datos Técnicos
Silla de ducha y WC Ocean E-VIP Datos técnicos 10 Datos técnicos M Anchura, hueco higiénico 205 mm N Profundidad, hueco higiénico 320 mm Ajuste de la altura continua Diámetro de rueda 5" (127 mm) Peso aprox. 39 kg Capacidad de carga 150 kg 10.2 Datos electrónicos Tensión operativa... -
Page 103: Materiales
Datos técnicos Silla de ducha y WC Ocean E-VIP 10.3 Materiales Chasis Acero inoxidable, pintura electrostática Placa del asiento Polipropileno Funda del respaldo Nailon, revestimiento de PVC Reposapiés Polipropileno, reforzado con fibra de vidrio Reposabrazos Polipropileno Ruedas Plásticos y acero inoxidable Todos los componentes del producto son resistentes a la corrosión y no contienen látex. - Page 104 Inhoud nederlands Algemene informatie Bediening Algemene informatie Veiligheidsinformatie Symbolen in deze gebruiksaanwijzing De armsteunen draaien Garantie De voetsteunen draaien Normen en regelgeving Bediening Bedoeld gebruik De draaivergrendeling activeren Levensduur van het product Transport Veiligheid Veiligheidsinformatie Veiligheidsinformatie Onderhoud Veiligheidsinformatie over elektromagnetische Onderhoud en service compatibiliteit Schoonmaken en ontsmetten...
-
Page 105: Algemene Informatie
DIN EN 60601-1 (elektrische veiligheid) en die de ernst van het gevaar aangeeft. DIN EN 60601-1-2 (elektromagnetische compatibiliteit). Invacare® zet zich er voortdurend voor in om de impact van het bedrijf WAARSCHUWING op het milieu, zowel plaatselijk als wereldwijd, tot een minimum te Geeft een gevaarlijke situatie aan die kan leiden tot ernstige beperken. -
Page 106: Levensduur Van Het Product
Douche- en toiletrolstoel Ocean E-VIP Veiligheid 1.6 Levensduur van het product Omschrijving De verwachte levensduur van dit product is vijf jaar bij gebruik in 3.1 Componenten overeenstemming met de veiligheidsinstructies en onderhoudstermij- De volgende onderdelen zijn inbegrepen in de levering: nen en bij correct gebruik zoals in deze handleiding wordt beschreven. -
Page 107: Typeplaatje
Montage en installatie Douche- en toiletrolstoel Ocean E-VIP 3.2 Typeplaatje Montage en installatie 4.1 Veiligheidsinformatie Het typeplaatje bevat ook belangrijke informatie: BELANGRIJK ▸ Controleer de onderdelen op transportschade voordat u het product in gebruik neemt en neem indien nodig contact op met de dealer. -
Page 108: De Hoofdsteun Monteren
Douche- en toiletrolstoel Ocean E-VIP Montage en installatie 4. Plaats de bout E (35mm) vanuit de buitenkant in de gaten en duw 8. Bevestig beide zijden van het zittingframe F op de bijbehorende deze volledig naar binnen. delen H op het chassis J. 5. -
Page 109: De Borstriem Plaatsen
Montage en installatie Douche- en toiletrolstoel Ocean E-VIP 4. Plaats het buitenste gedeelte B van de montagebeugel met de bout BELANGRIJK met intern schroefdraad door het gat van het binnenste gedeelte. Als u de ondersteuning plaatst, moet de afronding van de 5. -
Page 110: De Zittingplaat Plaatsen
Douche- en toiletrolstoel Ocean E-VIP Montage en installatie De borstriemlengte aanpassen Verwijdering: 1. Trek de zittingplaat aan beiden zijden naar boven. BELANGRIJK 4.6 De rugbekleding aanpassen ▸ Pas de lengte van de borstriem aan zodat deze de gebruiker past. De lengte van de borstriem wordt aangepast via de riemgesp van de borstriem. -
Page 111: Hoogte Van De Armsteunen Instellen
Montage en installatie Douche- en toiletrolstoel Ocean E-VIP 1. Open de riemgesp op de rugbekleding die via de binnenkant van het rugleuningframe wordt gelegd. 2. Open de gesp van de riem C op de rugbekleding die boven de armsteunen ligt. 3. -
Page 112: De Voetsteunen Monteren
Douche- en toiletrolstoel Ocean E-VIP Montage en installatie 4.8 De voetsteunen monteren BELANGRIJK ▸ Wanneer een voetsteun wordt geïnstalleerd, moet ervoor BELANGRIJK worden gezorgd dat de klittenbandsluiting van de hielband ▸ De rechter en linker voetsteun worden op dezelfde manier naar achteren is gericht. -
Page 113: De Accu Verwijderen
Montage en installatie Douche- en toiletrolstoel Ocean E-VIP 4. Klap de veiligheidsgreep A naar voren. 5. Koppel de lange verbindingskabel B los (180 mm) tussen de accu en de elektronica. 6. Verbind de korte verbindingskabel C (110 mm). 7. Klap de veiligheidsgreep weer terug. 8. -
Page 114: De Accu Opladen
Douche- en toiletrolstoel Ocean E-VIP Montage en installatie 4.11 De accu opladen 3. Klap de veiligheidsgreep B naar voren en koppel de aansluiting los C van de accu A. Het product kan niet worden gebruikt wanneer de accu wordt opge- laden. -
Page 115: Bediening
Bediening Douche- en toiletrolstoel Ocean E-VIP Bediening 5.1 Veiligheidsinformatie WAARSCHUWING ▸ Gebruik de douche- en toiletrolstoel alleen op een vlakke ondergrond en binnenshuis. ▸ Kijk naar de specificaties op het typeplaatje. Plaats geen al te zware voorwerpen op de douche- en toiletrolstoel. ▸... -
Page 116: De Armsteunen Draaien
Douche- en toiletrolstoel Ocean E-VIP Bediening 5.2 De armsteunen draaien 5.4 Bediening Het product wordt bediend via de handbediening. LET OP Gevaar van beknelling van vingers in het Het apparaat stopt direct in de huidige positie zodra de desbetreffende inklapmechanisme knoppen worden losgelaten. -
Page 117: De Draaivergrendeling Activeren
Bediening Douche- en toiletrolstoel Ocean E-VIP LET OP Beknellingsgevaar voor de vingers ▸ Plaats geen vingers tussen het zittingframe en het buizen- frame aan de voorzijde van het chassis wanneer u de zitting omhoog of omlaag beweegt. BELANGRIJK Als het zittingframe naar voren wordt gekanteld, kan de zithoogte tot maximaal 600 mm worden aangepast. -
Page 118: Transport
Douche- en toiletrolstoel Ocean E-VIP Transport Transport 7.2 Schoonmaken en ontsmetten Het product kan worden schoongemaakt en ontsmet met in de handel 6.1 Veiligheidsinformatie verkrijgbare middelen. Het product kan in de onderdelen worden gedemonteerd die BELANGRIJK zijn inbegrepen in de levering (Hoofdstuk 3.1 Componenten) om te kunnen worden getransporteerd. -
Page 119: De Prestaties Van De Accu Op Peil Houden
Onderhoud Douche- en toiletrolstoel Ocean E-VIP 6. Spoel de onderdelen met warm water af. De lader en accu reinigen 7. Droog de onderdelen met een doek. LET OP Gevaar door elektriciteit 8. Zet de douche- en toiletrolstoel weer in elkaar. ▸... -
Page 120: Na Gebruik
Douche- en toiletrolstoel Ocean E-VIP Na gebruik Na gebruik 8.1 Opslag BELANGRIJK Risico op beschadiging ▸ Bewaar het product in een droge ruimte bij een temperatu- ur tussen 0 °C en 40 °C, bij een atmosferische druk tussen 795 en 1060 hPa en een luchtvochtigheidsgraad tussen 30 en 75%. -
Page 121: Problemen Oplossen
Problemen oplossen Douche- en toiletrolstoel Ocean E-VIP Problemen oplossen 9.1 Defecten identificeren en repareren In de volgende tabel vindt u een overzicht van storingen en de mogelijke oorzaken daarvan. Als u de storing niet kunt verhelpen met behulp van de gege- ven oplossingen, kunt u ook rechtstreeks contact opnemen met uw dealer. - Page 122 Douche- en toiletrolstoel Ocean E-VIP Problemen oplossen Defect Mogelijke oorzaak/oorzaken Oplossing ▸ Maximale belasting 150 kg Het zittingframe gaat niet Gewichtslimiet overschreden omhoog ▸ Sluit de kabel correct aan Kabel niet correct aangesloten ▸ Contactdoos aangesloten (vastgeklikt) Contactdoos niet aangesloten Het zittingframe gaat niet ▸...
-
Page 123: Technische Gegevens
Technische gegevens Douche- en toiletrolstoel Ocean E-VIP 10 Technische gegevens M Breedte, hygiëneholte 205 mm N Diepte, hygiëneholte 320 mm Hoogteaanpassing traploos Wieldiameter 5" (127 mm) Gewicht ongeveer 39 kg Laadcapaciteit 150 kg 10.2 Elektronische gegevens Bedrijfsspanning 24 V Nominale ingangsvoeding 170 VA Accutype Loodzuur... -
Page 124: Materialen
Douche- en toiletrolstoel Ocean E-VIP Technische gegevens 10.3 Materialen Frame Roestvrij staal, gemoffeld Zittingplaat Polypropyleen Rugbekleding Kunststof, PVC-coating Voetsteunen Polypropyleen, glasvezelversterkt Armsteunen Polypropyleen Wielen Kunststof en roestvrij staal Alle productonderdelen zijn roestbestendig en latexvrij. -
Page 125: Guidance And Manufacturer's Declaration
10.4 Guidance and manufacturer’s declaration Guidance and manufacturer’s declaration - elektromagnetic emissions - for all equipment and systems (see 5.2.2.1 c)) The Ocean E-Vip is intended for use in the electromagnetic environment specified below. The customer or the user of the Ocean E-Vip should assure that it is used in such an environment. Emission test Compliance Electromagnetic environmant - guidance... - Page 126 Immunity test IEC 60601 test level Compliance level Recommended separation distance: Conducted RF = 3 V (IEC 61000-4-6) 150 kHz to 80 MHz Radiated RF 3 V/m = 3 V/m 80 MHz to 800 MHz (IEC 61000-4-3) 80 MHz to 2.5 GHz 800 MHz to 2.5 GHz where P is the maximum output power rating of the transmitter in watts (W) according to the transmitter manufacturer and d is the recommended separation distance in metres (m).
- Page 127 Notes...
- Page 128 / www.invacare.be nederland@invacare.com / www.invacare.nl Deutschland: Ireland: Invacare GmbH, Alemannenstraße 10, Invacare Ireland Ltd, Unit 5 Seatown Business Campus, D-88316 Isny Seatown Road, Swords, County Dublin - Ireland Tel: (49) (0)75 62 7 00 0 Tel: (353) 1 810 7084...