Table of Contents
Advertisement
Quick Links
MODEL G0836
MINI MILL/DRILL w/DRO
OWNER'S MANUAL
(For models manufactured since 09/17)
COPYRIGHT © JANUARY, 2018 BY GRIZZLY INDUSTRIAL, INC. REVISED AUGUST, 2018 (TK)
WARNING: NO PORTION OF THIS MANUAL MAY BE REPRODUCED IN ANY SHAPE
OR FORM WITHOUT THE WRITTEN APPROVAL OF GRIZZLY INDUSTRIAL, INC.
V1.08.18
#19249KB PRINTED IN CHINA
Advertisement
Table of Contents

Related Manuals for Grizzly G0836


Summary of Contents for Grizzly G0836
- Page 1 OWNER'S MANUAL (For models manufactured since 09/17) COPYRIGHT © JANUARY, 2018 BY GRIZZLY INDUSTRIAL, INC. REVISED AUGUST, 2018 (TK) WARNING: NO PORTION OF THIS MANUAL MAY BE REPRODUCED IN ANY SHAPE OR FORM WITHOUT THE WRITTEN APPROVAL OF GRIZZLY INDUSTRIAL, INC.
- Page 2 This manual provides critical safety instructions on the proper setup, operation, maintenance, and service of this machine/tool. Save this document, refer to it often, and use it to instruct other operators. Failure to read, understand and follow the instructions in this manual may result in fire or serious personal injury—including amputation, electrocution, or death.
-
Page 3: Table Of Contents
Table of Contents INTRODUCTION ..........2 SECTION 5: ACCESSORIES ......30 Contact Info ............2 SECTION 6: MAINTENANCE ......35 Manual Accuracy ..........2 Schedule ............35 Identification ............3 Cleaning and Protecting ........35 Controls & Components ........4 Replacing Spindle Depth DRO Battery .... -
Page 4: Introduction
ID label (see below). This information is required for us to provide proper tech support, and it helps us determine if updated documenta- tion is available for your machine. Manufacture Date Serial Number Model G0836 (Mfd. Since 09/17) -
Page 5: Identification
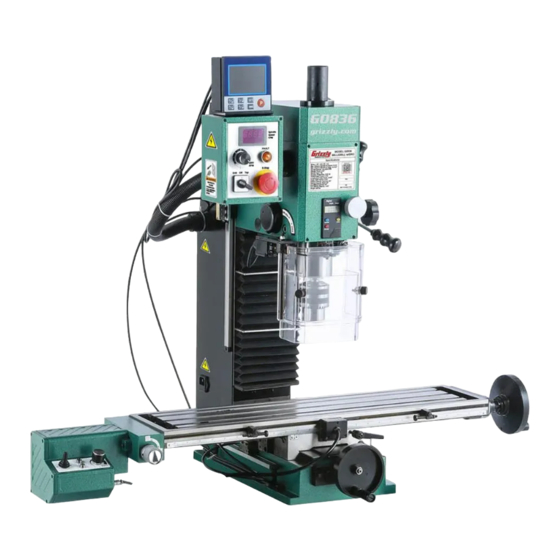
H. Drawbar Cover Table Lock Handles U. Y-Axis Handwheel E-Stop Button V. Power Feed Limit Switch Spindle Depth DRO K. Fine Downfeed Knob W. Leadscrew Selector Knob X. X-Axis Power Feed & Controls Downfeed Selector Knob Model G0836 (Mfd. Since 09/17) -
Page 6: Controls & Components
Use arrow keys (B, C, D, J, K) to select or change parameter. DRO resolution can be set in inches or millimeters with values of 0.0001 to 1.0000. Figure 1. G0836 DRO and control panel. Model G0836 (Mfd. Since 09/17) - Page 7 V. Fine Downfeed Knob. Manually controls rate of fine spindle downfeed. Table Power Feed Controls Figure 2. G0836 Z-axis lock handle. N. Z-Axis Lock Handle. Tighten to lock head- stock in position. Figure 4. G0836 power feed controls.
-
Page 8: Machine Data Sheet
MACHINE DATA SHEET Customer Service #: (570) 546-9663 · To Order Call: (800) 523-4777 · Fax #: (800) 438-5901 MODEL G0836 MINI MILL X2.7 VARIABLE SPEED WITH Product Dimensions: Weight................................220 lbs. Width (side-to-side) x Depth (front-to-back) x Height................39 x 25 x 33 in. - Page 9 The information contained herein is deemed accurate as of 9/11/2018 and represents our most recent product specifications. Model G0836 PAGE 2 OF 2 Due to our ongoing improvement efforts, this information may not accurately describe items previously purchased. Model G0836 (Mfd. Since 09/17)
-
Page 10: Section 1: Safety
Everyday ery. Never operate under the influence of drugs or eyeglasses are NOT approved safety glasses. alcohol, when tired, or when distracted. Model G0836 (Mfd. Since 09/17) - Page 11 Make sure they are properly installed, you experience difficulties performing the intend- undamaged, and working correctly BEFORE ed operation, stop using the machine! Contact our operating machine. Technical Support at (570) 546-9663. Model G0836 (Mfd. Since 09/17)
-
Page 12: Additional Safety For Mill/Drills
Use this machine with respect and caution to lessen the possibility of operator injury. If normal safety precautions are over- looked or ignored, serious personal injury may occur. -10- Model G0836 (Mfd. Since 09/17) -
Page 13: Section 2: Power Supply
-11- Model G0836 (Mfd. Since 09/17) - Page 14 Two-prong outlets do not meet the grounding requirements for this machine. Do not modify or use an adapter on the plug provided—if it will not fit the outlet, have a qualified electrician install the proper outlet with a verified ground. -12- Model G0836 (Mfd. Since 09/17)
-
Page 15: Section 3: Setup
IMPORTANT: Save all packaging materials until you are completely satisfied with the machine and have resolved any issues between Grizzly or the shipping agent. You MUST have the original pack- aging to file a freight claim. It is also extremely helpful if you need to return your machine later. -
Page 16: Inventory
Often, these items get lost in packaging materials while unpack- ing or they are pre-installed at the factory. Figure 7. G0836 inventory. Figure 6. G0836 mill/drill unit. -14- Model G0836 (Mfd. Since 09/17) -
Page 17: Cleanup
Repeat Steps 2–3 as necessary until clean, Figure 8. T23692 Orange Power Degreaser. then coat all unpainted surfaces with a quality metal protectant to prevent rust. -15- Model G0836 (Mfd. Since 09/17) -
Page 18: Site Considerations
Only install in an Shadows, glare, or strobe effects that may distract access restricted location. or impede the operator must be eliminated. Wall Min. 30" for Maintenance 25" 39" " Figure 9. Minimum working clearances. -16- Model G0836 (Mfd. Since 09/17) -
Page 19: Lifting & Placing
Lag Screw Flat Washer Machine Base Workbench Figure 10. G0836 mounted on optional T28099 Figure 12. "Direct Mount" setup. stand. -17- Model G0836 (Mfd. Since 09/17) -
Page 20: Assembly
If you would like to use a different chuck in the future, The Model G0836 comes nearly fully assembled we recommend obtaining a new arbor. from the factory; however, the handwheel handles were mounted internally for shipping. -
Page 21: Power Connection
Note: Make sure power cords and cables do Twist Emergency Stop button clockwise until not interfere with table movement. it springs out (see Figure 16). This resets the switch so the machine can start. Figure 16. Resetting Emergency Stop button. -19- Model G0836 (Mfd. Since 09/17) - Page 22 Switch Indicator Rotate spindle speed dial all the way counter- clockwise to "0" position. WITHOUT resetting Figure 18. G0836 power feed controls. Emergency Stop button, try to start machine by rotating spindle speed dial clockwise. The machine should not start.
- Page 23 Turn speed control dial all the way counter- clockwise to prevent high-speed startup. Move direction switch to left position. Turn speed control dial clockwise to turn power feed ON, then gradually increase speed to confirm that table is moving to left. -21- Model G0836 (Mfd. Since 09/17)
-
Page 24: Spindle Bearing Break-In
500, 1000, and 2000 RPM. Be sure to run the spindle for a minimum of 5 minutes in each direction of rotation at each speed. The spindle break-in of the machine is now complete! -22- Model G0836 (Mfd. Since 09/17) -
Page 25: Section 4: Operations
Regardless of the content in this sec- ing parts at all times. tion, Grizzly Industrial will not be held liable Entanglement can result for accidents caused by lack of training. in death, amputation, or... -
Page 26: Spindle Downfeed
Figure 23. Location of quill lock controls. trols quick spindle downfeed. Turn spindle depth DRO ON and zero it out. Use coarse downfeed handles to raise and lower spindle while referencing spindle depth DRO for precise movement. -24- Model G0836 (Mfd. Since 09/17) - Page 27 Figure 24) to engage fine downfeed knob. Loosen quill lock with hex wrench. Rotate fine downfeed knob clockwise and lower cutting tool so it just touches workpiece. Move workpiece out of the way, using X/Y table handwheels. -25- Model G0836 (Mfd. Since 09/17)
-
Page 28: Adjusting Headstock
Adjusting Headstock Controlling Table Travel The headstock can be adjusted up and down the column (Z-axis). The G0836 has a dovetailed The table travels in two directions, as illustrated slide that allows users to reposition the headstock in Figure 28: or change tooling without losing workpiece align- ment with a hole or milling path. - Page 29 Reset by turning speed control Connect power feed to provided 5A power dial OFF, moving direction switch to middle supply and grounded 5-15 outlet. POWER (OFF) position, and eliminating fault condition. light will illuminate. -27- Model G0836 (Mfd. Since 09/17)
-
Page 30: Installing/Removing Tooling
Spindle Spanner Wrench ........1 Figure 33. Using hex wrench and spindle spanner wrench to tighten drawbar. To install tooling: DISCONNECT MACHINE FROM POWER! Clean debris or oily substances from inside spindle taper and tooling mating surface. -28- Model G0836 (Mfd. Since 09/17) -
Page 31: Setting Spindle Speed
Also, there are many spindle-speed calculators on the internet. These sources will help you consider the applicable variables in order to determine the best spindle speed for the operation. -29- Model G0836 (Mfd. Since 09/17) -
Page 32: Section 5: Accessories
Refer to our website or latest catalog for additional recommended accessories. T28099—Stand for G0836 Figure 37. G7154 Precision Milling Vise. Mount the G0836 on this sturdy metal stand with built-in storage. H7576—Precision Self-Centering Vise Both jaws on this precision vise move in equal and opposite directions so vise remains centered with the milling machine spindle. - Page 33 3 ⁄ ". tool box Figure 43. T10442 Milling Tool Kit, 10-Pc. Figure 41. T1192 4 ⁄ " Power DRO Rotary Table Set. www.grizzly.com 1-800-523-4777 order online at or call -31- Model G0836 (Mfd. Since 09/17)
- Page 34 " sizes. Figure 42. T25702 5-Pc. R8 End Mill Holder Set. Figure 45. T25702 5-Pc. R8 End Mill Holder set. Figure 48. G9893 6-Pc. End Mill Set. www.grizzly.com 1-800-523-4777 order online at or call -32- Model G0836 (Mfd. Since 09/17)
- Page 35 (not included). Comes with an R8 arbor. Figure ??. H2861 Face Mill. Figure 52. H2861 Face Mill. Figure 50. G9849 Magnetic Base/Dial Indicator Combo. www.grizzly.com 1-800-523-4777 order online at or call -33- Model G0836 (Mfd. Since 09/17)
- Page 36 Features machined and ground faces and locking set screws. Protected in a vinyl pouch. Figure 56. G5680 Adjustable Parallel Set. Figure 54. G9574 Slotted Angle Plate. www.grizzly.com 1-800-523-4777 order online at or call -34- Model G0836 (Mfd. Since 09/17)
-
Page 37: Section 6: Maintenance
Keep unpainted cast-iron surfaces rust-free items below, shut down the machine immediately with regular applications of ISO 68 way oil (see and fix the problem before continuing operations: Page 31 for offerings from Grizzly). • Loose mounting bolts. • Damaged tooling. - Page 38 Repeat Step 3 for X-axis leadscrew Figure 58. Y-axis way lubrication points. (see Figure 61). Repeat Step 4. X-Axis Ways X-Axis Leadscrew Figure 59. X-axis way lubrication points. Figure 61. Location of X-axis leadscrew. -36- Model G0836 (Mfd. Since 09/17)
- Page 39 Remove (4) cap screws securing cabinet to Bearing column. 68 Oil Block Leadscrew Figure 64. Column leadscrew lubrication points. Use handwheel to raise and lower headstock to distribute lubricants. Reverse Steps 2–4 to re-install DRO sensor strip and cabinet. -37- Model G0836 (Mfd. Since 09/17)
-
Page 40: Replacing Spindle Depth Dro Battery
(see Figure 66). Lock in position. Remove old battery, dispose of it according to state and federal regulations, then replace it with a new one. Replace battery cover. Quill Rack Figure 66. Location of quill rack. -38- Model G0836 (Mfd. Since 09/17) -
Page 41: Section 7: Service
7. Cogged belt worn or loose. 7. Inspect/replace belt. 8. Spindle bearings at fault. 8. Test by rotating spindle; rotational grinding/loose shaft requires bearing replacement. 9. Test/repair/replace. 9. Motor bearings at fault. 10. Test/repair/replace. 10. Motor at fault. -39- Model G0836 (Mfd. Since 09/17) - Page 42 Repair/replace as necessary. display reading. 2. Spindle speed sensor has gone bad. 2. Test/replace as necessary. 3. Spacing between sensor and scale 3. Adjust spacing between sensor and scale. incorrect -40- Model G0836 (Mfd. Since 09/17)
- Page 43 2. Zero/reset DRO at beginning point. reading is incorrect. 3. Sensor has gone bad. 3. Test/replace sensor as necessary. 1. Spacing between sensor and scale is 1. Adjust spacing between sensor and scale. incorrect. -41- Model G0836 (Mfd. Since 09/17)
-
Page 44: Adjusting Gibs
X-Axis Gib (Left) X-Axis Leadscrew Y-Axis Gib X-Axis Gib (Front) (Right) Y-Axis Gib (Rear) Z-Axis Gib Backlash (Top) Leadscrew Cap Screws Figure 69. Handwheel backlash adjustment. Z-Axis Gib (Bottom) Figure 68. Gib adjustment screws. -42- Model G0836 (Mfd. Since 09/17) -
Page 45: Section 8: Wiring
Technical Support at (570) 546-9663. The photos and diagrams included in this section are best viewed in color. You can view these pages in color at www.grizzly.com. -43- Model G0836 (Mfd. Since 09/17) -
Page 46: Wiring Overview
Table Limit Switch Component Location Motor Control Panel Spindle Depth DRO (Battery Operated) Machine Column Clear Guard Limit Switch Power Connection Port Power Power Feed Feed Limit Switch READ ELECTRICAL SAFETY -44- Model G0836 (Mfd. Since 09/17) ON PAGE 43! -
Page 47: Control Panel & Motor Wiring
DYB-01 110V (To Column) RSD-27 Fault Light Potentiometer WH24-2 PL110V Control Panel (as viewed from behind) KEDU ZH-A KEDU 10 12 HY-57B Emergency Stop EN61058 EN61058 Rotary Switch READ ELECTRICAL SAFETY -45- Model G0836 (Mfd. Since 09/17) ON PAGE 43! -
Page 48: Machine Column & Dro Wiring
5W0 1J 5W0 1J FC750BJ/110V 942H-1A-12DS-T Ground Power Connection Port 10A 250V Fuse X-Axis Sensor Machine Ground Column Y-Axis Sensor DRO Unit Z-Axis Sensor DT 20 From Control Panel READ ELECTRICAL SAFETY -46- Model G0836 (Mfd. Since 09/17) ON PAGE 43! -
Page 49: Power Feed Wiring
Power Feed Housing – Circuit Board (Front View) +24V Potentiometer – Power Lamp Fault Lamp WH24-Z 24K7 KEDU HY29K Table Direction Switch BRUSH STYLE MOTOR 110V Limit Switch Housing READ ELECTRICAL SAFETY -47- Model G0836 (Mfd. Since 09/17) ON PAGE 43! -
Page 50: Section 9: Parts
SECTION 9: PARTS Headstock Parts 75 28 84 16-2 16-1 13 33 27 37 BUY PARTS ONLINE AT GRIZZLY.COM! -48- Model G0836 (Mfd. Since 09/17) Scan QR code to visit our Parts Store. - Page 51 POTENTIOMETER WHZ4-2 P0836054 INT RETAINING RING 62MM P0836207 FAULT INDICATOR LIGHT P0836055 EXT RETAINING RING 35MM P0836208 SPINDLE SPEED DAIL STRAIN RELIEF TYPE -3 P0836056 CAP SCREW M5-.8 X 16 P0836211 P0836057 SPINDLE TIMING PULLEY -49- Model G0836 (Mfd. Since 09/17)
- Page 52 Table Parts 339-1 316 333 331 348 386 387 392 393 -50- Model G0836 (Mfd. Since 09/17)
- Page 53 P0836391 OPEN-END WRENCH 14/17MM P0836337 POWER FEED ASSY P0836392 OPEN-END WRENCH 8/10MM P0836338 POWER FEED CLUTCH ASSY P0836393 HEX WRENCH 8MM P0836339 POWER FEED LIMIT ASSY P0836394 HEX WRENCH SET 3, 4, 5, 6MM -51- Model G0836 (Mfd. Since 09/17)
-
Page 54: Column Parts
Column Parts 411 409 -52- Model G0836 (Mfd. Since 09/17) - Page 55 MAGNETIC PAD READER P08360434 WAYS COVER BRACKET P08360471 PHLP HD SCR M3-.5 X 14 P08360435 PHLP HD SCR M5-.8 X 6 P08360472 PHLP HD SCR M3-.5 X 10 P08360436 PHLP HD SCR M4-.7 X 10 -53- Model G0836 (Mfd. Since 09/17)
-
Page 56: Labels & Cosmetics
EYE/FACE INJURY P08360514 INJURY/SHOCK HAZARD P08360506 FINE DOWNFEED CONTROL LABEL P08360515 ELECTRICITY LABEL 1.4W P08360507 ENTANGLEMENT LABEL P08360516 TOUCH-UP PAINT, GRIZZLY GREEN P08360508 WARNING LABEL P08360517 TOUCH-UP PAINT, GRIZZLY BLACK P08360509 MACHINE ID LABEL -54- Model G0836 (Mfd. Since 09/17) - Page 57 Would you recommend Grizzly Industrial to a friend? _____ Yes _____No Would you allow us to use your name as a reference for Grizzly customers in your area? Note: We never use names more than 3 times. _____ Yes _____No 10.
- Page 58 FOLD ALONG DOTTED LINE Place Stamp Here GRIZZLY INDUSTRIAL, INC. P.O. BOX 2069 BELLINGHAM, WA 98227-2069 FOLD ALONG DOTTED LINE Send a Grizzly Catalog to a friend: Name_______________________________ Street_______________________________ City______________State______Zip______ TAPE ALONG EDGES--PLEASE DO NOT STAPLE...
-
Page 59: Warranty & Returns
WARRANTY & RETURNS Grizzly Industrial, Inc. warrants every product it sells for a period of 1 year to the original purchaser from the date of purchase. This warranty does not apply to defects due directly or indirectly to misuse, abuse, negligence, accidents, repairs or alterations or lack of maintenance.