ZyXEL Communications NWA1123-ACv2 User Manual
Nwa1123 series,
nwa5000 series;
wac5000 series;
wac6000 series;
wac6500 series
Hide thumbs
Also See for NWA1123-ACv2:
- Quick start manual ,
- User manual (218 pages) ,
- User manual (333 pages)
Table of Contents
Troubleshooting

Related Manuals for ZyXEL Communications NWA1123-ACv2


Summary of Contents for ZyXEL Communications NWA1123-ACv2
- Page 1 User’s Guide NWA/WAC Series 802.11 a/b/g/n/ac Unified Access Point Default Login Details Version 5.10 Edition 1, 09/2017 LAN IP Address DHCP-assigned http://192.168.1.2 User Name admin Password 1234 Copyright © 2017 Zyxel Communications Corporation...
-
Page 2: Related Documentation
IMPORTANT! READ CAREFULLY BEFORE USE. KEEP THIS GUIDE FOR FUTURE REFERENCE. This is a User’s Guide for a series of products. Not all products support all firmware features. Screenshots and graphics in this book may differ slightly from your product due to differences in your product firmware or your computer operating system. -
Page 3: Document Conventions
Document Conventions Warnings and Notes These are how warnings and notes are shown in this guide. Warnings tell you about things that could harm you or your device. Note: Notes tell you other important information (for example, other things you may need to configure or helpful tips) or recommendations. -
Page 4: Table Of Contents
Contents Overview Contents Overview User’s Guide ............................12 Introduction ............................13 The Web Configurator ......................... 35 Setup Wizard ............................47 Technical Reference ........................53 Dashboard ............................54 Monitor ..............................60 Network ..............................75 Wireless ..............................84 Bluetooth ............................... 97 User ............................... 100 AP Profile .............................. -
Page 5: Table Of Contents
1.6.1 WAC6502D-E, WAC6502D-S, and WAC6503D-S ..............25 1.6.2 NWA1123-AC PRO and WAC6103D-I ................. 27 1.6.3 NWA5301-NJ .......................... 29 1.6.4 NWA1123-ACv2, NWA5121-N, NWA5121-NI, NWA5123-AC and NWA5123-NI ....30 1.6.5 WAC5302D-S .......................... 31 1.6.6 NWA1123-AC HD, NWA5123-AC HD and WAC6303D-S ........... 32 1.7 Starting and Stopping the NWA/WAC .................. - Page 6 Table of Contents 2.3.2 Navigation Panel ........................40 2.3.3 Warning Messages ........................ 43 2.3.4 Tables and Lists ........................43 Chapter 3 Setup Wizard............................47 3.1 Accessing the Wizard ........................47 3.2 Using the Wizard ..........................47 3.2.1 Country Code ........................47 3.2.2 Time Zone ..........................
- Page 7 Table of Contents 6.1 Overview ............................75 6.1.1 Management Mode ......................75 6.1.2 What You Can Do in this Chapter ..................77 6.2 IP Setting ............................78 6.3 VLAN ..............................79 6.4 AC (AP Controller) Discovery ......................82 Chapter 7 Wireless ...............................84 7.1 Overview ............................
- Page 8 Table of Contents 10.2.1 Add/Edit Radio Profile ...................... 109 10.3 SSID .............................. 114 10.3.1 SSID List ..........................114 10.3.2 Add/Edit SSID Profile ......................115 10.4 Security List ..........................118 10.4.1 Add/Edit Security Profile ....................118 10.5 MAC Filter List ..........................121 10.5.1 Add/Edit MAC Filter Profile ....................
- Page 9 Table of Contents 14.1 Overview ............................. 148 14.1.1 What You Can Do in this Chapter ................... 148 14.2 Host Name ........................... 148 14.3 Date and Time ........................... 149 14.3.1 Pre-defined NTP Time Servers List ..................152 14.3.2 Time Server Synchronization .................... 152 14.4 WWW Overview ..........................
- Page 10 Table of Contents 16.2.1 Example of Configuration File Download Using FTP ............190 16.3 Firmware Package ........................191 16.3.1 Example of Firmware Upload Using FTP ................192 16.4 Shell Script ........................... 193 Chapter 17 Diagnostics ............................196 17.1 Overview ............................. 196 17.1.1 What You Can Do in this Chapter ...................
- Page 11 Table of Contents 22.6 Resetting the NWA/WAC ......................212 22.7 Getting More Troubleshooting Help ..................213 Appendix A Importing Certificates ....................214 Appendix B IPv6..........................227 Appendix C Customer Support ..................... 235 Appendix D Legal Information ...................... 241 Index ..............................254 NWA / WAC Series User’s Guide...
-
Page 12: User's Guide
User’s Guide... -
Page 13: Introduction
H A P T E R Introduction 1.1 Overview This User’s Guide covers the following models: NWA1123-ACv2, NWA1123-AC PRO, NWA1123-AC HD, NWA5121-N, NWA5121-NI, NWA5123-AC, NWA5123-AC HD, NWA5123-NI, NWA5301-NJ, WAC5302D-S, WAC6103D-I, WAC6303D-S, WAC6502D-E, WAC6502D-S, WAC6503D-S, and WAC6553D-E. Your NWA/ WAC is a wireless AP (Access Point). It extends the range of your existing wired network without additional wiring, providing easy network access to mobile users. - Page 14 Chapter 1 Introduction Table 1 NWA1123 Series Comparison Table FEATURES NWA1123-AC NWA1123-AC PRO NWA1123-AC HD CAPWAP Managed AP Mode AC (AP Controller) Discovery 802.11r Fast Roaming Support in Managed AP Mode Bluetooth Low Energy (BLE) Maximum number of 512 event logs or 1024 debug logs log messages Table 2 NWA5000 Series Comparison Table NWA5121-...
- Page 15 Chapter 1 Introduction Table 2 NWA5000 Series Comparison Table NWA5121- NWA5123- NWA5123- NWA5123- NWA5301- FEATURES NWA5121-N AC HD AC (AP Controller) Discovery 802.11r Fast Roaming Support in Managed AP Mode Bluetooth Low Energy (BLE) Maximum number of 256 event 256 event 512 event 512 event 256 event...
- Page 16 Chapter 1 Introduction Table 3 WAC5000/6000 Series Comparison Table FEATURES WAC5302D-S WAC6103D-I WAC6303D-S 802.11r Fast Roaming Support in Managed AP Mode Bluetooth Low Energy (BLE) Maximum number of 512 event logs 512 event logs 256 event logs or 1024 debug or 1024 debug log messages or 1 debug logs...
-
Page 17: Management Mode
Chapter 1 Introduction Table 4 WAC6500 Series Comparison Table FEATURES WAC6502D-E WAC6502D-S WAC6503D-S WAC6553D-E Bluetooth Low Energy (BLE) Maximum number of 512 event logs or 1024 debug logs log messages You can set the NWA/WAC to operate in either standalone AP or managed AP mode. When the NWA/ WAC is in standalone AP mode, it can serve as a normal AP, as an RF monitor to search for rouge APs to help eliminate network threats (if it supports monitor mode and rogue APs detection/containment), or even as a root AP or a wireless repeater to establish wireless links with other APs in a WDS (Wireless... -
Page 18: Mbssid
Chapter 1 Introduction 1.1.2 MBSSID A Basic Service Set (BSS) is the set of devices forming a single wireless network (usually an access point and one or more wireless clients). The Service Set IDentifier (SSID) is the name of a BSS. In Multiple BSS (MBSSID) mode, the NWA/WAC provides multiple virtual APs, each forming its own BSS and using its own individual SSID profile. -
Page 19: Dual-Radio
Chapter 1 Introduction 1.1.3 Dual-Radio Some of the NWA/WAC models are equipped with dual wireless radios. This means you can configure two different wireless networks to operate simultaneously. Note: A different channel should be configured for each WLAN interface to reduce the effects of radio interference. -
Page 20: Repeater
Chapter 1 Introduction Figure 3 Root AP Application On the NWA/WAC in Root AP mode, you can have multiple SSIDs active for regular wireless connections and one SSID for the connection with a repeater (repeater SSID). Wireless clients can use either SSID to associate with the NWA/WAC in Root AP mode. -
Page 21: Ways To Manage The Nwa/Wac
Chapter 1 Introduction Figure 4 Repeater Application When the NWA/WAC is in Repeater mode, repeater security between the NWA/WAC and other repeater is independent of the security between the wireless clients and the AP or repeater. When repeater security is enabled, both APs and repeaters must use the same pre-shared key. See Section 7.2 on page 85 Section 12.2 on page 130... -
Page 22: Good Habits For Managing The Nwa/Wac
Chapter 1 Introduction Simple Network Management Protocol (SNMP) The NWA/WAC can be monitored by an SNMP manager. See the SNMP chapter in this User’s Guide. 1.3 Good Habits for Managing the NWA/WAC Do the following things regularly to make the NWA/WAC more secure and to manage it more effectively. - Page 23 Chapter 1 Introduction NWA Rear Panel UPLINK PHONE PORT PORT PIN# Table 6 Color Codes for 110 Punch Down Block Wiring PIN# WIRE COLOR White/Orange Orange White/Green Blue White/Blue Green White/Brown Brown Use a punch-down tool to seat the wires down properly into the slot. Trim any excess wires.
-
Page 24: Phone Port
Chapter 1 Introduction 1.5.2 Phone Port Connect a digital telephone to the RJ-45 PHONE port at the bottom of the NWA to forward voice traffic to/from the telephone switchboard that is connected to the RJ-45 PHONE port on the back of the NWA. The NWA does not support VoIP (Voice over Internet Protocol) and the PHONE port is NOT for making calls over the regular networking network (PSTN), either. -
Page 25: Leds
Chapter 1 Introduction • 115200 bps • No parity, 8 data bits, 1 stop bit • No flow control The following table shows you the wire color codes and pin assignment for the console cable. Table 7 RJ45-to-DB-9 Console Cable Color Codes RJ45 PIN# WIRE COLOR DB-9 PIN#... - Page 26 Chapter 1 Introduction Figure 5 WAC6500 Series LEDs The following table describes the LEDs. Table 8 WAC6500 Series LEDs COLOR STATUS DESCRIPTION PWR/SYS Slow Blinking (On for 1s, The WAC is booting up. Off for 1s) Green The WAC is ready for use. Green There is system error and the WAC cannot boot up, or the WAC suffered a system failure.
-
Page 27: Nwa1123-Ac Pro And Wac6103D-I
Chapter 1 Introduction Table 8 WAC6500 Series LEDs (continued) COLOR STATUS DESCRIPTION WLAN Green The 5 GHz WLAN is active. The 5 GHz WLAN is not active. UPLINK Amber/ Amber - The port is operating as a 100-Mbps connection. Green Green - The port is operating as a Gigabit connection (1000 Mbps). - Page 28 Chapter 1 Introduction The following table describes the LEDs. Table 9 NWA1123-AC PRO and WAC6103D-I LEDs COLOR STATUS DESCRIPTION PWR/SYS Slow Blinking (On for 1s, The NWA/WAC is booting up. Off for 1s) Green The NWA/WAC is ready for use. Green There is system error and the NWA/WAC cannot boot up, or the NWA/WAC suffered a system failure.
-
Page 29: Nwa5301-Nj
Chapter 1 Introduction Table 9 NWA1123-AC PRO and WAC6103D-I LEDs (continued) COLOR STATUS DESCRIPTION Locator White Blinking The Locator is activated and will show the actual location of the NWA/WAC between several devices in the network. The Locator function is off. 1.6.3 NWA5301-NJ The LEDs automatically turn off when the NWA5301-NJ is ready. -
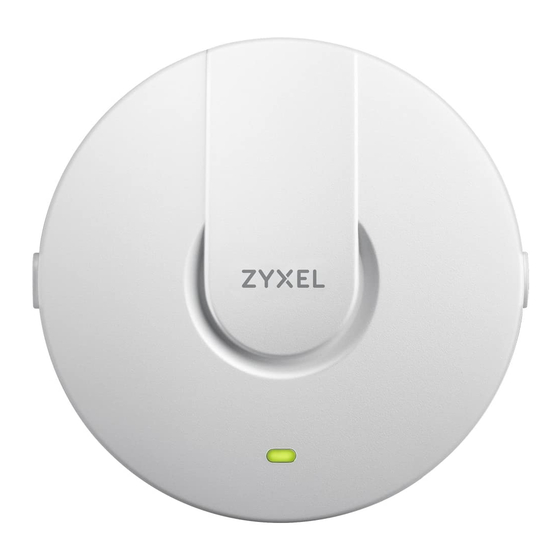
Page 30: Nwa1123-Acv2, Nwa5121-N, Nwa5121-Ni, Nwa5123-Ac And Nwa5123-Ni
The port is connected. Blinking The NWA is sending/receiving data through the port. The port is not connected. 1.6.4 NWA1123-ACv2, NWA5121-N, NWA5121-NI, NWA5123-AC and NWA5123-NI The following are the LED descriptions for your NWA1123/5120 series. Figure 8 NWA1123/5120 Series LED The following are the LED descriptions for your NWA1123/5120 series. -
Page 31: Wac5302D-S
Chapter 1 Introduction Table 11 NWA1123/5120 Series LED (continued) COLOR STATUS DESCRIPTION Amber The NWA is ready for use. Green Amber The NWA’s wireless interface is activated. Green Amber Slow Blinking (blink for 3 The NWA is discovering an AP controller. times, Off for 3s) Green Amber... -
Page 32: Nwa1123-Ac Hd, Nwa5123-Ac Hd And Wac6303D-S
Chapter 1 Introduction The following table describes the LEDs. Table 12 WAC5302D-S LEDs COLOR STATUS DESCRIPTION PWR/SYS Slow Blinking (On for 1s, The WAC is booting up. Off for 1s) Green The WAC is ready for use. Green There is system error and the WAC cannot boot up, or the WAC suffered a system failure. -
Page 33: Starting And Stopping The Nwa/Wac
Chapter 1 Introduction Figure 10 NWA1123-AC HD, NWA5123-AC HD and WAC6303D-S LED The following are the LED descriptions for your NWA/WAC. Table 13 NWA1123-AC HD, NWA5123-AC HD and WAC6303D-S LED COLOR STATUS DESCRIPTION Amber Slow Blinking (On for 1s, The NWA/WAC is booting up. Off for 1s) Green Amber... - Page 34 Chapter 1 Introduction Always use Maintenance > Shutdown or the shutdown command before you turn off the NWA/WAC or remove the power. Not doing so can cause the firmware to become corrupt. Table 14 Starting and Stopping the NWA/WAC METHOD DESCRIPTION Turning on the power A cold start occurs when you turn on the power to the NWA/WAC.
-
Page 35: The Web Configurator
H A P T E R The Web Configurator 2.1 Overview The NWA/WAC Web Configurator allows easy management using an Internet browser. Browsers supported are: • Firefox 36.0.1 or later • Chrome 41.0 or later • IE 10 or later The recommended screen resolution is 1024 x 768 pixels and higher. -
Page 36: Navigating The Web Configurator
2.3 Navigating the Web Configurator The following summarizes how to navigate the web configurator from the Dashboard screen. This guide uses the NWA1123-ACv2 screens as an example. The screens may vary slightly for different models. NWA / WAC Series User’s Guide... -
Page 37: Title Bar
Chapter 2 The Web Configurator Figure 11 The Web Configurator’s Main Screen The Web Configurator’s main screen is divided into these parts: • A - Title Bar • B - Navigation Panel • C - Main Window 2.3.1 Title Bar The title bar provides some useful links that always appear over the screens below, regardless of how deep into the Web Configurator you navigate. - Page 38 Chapter 2 The Web Configurator Table 15 Title Bar: Web Configurator Icons (continued) LABEL DESCRIPTION About Click this to display basic information about the NWA/WAC. Site Map Click this to see an overview of links to the Web Configurator screens. Object Click this to open a screen where you can check which configuration items reference an Reference...
- Page 39 Chapter 2 The Web Configurator Figure 14 Site Map Object Reference Click Object Reference to open the Object Reference screen. Select the type of object and the individual object and click Refresh to show which configuration settings reference the object. Figure 15 Object Reference The fields vary with the type of object.
-
Page 40: Navigation Panel
Chapter 2 The Web Configurator Table 17 Object References (continued) LABEL DESCRIPTION Priority If it is applicable, this field lists the referencing configuration item’s position in its list, otherwise N/A displays. Name This field identifies the configuration item that references the object. Description If the referencing configuration item has a description configured, it displays here. -
Page 41: Configuration Menu
Chapter 2 The Web Configurator Figure 17 Navigation Panel Dashboard The dashboard displays general device information, system status, system resource usage, and interface status in widgets that you can re-arrange to suit your needs. For details on the Dashboard’s features, see Chapter 4 on page Monitor Menu The monitor menu screens display status and statistics information. - Page 42 Chapter 2 The Web Configurator Table 19 Configuration Menu Screens Summary (continued) FOLDER OR LINK FUNCTION Wireless WLAN Setting Manage the NWA/WAC’s general wireless settings. Management Rogue AP Rogue/Friendly AP Configure how the NWA/WAC monitors for rogue APs. List Load Balancing Load Balancing Configure load balancing for traffic moving to and from wireless clients.
-
Page 43: Warning Messages
Chapter 2 The Web Configurator Maintenance Menu Use the maintenance menu screens to manage configuration and firmware files, run diagnostics, and reboot or shut down the NWA/WAC. Table 20 Maintenance Menu Screens Summary FOLDER OR LINK FUNCTION File Manager Configuration File Manage and upload configuration files for the NWA/WAC. - Page 44 Chapter 2 The Web Configurator Click a column heading to sort the table’s entries according to that column’s criteria. Click the down arrow next to a column heading for more options about how to display the entries. The options available vary depending on the type of fields in the column. Here are some examples of what you can do: •...
- Page 45 Chapter 2 The Web Configurator Select a column heading and drag and drop it to change the column order. A green check mark displays next to the column’s title when you drag the column to a valid new location. Use the icons and fields at the bottom of the table to navigate to different pages of entries and control how many entries display at a time.
- Page 46 Chapter 2 The Web Configurator Table 22 Common Table Icons (continued) LABEL DESCRIPTION Remove To remove an entry, select it and click Remove. The NWA/WAC confirms you want to remove it before doing so. Activate To turn on an entry, select it and click Activate. Inactivate To turn off an entry, select it and click Inactivate.
-
Page 47: Setup Wizard
H A P T E R Setup Wizard 3.1 Accessing the Wizard When you log into the Web Configurator for the first time or when you reset the NWA/WAC to its default configuration, the wizard screen displays. Note: If you have already configured the wizard screens and want to open it again, click the Wizard icon on the upper right corner of any Web Configurator screen. -
Page 48: Time Zone
Chapter 3 Setup Wizard 3.2.2 Time Zone Use this screen to configure the NWA/WAC’s time zone and daylight saving time. • Time Zone: Select the time zone of your location. This will set the time difference between your time zone and Greenwich Mean Time (GMT). •... -
Page 49: Radio
Chapter 3 Setup Wizard Click Prev to return to the previous screen. Click Next to proceed. Click Cancel to close the wizard without saving. Figure 21 Wizard: Uplink 3.2.4 Radio Use this screen to configure the NWA/WAC’s radio transmitter(s). • Channel Selection: Select Auto to have the NWA/WAC automatically choose a radio channel that has least interference. -
Page 50: Ssid
Chapter 3 Setup Wizard Figure 22 Wizard: Radio 3.2.5 SSID Use this screen to enable, disable or edit an SSID profile. Select an SSID profile and click the Activate icon to turn it on or click the Inactivate icon to turn it off. To change an SSID profile’s settings, such as the SSID (WiFi network name) and WiFi password, select the SSID profile from the list and click the Edit icon. - Page 51 Chapter 3 Setup Wizard The screen varies depending on the security type you selected. • SSID - Enter a descriptive name of up to 32 printable characters for the wireless LAN. • VLAN ID: Enter a VLAN ID for the NWA/WAC to use to tag traffic originating from this SSID. •...
-
Page 52: Summary
Chapter 3 Setup Wizard Figure 25 Wizard: SSID: Edit (802.1x) 3.2.6 Summary Use this screen to check whether what you have configured is correct. Click Save to apply your settings and complete the wizard setup. Otherwise, click Prev to return to the previous screen or click Cancel to close the wizard without saving. -
Page 53: Technical Reference
Technical Reference... -
Page 54: Dashboard
H A P T E R Dashboard 4.1 Overview Use the Dashboard screens to check status information about the NWA/WAC. 4.1.1 What You Can Do in this Chapter • The main Dashboard screen (Section 4.2 on page 54) displays the NWA/WAC’s general device information, system status, system resource usage, and interface status. - Page 55 Chapter 4 Dashboard Figure 27 Dashboard The following table describes the labels in this screen. Table 23 Dashboard LABEL DESCRIPTION Widget Settings (A) Use this link to re-open closed widgets. Widgets that are already open appear grayed out. Refresh Time Setting Set the interval for refreshing the information displayed in the widget.
- Page 56 Chapter 4 Dashboard Table 23 Dashboard (continued) LABEL DESCRIPTION Last Firmware This field displays the date and time when the last firmware update was made. Upgrade System Resources CPU Usage This field displays what percentage of the NWA/WAC’s processing capability is currently being used.
- Page 57 Chapter 4 Dashboard Table 23 Dashboard (continued) LABEL DESCRIPTION Boot Status This field displays details about the NWA/WAC’s startup state. OK - The NWA/WAC started up successfully. Firmware update OK - A firmware update was successful. Problematic configuration after firmware update - The application of the configuration failed after a firmware upgrade.
-
Page 58: Cpu Usage
Chapter 4 Dashboard Table 23 Dashboard (continued) LABEL DESCRIPTION WLAN Interface This displays status information for the WLAN interface. Status Summary Status This displays whether or not the WLAN interface is activated. MAC Address This displays the MAC address of the radio. Radio This indicates the radio number on the NWA/WAC. -
Page 59: Memory Usage
Chapter 4 Dashboard The following table describes the labels in this screen. Table 24 Dashboard > CPU Usage LABEL DESCRIPTION The y-axis represents the percentage of CPU usage. time The x-axis shows the time period over which the CPU usage occurred Refresh Interval Enter how often you want this window to be automatically updated. -
Page 60: Monitor
H A P T E R Monitor 5.1 Overview Use the Monitor screens to check status and statistics information. 5.1.1 What You Can Do in this Chapter • The Network Status screen (Section 5.3 on page 61) displays general LAN interface information and packet statistics. -
Page 61: Network Status
Chapter 5 Monitor 5.3 Network Status Use this screen to look at general Ethernet interface information and packet statistics. To access this screen, click Monitor > Network Status. The screen varies depending on whether the NWA/WAC has an extra Ethernet port (except the uplink port). Figure 30 Monitor >... - Page 62 Chapter 5 Monitor The following table describes the labels in this screen. Table 26 Monitor > Network Status LABEL DESCRIPTION Interface Use the Interface Summary section for IPv4 network settings. Use the IPv6 Interface Summary Summary section for IPv6 network settings if you connect your NWA/WAC to an IPv6 network. Both sections have similar fields as described below.
-
Page 63: Port Statistics Graph
Chapter 5 Monitor Table 26 Monitor > Network Status (continued) LABEL DESCRIPTION This field displays the reception speed, in bytes per second, on the physical port in the one- second interval before the screen updated. Up Time This field displays how long the physical port has been connected. System Up Time This field displays how long the NWA/WAC has been running since it last restarted or was turned 5.3.1 Port Statistics Graph... -
Page 64: Radio List
Chapter 5 Monitor Table 27 Monitor > Network Status > Switch to Graphic View (continued) LABEL DESCRIPTION This line represents the traffic received by the NWA/WAC on the physical port since it was last connected. Last Update This field displays the date and time the information in the window was last updated. 5.4 Radio List Use this screen to view statistics for the NWA/WAC’s wireless radio transmitters. -
Page 65: Ap Mode Radio Information
Chapter 5 Monitor Table 28 Monitor > Wireless > AP Information > Radio List (continued) LABEL DESCRIPTION Loading This indicates the AP’s load balance status (UnderLoad or OverLoad) when load balancing is enabled on the NWA/WAC. Otherwise, it shows - when load balancing is disabled or the radio is in monitor mode. - Page 66 Chapter 5 Monitor Figure 35 Monitor > Wireless > AP Information > Radio List > More Information The following table describes the labels in this screen. Table 29 Monitor > Wireless > AP Information > Radio List > More Information LABEL DESCRIPTION SSID Detail...
-
Page 67: Station List
Chapter 5 Monitor Table 29 Monitor > Wireless > AP Information > Radio List > More Information (continued) LABEL DESCRIPTION SSID Name This displays an SSID associated with this radio. There can be up to eight maximum. BSSID This displays a BSSID associated with this radio. The BSSID is tied to the SSID. Security This displays the security mode in which the SSID is operating. -
Page 68: Wds Link Info
Chapter 5 Monitor Table 30 Monitor > Wireless > Station Info (continued) LABEL DESCRIPTION SSID Name This indicates the name of the wireless network to which the station is connected. A single AP can have multiple SSIDs or networks. Security Mode This indicates which secure encryption methods is being used by the station to connect to the network. -
Page 69: Detected Device
Chapter 5 Monitor Table 31 Monitor > Wireless > WDS Link Info (continued) LABEL DESCRIPTION MAC Address This is the MAC address of the root AP or repeater to which the NWA/WAC is connected using WDS. Radio This is the radio number on the root AP or repeater to which the NWA/WAC is connected using WDS. - Page 70 Chapter 5 Monitor Figure 38 Monitor > Wireless > Detected Device (for NWA/WAC that supports Monitor mode) NWA / WAC Series User’s Guide...
- Page 71 Chapter 5 Monitor Figure 39 Monitor > Wireless > Detected Device (for NWA/WAC that doesn’t support Monitor mode) The following table describes the labels in this screen. Table 32 Monitor > Wireless > Detected Device LABEL DESCRIPTION Discovered APs Rogue AP This shows how many devices are detected as rogue APs.
-
Page 72: View Log
Chapter 5 Monitor Table 32 Monitor > Wireless > Detected Device (continued) LABEL DESCRIPTION Mark as Rogue Click this button to mark the selected AP as a rogue AP. A rogue AP can be contained in the Configuration > Wireless > Rogue AP screen (Section 7.3 on page 88). - Page 73 Chapter 5 Monitor Figure 40 Monitor > Log > View Log The following table describes the labels in this screen. Table 33 Monitor > Log > View Log LABEL DESCRIPTION Show Filter / Hide Click this button to show or hide the filter settings. Filter If the filter settings are hidden, the Display, Email Log Now, Refresh, and Clear Log fields are available.
- Page 74 Chapter 5 Monitor Table 33 Monitor > Log > View Log (continued) LABEL DESCRIPTION Destination This displays when you show the filter. Type the IP address of the destination of the incoming Address packet when the log message was generated. Do not include the port in this filter. Source Interface This displays when you show the filter.
-
Page 75: Network
H A P T E R Network 6.1 Overview This chapter describes how you can configure the management IP address and VLAN settings of your NWA/WAC. The Internet Protocol (IP) address identifies a device on a network. Every networking device (including computers, servers, routers, printers, etc.) needs an IP address to communicate across the network. -
Page 76: Capwap Discovery And Management
Chapter 6 Network Figure 42 CAPWAP Network Example Note: The NWA/WAC can be a standalone AP (default), or a CAPWAP managed AP. CAPWAP Discovery and Management The link between CAPWAP-enabled access points proceeds as follows: An AP in managed AP mode joins a wired network (receives a dynamic IP address). The AP sends out a discovery request, looking for a CAPWAP AP controller. -
Page 77: What You Can Do In This Chapter
Chapter 6 Network • Broadcasting to discover the controller within the broadcast domain. Note: The AP controller needs to have a static IP address. If it is a DHCP client, set the DHCP server to reserve an IP address for the AP controller. CAPWAP and IP Subnets By default, CAPWAP works only between devices with IP addresses in the same subnet. -
Page 78: Ip Setting
Chapter 6 Network 6.2 IP Setting Use this screen to configure the IP address for your NWA/WAC. To access this screen, click Configuration > Network > IP Setting. Figure 44 Configuration > Network > IP Setting Each field is described in the following table. Table 34 Configuration >... -
Page 79: Vlan
Chapter 6 Network Table 34 Configuration > Network > IP Setting (continued) LABEL DESCRIPTION IPv6 Address Assignment Enable Stateless Select this to enable IPv6 stateless auto-configuration on the NWA/WAC. The NWA/WAC will Address Auto- generate an IPv6 address itself from a prefix obtained from an IPv6 router in the network. configuration (SLAAC) Link-Local... - Page 80 Chapter 6 Network Figure 45 Management VLAN Setup In the figure above, to access and manage the NWA/WAC from computer A, the NWA/WAC and switch B’s ports to which computer A and the NWA/WAC are connected should be in the same VLAN. A Virtual Local Area Network (VLAN) allows a physical network to be partitioned into multiple logical networks.
- Page 81 Chapter 6 Network Figure 46 Configuration > Network > VLAN (for NWA/WAC with multiple Ethernet ports) Figure 47 Configuration > Network > VLAN (for NWA/WAC with one Ethernet port) Each field is described in the following table. Table 35 Configuration > Network > VLAN LABEL DESCRIPTION VLAN Settings...
-
Page 82: Ac (Ap Controller) Discovery
Chapter 6 Network Table 35 Configuration > Network > VLAN (continued) LABEL DESCRIPTION Status This field indicates whether the port is enabled (a yellow bulb) or not (a gray bulb). Port This field displays the name of the port. PVID This field displays the port number of the VLAN ID. - Page 83 Chapter 6 Network Figure 48 Configuration > Network > AC Discovery Each field is described in the following table. Table 36 Configuration > Network > AC Discovery LABEL DESCRIPTION Discovery Setting Auto Select this option to use DHCP option 138/DNS SRV record/Broadcast to get the AP controller’s IP address.
-
Page 84: Wireless
H A P T E R Wireless 7.1 Overview This chapter discusses how to configure the wireless network settings in your NWA/WAC. The following figure provides an example of a wireless network. Figure 49 Example of a Wireless Network The wireless network is the part in the blue circle. In this wireless network, devices A and B are called wireless clients. -
Page 85: What You Need To Know
Chapter 7 Wireless 7.1.2 What You Need to Know The following terms and concepts may help as you read this chapter. Station / Wireless Client A station or wireless client is any wireless-capable device that can connect to an AP using a wireless signal. - Page 86 Chapter 7 Wireless Figure 50 Configuration > Wireless > AP Management Each field is described in the following table. Table 37 Configuration > Wireless > AP Management LABEL DESCRIPTION Radio 1 Setting Radio 1 Activate Select the check box to enable the NWA/WAC’s first (default) radio. NWA / WAC Series User’s Guide...
- Page 87 Chapter 7 Wireless Table 37 Configuration > Wireless > AP Management (continued) LABEL DESCRIPTION Radio 1 OP Mode Select the operating mode for radio 1. AP Mode means the radio can receive connections from wireless clients and pass their data traffic through to the NWA/WAC to be managed (or subsequently passed on to an upstream gateway for managing).
-
Page 88: Rogue Ap
Chapter 7 Wireless Table 37 Configuration > Wireless > AP Management (continued) LABEL DESCRIPTION Radio 2 OP Mode This displays if the NWA/WAC has a second radio. Select the operating mode for radio 2. AP Mode means the radio can receive connections from wireless clients and pass their data traffic through to the NWA/WAC to be managed (or subsequently passed on to an upstream gateway for managing). - Page 89 Chapter 7 Wireless Figure 51 Configuration > Wireless > Rogue AP (for NWA/WAC that supports Monitor mode) Figure 52 Configuration > Wireless > Rogue AP (for NWA/WAC that doesn’t support Monitor mode) NWA / WAC Series User’s Guide...
-
Page 90: Add/Edit Rogue/Friendly List
Chapter 7 Wireless Each field is described in the following table. Table 38 Configuration > Wireless > Rogue AP LABEL DESCRIPTION Rogue AP Detection Setting Enable Rogue AP Select this option to detect Rogue APs in the network. Detection Suspected Rogue AP Click the check boxes (Weak Security (Open, WEP, WPA-PSK), Hidden SSID, SSID Classification Rule Keyword) of the characteristics an AP should have for the NWA/WAC to rule it as a... -
Page 91: Load Balancing
Chapter 7 Wireless Figure 53 Configuration > Wireless > Rogue AP > Add/Edit Rogue/Friendly AP List Each field is described in the following table. Table 39 Configuration > Wireless > Rogue AP > Add/Edit Rogue/Friendly AP List LABEL DESCRIPTION Enter the MAC address of the AP you want to add to the list. A MAC address is a unique hardware identifier in the following hexadecimal format: xx:xx:xx:xx:xx:xx where xx is a hexadecimal number separated by colons. - Page 92 Chapter 7 Wireless Each field is described in the following table. Table 40 Configuration > Wireless > Load Balancing LABEL DESCRIPTION Enable Load Select this to enable load balancing on the NWA/WAC. Balancing Use this section to configure wireless network traffic load balancing between the managed APs in this group.
-
Page 93: Disassociating And Delaying Connections
Chapter 7 Wireless 7.4.1 Disassociating and Delaying Connections When your AP becomes overloaded, there are two basic responses it can take. The first one is to “delay” a client connection. This means that the AP withholds the connection until the data transfer throughput is lowered or the client connection is picked up by another AP. -
Page 94: Dcs
Chapter 7 Wireless Connections are kicked based on either idle timeout or signal strength. The NWA/WAC first looks to see which devices have been idle the longest, then starts kicking them in order of highest idle time. If no connections are idle, the next criteria the NWA/WAC analyzes is signal strength. Devices with the weakest signal strength are kicked first. - Page 95 Chapter 7 Wireless Figure 58 An Example Three-Channel Deployment Three channels are situated in such a way as to create almost no interference with one another if used exclusively: 1, 6 and 11. When an AP broadcasts on any of these three channels, it should not interfere with neighboring APs as long as they are also limited to same trio.
- Page 96 Chapter 7 Wireless available bandwidth to the point where each connecting device receives a meager trickle, the load balanced AP instead limits the incoming connections as a means to maintain bandwidth integrity. There are three kinds of wireless load balancing available on the NWA/WAC: Load balancing by station number limits the number of devices allowed to connect to your AP.
-
Page 97: Bluetooth
H A P T E R Bluetooth 8.1 Overview Use this screen to configure the Bluetooth advertising settings for the NWA/WAC that supports Bluetooth Low Energy (BLE). Bluetooth Low Energy, which is also known as Bluetooth Smart, transmits less data over a shorter distance and consumes less power than classic Bluetooth. -
Page 98: Edit Advertising Settings
Chapter 8 Bluetooth Figure 61 Configuration > Bluetooth > Advertising Settings The following table describes the labels in this screen. Table 42 Configuration > Bluetooth > Advertising Settings LABEL DESCRIPTION Edit Click this to edit the selected entry. Activate To turn on an entry, select it and click Activate. Inactivate To turn off an entry, select it and click Inactivate. - Page 99 Chapter 8 Bluetooth The following table describes the labels in this screen. Table 43 Configuration > Bluetooth > Advertising Settings > Edit LABEL DESCRIPTION Activate Select this option to enable the advertising settings. UUID To specify a UUID of the NWA/WAC’s beacon ID, enter 32 hexadecimal digits in the range of “A-F”, “a-f”...
-
Page 100: User
H A P T E R User 9.1 Overview This chapter describes how to set up user accounts and user settings for the NWA/WAC. 9.1.1 What You Can Do in this Chapter • The User screen (see Section 9.2 on page 101) provides a summary of all user accounts. -
Page 101: User Summary
Chapter 9 User 9.2 User Summary The User screen provides a summary of all user accounts. To access this screen click Configuration > Object > User. Figure 63 Configuration > Object > User The following table describes the labels in this screen. Table 45 Configuration >... - Page 102 Chapter 9 User • - [dashes] The first character must be alphabetical (A-Z a-z), an underscore (_), or a dash (-). Other limitations on user names are: • User names are case-sensitive. If you enter a user 'bob' but use 'BOB' when connecting via CIFS or FTP, it will use the account settings used for 'BOB' not ‘bob’.
-
Page 103: Setting
Chapter 9 User Table 46 Configuration > User > User > Add/Edit A User (continued) LABEL DESCRIPTION Authentication This field is not available if the user type is user. Timeout Settings If you want to set authentication timeout to a value other than the default settings, select Use Manual Settings then fill your preferred values in the fields that follow. - Page 104 Chapter 9 User Figure 65 Configuration > Object > User > Setting The following table describes the labels in this screen. Table 47 Configuration > Object > User > Setting LABEL DESCRIPTION User Default Setting Default Authentication These authentication timeout settings are used by default when you create a new Timeout Settings user account.
-
Page 105: Edit User Authentication Timeout Settings
Chapter 9 User Table 47 Configuration > Object > User > Setting (continued) LABEL DESCRIPTION Limit the number of Select this check box if you want to set a limit on the number of simultaneous logins simultaneous logons for by admin users. If you do not select this, admin users can login as many times as they administration account want at the same time using the same or different IP addresses. - Page 106 Chapter 9 User The following table describes the labels in this screen. Table 48 User > Setting > Edit User Authentication Timeout Settings LABEL DESCRIPTION User Type This read-only field identifies the type of user account for which you are configuring the default settings.
-
Page 107: Ap Profile
H A P T E R AP Profile 10.1 Overview This chapter shows you how to configure preset profiles for the NWA/WAC. 10.1.1 What You Can Do in this Chapter • The Radio screen (Section 10.2 on page 108) creates radio configurations that can be used by the APs. -
Page 108: Radio
Chapter 10 AP Profile WEP (Wired Equivalent Privacy) encryption scrambles all data packets transmitted between the AP and the wireless stations associated with it in order to keep network communications private. Both the wireless stations and the access points must use the same WEP key for data encryption and decryption. WPA2 WPA2 (IEEE 802.11i) is a wireless security standard that defines stronger encryption, authentication and key management than WPA. -
Page 109: Add/Edit Radio Profile
Chapter 10 AP Profile Table 49 Configuration > Object > AP Profile > Radio (continued) LABEL DESCRIPTION Inactivate To turn off an entry, select it and click Inactivate. Object Click this to view which other objects are linked to the selected radio profile. Reference This field is a sequential value, and it is not associated with a specific user. - Page 110 Chapter 10 AP Profile Figure 68 Configuration > Object > AP Profile > Add/Edit Profile The following table describes the labels in this screen. Table 50 Configuration > Object > AP Profile > Add/Edit Profile LABEL DESCRIPTION Hide / Show Click this to hide or show the Advanced Settings in this window.
- Page 111 Chapter 10 AP Profile Table 50 Configuration > Object > AP Profile > Add/Edit Profile (continued) LABEL DESCRIPTION Profile Name Enter up to 31 alphanumeric characters to be used as this profile’s name. Spaces and underscores are allowed. 802.11 Band Select the wireless band which this radio profile should use.
- Page 112 Chapter 10 AP Profile Table 50 Configuration > Object > AP Profile > Add/Edit Profile (continued) LABEL DESCRIPTION 2.4 GHz Channel This is available when the 2.4 GHz Channel Selection Method is set to auto. Deployment Select Three-Channel Deployment to limit channel switching to channels 1,6, and 11, the three channels that are sufficiently attenuated to have almost no impact on one another.
- Page 113 Chapter 10 AP Profile Table 50 Configuration > Object > AP Profile > Add/Edit Profile (continued) LABEL DESCRIPTION Enable A-MPDU Select this to enable A-MPDU aggregation. This field is not available if you set 802.11 Band Aggregation to 11a or 11b/g. Message Protocol Data Unit (MPDU) aggregation collects Ethernet frames along with their 802.11n headers and wraps them in a 802.11n MAC header.
-
Page 114: Ssid
Chapter 10 AP Profile Table 50 Configuration > Object > AP Profile > Add/Edit Profile (continued) LABEL DESCRIPTION Transmission Specify how the NWA/WAC handles wireless multicast traffic. Mode Select Multicast to Unicast to broadcast wireless multicast traffic to all of the wireless clients as unicast traffic. -
Page 115: Add/Edit Ssid Profile
Chapter 10 AP Profile Figure 70 Configuration > Object > AP Profile > SSID > SSID List (After wizard setup) The following table describes the labels in this screen. Table 51 Configuration > Object > AP Profile > SSID List LABEL DESCRIPTION Click this to add a new SSID profile. - Page 116 Chapter 10 AP Profile Figure 71 Configuration > Object > AP Profile > Add/Edit SSID Profile The following table describes the labels in this screen. Table 52 Configuration > Object > AP Profile > Add/Edit SSID Profile LABEL DESCRIPTION Create new Select an object type from the list to create a new one associated with this SSID profile.
- Page 117 Chapter 10 AP Profile Table 52 Configuration > Object > AP Profile > Add/Edit SSID Profile (continued) LABEL DESCRIPTION Layer-2 Isolation Select a layer-2 isolation profile from the list to associate with this SSID. If none exist, you can use Profile the Create new Object menu to create one.
-
Page 118: Security List
Chapter 10 AP Profile 10.4 Security List This screen allows you to manage wireless security configurations that can be used by your SSIDs. Wireless security is implemented strictly between the AP broadcasting the SSID and the stations that are connected to it. To access this screen click Configuration >... - Page 119 Chapter 10 AP Profile Figure 73 Configuration > Object > AP Profile > SSID > Security List > Add/Edit Security Profile The following table describes the labels in this screen. Table 54 Configuration > Object > AP Profile > SSID > Security List > Add/Edit Security Profile LABEL DESCRIPTION Profile Name...
- Page 120 Chapter 10 AP Profile Table 54 Configuration > Object > AP Profile > SSID > Security List > Add/Edit Security Profile (continued) LABEL DESCRIPTION Primary / Secondary Select this to have the NWA/WAC use the specified RADIUS server. Radius Server Activate Radius Server IP Enter the IP address of the RADIUS server to be used for authentication.
-
Page 121: Mac Filter List
Chapter 10 AP Profile Table 54 Configuration > Object > AP Profile > SSID > Security List > Add/Edit Security Profile (continued) LABEL DESCRIPTION This field is available when you select the wpa2, or wpa2-mix security mode. Select this option to use a Pre-Shared Key with WPA2 encryption. Pre-Shared Key Enter a pre-shared key of between 8 and 63 case-sensitive ASCII characters (including spaces and symbols) or 64 hexadecimal characters. -
Page 122: Add/Edit Mac Filter Profile
Chapter 10 AP Profile Figure 74 Configuration > Object > AP Profile > SSID > MAC Filter List The following table describes the labels in this screen. Table 55 Configuration > Object > AP Profile > SSID > MAC Filter List LABEL DESCRIPTION Click this to add a new MAC filtering profile. -
Page 123: Layer-2 Isolation List
Chapter 10 AP Profile The following table describes the labels in this screen. Table 56 Configuration > Object > AP Profile > SSID > MAC Filter List > Add/Edit MAC Filter Profile LABEL DESCRIPTION Profile Name Enter up to 31 alphanumeric characters for the profile name. This name is only visible in the Web Configurator and is only for management purposes. -
Page 124: Add/Edit Layer-2 Isolation Profile
Chapter 10 AP Profile MAC addresses that are not listed in the layer-2 isolation table are blocked from communicating with the NWA/WAC’s wireless clients except for broadcast packets. Layer-2 isolation does not check the traffic between wireless clients that are associated with the same AP. Intra-BSS traffic allows wireless clients associated with the same AP to communicate with each other. - Page 125 Chapter 10 AP Profile Figure 78 Configuration > Object > AP Profile > SSID > Layer-2 Isolation List > Add/Edit Layer-2 Isolation Profile The following table describes the labels in this screen. Table 58 Configuration > Object > AP Profile > SSID > Layer-2 Isolation List > Add/Edit Layer-2 Isolation Profile LABEL DESCRIPTION...
-
Page 126: Mon Profile
H A P T E R MON Profile 11.1 Overview This screen allows you to set up monitor mode configurations that allow your NWA/WAC to scan for other wireless devices in the vicinity. Once detected, you can use the Wireless > MON Mode screen (Section 7.3 on page 88) to classify them as either rogue or friendly. -
Page 127: Add/Edit Mon Profile
Chapter 11 MON Profile Table 59 Configuration > Object > MON Profile (continued) LABEL DESCRIPTION Object Click this to view which other objects are linked to the selected monitor mode profile (for Reference example, an AP management profile). This field is a sequential value, and it is not associated with a specific profile. Status This field shows whether or not the entry is activated. -
Page 128: Technical Reference
Chapter 11 MON Profile The following table describes the labels in this screen. Table 60 Configuration > Object > MON Profile > Add/Edit MON Profile LABEL DESCRIPTION Activate Select this to activate this monitor mode profile. Profile Name This field indicates the name assigned to the monitor mode profile. Channel dwell time Enter the interval (in milliseconds) before the NWA/WAC switches to another channel for monitoring. - Page 129 Chapter 11 MON Profile Figure 81 Rogue AP Example In the example above, a corporate network’s security is compromised by a rogue AP (RG) set up by an employee at his workstation in order to allow him to connect his notebook computer wirelessly (A). The company’s legitimate wireless network (the dashed ellipse B) is well-secured, but the rogue AP uses inferior security that is easily broken by an attacker (X) running readily available encryption-cracking software.
-
Page 130: Wds Profile
H A P T E R WDS Profile 12.1 Overview This chapter shows you how to configure WDS (Wireless Distribution System) profiles for the NWA/WAC to form a WDS with other APs. 12.1.1 What You Can Do in this Chapter The WDS Profile screen (Section 12.2 on page 130) creates preset WDS configurations that can be used... -
Page 131: Add/Edit Wds Profile
Chapter 12 WDS Profile 12.2.1 Add/Edit WDS Profile This screen allows you to create a new WDS profile or edit an existing one. To access this screen, click the Add button or select and existing profile and click the Edit button. Figure 83 Configuration >... -
Page 132: Certificates
H A P T E R Certificates 13.1 Overview The NWA/WAC can use certificates (also called digital IDs) to authenticate users. Certificates are based on public-private key pairs. A certificate contains the certificate owner’s identity and public key. Certificates provide a way to exchange public keys for use in authentication. 13.1.1 What You Can Do in this Chapter •... - Page 133 Chapter 13 Certificates Additionally, Jenny uses her own private key to sign a message and Tim uses Jenny’s public key to verify the message. The NWA/WAC uses certificates based on public-key cryptology to authenticate users attempting to establish a connection, not to encrypt the data that you send after establishing a connection. The method used to secure the data that you send through an established connection depends on the type of connection.
-
Page 134: Verifying A Certificate
Chapter 13 Certificates • Binary PKCS#12: This is a format for transferring public key and private key certificates.The private key in a PKCS #12 file is within a password-encrypted envelope. The file’s password is not connected to your certificate’s public or private passwords. Exporting a PKCS #12 file creates this and you must provide it to decrypt the contents when you import the file into the NWA/WAC. -
Page 135: My Certificates
Chapter 13 Certificates 13.2 My Certificates Click Configuration > Object > Certificate > My Certificates to open this screen. This is the NWA/WAC’s summary list of certificates and certification requests. Figure 84 Configuration > Object > Certificate > My Certificates The following table describes the labels in this screen. -
Page 136: Add My Certificates
Chapter 13 Certificates Table 63 Configuration > Object > Certificate > My Certificates (continued) LABEL DESCRIPTION Issuer This field displays identifying information about the certificate’s issuing certification authority, such as a common name, organizational unit or department, organization or company and country. - Page 137 Chapter 13 Certificates The following table describes the labels in this screen. Table 64 Configuration > Object > Certificate > My Certificates > Add LABEL DESCRIPTION Name Type a name to identify this certificate. You can use up to 31 alphanumeric and ;‘~!@#$%^&()_+[]{}’,.=- characters.
-
Page 138: Edit My Certificates
Chapter 13 Certificates Table 64 Configuration > Object > Certificate > My Certificates > Add (continued) LABEL DESCRIPTION Create a certification Select this to have the NWA/WAC generate a request for a certificate and apply to a request and enroll for certification authority for a certificate. - Page 139 Chapter 13 Certificates Figure 86 Configuration > Object > Certificate > My Certificates > Edit NWA / WAC Series User’s Guide...
- Page 140 Chapter 13 Certificates The following table describes the labels in this screen. Table 65 Configuration > Object > Certificate > My Certificates > Edit LABEL DESCRIPTION Name This field displays the identifying name of this certificate. You can use up to 31 alphanumeric and ;‘~!@#$%^&()_+[]{}’,.=- characters.
-
Page 141: Import Certificates
Chapter 13 Certificates Table 65 Configuration > Object > Certificate > My Certificates > Edit LABEL DESCRIPTION MD5 Fingerprint This is the certificate’s message digest that the NWA/WAC calculated using the MD5 algorithm. SHA1 Fingerprint This is the certificate’s message digest that the NWA/WAC calculated using the SHA1 algorithm. -
Page 142: Trusted Certificates
Chapter 13 Certificates Figure 87 Configuration > Object > Certificate > My Certificates > Import The following table describes the labels in this screen. Table 66 Configuration > Object > Certificate > My Certificates > Import LABEL DESCRIPTION File Path Type in the location of the file you want to upload in this field or click Browse to find it. -
Page 143: Edit Trusted Certificates
Chapter 13 Certificates Figure 88 Configuration > Object > Certificate > Trusted Certificates The following table describes the labels in this screen. Table 67 Configuration > Object > Certificate > Trusted Certificates LABEL DESCRIPTION PKI Storage Space This bar displays the percentage of the NWA/WAC’s PKI storage space that is currently in use. in Use When the storage space is almost full, you should consider deleting expired or unnecessary certificates before adding more certificates. - Page 144 Chapter 13 Certificates Figure 89 Configuration > Object > Certificate > Trusted Certificates > Edit NWA / WAC Series User’s Guide...
- Page 145 Chapter 13 Certificates The following table describes the labels in this screen. Table 68 Configuration > Object > Certificate > Trusted Certificates > Edit LABEL DESCRIPTION Name This field displays the identifying name of this certificate. You can change the name. You can use up to 31 alphanumeric and ;‘~!@#$%^&()_+[]{}’,.=- characters.
-
Page 146: Import Trusted Certificates
Chapter 13 Certificates Table 68 Configuration > Object > Certificate > Trusted Certificates > Edit (continued) LABEL DESCRIPTION Valid From This field displays the date that the certificate becomes applicable. The text displays in red and includes a Not Yet Valid! message if the certificate has not yet become applicable. Valid To This field displays the date that the certificate expires. -
Page 147: Technical Reference
Chapter 13 Certificates Figure 90 Configuration > Object > Certificate > Trusted Certificates > Import The following table describes the labels in this screen. Table 69 Configuration > Object > Certificate > Trusted Certificates > Import LABEL DESCRIPTION File Path Type in the location of the file you want to upload in this field or click Browse to find it. -
Page 148: System
H A P T E R System 14.1 Overview Use the system screens to configure general NWA/WAC settings. 14.1.1 What You Can Do in this Chapter • The Host Name screen (Section 14.2 on page 148) configures a unique name for the NWA/WAC in your network. -
Page 149: Date And Time
Chapter 14 System The following table describes the labels in this screen. Table 70 Configuration > System > Host Name LABEL DESCRIPTION System Name Choose a descriptive name to identify your NWA/WAC device. This name can be up to 64 alphanumeric characters long. - Page 150 Chapter 14 System Figure 92 Configuration > System > Date/Time The following table describes the labels in this screen. Table 71 Configuration > System > Date/Time LABEL DESCRIPTION Current Time and Date Current Time This field displays the present time of your NWA/WAC. Current Date This field displays the present date of your NWA/WAC.
- Page 151 Chapter 14 System Table 71 Configuration > System > Date/Time (continued) LABEL DESCRIPTION Get from Time Select this radio button to have the NWA/WAC get the time and date from the time server Server you specify below. The NWA/WAC requests time and date settings from the time server under the following circumstances.
-
Page 152: Pre-Defined Ntp Time Servers List
Chapter 14 System 14.3.1 Pre-defined NTP Time Servers List When you turn on the NWA/WAC for the first time, the date and time start at 2003-01-01 00:00:00. The NWA/WAC then attempts to synchronize with one of the following pre-defined list of Network Time Protocol (NTP) time servers. -
Page 153: Www Overview
Chapter 14 System To get the NWA/WAC date and time from a time server: Click System > Date/Time. Select Get from Time Server under Time and Date Setup. Under Time Zone Setup, select your Time Zone from the list. Under Time and Date Setup, enter a Time Server Address. Click Apply. -
Page 154: Https
Chapter 14 System 14.4.3 HTTPS You can set the NWA/WAC to use HTTP or HTTPS (HTTPS adds security) for Web Configurator sessions. HTTPS (HyperText Transfer Protocol over Secure Socket Layer, or HTTP over SSL) is a web protocol that encrypts and decrypts web pages. Secure Socket Layer (SSL) is an application-level protocol that enables secure transactions of data by ensuring confidentiality (an unauthorized party cannot read the transferred data), authentication (one party can identify the other party) and data integrity (you know if data has been changed). -
Page 155: Https Example
Chapter 14 System Figure 96 Configuration > System > WWW > Service Control The following table describes the labels in this screen. Table 73 Configuration > System > WWW > Service Control LABEL DESCRIPTION HTTPS Enable Select the check box to allow or disallow the computer with the IP address that matches the IP address(es) in the Service Control table to access the NWA/WAC Web Configurator using secure HTTPs connections. - Page 156 Chapter 14 System 14.4.5.1 Internet Explorer Warning Messages When you attempt to access the NWA/WAC HTTPS server, you will see the error message shown in the following screen. Figure 97 Security Alert Dialog Box (Internet Explorer) Select Continue to this website. to proceed to the Web Configurator login screen. Otherwise, select Click here to close this webpage.
- Page 157 Chapter 14 System Figure 98 Security Certificate 1 (Firefox) Figure 99 Security Certificate 2 (Firefox) 14.4.5.3 Avoiding Browser Warning Messages Here are the main reasons your browser displays warnings about the NWA/WAC’s HTTPS server certificate and what you can do to avoid seeing the warnings: •...
- Page 158 Chapter 14 System • For the browser to trust a self-signed certificate, import the self-signed certificate into your operating system as a trusted certificate. • To have the browser trust the certificates issued by a certificate authority, import the certificate authority’s certificate into your operating system as a trusted certificate.
- Page 159 Chapter 14 System 14.4.5.5 Installing the CA’s Certificate Double click the CA’s trusted certificate to produce a screen similar to the one shown next. Click Install Certificate and follow the wizard as shown. 14.4.5.6 Installing a Personal Certificate You need a password in advance. The CA may issue the password or you may have to specify it during the enrollment.
- Page 160 Chapter 14 System Click Next to begin the wizard. The file name and path of the certificate you double-clicked should automatically appear in the File name text box. Click Browse if you wish to import a different certificate. NWA / WAC Series User’s Guide...
- Page 161 Chapter 14 System Enter the password given to you by the CA. Have the wizard determine where the certificate should be saved on your computer or select Place all certificates in the following store and choose a different location. NWA / WAC Series User’s Guide...
- Page 162 Chapter 14 System Click Finish to complete the wizard and begin the import process. You should see the following screen when the certificate is correctly installed on your computer. 14.4.5.7 Using a Certificate When Accessing the NWA/WAC To access the NWA/WAC via HTTPS: Enter ‘https://NWA/WAC IP Address/’...
-
Page 163: Ssh
Chapter 14 System When Authenticate Client Certificates is selected on the NWA/WAC, the following screen asks you to select a personal certificate to send to the NWA/WAC. This screen displays even if you only have a single certificate as in the example. You next see the Web Configurator login screen. -
Page 164: Ssh Implementation On The Nwa/Wac
Chapter 14 System Figure 102 How SSH v1 Works Example Host Identification The SSH client sends a connection request to the SSH server. The server identifies itself with a host key. The client encrypts a randomly generated session key with the host key and server key and sends the result back to the server. -
Page 165: Requirements For Using Ssh
Chapter 14 System 14.5.3 Requirements for Using SSH You must install an SSH client program on a client computer (Windows or Linux operating system) that is used to connect to the NWA/WAC over SSH. 14.5.4 Configuring SSH Click Configuration > System > SSH to open the following screen. Use this screen to configure your NWA/ WAC’s Secure Shell settings. - Page 166 Chapter 14 System Launch the SSH client and specify the connection information (IP address, port number) for the NWA/ WAC. Configure the SSH client to accept connection using SSH version 1. A window displays prompting you to store the host key in you computer. Click Yes to continue. Figure 104 SSH Example 1: Store Host Key Enter the password to log in to the NWA/WAC.
-
Page 167: Telnet
Chapter 14 System The CLI screen displays next. 14.6 Telnet You can use Telnet to access the NWA/WAC’s command line interface. Click Configuration > System > TELNET to configure your NWA/WAC for remote Telnet access. Use this screen to enable or disable Telnet and set the server port number. -
Page 168: Snmp
Chapter 14 System Figure 108 Configuration > System > FTP The following table describes the labels in this screen. Table 76 Configuration > System > FTP LABEL DESCRIPTION Enable Select the check box to allow or disallow the computer with the IP address that matches the IP address(es) in the Service Control table to access the NWA/WAC using this service. -
Page 169: Supported Mibs
Chapter 14 System Figure 109 SNMP Management Model An SNMP managed network consists of two main types of component: agents and a manager. An agent is a management software module that resides in a managed device (the NWA/WAC). An agent translates the local management information from the managed device into a form compatible with SNMP. -
Page 170: Snmp Traps
Chapter 14 System administrators collect statistical data and monitor status and performance. You can download the NWA/WAC’s MIBs from www.zyxel.com. 14.8.2 SNMP Traps The NWA/WAC will send traps to the SNMP manager when any one of the following events occurs. Table 77 SNMP Traps OBJECT LABEL OBJECT ID... -
Page 171: Adding Or Editing An Snmpv3 User Profile
Chapter 14 System Table 78 Configuration > System > SNMP (continued) LABEL DESCRIPTION Community Type the trap community, which is the password sent with each trap to the SNMP manager. The default is public and allows all requests. Destination Type the IP address of the station to send your SNMP traps to. Trap Wireless Select this to have the NWA/WAC send a trap to the SNMP manager when a wireless client is Event... - Page 172 Chapter 14 System The following table describes the labels in this screen. Table 79 Configuration > System > SNMP LABEL DESCRIPTION User Name Select the user name of the user account for which this SNMPv3 user profile is configured. Authentication Select the type of authentication the SNMPv3 user must use to connect to the NWA/WAC using this SNMPv3 user profile.
-
Page 173: Log And Report
H A P T E R Log and Report 15.1 Overview Use the system screens to configure daily reporting and log settings. 15.1.1 What You Can Do In this Chapter • The Email Daily Report screen (Section 15.2 on page 173) configures how and where to send daily reports and what reports to send. - Page 174 Chapter 15 Log and Report Figure 112 Configuration > Log & Report > Email Daily Report The following table describes the labels in this screen. Table 80 Configuration > Log & Report > Email Daily Report LABEL DESCRIPTION Enable Email Select this to send reports by e-mail every day.
-
Page 175: Log Setting
Chapter 15 Log and Report Table 80 Configuration > Log & Report > Email Daily Report (continued) LABEL DESCRIPTION SSL/TLS Select SSL/TLS to use Secure Sockets Layer (SSL) or Transport Layer Security (TLS) if you want Encryption encrypted communications between the mail server and the NWA/WAC. Select STARTTLS to upgrade a plain text connection to a secure connection using SSL/TLS. -
Page 176: Log Setting Screen
Chapter 15 Log and Report Alternatively, if you want to edit what events is included in each log, you can also use the Active Log Summary screen to edit this information for all logs at the same time. 15.3.1 Log Setting Screen To access this screen, click Configuration >... -
Page 177: Edit System Log Settings
Chapter 15 Log and Report Table 81 Configuration > Log & Report > Log Setting (continued) LABEL DESCRIPTION Log Format This field displays the format of the log. Internal - system log; you can view the log on the View Log tab. VRPT/Syslog - Zyxel’s Vantage Report, syslog-compatible format. - Page 178 Chapter 15 Log and Report Figure 114 Configuration > Log & Report > Log Setting > Edit System Log Setting NWA / WAC Series User’s Guide...
- Page 179 Chapter 15 Log and Report The following table describes the labels in this screen. Table 82 Configuration > Log & Report > Log Setting > Edit System Log Setting LABEL DESCRIPTION E-Mail Server 1/2 Active Select this to send log messages and alerts according to the information in this section. You specify what kinds of log messages are included in log information and what kinds of log messages are included in alerts in the Active Log and Alert section.
- Page 180 Chapter 15 Log and Report Table 82 Configuration > Log & Report > Log Setting > Edit System Log Setting (continued) LABEL DESCRIPTION E-mail Server 1 Use the E-Mail Server 1 drop-down list to change the settings for e-mailing logs to e-mail server 1 for all log categories.
-
Page 181: Edit Remote Server
Chapter 15 Log and Report 15.3.3 Edit Remote Server This screen controls the settings for each log in the remote server (syslog). Select a remote server entry in the Log Setting screen and click the Edit icon. Figure 115 Configuration > Log & Report > Log Setting > Edit Remote Server NWA / WAC Series User’s Guide... -
Page 182: Active Log Summary
Chapter 15 Log and Report The following table describes the labels in this screen. Table 83 Configuration > Log & Report > Log Setting > Edit Remote Server LABEL DESCRIPTION Log Settings for Remote Server Active Select this check box to send log information according to the information in this section. You specify what kinds of messages are included in log information in the Active Log section. - Page 183 Chapter 15 Log and Report Figure 116 Active Log Summary This screen provides a different view and a different way of indicating which messages are included in each log and each alert. (The Default category includes debugging messages generated by open source software.) The following table describes the fields in this screen.
- Page 184 Chapter 15 Log and Report Table 84 Configuration > Log & Report > Log Setting > Active Log Summary (continued) LABEL DESCRIPTION E-mail Server 1 Use the E-Mail Server 1 drop-down list to change the settings for e-mailing logs to e-mail server 1 for all log categories.
-
Page 185: File Manager
H A P T E R File Manager 16.1 Overview Configuration files define the NWA/WAC’s settings. Shell scripts are files of commands that you can store on the NWA/WAC and run when you need them. You can apply a configuration file or run a shell script without the NWA/WAC restarting. -
Page 186: Configuration File
Chapter 16 File Manager While configuration files and shell scripts have the same syntax, the NWA/WAC applies configuration files differently than it runs shell scripts. This is explained below. Table 85 Configuration Files and Shell Scripts in the NWA/WAC Configuration Files (.conf) Shell Scripts (.zysh) •... - Page 187 Chapter 16 File Manager Once your NWA/WAC is configured and functioning properly, it is highly recommended that you back up your configuration file before making further configuration changes. The backup configuration file will be useful in case you need to return to your previous settings. Configuration File Flow at Restart •...
- Page 188 Chapter 16 File Manager The following table describes the labels in this screen. Table 86 Maintenance > File Manager > Configuration File LABEL DESCRIPTION Rename Use this button to change the label of a configuration file on the NWA/WAC. You can only rename manually saved configuration files.
- Page 189 Chapter 16 File Manager Table 86 Maintenance > File Manager > Configuration File (continued) LABEL DESCRIPTION Apply Use this button to have the NWA/WAC use a specific configuration file. Click a configuration file’s row to select it and click Apply to have the NWA/WAC use that configuration file.
-
Page 190: Example Of Configuration File Download Using Ftp
Chapter 16 File Manager Table 86 Maintenance > File Manager > Configuration File (continued) LABEL DESCRIPTION Last Modified This column displays the date and time that the individual configuration files were last changed or saved. Upload The bottom part of the screen allows you to upload a new or previously saved configuration file Configuration File from your computer to your NWA/WAC You cannot upload a configuration file named system-default.conf or lastgood.conf. -
Page 191: Firmware Package
Chapter 16 File Manager C:\>ftp 192.168.1.2 Connected to 192.168.1.2. 220---------- Welcome to Pure-FTPd [privsep] [TLS] ---------- 220-You are user number 1 of 5 allowed. 220-Local time is now 21:28. Server port: 21. 220-This is a private system - No anonymous login 220 You will be disconnected after 600 minutes of inactivity. -
Page 192: Example Of Firmware Upload Using Ftp
Chapter 16 File Manager Figure 119 Maintenance > File Manager > Firmware Package The following table describes the labels in this screen. Table 87 Maintenance > File Manager > Firmware Package LABEL DESCRIPTION Boot This is the version of the boot module that is currently on the NWA/WAC. Module Current This is the firmware version and the date created. -
Page 193: Shell Script
Chapter 16 File Manager The FTP server IP address of the NWA/WAC in standalone AP mode is 192.168.1.2, so set your computer to use a static IP address from 192.168.1.3 ~192.168.1.254. Use an FTP client on your computer to connect to the NWA/WAC. For example, in the Windows command prompt, type ftp 192.168.1.2. - Page 194 Chapter 16 File Manager Figure 121 Maintenance > File Manager > Shell Script Each field is described in the following table. Table 88 Maintenance > File Manager > Shell Script LABEL DESCRIPTION Rename Use this button to change the label of a shell script file on the NWA/WAC. You cannot rename a shell script to the name of another shell script in the NWA/WAC.
- Page 195 Chapter 16 File Manager Table 88 Maintenance > File Manager > Shell Script (continued) LABEL DESCRIPTION Browse... Click Browse... to find the .zysh file you want to upload. Upload Click Upload to begin the upload process. This process may take up to several minutes. NWA / WAC Series User’s Guide...
-
Page 196: Diagnostics
H A P T E R Diagnostics 17.1 Overview Use the diagnostics screen for troubleshooting. 17.1.1 What You Can Do in this Chapter • The Diagnostics screen (Section 17.2 on page 196) generates a file containing the NWA/WAC’s configuration and diagnostic information if you need to provide it to customer support during troubleshooting. - Page 197 Chapter 17 Diagnostics The following table describes the labels in this screen. Table 89 Maintenance > Diagnostics LABEL DESCRIPTION Filename This is the name of the most recently created diagnostic file. Last modified This is the date and time that the last diagnostic file was created. The format is yyyy-mm-dd hh:mm:ss.
-
Page 198: Leds
H A P T E R LEDs 18.1 Overview The LEDs of your NWA/WAC can be controlled such that they stay lit (ON) or OFF after the NWA/WAC is ready. There are two features that control the LEDs of your NWA/WAC - Locator and Suppression. 18.1.1 What You Can Do in this Chapter •... -
Page 199: Locator Screen
Chapter 18 LEDs The following table describes fields in the above screen. Table 90 Maintenance > LED > Suppression LABEL DESCRIPTION Suppression On If the Suppression On check box is checked, the LEDs of your NWA/WAC will turn off after it’s ready. -
Page 200: Antenna Switch
H A P T E R Antenna Switch 19.1 Overview Use this screen to adjust coverage depending on the orientation of the antenna. 19.1.1 What You Need To Know Positioning the antennas properly increases the range and coverage area of a wireless LAN. On the NWA/WAC that comes with internal antennas and also has an antenna switch, you can adjust coverage depending on the orientation of the antenna for the NWA/WAC radios using the web configurator, the command line interface (CLI) or a physical switch. - Page 201 Chapter 19 Antenna Switch Figure 126 Maintenance > Antenna > Antenna Switch Select the Enable Software Control option to use the Web configurator to adjust coverage depending on each radio’s antenna orientation for better coverage. Select Wall if you mount the NWA/WAC to a wall.
-
Page 202: Reboot
H A P T E R Reboot 20.1 Overview Use this screen to restart the device. 20.1.1 What You Need To Know If you applied changes in the Web configurator, these were saved automatically and do not change when you reboot. If you made changes in the CLI, however, you have to use the write command to save the configuration before you reboot. -
Page 203: Shutdown
H A P T E R Shutdown 21.1 Overview Use this screen to shut down the device. Always use Maintenance > Shutdown > Shutdown or the shutdown command before you turn off the NWA/WAC or remove the power. Not doing so can cause the firmware to become corrupt. 21.1.1 What You Need To Know Shutdown writes all cached data to the local storage and stops the system processes. -
Page 204: Troubleshooting
H A P T E R Troubleshooting 22.1 Overview This chapter offers some suggestions to solve problems you might encounter. The potential problems are divided into the following categories. • Power, Hardware Connections, and LED • NWA/WAC Access and Login •... -
Page 205: Nwa/Wac Access And Login
Chapter 22 Troubleshooting Disconnect and re-connect the power adaptor or PoE power injector to the NWA/WAC. If the problem continues, contact the vendor. 22.3 NWA/WAC Access and Login I forgot the IP address for the NWA/WAC. The default IP address (in standalone AP mode) is 192.168.1.2. If you changed the IP address and have forgotten it, you have to reset the device to its factory defaults. -
Page 206: Internet Access
Chapter 22 Troubleshooting • Try to access the NWA/WAC using another service, such as Telnet. If you can access the NWA/WAC, check the remote management settings to find out why the NWA/WAC does not respond to HTTP. • If your computer is connected wirelessly, use a computer that is connected to a LAN/ETHERNET port. I forgot the password. -
Page 207: Wireless Connections
Chapter 22 Troubleshooting If you are trying to access the Internet wirelessly, make sure the wireless settings on the wireless client are the same as the settings on the NWA/WAC. Disconnect all the cables from your device, and follow the directions in the Quick Start Guide again. If the problem continues, contact your ISP. - Page 208 Chapter 22 Troubleshooting Make sure the radio or at least one of the NWA/WAC’s radios is operating in AP mode. Make sure the wireless adapter (installed on your computer) is working properly. Make sure the wireless adapter (installed on your computer) is IEEE 802.11 compatible and supports the same wireless standard as the NWA/WAC’s active radio.
- Page 209 Chapter 22 Troubleshooting • Binary PKCS#12: This is a format for transferring public key and private key certificates.The private key in a PKCS #12 file is within a password-encrypted envelope. The file’s password is not connected to your certificate’s public or private passwords. Exporting a PKCS #12 file creates this and you must provide it to decrypt the contents when you import the file into the NWA/WAC.
- Page 210 Chapter 22 Troubleshooting In the Monitor > Wireless > AP Information > Radio List screen, there is no load balancing indicator associated with any APs assigned to the load balancing task. • Check to be sure that the AP profile which contains the load balancing settings is correctly assigned to the APs in question.
- Page 211 Chapter 22 Troubleshooting • Detach the WAC6500 series indoor AP from the mounting bracket. How do I remove the NWA1123-AC PRO and WAC6103D-I indoor AP from its mounting bracket? • Find the down arrow close to the Ethernet ports, then use a thin flat tool (for example, a flat screw driver) to lift up a clip beneath 5GHz LED.
-
Page 212: Resetting The Nwa/Wac
Chapter 22 Troubleshooting • Turn the NWA1123-AC PRO or WAC6103D-I indoor AP counter-clockwise to detach it from the mounting bracket. 22.6 Resetting the NWA/WAC If you cannot access the NWA/WAC by any method, try restarting it by turning the power off and then on again. -
Page 213: Getting More Troubleshooting Help
Chapter 22 Troubleshooting Make sure the Power LED is on and not blinking. Press the RESET button and hold it until the Power LED begins to blink. (This usually takes about ten seconds.) Release the RESET button, and wait for the NWA/WAC to restart. You should be able to access the NWA/WAC using the default settings. -
Page 214: Appendix A Importing Certificates
P P E N D I X Importing Certificates This appendix shows you how to import public key certificates into your web browser. Public key certificates are used by web browsers to ensure that a secure web site is legitimate. When a certificate authority such as VeriSign, Comodo, or Network Solutions, to name a few, receives a certificate request from a website operator, they confirm that the web domain and contact information in the request match those on public record with a domain name registrar. - Page 215 Appendix A Importing Certificates If your device’s Web Configurator is set to use SSL certification, then the first time you browse to it you are presented with a certification error. Click Continue to this website (not recommended). In the Address Bar, click Certificate Error > View certificates. NWA / WAC Series User’s Guide...
- Page 216 Appendix A Importing Certificates In the Certificate dialog box, click Install Certificate. In the Certificate Import Wizard, click Next. NWA / WAC Series User’s Guide...
- Page 217 Appendix A Importing Certificates If you want Internet Explorer to Automatically select certificate store based on the type of certificate, click Next again and then go to step 9. Otherwise, select Place all certificates in the following store and then click Browse. In the Select Certificate Store dialog box, choose a location in which to save the certificate and then click OK.
- Page 218 Appendix A Importing Certificates In the Completing the Certificate Import Wizard screen, click Finish. 10 If you are presented with another Security Warning, click Yes. 11 Finally, click OK when presented with the successful certificate installation message. NWA / WAC Series User’s Guide...
- Page 219 Appendix A Importing Certificates 12 The next time you start Internet Explorer and go to a Zyxel Web Configurator page, a sealed padlock icon appears in the address bar. Click it to view the page’s Website Identification information. Installing a Stand-Alone Certificate File in Internet Explorer Rather than browsing to a Zyxel Web Configurator and installing a public key certificate when prompted, you can install a stand-alone certificate file if one has been issued to you.
- Page 220 Appendix A Importing Certificates Removing a Certificate in Internet Explorer This section shows you how to remove a public key certificate in Internet Explorer 7 on Windows XP. Open Internet Explorer and click Tools > Internet Options. In the Internet Options dialog box, click Content > Certificates. NWA / WAC Series User’s Guide...
- Page 221 Appendix A Importing Certificates In the Certificates dialog box, click the Trusted Root Certificates Authorities tab, select the certificate that you want to delete, and then click Remove. In the Certificates confirmation, click Yes. In the Root Certificate Store dialog box, click Yes. The next time you go to the web site that issued the public key certificate you just removed, a certification error appears.
- Page 222 Appendix A Importing Certificates Firefox The following example uses Mozilla Firefox 2 on Windows XP Professional; however, the screens can also apply to Firefox 2 on all platforms. If your device’s Web Configurator is set to use SSL certification, then the first time you browse to it you are presented with a certification error.
- Page 223 Appendix A Importing Certificates Installing a Stand-Alone Certificate File in Firefox Rather than browsing to a Zyxel Web Configurator and installing a public key certificate when prompted, you can install a stand-alone certificate file if one has been issued to you. Open Firefox and click Tools >...
- Page 224 Appendix A Importing Certificates In the Certificate Manager dialog box, click Web Sites > Import. Use the Select File dialog box to locate the certificate and then click Open. The next time you visit the web site, click the padlock in the address bar to open the Page Info > Security window to see the web page’s security information.
- Page 225 Appendix A Importing Certificates Open Firefox and click Tools > Options. In the Options dialog box, click Advanced > Encryption > View Certificates. NWA / WAC Series User’s Guide...
- Page 226 Appendix A Importing Certificates In the Certificate Manager dialog box, select the Web Sites tab, select the certificate that you want to remove, and then click Delete. In the Delete Web Site Certificates dialog box, click OK. The next time you go to the web site that issued the public key certificate you just removed, a certification error appears.
-
Page 227: Appendix B Ipv6
P P E N D I X IPv6 Overview IPv6 (Internet Protocol version 6), is designed to enhance IP address size and features. The increase in IPv6 address size to 128 bits (from the 32-bit IPv4 address) allows up to 3.4 x 10 IP addresses. - Page 228 Appendix B IPv6 Unspecified Address An unspecified address (0:0:0:0:0:0:0:0 or ::) is used as the source address when a device does not have its own address. It is similar to “0.0.0.0” in IPv4. Loopback Address A loopback address (0:0:0:0:0:0:0:1 or ::1) allows a host to send packets to itself. It is similar to “127.0.0.1” in IPv4.
- Page 229 Appendix B IPv6 Subnet Masking Both an IPv6 address and IPv6 subnet mask compose of 128-bit binary digits, which are divided into eight 16-bit blocks and written in hexadecimal notation. Hexadecimal uses four bits for each character (1 ~ 10, A ~ F). Each block’s 16 bits are then represented by four hexadecimal characters. For example, FFFF:FFFF:FFFF:FFFF:FC00:0000:0000:0000.
-
Page 230: Dhcp Relay Agent
Appendix B IPv6 Each DHCP client and server has a unique DHCP Unique IDentifier (DUID), which is used for identification when they are exchanging DHCPv6 messages. The DUID is generated from the MAC address, time, vendor assigned ID and/or the vendor's private enterprise number registered with the IANA. It should not change over time even after you reboot the device. - Page 231 Appendix B IPv6 ICMPv6 Internet Control Message Protocol for IPv6 (ICMPv6 or ICMP for IPv6) is defined in RFC 4443. ICMPv6 has a preceding Next Header value of 58, which is different from the value used to identify ICMP for IPv4. ICMPv6 is an integral part of IPv6.
- Page 232 Appendix B IPv6 MLD allows an IPv6 switch or router to discover the presence of MLD listeners who wish to receive multicast packets and the IP addresses of multicast groups the hosts want to join on its network. MLD snooping and MLD proxy are analogous to IGMP snooping and IGMP proxy in IPv4. MLD filtering controls which multicast groups a port can join.
- Page 233 Appendix B IPv6 Install Dibbler and select the DHCPv6 client option on your computer. After the installation is complete, select Start > All Programs > Dibbler-DHCPv6 > Client Install as service. Select Start > Control Panel > Administrative Tools > Services. Double click Dibbler - a DHCPv6 client.
- Page 234 Appendix B IPv6 Select Control Panel > Network and Sharing Center > Local Area Connection. Select the Internet Protocol Version 6 (TCP/IPv6) checkbox to enable it. Click OK to save the change. Click Close to exit the Local Area Connection Status screen. Select Start >...
-
Page 235: Appendix C Customer Support
• Brief description of the problem and the steps you took to solve it. Corporate Headquarters (Worldwide) Taiwan • Zyxel Communications Corporation • http://www.zyxel.com Asia China • Zyxel Communications (Shanghai) Corp. Zyxel Communications (Beijing) Corp. Zyxel Communications (Tianjin) Corp. • http://www.zyxel.cn India • Zyxel Technology India Pvt Ltd • http://www.zyxel.in Kazakhstan •... - Page 236 • Zyxel Singapore Pte Ltd. • http://www.zyxel.com.sg Taiwan • Zyxel Communications Corporation • http://www.zyxel.com/tw/zh/ Thailand • Zyxel Thailand Co., Ltd • http://www.zyxel.co.th Vietnam • Zyxel Communications Corporation-Vietnam Office • http://www.zyxel.com/vn/vi Europe Austria • Zyxel Deutschland GmbH • http://www.zyxel.de Belarus • Zyxel BY • http://www.zyxel.by...
- Page 237 Appendix C Customer Support Belgium • Zyxel Communications B.V. • http://www.zyxel.com/be/nl/ • http://www.zyxel.com/be/fr/ Bulgaria • Zyxel България • http://www.zyxel.com/bg/bg/ Czech Republic • Zyxel Communications Czech s.r.o • http://www.zyxel.cz Denmark • Zyxel Communications A/S • http://www.zyxel.dk Estonia • Zyxel Estonia • http://www.zyxel.com/ee/et/ Finland •...
- Page 238 • Zyxel Communications Poland • http://www.zyxel.pl Romania • Zyxel Romania • http://www.zyxel.com/ro/ro Russia • Zyxel Russia • http://www.zyxel.ru Slovakia • Zyxel Communications Czech s.r.o. organizacna zlozka • http://www.zyxel.sk Spain • Zyxel Communications ES Ltd • http://www.zyxel.es Sweden • Zyxel Communications • http://www.zyxel.se Switzerland •...
- Page 239 Appendix C Customer Support • http://www.zyxel.ch/ Turkey • Zyxel Turkey A.S. • http://www.zyxel.com.tr • Zyxel Communications UK Ltd. • http://www.zyxel.co.uk Ukraine • Zyxel Ukraine • http://www.ua.zyxel.com Latin America Argentina • Zyxel Communication Corporation • http://www.zyxel.com/ec/es/ Brazil • Zyxel Communications Brasil Ltda.
- Page 240 Appendix C Customer Support North America • Zyxel Communications, Inc. - North America Headquarters • http://www.zyxel.com/us/en/ Oceania Australia • Zyxel Communications Corporation • http://www.zyxel.com/au/en/ Africa South Africa • Nology (Pty) Ltd. • http://www.zyxel.co.za NWA / WAC Series User’s Guide...
-
Page 241: Appendix D Legal Information
The contents of this publication may not be reproduced in any part or as a whole, transcribed, stored in a retrieval system, translated into any language, or transmitted in any form or by any means, electronic, mechanical, magnetic, optical, chemical, photocopying, manual, or otherwise, without the prior written permission of Zyxel Communications Corporation. Published by Zyxel Communications Corporation. All rights reserved. - Page 242 Appendix D Legal Information Industry Canada ICES Statement CAN ICES-3 (B)/NMB-3(B) Industry Canada RSS-GEN & RSS-247 Statement • This device complies with Industry Canada license-exempt RSS standard(s). Operation is subject to the following two conditions: (1) this device may not cause interference, and (2) this device must accept any interference, including interference that may cause undesired operation of the device.
- Page 243 Appendix D Legal Information Antenna Information ANTENNA MODEL TYPE CONNECTOR 2.4 G GAIN 5G GAIN REMARK NWA5123-AC 2.4 GHz PIFA U.FL 3.08 (2400-2483.5 MHz) Antenna PIFA U.FL 3.07 (2400-2483.5 MHz) NWA5123-AC 5 GHz PIFA U.FL 4.06 (5150-5250 MHz) Antenna 3.91 (5725-5850 MHz) PIFA U.FL 3.99 (5150-5250 MHz)
- Page 244 Appendix D Legal Information If the product with 5G wireless function operating in 5250-5350 MHz and 5470-5725 MHz, the following attention must be paid. • For devices with detachable antenna(s), the maximum antenna gain permitted for devices in the bands 5250-5350 MHz and 5470-5725 MHz shall be such that the equipment still complies with the e.i.r.p.
- Page 245 Appendix D Legal Information Informations Antenne MODÈLE D'ANTENNE TYPE CONNECTEUR 2.4 G GAIN 5G GAIN REMARQUE NWA5123-AC 2.4 GHz PIFA U.FL 3.08 (2400-2483.5 MHz) Antenna PIFA U.FL 3.07 (2400-2483.5 MHz) NWA5123-AC 5 GHz PIFA U.FL 4.06 (5150-5250 MHz) Antenna 3.91 (5725-5850 MHz) PIFA U.FL 3.99 (5150-5250 MHz)
-
Page 246: Industry Canada Radiation Exposure Statement
Appendix D Legal Information • Les pires angles d’inclinaison nécessaires pour rester conforme à l’exigence de la p.i.r.e. applicable au masque d’élévation, et énoncée à la section 6.2.2 3) du CNR-247, doivent être clairement indiqués. Lorsque la fonction sans fil 5G fonctionnant en 5250-5350 MHz et 5470-5725 MHz est activée pour ce produit, il est nécessaire de porter une attention particulière aux choses suivantes. - Page 247 Appendix D Legal Information • The 5,470 MHz to 5,725 MHz is 743.02 mW. NWA1123-ACv2 • This equipment should be installed and operated with a minimum distance of 20 cm between the radio equipment and your body. • The maximum RF power operating for each band as follows: •...
- Page 248 Appendix D Legal Information NWA5123-AC HD • This equipment should be installed and operated with a minimum distance of 20 cm between the radio equipment and your body. • The maximum RF power operating for each band as follows: • The band 2,400 to 2,483.5 MHz is 97.274 mW, •...
- Page 249 RF exposure requirement. External antenna Use only the antennas which have been approved by Zyxel Communications Corporation. The non-approved antenna(s) may produce unwanted spurious or excessive RF transmitting power which may lead to the violation of FCC/IC limit and is prohibited.
-
Page 250: Safety Warnings
Appendix D Legal Information Please refer to user's manual for the detail. Warning Please carefully select the installation position and make sure that the final output power does not exceed the limit set force in relevant rules. The violation of the rule could lead to serious federal penalty. Instructions d'installation professionnelle (WAC6553D-E) Veuillez noter que l'appareil etant dedie a une fonction unique, il doit etre utilise avec notre logiciel proprietaire de divertissement interactif . - Page 251 前項合法通信,指依電信法規定作業之無線電通信。 低功率射頻電機須忍受合法通信或工業、科學及醫療用電波輻射性電機設備之干擾。 電磁波曝露量 MPE 標準值 1mW/cm2,送測產品 (NWA5123-AC) 實測值為:0.316 mW/cm2 本產品使用時建議應距離人體 20 cm 電磁波曝露量 MPE 標準值 1mW/cm2,送測產品 (NWA1123-ACv2) 實測值為:0.316 mW/cm2 本產品使用時建議應距離人體 20 cm 電磁波曝露量 MPE 標準值 1mW/cm2,送測產品 (NWA5121-N) 實測值為:0.218 mW/cm2 本產品使用時建議應距離人體 20 cm 電磁波曝露量 MPE 標準值 1mW/cm2,送測產品 (NWA5123-NI) 實測值為:0.916 mW/cm2 本產品使用時建議應距離人體 22 cm 電磁波曝露量...
- Page 252 Appendix D Legal Information 專業安裝警語: (WAC6553D-E) 以下訊息僅適用於產品屬於專業安裝並銷售至台灣地區 本器材須經專業工程人員安裝及設定,始得設置使用,且不得直接販售給一般消費者。 安全警告 為了您的安全,請先閱讀以下警告及指示 : • 請勿將此產品接近水、火焰或放置在高溫的環境。 • 避免設備接觸任何液體 - 切勿讓設備接觸水、雨水、高濕度、污水腐蝕性的液體或其他水份。 • 灰塵及污物 - 切勿接觸灰塵、污物、沙土、食物或其他不合適的材料。 • 雷雨天氣時,不要安裝,使用或維修此設備。有遭受電擊的風險。 • 切勿重摔或撞擊設備,並勿使用不正確的電源變壓器。 • 若接上不正確的電源變壓器會有爆炸的風險。 • 請勿隨意更換產品內的電池。 • 如果更換不正確之電池型式,會有爆炸的風險,請依製造商說明書處理使用過之電池。 • 請將廢電池丟棄在適當的電器或電子設備回收處。 • 請勿將設備解體。 • 請勿阻礙設備的散熱孔,空氣對流不足將會造成設備損害。 • 請插在正確的電壓供給插座 ( 如 : 北美 / 台灣電壓 110V AC,歐洲是 230V AC)。 •...
- Page 253 Appendix D Legal Information Note Repair or replacement, as provided under this warranty, is the exclusive remedy of the purchaser. This warranty is in lieu of all other warranties, express or implied, including any implied warranty of merchantability or fitness for a particular use or purpose. Zyxel shall in no event be held liable for indirect or consequential damages of any kind to the purchaser.
-
Page 254: Index
Index Index Bluetooth Smart Symbols boot module access and certificates access privileges CA (Certificate Authority), see certificates access users CAPWAP see also users 75, 77 CEF (Common Event Format) admin users 177, 182 multiple logins Certificate Authority (CA) see also users see certificates alerts Certificate Management Protocol (CMP) - Page 255 Index channel DHCP and domain name 21, 40 button diagnostics messages disclaimer popup window domain name Reference Guide DTLS cold start dual radios commands dual-radio application sent by Web Configurator dynamic channel selection Common Event Format (CEF) 177, 182 comparison table 13, 14, 15, 16 configuration information...
- Page 256 Index HTTP key pairs over SSL, see HTTPS redirect to HTTPS vs HTTPS HTTPS and certificates lastgood.conf 187, 189 authenticating clients layer-2 isolation avoiding warning messages example example vs HTTP with Internet Explorer LED suppression with Netscape Navigator LEDs HyperText Transfer Protocol over Secure Socket Layer, Blinking 26, 28, 32 see HTTPS...
- Page 257 Index managed AP standalone mode management mode radio managing the device reboot 34, 202 good habits vs reset using FTP. See FTP. Reference Guide, CLI MBSSID registration memory usage 56, 59 product message bar remote management messages FTP, see FTP Telnet warning WWW, see WWW...
- Page 258 Index how applied supported browsers managing syslog 177, 182 syntax syslog servers, see also logs uploading system log, see logs shutdown 34, 203 system name 55, 149 vs reset system uptime Simple Certificate Enrollment Protocol (SCEP) system-default.conf Simple Network Management Protocol, see SNMP SNMP 168, 169 agents...
- Page 259 Index default lease time SSID 104, 106 default reauthentication time wireless repeater 104, 106 lease time wireless security 18, 207 limited-admin (type) wireless station lockout Wizard Setup reauthentication time WLAN interface types of WPA2 user (type) user names and certificates see also HTTP, HTTPS Vantage Report (VRPT) 177, 182...