Sign In
Upload
Manuals
Brands
Exabyte Manuals
Storage
EXB-8505 8mm
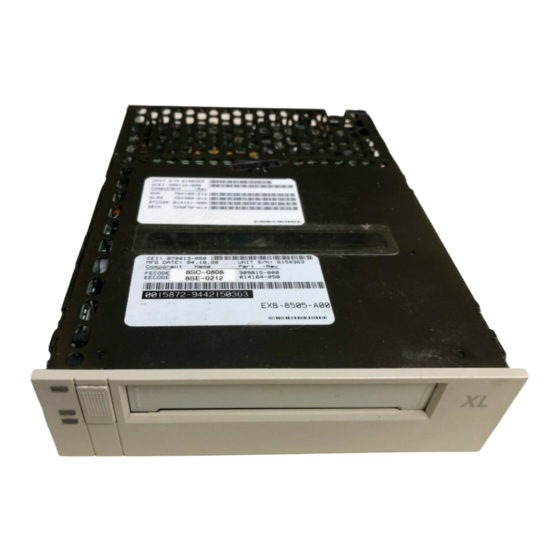
Exabyte EXB-8505 8mm Manuals
Manuals and User Guides for Exabyte EXB-8505 8mm. We have
4
Exabyte EXB-8505 8mm manuals available for free PDF download: Product Specification, Maintenance Manual, Owner's Manual, Installation And Operation Manual
Exabyte EXB-8505 8mm Product Specification (124 pages)
standard and eXtended-Length configuration
Brand:
Exabyte
| Category:
Storage
| Size: 1 MB
Table of Contents
Revision History
2
Trademark Notices
2
Product Warranty Caution
4
Table of Contents
5
About this Manual
11
Intended Audience
11
How this Manual Is Organized
11
Related Publications
12
Index
12
Conventions Used in this Specification
13
1 Features
15
Features
16
Figure 1-1 Comparison of the Four Tape Drives
17
Table 1-2 Read/Write Compatibility of Exabyte 8Mm Tape Drives
19
Table 1-3 Data Format Features
19
Table 1-4 Approximate Capacities of EXATAPE Data Cartridges
22
Figure 1-2 Front Panel
23
Front Panel Controls and Indicators
23
Physical Description
23
Figure 1-3 Label Location and Content
24
Unload Button
24
Back Panel Components
25
Figure 1-4 Back Panel (Single-Ended Configuration)
25
SCSI Connector
25
Figure 1-5 Internal Components (EXB-8505 Shown)
27
Internal Components of the Tape Drive
27
Figure 1-6 Location of the Read Heads and Write Heads
28
Tape Transport Mechanism
28
Figure 1-7 External Dimensions in Inches (and Millimeters)
31
Size and Weight
31
Figure 1-8 EXB-210 8Mm Library
32
Integration with Other Exabyte Products
32
Related Products
32
Figure 1-9 Mini Tabletop Ctss with EXB-8505S Installed
33
EXATAPE Data Cartridges
34
Table 1-5 EXATAPE Media Compatibility with 8Mm Tape Drives
35
Exabyte Cleaning Cartridges
36
Data Compression
20
Custom EEPROM Options
21
Storage Capacity
22
Read/Write Compatibility with Other Tape Drives
18
Supported Formats
18
Table 1-1 Comparison of Tape Drive Features
18
2 Recording Format
37
Figure 2-1 Helical-Scan Recording
38
Helical-Scan Recording
38
Physical Format
39
Physical Track Structure
39
Figure 2-2 Relationship of 8Mm Physical Track Structures to Logical Data Formats
40
Figure 2-3 Physical Track Structure for 8500 and 8500C Format
41
Figure 2-4 Position of the Tape Drive's Heads Relative to the Tracks
42
Figure 2-5 Physical Track Structure for 8200C Track Format
43
Figure 2-6 Physical Track Structure for 8200 Track Format
43
Figure 2-7 Position of the Tape Drive's Heads Relative to the Tracks
44
Figure 2-8 Physical Block Format for All Logical Formats
45
Table 2-1 Recording Parameters
47
Logical Format
48
Supported Logical Formats
48
Logical Blocks
49
Figure 2-9 Logical Block Packing (One Physical Block)
50
Figure 2-10 Gap Bytes (One Physical Block)
51
Figure 2-11 One Gap Block and One Gap Track in Two Physical Tracks
52
Gap Blocks and Gap Tracks
52
Filemarks
53
Table 2-2 Type and Size of Filemarks for each Format
53
End of Data (EOD)
54
Setmarks (EXB-8505 and EXB-8505XL Only)
54
Track and Block Counts
55
Gap Bytes
51
Physical Blocks
45
Search Fields
46
Servo Areas
46
Recording Parameters
47
Table 2-3 Track and Physical Block Counts for 8200 and 8200C Formats
56
Table 2-4 Track and Physical Block Counts for 8500 and 8500C Formats
56
3 Functional Description
57
Figure 3-1 Data Flow During a Write Operation
58
Figure 3-2 Data Flow During a Read Operation
63
Read Operations
63
Thresholds During a Read Operation
64
Write Operations
58
Data Flow and Data Compression
58
Streaming and Start/Stop Modes
60
Motion Threshold
61
Thresholds During a Write Operation
61
Cyclic Redundancy Check (CRC)
62
Error Detection, Correction, and Recovery Procedures
62
Read-After-Write Checking
62
4 Requirements for Use
65
Figure 4-1 SCSI ID Jumper Block on the Back Panel (Single-Ended Configuration)
66
Installation Requirements
66
Requirements for Setting the SCSI ID
66
Requirements for Mounting the Tape Drive
67
Figure 4-2 Mounting Holes on the Sides
68
Figure 4-5 SCSI Connector Location on the Back Panel
72
Figure 4-6 Leds on the Faceplate of the EXB-8505 and EXB-8505XL
76
Figure 4-7 Leds on the Faceplate of the EXB-8205 and EXB-8205XL
76
Table 4-3 LED States During Operation
77
Loading Data Cartridges
78
Load Time
79
Unloading Data Cartridges
79
Error During Unload Procedure
80
Resetting the Tape Drive
80
Cleaning the Tape Drive
81
Preventive Maintenance
81
Using SCSI Commands
81
Determining When the Tape Drive Needs Cleaning
82
Loading New Microcode
82
REQUEST SENSE (03H) Command
82
Shipping Cartons
83
Shipping Requirements
83
Table 4-4 Single Pack and Multi-Pack Shipping Dimensions and Weights
83
Unpacking and Packing Instructions
84
Figure 4-3 Mounting Holes on the Bottom
68
Table 4-1 Connector Pin Assignments for Differential Tape Drives
73
Table 4-2 Connector Pin Assignments for Single-Ended Tape Drives
74
Operation
75
Device States
75
Power-On Mode
75
Tape Drive Controls
75
Figure 4-4 Mounting Hole Dimensions in Inches (and Millimeters)
69
Requirements for SCSI Bus Termination
70
Cable Length
71
Requirements for Connecting a SCSI Cable
71
5 Interface Specifications
85
SCSI Features
86
Physical Path
86
Interface Specifications
86
SCSI Messages
87
Table 5-1 SCSI Messages
87
Table 5-2 SCSI-2 Command Set
88
Using SCSI Commands
90
Erasing Data
90
Reading Data
90
Writing Data
90
Copying Microcode
91
Inquiring about Tape Drive Status
91
Searching for Data
91
Performing Diagnostic Tests
92
Setting Operating Parameters
92
SCSI Commands
88
6 Functional Specifications
93
Performance Specifications
94
Write Access Time
94
Read Access Time
94
Tape Speed
95
Reposition Time
96
Rewind Tape Speed
96
Drum Rotation Period
97
Tape Tension Release and Drum Motion Suspension
97
Data Transfer Rate
98
Reliability Specifications
99
Service Life
99
Machine Reliability: Mean Time between Failures (MTBF)
99
Test Conditions
100
Data Integrity
101
Data Reliability
102
Write Reliability
103
Read Reliability
103
Power Specifications
104
Voltages
104
Figure 6-1 Power Connector Location on the Back Panel
105
Power Connector
105
Figure 6-2 Chassis Ground Location on Back Panel
106
Figure 6-3 Temperature and Humidity Ranges for Operation
108
Figure 6-4 Particulate Contamination Specification Vs. Typical Office
110
Vibration Specifications
111
Acoustic Noise
112
Air Flow Requirements
109
Particulate Contamination Limits
109
Shock Specifications
110
Grounding Hole and Ground Tab
106
Environmental Specifications
107
Operating Environment
108
7 Safety and Regulatory Agency Compliance
113
Safety Agency Standards
114
Electrostatic Discharge (ESD)
114
Electromagnetic Compatibility (EMC)
115
Radiated Susceptibility
115
Glossary
117
Index
121
Advertisement
Exabyte EXB-8505 8mm Maintenance Manual (101 pages)
8mm Cartridge Tape Subsystems
Brand:
Exabyte
| Category:
Storage
| Size: 1 MB
Table of Contents
Table of Contents
6
About this Manual
10
Intended Audience
10
How to Use this Manual
11
Conventions Used in this Manual
12
Related Publications
13
1 Before You Begin
14
Troubleshooting the CTS
15
Static Protection Requirements for the Troubleshooting Environment
15
Tools Required for Troubleshooting
15
Troubleshooting Guidelines
16
Troubleshooting Table
17
Performing Maintenance Procedures
24
Static Protection Requirements for the Maintenance Environment
25
Tools Required for Maintenance
26
Maintenance Guidelines
27
Preparing the CTS for Operation after Maintenance
28
2 Cleaning the CTS
30
Determining When the CTS Needs Cleaning
31
Time-To-Clean LED Indication
31
REQUEST SENSE (03H) Command
31
Using the 8Mm Cleaning Cartridge
32
3 Loading New Microcode from Tape
34
Creating a Microcode Update Tape
35
Steps for Making a Microcode Update Tape
35
Time Required to Make a Microcode Update Tape
38
Using a Microcode Update Tape
39
Steps that Occur During the Microcode Update Process
39
Time Required to Load Code from Tape
42
4 Removing a Cartridge from the CTS
44
Procedure for Removing a Cartridge
45
Do this First
45
Removing Tape from the Tape Path
46
Removing the Cartridge
48
Preparing the CTS for Operation
49
5 Replacing Frus
50
Replacing the Front Bezel
51
Do this First
51
Procedure for Removing the Front Bezel
51
Procedure for Replacing the Front Bezel
52
Preparing the CTS for Operation
53
Replacing the Front Panel
54
Do this First
54
Procedure for Removing the Front Panel
54
Procedure for Replacing the Front Panel
55
Preparing the CTS for Operation
57
Replacing the Rear Panel
58
Do this First
58
Procedure for Removing the Rear Panel
58
Procedure for Replacing the Rear Panel
59
Preparing the CTS for Operation
60
Replacing the Top Panel
61
Do this First
61
Procedure for Removing the Top Panel
61
Procedure for Replacing the Top Panel
62
Preparing the CTS for Operation
63
Replacing the Bottom Panel
64
Do this First
64
Procedure for Removing the Bottom Panel
64
Procedure for Replacing the Bottom Panel
65
Preparing the CTS for Operation
66
Replacing the Left Panel
67
Do this First
67
Procedure for Removing the Left Panel
67
Procedure for Replacing the Left Panel
68
Preparing the CTS for Operation
69
Replacing the Right Panel
70
Do this First
70
Procedure for Removing the Right Panel
70
Procedure for Replacing the Right Panel
71
Preparing the CTS for Operation
72
Replacing the VUA/SUA Card
73
Do this First
73
Procedure for Removing the VUA/SUA Card
73
Procedure for Replacing the VUA/SUA Card
75
Preparing the CTS for Operation
76
Replacing the SLD Card
77
Do this First
77
Procedure for Removing the SLD Card
77
Procedure for Replacing the SLD Card
79
Preparing the CTS for Operation
82
Replacing the VUA-SLD Flex Cable
83
Do this First
83
Procedure for Removing the VUA-SLD Flex Cable
83
Procedure for Replacing the VUA-SLD Flex Cable
84
Preparing the CTS for Operation
85
Replacing the Deck Subassembly
86
Do this First
86
Procedure for Replacing the Deck Subassembly
87
Preparing the CTS for Operation
92
Replacing the Door and Retainer
93
Do this First
93
Procedure for Removing the Door and Retainer
93
Procedure for Replacing the Door and Retainer
95
Preparing the CTS for Operation
97
Index
98
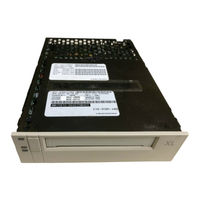
Exabyte EXB-8505 8mm Owner's Manual (78 pages)
8 mm tape drives, for standard and extended-length configurations
Brand:
Exabyte
| Category:
Storage
| Size: 1 MB
Table of Contents
Table of Contents
5
Welcome
7
Identifying the Tape Drives
8
About this Manual
9
Conventions Used in this Manual
9
For more Information
10
Installation
11
Preparing for Installation
12
Step 1 - Ensure ESD Protection
12
Step 2 - Unpack the Tape Drive and Save the Materials
13
Step 3 - Check the Tape Drive Accessories
13
Step 4 - Check the Power Cord
14
Step 5 - Check the Compatibility Matrix
14
Step 6 - Register Your Tape Drive
15
Step 7 - Set up Your System
16
Installing the Tape Drive
17
Step 1 - Set the SCSI ID
17
Step 2 - Terminate the SCSI Bus
20
Step 3 - Install the Internal Tape Drive
23
Connect the Power Cable
29
Step 4 - Install an External Tape Drive
31
Step 5 - Power on the Tape Drive
34
Step 6 - Install Your Software Application
37
Step 7 - Test Your Installation
38
Operating the Tape Drive
41
Reading the Leds
41
Selecting Data Cartridges
43
Write-Protecting a Data Cartridge
45
Loading a Data Cartridge
46
Unloading a Data Cartridge
47
Resetting the Tape Drive
48
Preventive Maintenance
49
Exabyte Cleaning Cartridges
49
Determining When to Clean the Tape Drive
50
Using the Cleaning Cartridge
50
Caring for Data Cartridges
52
Replacing Data Cartridges
53
Troubleshooting
55
Problems with Tape Drive Installation
56
Problems with Tape Drive Operation
57
Problems Reported by the Application Software
59
Getting Help
61
Contacting Exabyte Sales Support
61
Ordering Supplies from Exabyte
63
Returning the Tape Drive for Repair
64
Moving the Tape Drive
66
Appendix A Installation Requirements
67
Connecting a Power Cable
70
Appendix B Tape Drive Specifications
71
Appendix C Glossary
72
Index
75
Advertisement
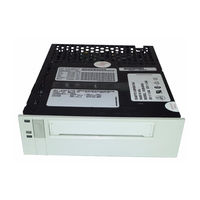
Exabyte EXB-8505 8mm Installation And Operation Manual (46 pages)
Exabyte Cartridge Tape Subsystems Installation and Operation
Brand:
Exabyte
| Category:
Storage
| Size: 0 MB
Table of Contents
Table of Contents
4
Welcome
5
About this Guide
6
Conventions Used in this Guide
6
For more Information
6
Installing the Tape Drive
7
Unpacking and Handling the Tape Drive
8
Setting the SCSI ID
9
Preparing the Tape Drive for the SCSI Bus
11
Installing the Tape Drive in a Computer
13
Performing the Initial Power on
18
Operating the Tape Drive
20
Selecting Data Cartridges
23
Setting the Write-Protect Switch on a Data Cartridge
25
Loading a Data Cartridge in the Tape Drive
26
Unloading a Data Cartridge
27
Preventive Maintenance
28
Determining When to Clean the Tape Drive
28
Using the 8Mm Cleaning Cartridge
29
Caring for Data Cartridges
30
Shipping the Tape Drive
32
Packing the Tape Drive
33
Environmental Requirements for Shipment
35
Appendix A Installation Requirements
36
SCSI Cable
36
SCSI Connector
37
Power Supply
38
Power Connector
38
Attaching the Tape Drive to a Frame
39
Chassis Grounding (Optional)
41
Appendix B Unload Button Options
42
Appendix C Tape Drive Specifications
44
EXB-8205 and EXB-8505 (Standard and XL)
45
Index
45
Advertisement
Related Products
Exabyte EXB-8505XL
Exabyte EXB-8500c
Exabyte EXB-8205
Exabyte EXB-8205XL
Exabyte EXB-8200
Exabyte EXB-8700
Exabyte EXB-8500
Exabyte EXB-8200SX
Exabyte EZ17M
Exabyte EZ17A
Exabyte Categories
Storage
Computer Hardware
Accessories
Robotics
Tape Deck
More Exabyte Manuals
Login
Sign In
OR
Sign in with Facebook
Sign in with Google
Upload manual
Upload from disk
Upload from URL