Earlex Pro-8 Operating Instructions Manual
Spray gun
Hide thumbs
Also See for Pro-8:
- Operating instructions manual (42 pages) ,
- Operating instructions manual (12 pages)

Subscribe to Our Youtube Channel
Related Manuals for Earlex Pro-8


Summary of Contents for Earlex Pro-8
-
Page 1: Spray Gun
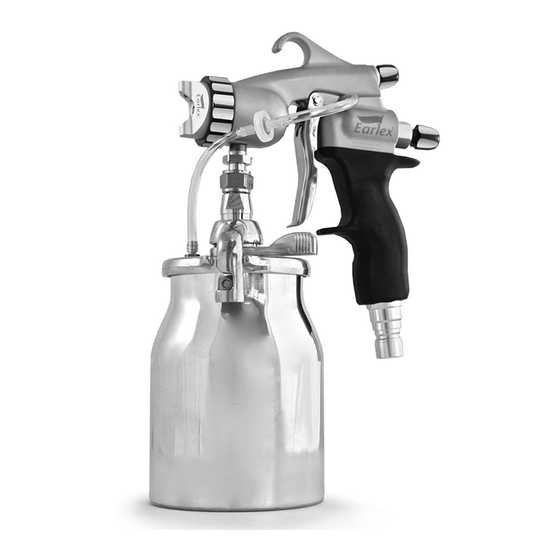
SPRAY GUN OPERATING INSTRUCTION MANUAL Thank you for purchasing the Earlex Pro-8 Spray Gun. BEFORE USE – PLEASE READ THE MANUAL AND SAFETY INSTRUCTIONS. Please retain for future reference. - Page 2 WARNING! Use the Spray Gun only for the job it was designed for. Misuse of the Spray Gun will invalidate the guarantee. WARNING! If the cordset is damaged, it must be replaced with the correct Earlex part to avoid a hazard.
- Page 3 Therefore use of the Spray Gun is not recommended below a minimum temperature of 15 C. The Earlex Pro-8 is a streamlined, non-bleed die-cast aluminium gun. It has been engineered to provide a superior level of atomisation to ensure a flawless finish. The Pro-8 gun has been ergonomically designed for user comfort and lightweight control.
- Page 4 PRESSURE-FED EXPLODED VIEW Description Part No. Needle spring Fluid adjuster PARTS LIST P1430/P1431 Air tube fitting Trigger Description Part No. Check valve & tubes PACC69 Quick connect fitting Locking ring and washer PACC39 PACC99 1000ml cup Air cap assy 1.3-2.0 PACC32 PACC51 Pickup tube...
-
Page 5: Parts List
GRAVITY-FED EXPLODED VIEW PARTS LIST Description Part No. Description Part No. Air control assy PACC98 Locking ring and washer PACC39 Needle 1.3mm PACC13NT Air cap assy 1.3-2.0 PACC32 Needle spring fluid tip 1.3mm PACC13NT Fluid adjuster Gun chassis gravity Air tube fitting Circlip Trigger pivot Cup filter... -
Page 6: Spray Pattern
THINNING Thinning is very important when spraying. Most paints are supplied ready for brush application and may need to be thinned (diluted) for spraying purposes. Follow the manufacturers guide for thinning in conjunction with a spray gun. If in doubt contact the manufacturers of the paint. Paint is “thinned” by adding the substance which the paint is based upon. - Page 7 SPRAY GUN ADJUSTMENTS Pattern Control Adjuster The Pattern Control Adjuster (10/20) on the Pro-8 spray gun is conveniently placed at the rear to allow you to easily change the spray pattern without needing to adjust the air cap. The pattern control can be set to either a round pattern for intricate detail work or to an elliptical fan shape which widens as you adjust the pattern adjuster, ideal for different size surfaces.
-
Page 8: Spraying Technique
The needle has a size laser marked onto the shaft. Below, we have put together a chart showing what the various Aircap sizes we offer for the Pro-8 Spray Gun and the corresponding needle identification numbers which they are paired with. - Page 9 Light = Light Spray Heavy = Heavy Spray The Pro-8™ Spray Gun is supplied as standard with the 1.3mm - 2mm. This Air Cap is compatible with the 1.3mm, 1.5mm 1.8mm & 2mm Needle and Fluid Tips. There are 5 Air Cap sizes available, each suitable for a different range of Needle and Fluid Tips.To make selection easy, each Air Cap is marked with a suitable Needle / Fluid Tip size range.
- Page 10 ADJUSTING THE PICK UP TUBE The adjustable swivel pick-up tube allows you to spray at almost every angle. To swivel the pick- up tube release the paint container from the spray gun, wipe the pick-up tube to remove any paint and with a firm grip rotate 180 degrees..
- Page 11 This makes for handy storage of the gun when in use or not. SPRAYING WITH PRESSURISED PAINT CONTAINERS Using a pressurised paint container with your Pro-8™ spray gun is very easy. All you need is the converter 3/8" H/BARB - GUN TO P/POT (PACC74). This connector allows you to connect directly to the pressurised paint container via the tube.-...
- Page 12 CLEANING INSTRUCTIONS FOR YOUR SPRAY GUN TYPE OF MATERIAL CLEANING Water-based material Clean with water Oil-based material Clean with appropriate thinners BASIC CLEAN - AFTER EVERY USE & CHANGES OF MATERIAL COLOUR • Remove Paint Container . • Pour any left over material back into its container so that it can be used for the future. Pull the trigger to allow material to run out of the Pick-Up Tube.
- Page 13 PROBLEM The paint runs or sags Paint is too thin.or .irregular No paint being .released Remove/replace cup filter Filter - Clogged Paint leaking from the gland nut in front of the trigger Too much paint in the area Pulverisation...
- Page 14 In other countries please call the company where you originally purchased the product. Earlex will not be held liable if equipment is not used solely for the purpose it was designed. Warranty will become void through improper installation or operation. Any modifications to the...
- Page 15 AVERTISSEMENT ! Utiliser le pistolet pulvérisateur uniquement pour les travaux pour lesquels il a été conçu. Une mauvaise utilisation du pistolet pulvérisateur invalidera la garantie. AVERTISSEMENT ! Si le cordon d’alimentation est endommagé, il doit être remplacé avec la pièce Earlex appropriée pour éviter tous dangers.
- Page 16 Il a été fabriqué pour offrir un niveau supérieur d’atomisation pour assurer un fini parfait. Le pistolet Pro-8 a été conçu ergonomiquement pour le confort de l’utilisateur et un contrôle aisé. Il est fiable et offre un démontage facile pour l’entretien et un nettoyage facile. Disponible en options Alimenté...
- Page 17 TALIMENTÉ PAR PRESSION VUE ÉCLATÉE No. de Description pièce Joint torique Gaine de commande pneumatique Dispositif de réglage de motif PACC98 Écrou face arrière Joint torique Écrou face arrière Joint d’étanchéité à l’air interne Écrou Joint d’étanchéité à l’air interne Ressort Soupape de purge Ensemble Soupape de retenue Pièce de fixation Tube d’air...
- Page 18 ALIMENTÉ PAR GRAVITÉ VUE ÉCLATÉE 19 20 LISTE DES PIÈCES - P1420/P1421 No. de Description pièce Vis de blocage P0037 No. de Description Joint d’étanchéité à l’air interne P0013 pièce Bague de blocage Capuchon d’air Écrou Joint d’étanchéité à l’air interne P0014 P0038 Noir/Argent...
- Page 19 DILUTION La dilution est très importante pour la pulvérisation. La plupart des peintures sont prêtes pour une application au pinceau et peuvent devoir être diluées pour la pulvérisation. Suivre le guide du fabricant pour une dilution en vue d’utiliser avec un pistolet pulvérisateur. En cas de doute, veuillez contacter le fabricant de la peinture. La coupe consistométrique fournie vous aidera à...
- Page 20 RÉGLAGES DU PISTOLET PULVÉRISATEUR Dispositif de réglage de motif Le dispositif de réglage de motif sur le pistolet pulvérisateur Pro-8 est placé de façon pratique à l’arrière pour vous permettre de changer facilement le motif de pulvérisation sans avoir besoin de régler le capuchon d’air.
-
Page 21: Technique De Pulvérisation
CHOISIR LES POINTEAUX, BUSES DE FLUIDE ET CAPUCHONS D’AIR Lors du jumelage des pointeaux et des capuchons d’air du pistolet pulvérisateur Pro-8™ il est important de regarder les marquages sur le pointeau et sur le capuchon d’air. Le capuchon d’air a le marquage au laser de la taille réelle sur l’avant du capuchon d’air lui-même. - Page 22 Épais = Pulvérisation épaisse Le pistolet pulvérisateur Pro-8™ est fourni avec un capuchon d'air 1,3 mm - 2 mm en standard. Ce capuchon d'air est compatible avec les pointeaux et buses de fluide de 1,3 mm, 1,5 mm, 1,8 mm et 2 mm.
- Page 23 RÉGLER LE TUBE DE PRÉLÈVEMENT Le tube de prélèvement réglable sur pivot vous permet de pulvériser à partir de presque n’importe quel angle. Pour pivoter le tube de prélèvement, dégager le réservoir de peinture du pistolet pulvérisateur, essuyer le tube de prélèvement pour enlever toute peinture et avec une poigne solide tourner 180°.
- Page 24 Idéal pour déposer le pistolet lors de l’utilisation ou pour le ranger après utilisation. PULVERISATION AVEC COMPRIMÉ CONTENANTS DE PEINTURE Utiliser un réservoir de peinture sous pression avec votre pistolet pulvérisateur Pro-8™ est très facile. Tout ce dont vous avez besoin est du convertisseur 3/8” H/BARB - GUN TO P/POT (PACC74).
- Page 25 INSTRUCTIONS DE NETTOYAGE POUR VOTRE PISTOLET PULVÉRISATEUR TYPE DE MATIÈRE NETTOYAGE Matière à base d’eau Nettoyer avec de l’eau Matériau à base d'huile Nettoyer avec des diluants appropriés NETTOYAGE DE BASE - APRÈS CHAQUE UTILISATION ET CHANGEMENTS DE COULEUR DE PEINTURE • Enlevez le réservoir de peinture. •...
- Page 26 PROBLÈME La peinture coule ou s’affaisse La peinture est trop mince.ou .irrégulière Augmenter le débit de peinture en tournant Fluid Ajusteur de contrôle (20/24) sens anti-horaire Aucune peinture ne sort Filtre bouché Retirez / remplacez le filtre de tasse La peinture s’écoule de l’écrou de presse- garniture à...
- Page 27 REMARQUES...
- Page 28 SI UTILISÉ POUR DES FINS AUTRES QUE CELLES DÉTAILLÉES DANS LA PRÉSENTE. Garantie 24 mois Earlex offre une garantie de 24 mois à l’acheteur à compter de la date d’achat contre toutes défectuosités de matériels ou de fabrication. Cette garantie ne couvre pas les abus, dommages accidentels, mauvaises utilisations, usures normales des pièces,...
Need help?
Do you have a question about the Pro-8 and is the answer not in the manual?
Questions and answers