Air Weigh BinMaxx User Manual
On-board truck and trailer scales
Hide thumbs
Also See for BinMaxx:
- User manual (28 pages) ,
- Operation manual (24 pages) ,
- Installation manual (28 pages)
Table of Contents
Advertisement
Quick Links
Download this manual
See also:
Operating Manual
Advertisement
Table of Contents

Related Manuals for Air Weigh BinMaxx


Summary of Contents for Air Weigh BinMaxx
- Page 1 On-Board Truck and Trailer Scales BinMaxx User Guide PN:901-0147-002 R0...
-
Page 2: Table Of Contents
Contents BinMaxx Overview................1 Navigating the Scale Menu..............1 Calibrating Your Scale..............2 Equipment Needed................2 Determining Bin Weights for Calibration..........3 Entering Empty and Heavy Weights...........4 Calibrating Heavy Weights..............5 Calibrating Empty Weights..............7 Check-Weighing Your Scale..............8 Using BinMaxx................9 Getting Accurate Weight Readings.............9 Navigating the Weight Display............10 Reset Lifts Prompt..............10... - Page 3 Assigning a Truck Number...........17 Setting a PIN................18 Configuring the Printer Port..........18 Setting Your Calibration Weights........19 Setting Up Date and Time............19 Troubleshooting Your Scale............20 Navigating the Diagnostics Menu.............20 Diagnostics Menu Options..........21 Weight Readings Are Inaccurate............22 Scale Won’t Turn On................24 Lift Data Was Not Recorded..............25 What to Do if you Forget Your PIN............27 Identifying the Causes of Error Messages........28 Limited Warranty................30...
-
Page 4: Binmaxx Overview
Or, using the BinMaxx XL kit, users can send all weight data, including lift weight, date and time, GPS location, and any error messages, from the truck directly to an office PC . -
Page 5: Calibrating Your Scale
You must calibrate your scale before you begin weighing bins. If you do not do so you will not see accurate weight readings. Note: Do not calibrate until you have seated the sensors. See the BinMaxx Installation Guide for instructions. Equipment Needed • Access to an accurate ground scale • Two refuse bins with similar dimensions and weight, or use... -
Page 6: Determining Bin Weights For Calibration
Determining Bin Weights for Calibration For calibration to be accurate, you must determine the average size and the average weight of the contents of the filled bins you encounter on route (referred to in the BinMaxx display as bin net weight). 1. Find the average bin size by using the median number of yards. -
Page 7: Entering Empty And Heavy Weights
2. Weigh one of the bins on the ground scale while it is empty. 3. Enter the empty weight of the bin, with no contents, into your BinMaxx scale. This weight will be subtracted from the weight the scale measures to give you the content weight of the bin. -
Page 8: Calibrating Heavy Weights
Calibrating Your Scale | Calibrating Heavy Weights Calibrating Heavy Weights 1. Turn the vehicle on and wait for the scale to power up. 2. Place the heavy bin on the forks. 3. Follow the instructions below on the display menu: • From the weight display, press ESC to reach the main menu. - Page 9 Calibrating Your Scale | Calibrating Heavy Weights 9. Repeat lifting and lowering the bin until the heavy calibration is complete - five successful lifts and drops in total. The scale will repeat the instructions and show the count of lifts and drops completed. 10. After five successful lifts and drops, you have completed the heavy calibration. The scale will show HEAVY WEIGHT CALIBRATION DONE... After a few seconds, the display will show EMPTY CALIB REQUIRED BEFORE USE.
-
Page 10: Calibrating Empty Weights
Calibrating Your Scale | Calibrating Empty Weights Calibrating Empty Weights 1. Remove the heavy bin from the forks and replace with the empty bin. 2. Follow the instructions below on the display: • From the weight display, press ESC to reach the main menu. -
Page 11: Check-Weighing Your Scale
The two weights should be within 40 pounds of each other. Note: With the proper calibration, BinMaxx will provide net weight readings to within 20 pounds of any size bin with a net weight of at least 100 pounds. A net weight less than 40... -
Page 12: Using Binmaxx
100 inches from the ground. However, the measurement zone can vary by 10 to 15 inches on either end. See the BinMaxx Installation Guide for more information on determining your measurement zone. When you are using BinMaxx, you should be aware of the measurement zone to get the most accurate readings. -
Page 13: Navigating The Weight Display
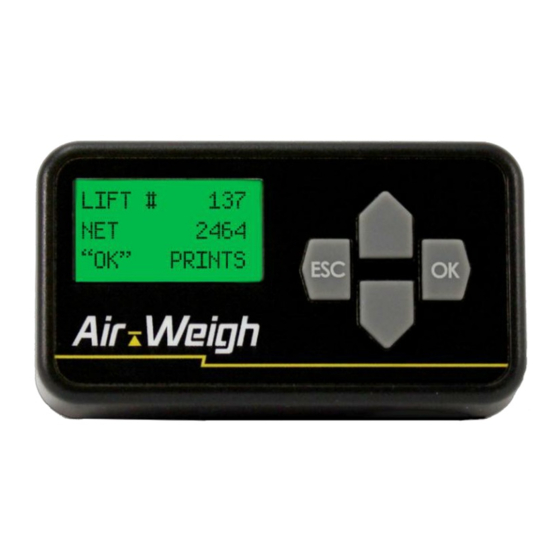
Prompt Off or On, p. 16. Weight Display When BinMaxx is on and the truck is in use, BinMaxx will show the weight display. This is the screen that provides information on lift number and bin net weight. The weight display shows the most recent lift number and bin net weight. - Page 14 Fig. 1 BinMaxx Weight Display If Screen 1 appears, the printer is not connected or is not turned on, or you have chosen to use BinMaxx’s RS 232 port for data stream output rather than printing. The ComLink will record all data, which can be printed or transferred at a later time.
-
Page 15: Resetting And Erasing Lift Data
Using BinMaxx | Resetting and Erasing Lift Data Resetting and Erasing Lift Data Resetting Lift Data As noted in the previous section, BinMaxx is set to display the Reset Lift prompt by factory default. The following instructions are for manual reset. -
Page 16: Erasing Lift Data
Fig. 2. Erasing Lift Data BinMaxx can store up to 1000 lifts and associated data. You can print or transfer the data at any time. If the ComLink has stored 1000 lifts without being cleared, new lifts will not be recorded and the operator will see an error message reading MEMORY FULL, NO RECORDINGS. -
Page 17: Printing Lift Data
Using BinMaxx | Printing Lift Data Printing Lift Data Make sure your printer is plugged in and turned on before attempting to print. Reference the document entitled Installing the Printer Kit for setup instructions. 1. From the weight display, press ESC to reach the main menu. -
Page 18: Setting Up Your Scale
Using BinMaxx | Setting Up Your Scale Setting Up Your Scale The setup menu allows you to calibrate and set parameters for your scale. To reach the setup menu, select SETUP from the main menu and press OK. Calibrating Your Scale To calibrate your scale, select CALIBRATION from the setup menu and press OK. - Page 19 Using BinMaxx | Setting Up Your Scale To select brightness: 1. From the weight display, press ESC to reach the main menu. 2. Press ▼ until SETUP is flashing. Press OK. 3. Press ▼ until DISPLY SETUP is flashing. Press OK. 4. Press ▼ until BRIGHTNESS is flashing. Press OK. 5. Use ▲ or ▼ to select either BRIGHT or DIM. Press OK. The screen will display either BRIGHT, (Now Bright) or DIM, (Now Dim), respectively.
-
Page 20: Turning The Default Reset Lifts Prompt Off Or On
Using BinMaxx | Setting Up Your Scale Turning the Default Reset Lifts Prompt Off or On Under the menu heading Power-Up Mode, you can decide whether the scale asks you to reset the lift number and net weight each time it is turned on, or whether you need to go into the erase menu to do so. -
Page 21: Setting A Pin
Using BinMaxx | Setting Up Your Scale Setting a PIN If you would like to protect your setup and calibration information from tampering, you may set a PIN. Once a PIN is set, the scale will require users to enter the PIN any time they try to access options in the setup menu. -
Page 22: Setting Your Calibration Weights
4. If the printer is connected and turned on, the display will appear as in Fig. 6. Use ▲ or ▼ to select the time or the date. Use ◄ or ► to set the correct time and date. When you have set them correctly, press OK. Fig. 6 Date/Time Setup Note: If BinMaxx does not sense a printer, the screen will show an error message reading DATE / TIME REQUIRES PRINTER... -
Page 23: Troubleshooting Your Scale
If your scale is not working correctly, the information in this section can help you identify the problem. If you are experiencing difficulties, call Air-Weigh Support at 1-888-459-3247 between 7 am and 5 pm PST for help troubleshooting your BinMaxx scale. Navigating the Diagnostics Menu The diagnostics menu provides information about the scale that can help you identify potential problems. -
Page 24: Diagnostics Menu Options
Troubleshooting | Navigating Diagnostics Menu Diagnostics Menu Options SENSOR DATA shows the scale’s A/D, or analog-to-digital, readings, which indicate whether the scale is reading weight. In general, an A/D reading of 409 indicates 0 pounds of weight; an A/D reading of 750-1250 is about normal for an empty bin in the lift zone;... -
Page 25: Weight Readings Are Inaccurate
Troubleshooting | Weight Readings Are Inaccurate Weight Readings Are Inaccurate Inaccurate weight readings could indicate a variety of problems, including incorrect calibration, a problem with your cables, or incorrectly adjusted targets. Follow the steps below to troubleshoot for potential causes of inaccurate weight readings. 1. - Page 26 • Measure the height from the ground to the arms. This height should usually be around 50 inches, but see your BinMaxx Installation Guide for an exact height for your model. • If the distance is much lower or higher than this, adjust your target until it engages at the correct height.
-
Page 27: Scale Won't Turn On
Troubleshooting | Scale Won’t Turn On Scale Won’t Turn On If your scale won’t turn on, this could be a problem with the power supply. Follow the steps below to troubleshoot for potential causes. 1. Check your power supply. Open the dash and find the ComLink. Check to make sure the wire harness leading to Power is securely plugged in and all wires are unbroken. -
Page 28: Lift Data Was Not Recorded
Troubleshooting | Lift Data Was Not Recorded Lift Data Was Not Recorded BinMaxx may not record lift data if the targets are incorrectly placed, if the bin is too light, or if the lift operator does not follow lift procedure necessary for BinMaxx to operate. - Page 29 • Measure the height from the ground to the arms as before. This height should be around 100 inches, but see the BinMaxx Installation Guide for an exact height. • If the distance is much lower or higher than this, adjust your target until it engages at the correct height.
-
Page 30: What To Do If You Forget Your Pin
Troubleshooting | Forgot PIN What to Do if you Forget Your PIN If you forget your PIN, call Air-Weigh Support. All scales are programmed with a manufacturer’s PIN that Support can access to help you unlock your scale. -
Page 31: Identifying The Causes Of Error Messages
RECORDING! PUSH data buffer is full; no new capacity – ERASE ALL to “ESC” lift information will be clear. saved. CALIBRATION The BinMaxx scale must The scale needs to be REQUIRED BEFORE be calibrated. calibrated. EMPTY CALIB The HEAVY calibration The EMPTY calibration... - Page 32 0.5 seconds.) NO NET DATA Error displayed when Forks too high when in RECORDED printed or via BinMaxx XL travel mode; adjust prox spreadsheet - BinMaxx target or lower travel did not record any data. mode height.
-
Page 33: Limited Warranty
Limited Warranty Limited Warranty For product failures due to material or manufacturing defects, Air-Weigh will replace or repair all components for up to three years from shipment date to the end-user Air-Weigh customer. These three-year components include: displays, ComLinks, sensors, power cables, sensor assemblies, sensor harnesses, and all other associated external components. -
Page 34: Procedure For Warranty Claims
Procedure for Warranty Claims Procedure For Warranty Claims ALL customers should first contact Air-Weigh Customer Support Department at (888) 459-3247 for questions regarding the use, operation, repair or return of any Air-Weigh product. In the event Air-Weigh requests to examine the product prior to disposition OR for repair or replacement, Air-Weigh requires a Return Material Authorization (RMA) number be issued before the item is returned. - Page 35 Notes...
- Page 36 1730 Willow Creek Circle • Eugene, OR 97402-9152 USA P.O. Box 24308 • Eugene, OR 97402-0437 USA Telephone (541) 343-7884 • Order Desk (888) 459-3444 Customer Support (888) 459-3247 • Fax (541) 431-3121 Hours of Operation: Monday - Friday, 7 a.m. - 5 p.m., PST www.Air-Weigh.com...
Need help?
Do you have a question about the BinMaxx and is the answer not in the manual?
Questions and answers