Air Weigh BinMaxx Operation Manual
Hide thumbs
Also See for BinMaxx:
- User manual (28 pages) ,
- User manual (36 pages) ,
- Installation manual (28 pages)
Table of Contents
Advertisement
Quick Links
Download this manual
See also:
User Manual
Advertisement
Table of Contents

Related Manuals for Air Weigh BinMaxx


Summary of Contents for Air Weigh BinMaxx
- Page 1 The Leader in Onboard Weighing Technology ™ BinMaxx Scale Calibration and Operations Manual PN: 901-0147-000 Rev. 001...
-
Page 2: Table Of Contents
Table of Contents I. BinMaxx FRONT-END LOADER SCALE SYSTEM OVERVIEW ..................3 Scale Display Overview ............. 3 Scale Buttons ................3 II. CALIBRATION ................4 Preliminary Considerations ............5 Calibration Overview ..............5 Calibration Procedure ..............5 III. FUNCTIONAL OPERATION ............ 8 User / System Operation ............ -
Page 3: Binmaxx Front-End Loader Scale System Overview
Once the scale has been calibrated correctly, the scale will display accurate net weights for any load or bin size. Use of the Air-Weigh BinMaxx Calibration Tank (Part Number 1280) is highly recommended for the most accurate calibration of the scale system. -
Page 4: Calibration
NOTE It is important that the calibration be completed as quickly as possible so that the arm temperature does not vary much during the calibration process. Figure 1: BinMaxx Calibration Tank... -
Page 5: Preliminary Considerations
Preliminary Considerations The accuracy of the BinMaxx Scale depends on the accuracy of the calibration weight used. Air-Weigh’s Calibration tank (Part Number 1280) has been previously weighed and the empty and heavy weights are located on a sticker attached to the outside of the calibration weight. - Page 6 OK. Push ESC until the main menu is reached. Heavy Calibration If using the BinMaxx Calibration tank, remove the lid and fill the tank with water until it is overflowing. Securely replace the lid. Turn the vehicle on and wait for the scale to power-up.
- Page 7 The new empty calibration weight value entered will automatically recalculate the Empty Ratio and Offset. Once calibrated, your Air-Weigh BinMaxx Scale will display weight in 20lb (10kg) increments, and is ready for use.
-
Page 8: Functional Operation
Do not exceed 60 seconds above the high proximity switch when emptying a bin, before returning to the measurement zone. BinMaxx will update the Lift # and Net weight soon after the bin has dropped below the Low proximity switch measurement area. - Page 9 Once the scale has been fully calibrated it will display RESET LIFT # or LIFT # / NET, depending on user settings. RESET LIFT # At this screen, the driver has the ability to reset both the Lift # and the Total (accumulated net bin weight) value.
-
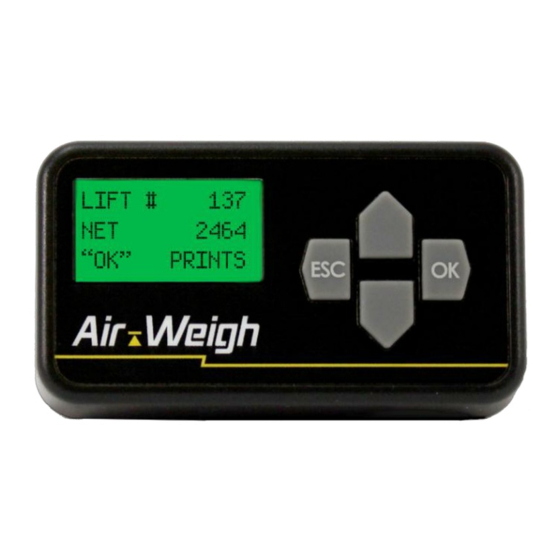
Page 10: Lift # / Net Or Total Screen
If Screen 1A or B appears, this signifies that the Printer is not connected and/or powered on. All data will be recorded in the BinMaxx ComLink, to be printed or transferred at a later time based upon user command input. -
Page 11: Erase / Print
NOTE Screen 2 will only be displayed if a printer is connected to the BinMaxx scale and it is operational. Use the UP or DOWN arrow buttons on the display to migrate to the desired action and it will begin to flash. Press the OK button to select the desired action. -
Page 12: Print, Erase Screen 2
If ERASE ALL is desired, Press OK. This process will delete all Lift and Weight information stored in the BinMaxx Comlink. A caution will be displayed. “USE CAUTION! PUSH “OK” TO ERASE ALL”. Pressing OK will delete all Lift and Weight data stored in the BinMaxx Comlink. -
Page 13: Setup
ALL command. Select ERASE ALL by pressing OK. This process will permanently delete all Lift and Weight information from the BinMaxx Comlink. When selecting ERASE ALL a caution will be displayed. “USE CAUTION! PUSH “OK” TO ERASE ALL”. Pressing OK will permanently delete all Lift and Weight data stored in the BinMaxx ComLink. -
Page 14: Display Setup
Display Setup Select DISPLY SETUP, Press OK. CALIBRATION DISPLY SETUP PWR UP MODE The display will show: LBS / KGS – Sets display as pounds or kilograms BRIGHTNESS – will change the display brightness LITE TIMEOUT – sets the display timeout time Select LBS / KGS, Press OK. -
Page 15: Truck Number
When (Now Prompt) is displayed, any time the truck is powered up, it will prompt the driver to Reset the Lift # and/or the Weight to zero. If the driver does not want to reset the Lift # or Weight at power up, select DON’T PROMPT, Press OK. -
Page 16: Date And Time
In this mode the BinMaxx system is looking for the Empty and Heavy Calibration weights to be input into the system. If the Air-Weigh calibration weight is used, the Heavy weight is 2580 lbs and the Empty weight is 480 lbs. If another weight is being used to calibrate (Empty / Heavy bin as an example), enter the Empty / Heavy bin weights as measured on a scale. -
Page 17: Display
Select CALIB DATA, Press OK. The screens will display Lift and Drop calibration data. Use the UP and DOWN arrows to page between screens. Select ECU ID, Press OK. The screen will display the BinMaxx Version number, Model number and unit Serial number. -
Page 18: Error Messages
IV. ERROR MESSAGES The following error messages may be displayed during BinMaxx operation. ERROR DESCRIPTION POSSIBLE CAUSE MESSAGE SCALE The scale did not deduce a Net Bad or damaged SYSTEM weight change after the lift; deflection sensor; ERROR deflection sensor value at 0... -
Page 19: Appendix
RECOMMENDED AIR-WEIGH CALIBRATION TANK A refuse front-end-loader vehicle with a BinMaxx scale installed must be calibrated before it can be placed in service. In order to calibrate a BinMaxx scale, Air-Weigh recommends that our calibration tank (P/N 1280) be used to perform the calibration. - Page 20 NOTES...
- Page 21 NOTES...
-
Page 22: Limited Warranty
Limited Warranty product failures material manufacturing defects, Air-Weigh will replace or repair all components for up to three years from shipment date to the end-user Air-Weigh customer. These three-year components include: displays, ComLinks , sensors, power cables, sensor assemblies, sensor harnesses, and all other associated external components. Air-Weigh assumes no responsibility for administering warranty claims directly with any third-party end users. -
Page 23: Procedure For Warranty Claims
Procedure for Warranty Claims 1. For a warranty claim customers must contact Air-Weigh Customer Support and provide the part number, serial number, and failure description of the failed item. At our discretion, we will replace or repair units that have failed due to workmanship. - Page 24 1730 Willow Creek Circle • Eugene, Oregon 97402-9152 USA P.O.Box 24308 • Eugene, Oregon 97402-0437 USA Telephone (541) 343-7884 • Order Desk (888) 459-3444 Customer Support (888) 459-3247 • FAX (541) 431-3121 Hours of Operation: Mon-Fri, 7am – 5pm, Pacific Time www.Air-Weigh.com Visit our YouTube channel to view our online installation and calibration videos: http://www.youtube.com/user/AirWeigh...
Need help?
Do you have a question about the BinMaxx and is the answer not in the manual?
Questions and answers