Table of Contents
Advertisement
Quick Links
Advertisement
Table of Contents

Related Manuals for ADB DTS


Summary of Contents for ADB DTS
- Page 1 Instruction Manual 8” Inset AD-light Type DTS / DTC AM.04.510e Edition 1.5...
- Page 2 AM.04.510e - Edition 1.5...
- Page 3 ADBs prior written consent. This manual could contain technical inaccuracies or typographical errors. ADB reserves the right to revise this manual from time to time in the contents thereof without obligation of ADB to notify any person of such revision or change.
-
Page 4: Table Of Contents
Table of contents About this manual 1.1. How to work with the manual ......................6 1.2. Record of changes..........................6 1.3. Abbreviations and terms ........................7 1.4. Icons used in the manual ........................7 Safety 2.1. Use..............................8 2.2. Safety symbols............................8 2.3. Skilled personnel..........................9 2.4. Liability ..............................9 2.5. -
Page 6: About This Manual
DTS / DTC light, in the manual referred to as the fixture. How to work with the manual Familiarize yourself with the structure and content. Carry out the actions completely and in the given sequence. -
Page 7: Abbreviations And Terms
Generic term for an item that holds the fixture together or that holds the fixture on its mounting support, e.g. nut, bolt, washer Foreign Object Debris Commercial name for an ADB type of 8” shallow base ICAO International Civil Aviation Organisation... -
Page 8: Safety
Safety Safety Read all warnings carefully. Failure to do so may result in personal injury, death, or property damage. To use the equipment safely: Refer to the International Standard IEC 61820, Electrical installation for lighting and beaconing of aerodromes - Constant current series circuits for aeronautical ground lighting - System design and installation requirements, and to the International Standard IEC 61821, Electrical installations for lighting and beaconing of aerodromes - Maintenance of aeronautical ground lighting circuits for instructions on safety precautions. -
Page 9: Skilled Personnel
Use this equipment only as described in the manual. ADB cannot be held responsible for injuries or damages resulting from non-standard, unintended uses of its equipment. The equipment is designed and intended only for the purpose described in the manual. -
Page 10: Fasteners
Safety Fasteners WARNING Only use fasteners of the same type as the one originally supplied with the equipment. Always tighten the fasteners to the recommended torque. Use a calibrated torque wrench and apply the recommended adhesive type. Obey the instructions of the adhesives necessary for the fasteners. If this is not the case, this may cause the fasteners to loosen, damage the equipment, potentially to loosen the equipment. -
Page 11: Maintenance And Repair
Maintenance and repair Allow only skilled personnel to perform maintenance, troubleshooting, and repair tasks. Only persons who are properly trained and familiar with ADB equipment are permitted to service the equipment. Always use safety devices when working on the equipment. -
Page 12: Description
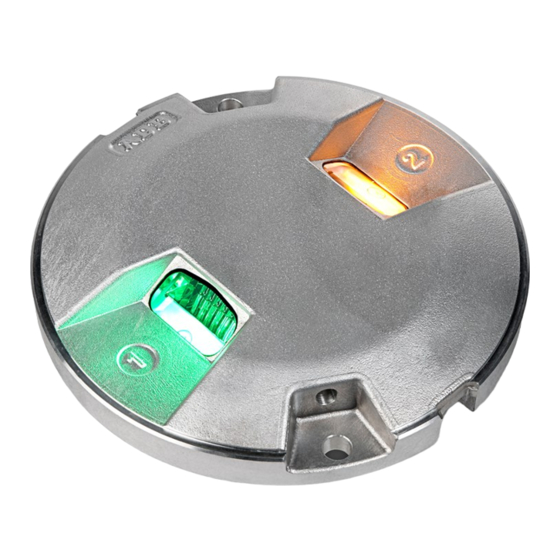
You can find a complete overview of the fixture in all available versions in the chapter 7. Intended use The ADB taxiway inset light types DTS / DTC are intended for: Centre line lights on straight and curved taxiway sections and on rapid exit taxiways... - Page 13 E: Article number of the inner cover assy. Note For an overview of all fixture colour codes see § 7.1. If you modify the fixture, it is your responsibility to update the identification. ADB can supply modification stickers: see § 7.3. AM.04.510e - Edition 1.5...
-
Page 14: Install And Replace The Complete Fixture
Obey the instructions of the adhesives necessary for the fasteners. Only install the fixture on mounting supports: That ADB has approved; That are installed according to the Instruction Manual of the mounting support. Failure to do so can result in a highly dangerous situation of FOD, with potential lethal consequences. - Page 15 Install and replace the complete fixture CAUTION Make sure that: The fixture is supplied from a 6.6 A series circuit; The series circuit is powered by a Constant Current Regulator that complies with IEC 61822; The transformer is an AGL series transformer that complies with IEC 61823.
- Page 16 Install and replace the complete fixture Curved section only Make sure the ADB logo (A) points towards the centre (B) of the curve of the section. Install Lubricate and connect Lubricate the labyrinth gasket (A) with water. Note To facilitate the use, add some soap to the water.
- Page 17 Install and replace the complete fixture Install Carefully move the fixture (A) vertically into the mounting support (B). Make sure that you do not pinch the cable leads. Check if the fixture fits correctly in the mounting support. Make sure the dents of the washers (D) face upwards.
-
Page 18: Remove
Install and replace the complete fixture Remove WARNING Make sure the power is OFF when you install or remove any fixture. CAUTION Never hold the fixture by the cable leads. This can damage the insulation, break the waterproof seal and cause insulation faults and water leakage. Note The instructions show only the lifting tool (on wheels). - Page 19 Install and replace the complete fixture AM.04.510e - Edition 1.5...
-
Page 20: Maintenance
Maintenance Maintenance Maintenance personnel must refer to the maintenance procedure described in the ICAO Airport Services Manual, Part 9, Airport maintenance practices and in FAA Advisory Circular N° AC150/ 5340-26, chapter 45, section 4. WARNING Do not carry out any action on the fixture unless you have read and understood all the information in the chapter 2. -
Page 21: Part Replacement
Maintenance Part replacement WARNING Only use fasteners of the same type as the one originally supplied with the fixture. Always tighten the fasteners to the recommended torque. Use a calibrated torque wrench. If this is not the case, this may cause the fasteners to loosen, damage the fixture, potentially to loosen the fixture. - Page 22 Maintenance 5.2.2 Replace upper cover assy CAUTION Always dispose of the gaskets and the screws when you disassemble the upper cover assy. Parts Upper cover assy Inner cover screws Gasket of the pressure release screw Tools: Lubricant A. See § 7.4. Disassemble Remove the pressure release screw (A).
- Page 23 Maintenance 5.2.3 Replace prism CAUTION Always dispose of the gaskets and the screws when you disassemble the prism. Parts Prism Prism gasket Prism screws. Disassemble Remove the upper cover assy. See § 5.2.2. Remove the prism screws (A). Dispose of the prism screws. Remove the prism bracket (B).
- Page 24 Maintenance 5.2.4 Replace optical assy CAUTION Always dispose of the gaskets and the screws when you disassemble the optical assy. Parts Optical assy Optical assy screws. Gasket for optical assy Gasket of the pressure release screw Tools Lubricant A. See § 7.4. Disassemble Remove the upper cover assy.
- Page 25 Maintenance Connect to PCB Connect the optical assy to input 1 and 2 on the PCB, if applicable. INPUT 1 INPUT 2 INPUT 1 and INPUT 2 are labelled underneath the connector. When you have an unidirectional light, connect the optical assy to connector INPUT1.
- Page 26 Maintenance 5.2.6 Replace cable lead Parts Cable lead Cable lead screws. Plug bracket Disassemble Remove the cable lead screws (A). Dispose of the cable lead screws. Remove the plug bracket (C). Remove the cable lead (B). Assemble Install the new cable lead. Install the plug bracket.
- Page 27 Take a new inner cover assy with new fuse resitors. Connect the PCB. See § 5.2.4. Do not fasten the optical assy. Do a fixture operation test. See § 5.4. If the fixture does not turn on, contact ADB. Assemble Assemble the optical assy. See § 5.2.4.
-
Page 28: Waterproof Test
Maintenance Disassemble Remove the fuse resistor(s) (A) by pulling the legs of the fuse resistor. Dispose of the old fuse resistor. Take the new fuse resistor from the kit. Place the new fuse resistor in the socket. Assemble Insert the legs of the new fuse resistor in the socket. Waterproof test Tools Air hose with dry air... -
Page 29: Fixture Operation Test
Maintenance In case of a leak Locate the leak source. Replace the gasket or part that causes the leak. Note Also check contact surfaces for any scratches, corrosion or other damage. Repeat the waterproof test. Fixture operation test Tools FAA or IEC series transformer, powered from a FAA or IEC constant current generator Note The power of the series transformer shall not exceed 200 W, for versions with the monitoring option. -
Page 30: Troubleshooting
Troubleshooting Troubleshooting Troubleshooting guide Table: 6.1 Troubleshooting guide Problem Possible cause Possible solution No light or light flickers Connection to the input power Remove the fixture. See has a malfunction. § 4.4. Check the electrical connection, the cable and the receptacles. The LED has a malfunction Replace the optical assy. - Page 31 Troubleshooting AM.04.510e - Edition 1.5...
-
Page 32: Technical Data
R = Red G = Green Y = Yellow N = Blank (no light) Toe-in 0 = No toe-in (for DTS) 3 = toe-in on both sides (for DTC) Dimensions A = 8" diameter Power supply and Monitoring S = 6,6A - 50/60Hz series supply, without monitoring option... -
Page 33: Hardware Kits
0: Fixed digit DTS: Toe-in = 0 0: Original version Hardware kits Note HPI bases only accept metric fasteners. Metric fasteners To install 8” inset lights on ADB 8” mounting supports. kits Hardware kit Components Description ADB Part number Metric screw kit 8” (with anti-rotation pins) 1411.20.400 Metric nut kit 8”... - Page 34 Technical data UNC fasteners kit To install 8” inset lights on ADB 8” mounting supports. Hardware kit Components Description ADB Part number UNC screw kit 8” 1411.20.410 AM.04.510e - Edition 1.5...
-
Page 35: Exploded View And Components
Technical data Exploded view and components 7.3.1 Exploded view AM.04.510e - Edition 1.5... - Page 36 Technical data 7.3.2 Components Components Versions A Upper cover assy (includes Unidirectional, window 1 4072.24.910 4072.25.170 metal cover, prisms, prism Unidirectional, window 2 4072.37.090 4072.25.180 gaskets, prism protection Bidirectional 4072.24.900 4072.25.110 plates, prism screws and prism brackets) B Labyrinth gasket 4071.73.100 C Prism Straight sections...
-
Page 37: Standard Toolkit
Technical data Components Versions O Cable lead With Style 6 2-pole plug 4072.24.951 With Style 1 2-pole plug (German 4072.24.731 version) With flat 3-pole plug (French 4072.24.771 version) 18" long, with Style 6 2-pole plug 4072.42.350 P Fuse resitor kit (20 Monitoring option 6132.00.250 resistors) -
Page 38: Additional Accessories
Technical data Details Article number Lubricant B Molykote HP870 Inerta (100 g) to replace prism 7850.05.061 Tool A Torque wrench 8961.06.203 Tool B Socket, hex 3/8”, screw 3/8”, J9/16LA 8961.06.008 Tool C Socket, hex 3/8”, screw M10, J 17LA 8961.06.000 Tool D Socket, 1/4”, 1.6x8 Flat, RS.8E 8961.05.050... -
Page 39: Specifications
Technical data Specifications Item Description Lamp rating 9 W per side 11W (Bidirectional light with one plug) Nominal supply current 6.6 A +/- 3% Rated frequencies 50 / 60 Hz (+/- 7.5%) Protection class IP67 Dimensions 203 mm x 97 mm (diameter height) Weight 4.0 kg... - Page 40 Tel: +86 10 8476 0106 P.O. Box 341218 Fax: +86 10 8476 0090 United Arab Emirates Tel: +971 4372 4970 ADB Airfield Solutions GmbH & Co. KG Fax: +971 4372 4975 Von-der-Tannstr. 31 90439 Nürnberg Germany Unit 44 Business Innovation Centre...
- Page 41 AM.04.510e - Edition 1.5...
Need help?
Do you have a question about the DTS and is the answer not in the manual?
Questions and answers