
Related Manuals for Alcatel-Lucent OmniTouch 8082 My IC


Summary of Contents for Alcatel-Lucent OmniTouch 8082 My IC
- Page 1 Alcatel-Lucent OmniTouch™ 8082 My IC Phone OmniPCX Office Rich Communication Edition User Manual R300 8AL90835USBDed01 -1409...
- Page 2 Introduction Thank you for choosing an Alcatel-Lucent phone. This model offers enhanced ergonomical features for more effective communication.
-
Page 3: Table Of Contents
1 GETTING TO KNOW YOUR TELEPHONE 1.1 PERMANENT FEATURES KEYS 1.2 ABOUT THE HOMEPAGE 1.3 NAVIGATION 1.4 APPLICATION 1.5 BLUETOOTH® WIRELESS HANDSET 1.6 INSTALL A COMFORT WIRED HANDSET 2 USING YOUR TELEPHONE 2.1 CHANGE THE DEFAULT PASSWORD 2.2 MAKING A CALL 2.3 MAKE A CALL USING THE PERSONAL PHONE BOOK (CONTACTS) 2.4 USING CALL BY NAME 2.5 CALL FROM CALL LOG ( HISTORY) - Page 4 4 VIDEO CALL 4.1 VIDEO CALL 4.2 START A VIDEO CALL 4.3 MUTE/UNMUTE THE VIDEO CALL 4.4 HIDE/SHOW THE ‘PICTURE IN PICTURE’ 4.5 DISPLAY VIDEO IN FULLSCREEN MODE 4.6 RECEIVING A SECOND CALL 5 CONTACTS MANAGEMENT 5.1 DEFINE A CONTACT 5.2 ADD A CONTACT FROM THE CALL LOG 5.3 ADD A CONTACT TO THE CONTACTS LIST FROM THE SEARCH BY NAME RESULTS 5.4 MAKE A CALL USING THE PERSONAL PHONE BOOK ( CONTACTS)
- Page 5 8.11 ADJUST THE LOUDSPEAKER AND THE HANDSET VOLUME 8.12 ACTIVATE/DEACTIVATE TACTILE FEEDBACK 8.13 ACTIVATING HEADSET MODE 8.14 INSTALL A BLUETOOTH® DEVICE (PAIRING) 8.15 INSTALL THE ALCATEL-LUCENT MY IC PHONE BLUETOOTH® WIRELESS HANDSET 8.16 UNINSTALL A BLUETOOTH® DEVICE (UNPAIRING) 8.17 HEARING AID KIT 8.18 SET AN ALARM 8.19 FILE MANAGER...
- Page 6 10 MY IC PHONE SYNCHRONIZER 10.1 INTRODUCTION 10.2 PREREQUISITES 10.3 INSTALLING THE APPLICATION ON YOUR PC 10.4 UNINSTALLING THE APPLICATION 10.5 REPAIRING THE APPLICATION 10.6 CONFIGURATION 10.7 SYNCHRONIZE YOUR PHONE AND YOUR PC 10.8 TROUBLESHOOTING 11 GUARANTEE AND CLAUSES...
-
Page 7: Getting To Know Your Telephone
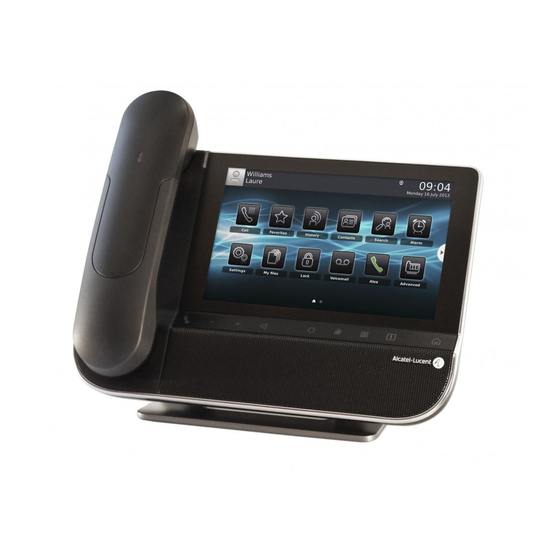
1 Getting to know your telephone A sensitive LCD wide screen Permanent feature keys: quick access to the phone’s main features A Bluetooth® handset for optimized communication A wired handset is also available and can replace the Bluetooth® handset. A wideband loudspeaker for optimized sound Arrival of a new call( Flashing) An adjustable and stable foot One 3.5 mm headset jack... -
Page 8: Permanent Features Keys
1.1 Permanent features keys They are located just below the touch screen Mute key. During a call, press this key to stop your contact from hearing you. As long as the mute feature is activated, the mute key stays lit (blue). Press this key to deactivate the mute feature. -
Page 9: About The Homepage
1.2 About the homepage Homepage in advanced mode Homepage in standard mode Personal area This area displays information about the user's phone and configuration, including last name, first name, avatar, and routing. Routing profile Access programming and configuration of routing profiles. User Information about the user. - Page 10 Date, time and connectivity area This area displays time, date, connectivity and customization information (wake-up on, intercom mode on). Security mode. Storage device connected to USB port. Bluetooth® device pairing in progress. Bluetooth® device connected (Other than your Bluetooth® handset). Headset plugged in.
- Page 11 Make sure your password is correct. Press your information area in the top left corner of the screen User Information Login Enter your password Bluetooth® device not connected Video active on your phone (blue color) Video available on your phone (white color) Active area This area is reserved for running applications and for previews of applications selected by the user.
-
Page 12: Navigation
1.3 Navigation Homepage The phone set homepage can be viewed in standard or advanced mode. Scroll your finger up or down to get the page or menus scrolling vertically (in advanced mode), or scroll right or left to get the page scrolling horizontally. (in standard mode only). Homepage in standard mode Homepage in standard mode Make your selection by pressing on the screen... -
Page 13: Application
1.4 Application The homepage in standard mode and the applications bar on the homepage in advanced mode allow you to access the phone applications. Scroll through the application area pages (standard mode) or the application bar (advanced mode) to find the application you want. Press the application button to access to the application... -
Page 14: Bluetooth® Wireless Handset
1.5 Bluetooth® Wireless handset Off-hook/On-hook: press this key to take or terminate a call Volume/Mute: Short successive presses to change the handset volume level (3 levels) Long press to activate or deactivate mute mode Location of the battery If the Bluetooth®... -
Page 15: Install A Comfort Wired Handset
1.6 Install a comfort wired handset You can install a wired handset in place of the My IC Phone Bluetooth® Wireless Handset. Plug-in the wired handset to the appropriate connector (refer to phone description). Switch off the My IC Phone Bluetooth® Wireless Handset (long press on the On/Off hook key until you hear two distinct tones). -
Page 16: Using Your Telephone
2 Using your telephone 2.1 Change the default password To access all your phone's features you need to replace the default password with a new password. Use one of the following: Press the User services key. Press your information area in the top left corner of the screen User Information ... -
Page 17: Make A Call Using The Personal Phone Book (Contacts)
End the call Use one of the following: Hang up the handset. End call On-hook key on the Bluetooth® handset. 2.3 Make a call using the personal phone book (Contacts) Select the application. Contacts Select the contact to call Information regarding your contact is displayed on the screen. -
Page 18: Call From Call Log ( History)
2.5 Call from call log ( History) All incoming, outgoing, missed or unanswered calls are displayed in the call log. You can call back from your phone call log. Select the application. History The history application shows two tabs, listing new phone events such as missed calls, and older phone events. -
Page 19: Call A Contact From The Favorites Application ( Favorites)
2.7 Call a contact from the favorites application ( Favorites) Favorites: This application contains favorite contacts that you have selected in your personal directory. Select the application. Favorites All contacts defined as a favorite are displayed. Select the contact to call. ... -
Page 20: Ignore Call
2.9 Ignore call A call is received: Ignore Your phone no longer rings but your caller still hears the ringing tone. You can still answer the call after you have ignored it 2.10 Forward an incoming call A call is received:. Your telephone rings. Forward to voicemail ... -
Page 21: Receiving Intercom Calls ( Interphony)
2.12 Receiving intercom calls ( Interphony) You can answer a call without lifting the receiver. When you receive a call, you are automatically connected in hands-free mode. The identity of the caller is displayed on the screen. To answer in intercom mode: ... -
Page 22: Delete One Call Log Event
2.15 Delete one call log event Select the application. History Select tab: History Press the desired event. Delete You can also access the feature by selecting the application preview History. 2.16 Delete events from the call log ... -
Page 23: During A Conversation
3 During a conversation 3.1 Putting a caller on hold You are in communication. On hold Your call is placed on hold. Your caller hears on-hold music or a tone until you pick the call up again. Recover the correspondent on hold. ... -
Page 24: Switching Between Calls (Broker Call)
3.3 Switching between calls (Broker call) You are in communication with a first correspondent. A second correspondent is on hold. Switch from one caller to another by selecting the caller on hold in the call log. You are in communication with the second contact: First call is automatically placed on hold. 3.4 Transferring a call During a conversation, to transfer the call to another number: You are in communication with a first correspondent. -
Page 25: Mute, So That Your Correspondent Cannot Hear You
3.6 Mute, so that your correspondent cannot hear you During the call, you do not wish your correspondent to hear you. Use one of the following: Press your phone Mute key: Mute mode is activated (The key is blue). Your caller can no longer hear you. -
Page 26: Video Call
4 Video call 4.1 Video call To use this feature, both your phone and your correspondent's phone must have the feature enabled. The phones must also be able to handle video. During a video call, the screen comprises two areas. The main screen shows your correspondents video and the “picture in the picture“... -
Page 27: Mute/Unmute The Video Call
This icon displayed in your contact details notifies you that the video call is being connected. This icon displayed on your contact details notifies you that the video call cannot be started. You can try to start a video call later on during the audio conversation. This icon (blue) displayed in the connectivity area notifies that broadcast is ongoing. -
Page 28: Receiving A Second Call
4.6 Receiving a second call You can only have one video communication at a time. This means that you cannot handle a second video call. Answering a second call during a conversation If you answer the incoming call, the ongoing video and audio call are put on hold. Retrieve the video call on hold the same way as an audio call. -
Page 29: Contacts Management
5 Contacts management 5.1 Define a contact Select the application. Contacts Add new contact Fill in the contact file. You must provide at least a last name. Back Your contact is added to the directory. For external numbers, we recommend you use canonical address formats comprising “+“, followed by the country code (e.g. -
Page 30: Add A Contact To The Contacts List From The Search By Name Results
5.3 Add a contact to the contacts list from the search by name results Search Enter the first letters of your contact name. The names of contacts matching your search criteria are automatically displayed on the screen. ... -
Page 31: Delete A Contact
5.6 Delete a contact Select the application. Contacts Select the contact to delete. Delete 5.7 Define a contact as a favorite ( Favorites) Most frequently called contacts can be defined as a favorite. Favorite contacts are displayed in the application Favorites. ... -
Page 32: Programing A Direct Shortcut For A Contact
5.8 Programing a direct shortcut for a contact. In standard mode, you can program a direct call shortcut on your homepage. Access programming and configuration of shortcut keys on the homepage Select the application. Settings Application Homepage Features keys are displayed on the bottom of the homepage. These keys are meant to manage shortcut key programming, key modification, deletion, moving and reseting of the homepage display. -
Page 33: Keep In Touch
6 Keep in touch 6.1 Define a forward Your phone allows you to define different types of forwards. Immediate forward All your calls are immediately forwarded to another set or voicemail. Forward if busy All your calls are forwarded to another set or voicemail when you are already on the line. ... -
Page 34: Activate A Predefined Forward
6.2 Activate a predefined forward Your phone allows you to activate predefined forwards or forwards that you created previously. Use one of the following: Press the User services key. Press your information area in the top left corner of the screen. ... - Page 35 All new messages. The number of new message is displayed on the tab. Messages Old messages. Select the appropriate tab. Select a message. Information regarding your contact is displayed on the screen. Play VM Listen to message. ...
-
Page 36: Cancel The Forward
6.5 Cancel the forward Forward is active (forward key lit). Use one of the following: Press the User services key. Press your information area in the top left corner of the screen. Route my calls to My office phone ... -
Page 37: Keypad
7 Keypad 7.1 Change the keyboard type While editing text, you can change the keyboard type to match the language you are writing: : AZERTY, QWERTY, QWERTZ, Cyrillic. The keyboard is displayed on the screen. Select the keypad type (AZERTY, QWERTY, QWERTZ, Cyrillic, ...). ... -
Page 38: Write A Number
7.4 Write a number Press this key once. The associated key light is on. Write numbers. To go back to alphabetic mode, press the key again. The associated key light is off. This green key light is on. The numerical keyboard is activated. 7.5 Write special characters ... -
Page 39: Programming Your Telephone
8 Programming your telephone 8.1 Define the phone language Select the application. Settings Settings Device Phone configuration Language Select the language of your choice. Back to homepage. 8.2 Favorites This application contains favorite contacts that you have selected in your personal directory ( Address book). -
Page 40: Lock / Unlock Your Telephone
8.3 Lock / unlock your telephone Once the phone is locked, you can only call special numbers such as emergency, security or standard (3 max configured by the administrator). Locking your terminal Use one of the following: Press the User services key. Press your information area in the top left corner of the screen. -
Page 41: Automatic Lock
8.4 Automatic lock When your phone's backlight goes off, the phone is locked at the same time. Activate the automatic lock Select the application. Settings Application Lock Lock on backlight off Enable the feature. Set the time-out duration for the phone backlight and lock ... -
Page 42: Ring Tones
8.7 Ring tones Select the application. Settings Device Audio Beeps before ringing One beep : One beep before ringing. Two beep : Two beeps before ringing. Three beep : Three beeps before ringing. No beep : Ring without beep. ... -
Page 43: Activating Headset Mode
8.13 Activating headset mode The side of the telephone features a 3.5 mm jack connector for headphone / external microphone. Contact your retailer for information on the various headphone models available. By default, the audio jack of your telephone can be used to connect a headset, hands-free kit or loudspeaker. -
Page 44: Install The Alcatel-Lucent My Ic Phone Bluetooth® Wireless Handset
Bluetooth® accessory Headset Handsfree Loudspeaker All devices other than the Alcatel-Lucent My IC Phone Bluetooth® Wireless Handset will be treated as headset device. 8.15 Install the Alcatel-Lucent My IC Phone Bluetooth® Wireless handset Select the application. Settings ... -
Page 45: Uninstall A Bluetooth® Device (Unpairing)
After pairing the Bluetooth® accessory, you must define the accessory type in the audio settings. Select the application. Settings Device Audio Accessory type BT Ok Bluetooth® accessory Headset Ok Error messages The handset displays an error message indicating that the pairing is unsuccessful Check the status of your Bluetooth®... -
Page 46: File Manager
8.19 File Manager This application allows you to manage audio files and images. Select the application. My files Select the file type you want: Audio Picture Select where to read the files from: files stored on the phone or on the connected USB device, or both. -
Page 47: Copy A File From The External Storage Device To The Phone Internal Memory
8.21 Copy a file from the external storage device to the phone internal memory Select the application. My files Select the file type you want: Audio Picture Filters Select the storage device. Select the file to copy. ... -
Page 48: Play All Audio Files
Supported audio formats are mp3 and aac. When released from the manufacturing plant, the audio files hosted on My IC Phone are Alcatel-Lucent property and can be used as is. When a installer or End-User downloads MP3 files via a USB link, they are responsible for the Intellectual Property Right requirements related to such downloads. -
Page 49: Phone Screensaver
8.25 Phone screensaver You can change your phone screensaver to a default or a personal screensaver. The default screensaver uses predefined images. The personal screensaver uses images you have stored in your phone memory and set up in a screensaver pool. ... -
Page 50: Customize The User Picture
8.26 Customize the user picture You can change the picture displayed in your personal information area in the top left corner of the screen. The image must be stored in the set or on a USB storage device. If the image is on the USB storage device, you must connect it to the phone: ... - Page 51 Add a shortcut key You can select a contact to associate to the key via your list of contacts, the search by name feature or via the keypad. Once you have found your contact via your list of contacts or the search by name feature, or once you have entered your contact number: ...
-
Page 52: Change The Theme (Skin) Of Your Phone
Deleting shortcut keys Delete Select the shortcut key to delete. Confirm the deletion. The key is deleted. Reseting homepage display When you move shortcut keys and default feature keys on the homepage, you can reset the display and go back to the default display. -
Page 53: Reset User Data
8.29 Reset user data Using the reset feature will erase: The audio files or photos that you have stored on your phone, your programmable keys, your contacts, your communications log, your programmed alarms, your own settings (made via the ‘Application’ or the ‘Device’ menus), ... -
Page 54: Manager/Assistant
9.1 Manager/Assistant The Manager/Assistant application offers specific additional features when the manager set (Alcatel- Lucent 8082 My IC Phone) is configured for use with an assistant phone (Alcatel-Lucent IP Touch 4068, 4038, 4039, 4028 or 4029 Phone). On the manager set, a dedicated application window shows the name of the assistant, the direct call feature access button, and the filtering mode access button. -
Page 55: Talk To The Assistant While On A Call
Manager receives the calls & Assistant monitors them In this filtering mode, the assistant is notified of the incoming call on the manager set. If necessary, the assistant can pick up the incoming call before the manager answers the call. If the call is picked up by the assistant, the call is identified by a special arrow in the history preview on the manager set. -
Page 56: My Ic Phone Synchronizer
10 My IC Phone Synchronizer 10.1 Introduction This application is for synchronizing your address book between your phone and the Outlook application. It supports synchronization of the Outlook data placed locally, for example in a local Outlook archive file. The default maximum number of contacts you can synchronize between your phone and your PC is 500. - Page 57 3. Read and agree the license Agreement. 4. Select the application destination folder on your PC (make sure you have the necessary administration rights to install the application in the selected folder). 5. Follow the installation steps.
-
Page 58: Uninstalling The Application
10.4 Uninstalling the application There are two different ways for uninstalling the application: Access the feature “Add/remove programs“ (Windows XP) or “Programs and features“ (Windows Vista or Windows 7). Run the installation executable file and select the “Remove“ option. 10.5 Repairing the application If the application becomes corrupted, you can repair it. - Page 59 2. You can define : The profile and the Outlook folder to use for synchronizing contacts. The default profile and Outlook folder will be used for synchronizing unless you specify a folder and profile. You can change the profile and folder used. You can define a profile for synchronizing the contacts.
- Page 60 The port used by PC for synchronization : if default port cannot be used on the PC you can change it. If you modify the port used by the application, you have to do the same modification on the phone side. Secured connection : while communicating between My IC Phone Synchronizer and the device, both unsecured HTTP or secured...
- Page 61 Configuring the phone Settings Application Synchronization PC address Enter the IP address or the complete network name on which the synchronization application is installed. PC port This data defines the port used on the PC for synchronization. The port must be the same as the one filled in the PC application.
-
Page 62: Synchronize Your Phone And Your Pc
10.7 Synchronize your phone and your PC Before starting synchronization please make sure both the phone and PC software are properly configured. Start synchronization Use one of the following: Synchronization (If enabled in the synchronization settings) Settings Application Synchronization ... -
Page 63: Troubleshooting
10.8 Troubleshooting Below is a troubleshooting guide that can help you resolve any problems that might occur. Installation says you do not have write You are probably not permitted to change the folder in which you are permissions in this folder trying to install PC Sync. -
Page 64: Guarantee And Clauses
When released from the manufacturing plant, the audio files hosted on My IC Phone are Alcatel-Lucent property and can be used as is. When a installer or End-User downloads MP3 files via a USB link, they are responsible for the Intellectual Property Right requirements related to such downloads. - Page 65 Regulatory Statements EU/EFTA This equipment is in compliance with the essential requirements of R & TTE Directive 1999/5/EC. The Declaration of Conformity may be obtained from your installer. USA and Canada This device complies with Part 15 of the FCC Rules and with RSS-210 of Industry Canada. Operation is subject to the following two conditions : (1) this device may not cause harmful interference, and (2) this device must accept any interference received, including interference that may cause undesired operation.
- Page 66 The labels and icons presented in this document are not contractually binding and may be modified without prior warning. Alcatel, Lucent, Alcatel-Lucent and the Alcatel-Lucent logo are trademarks of Alcatel-Lucent. All other trademarks are the property of their respective owners. The information presented is subject to change without notice.
Need help?
Do you have a question about the OmniTouch 8082 My IC and is the answer not in the manual?
Questions and answers