
Related Manuals for DeLonghi DGH 705


Summary of Contents for DeLonghi DGH 705
- Page 1 D E’ LO N G HI C OO KIN G USER & INSTALLATION INSTRUCTIONS D GH 70 5 BUILT-IN COOKING HOB...
-
Page 2: Table Of Contents
CONTENTS Page Number Introduction ..........Important Safety &... -
Page 3: Introduction
Dear Customer, Thank you for purchasing the De’Longhi DGH 705 built- in cooking hob. The safety precautions and recommendations listed below are for your own safety and that of others. They will also provide a means by which to make full use of the features offered by your appliance. -
Page 4: Important Safety & Recommendations
IMPORTANT SAFETY PRECAUTIONS AND RECOMMENDATIONS IMPORTANT: This appliance is designed and manufactured solely for the cooking of domestic (household) food and is not suitable for any non domestic application and therefore should not be used in a commercial environment. The appliance guarantee will be void if the appliance is used within a non domestic environment i.e. - Page 5 • If you should decide not to use this appliance any longer (or decide to substitute another model), before disposing of it, it is recommended that it be made inoperative in an appropriate manner in accordance to health and environmental protection regulations, ensuring in particular that all potentially hazardous parts be made harmless, especially in relation to children who could play with unused appliances.
-
Page 6: Features
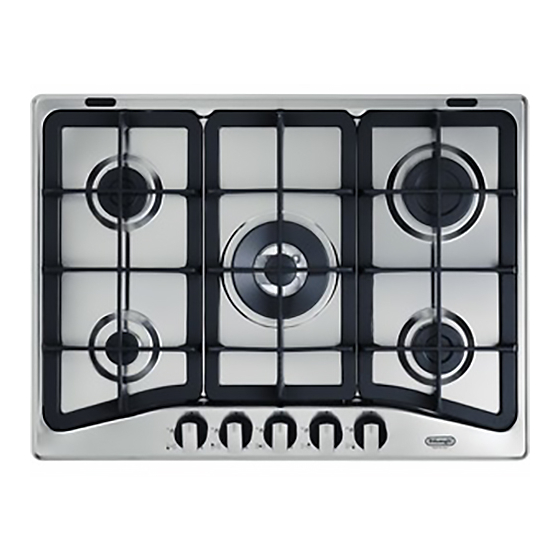
1 - FEATURES Fig. 1.1 This appliance is Class 3 (appliance for building into a kitchen unit or worktop) MADE IN ITALY GAS BURNERS Caution! Auxiliary burner (A) 1,00 kW The cooking hob becomes Semirapid burner (SR) 1,75 kW very hot during operation. Keep children well out of Rapid burner (R) 3,00 kW... -
Page 7: How To Use The Cooktop
2 - HOW TO USE THE COOKTOP LIGHTING GAS BURNERS FITTED GAS BURNERS WITH SAFETY VALVE DEVICE Gas flow to the burners is adjusted by turning the knobs (illustrated in figs. 2.1) In order to light the burner, you must: which control the valves. - Page 8 CHOICE OF BURNER The symbols printed on the panel beside the gas knobs indicate the correspondence between the knob and the burner. The most suitable burner is to be chosen according to the diameter and volume capacity of the container to be warmed. It is important that the diameter of the pots or pans suitably match the heating potential of the burners in order not to jeopardise the efficiency of the burners, bringing about a waste of gas fuel.
-
Page 9: Cleaning & Maintenance
3 - CLEANING AND MAINTENANCE GENERAL ADVICE COOKING HOBS WITH Before you begin cleaning, you • GLASS LID (optional) must ensure that the appliance is switched off at the cooker switch. • The periodical lubrication of the gas taps must be done only by specialized personnel. - Page 10 free of any cleaning chemicals to avoid damaging any screen print on the facia. • Painted surfaces: Clean very carefully with water and neutral soap; the cloth used must be rinsed well and must be free of any cleaning chemicals. Pan stands &...
- Page 11 Fig. 3.1 Fig. 3.2 Fig. 3.3 Fig. 3.4 Fig. 3.5...
-
Page 12: Advice For The Installer
Advice for the installer IMPORTANT • The appliance is designed and approved for domestic use only and should not be installed in a commercial, semi commercial or communal environment. Your product will not be guaranteed if installed in any of the above environments and could affect any third party or public liability insurances you may have. -
Page 13: Installation
4 - INSTALLATION TECHNICAL INFORMATION FOR THE INSTALLER In order to install the cooker top into the kitchen fixture, a hole with the dimensions shown in fig. 4.2 has to be made, bearing in mind the following: • If the cooktop is installed directly above an oven or if its base is accessible through a cupboard or drawer space after installation, a thermal protection barrier must be installed below the base... - Page 14 APPLYING THE SEALS • Turn the cooktop upside down. • Spread the longer seal “A” around the left, rear and right sides as shown in figure 4.4a. • With a cutter or a scissors cut the excess seal “C” and retain it for next use (figure 4.4b). • Spread the seal “B” around the left, front and right edges of the cooktop as shown in figure 4.4c.
- Page 15 FASTENING THE INSTALLATION BRACKETS (figs. 4.5, 4.6, 4.7) • Each cooker top is provided with an installation kit including brackets and screws for fastening the top to fixture panels from 2 to 4 cm thick. • Turn the cooker top upside down and fasten the brackets “F and R” to the appropriate socket holes, without tightening the screws “B” for the moment. •...
-
Page 16: Provision For Ventilation
PROVISION FOR VENTILATION • The appliance should be installed into a room or space with an air supply in accordance with the current version of BS 5440-2: 2000. • For rooms with a volume of less than 5m - permanent ventilation of 100 cm free area must be provided. -
Page 17: Gas Installation
5 - GAS INSTALLATION IMPORTANT NOTE This appliance is supplied for use on NATURAL GAS or LPG (check the gas regulation label attached on the appliance). • Appliances supplied for use on NATURAL GAS are adjusted for this gas only and cannot be used on any other gas (LPG) without modification. The appliances are manufactured for conversion to LPG. - Page 18 GAS CONNECTION Cat: 2H 3+ Installation to Natural Gas Installation to Natural Gas must conform to the Code of Practice, etc. The supply pressure for Natural Gas is 20 mbar. The installation must conform to the relevant British/European Standards. Installation to LP Gas When operating on Butane gas a supply pressure of 28-30 mbar is required.
- Page 19 The fitting (fig. 5.1) is made up of: 1/2" BSPP (G) parallel 1/2" BSPP (G) parallel – 1 nut “A” (ISO 228-1) male (ISO 228-1) female – 1 elbow fitting “C” – gasket “F” Connection to the Gas Supply – Be careful when flexible pipes are used that they do not come into contact with moving parts. –...
- Page 20 REPLACEMENT OF THE INJECTORS Auxiliary, If the injectors are not supplied they can semirapid and be obtained from the After-Sales Service. rapid burners Select the injectors to be replaced according to the “Table for the choice of the injectors”. nozzle diameters, expressed hundredths of a millimetre, are marked on...
- Page 21 TABLE FOR THE CHOICE OF THE INJECTORS Cat: 2H 3+ Natural Gas G30/G31 Nominal Reduced 28-30/37 mbar 20 mbar BURNERS Power Power [kW] [kW] Ø injector Ø injector [1/100 mm] [1/100 mm] Auxiliary (A) 1,00 0,40 Semirapid (SR) 1,75 0,45 Rapid (R) 3,00 0,75...
-
Page 22: Electrical Installation
6 - ELECTRICAL INSTALLATION IMPORTANT: The appliance must be installed in accordance with the manufacturer’s instructions. Incorrect installation, for which the manufacturer accepts no responsibility, may cause damage to persons, animals and property. The connection of the appliance to earth is mandatory. The manufacturer declines all responsibility for any inconvenience resulting from the inobservance of this condition. -
Page 23: Guarantee & After Sales Service
7 - GUARANTEE Your new “De’Longhi” product comes with 12-month guarantee covering all parts and labour. If your appliance proves to be defective as a result of faulty materials or workmanship during the guarantee period, these parts will be repaired or replaced free of charge. AFTER SALES SERVICE Should you require service, spares or product information and advice: •... - Page 24 D esc ri pt i o n s an d i ll ustrations i n this book let are gi ven a s s im p ly i nd ica ti ve . T he m an u f ac t u re r re serves the right, considering th e ch a ra cter is tics o f the model s d es c ri be d he re, at any ti me and wi thout notice, to ma ke even tua l n ecess a ry modifi c at i o n s f o r t he i r construction or for co mm erci al n eed s.
Need help?
Do you have a question about the DGH 705 and is the answer not in the manual?
Questions and answers