
Related Manuals for Oracle Audio Delphi MkVI Gen-2


Summary of Contents for Oracle Audio Delphi MkVI Gen-2
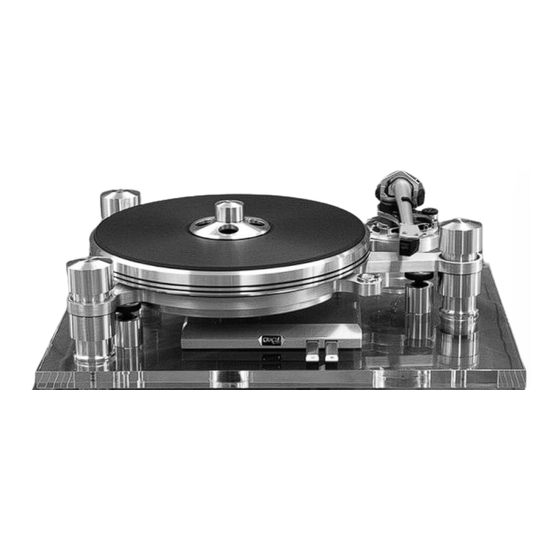
- Page 1 The Fine Art of Playing Music Oracle Audio Technologies Delphi MkVI Gen-2 Owner’s Manual...
- Page 2 FOR YOUR RECORDS Oracle Delphi MkVI Second Generation serial Number: Power Supply Serial Number: Dealer Name: Dealer Address: Dealer Phone: Purchase Date: We suggest you keep your sales slip together with this owner’s guide. Delphi MkVI Gen-2 Owner’s Manual Oracle Audio Technologies...
-
Page 3: Table Of Contents
Installing and calibrating the hinges ........... 18 The record clamp and tapered washer ..........18 Leveling your Delphi MkVI Second Generation ......... 19 Maintenance ..................20 Technical specifications ..............20 Warranty registration card ..............21 Delphi MkVI Gen-2 Owner’s Manual Oracle Audio Technologies... -
Page 4: Unpacking Your Delphi Mkvi Second Generation
Spindle holder lubricating oil (7cc syringe) Record clamp Suspension blocking spacers Oracle Power supply Drive belt Lint free cloth Suspension adjustment gauge Tool bag (screw driver, allen keys, 5/32" 9/64"-3/32"-5/64") Delphi MkVI Gen-2 Owner’s Manual Oracle Audio Technologies... - Page 5 One extra suspension spring, colored Blue Three suspension caps Three reservoirs for the Micro Vibration Stabilizer System ( MVSS ) Three plungers and wheel lock nut for the MVSS Delphi MkVI Gen-2 Owner’s Manual Oracle Audio Technologies...
-
Page 6: Assembling The Sub-Chassis
Precaution – When performing anything near the tonearm and cartridge, we recommend not wearing loose clothing, ties, sweaters or anything than can catch and damage the cartridge cantiliver. Install the tonearm following the manufacturer’s recommendations. Delphi MkVI Gen-2 Owner’s Manual Oracle Audio Technologies... - Page 7 Place the tonearm mounting board loosely in the sub-chassis mounting ring and determine the correct distance and direction to mount the arm to the arm board. First mount the tonearm to the pre-cut aluminum board. Properly secure the tone arm mounting hardware. Delphi MkVI Gen-2 Owner’s Manual Oracle Audio Technologies...
-
Page 8: Precisely Align The Phono Cartridge
Check the azimuth by lowering the stylus over the black portion on the calibrator disc. The mirror reflection will help determine if the cartridge stylus is off its vertical axis when looking at it from the front. Delphi MkVI Gen-2 Owner’s Manual... -
Page 9: Assembling And Leveling The Plinth
Retrieve the 3 silicone reservoirs and mounting screws from the bottom section of the foam packaging. Mount the silicone reservoirs on the acrylic base as shown on the picture. Secure the screw lightly using the 3/16 allen key. Delphi MkVI Gen-2 Owner’s Manual Oracle Audio Technologies... -
Page 10: Installing The Mvss Plungers
Install each threaded plunger at the position indicated on the plastic bag and thread both the wheel lock nut and the plunger all the way up loosely against the sub-chassis. Delphi MkVI Gen-2 Owner’s Manual Oracle Audio Technologies... -
Page 11: Preparing And Installing The Suspension Modules
Running the sorbothane on a paper towel will make fibers adhere to its surface making it easier to slide in the suspension housing. Delphi MkVI Gen-2 Owner’s Manual Oracle Audio Technologies... -
Page 12: Calibrating The Suspension
Make a final round of calibration of the suspension system so all three suspension housings are set at about 0.5 mm (0,020 inch) above the "B" step. Over a period of a few days the springs suspension system will set to the desired optimal setting. Delphi MkVI Gen-2 Owner’s Manual Oracle Audio Technologies... -
Page 13: Filling The Mvss Reservoirs With The Silicone Fluid
You will obtain the best result by doing this operation in 2 or 3 steps. It is important not to overfill the reservoirs. Install the sub-chassis back over the suspension towers. Delphi MkVI Gen-2 Owner’s Manual Oracle Audio Technologies... -
Page 14: Installing The Drive Belt
Carefuly place the main platter on the inner platter hub. Remove the three suspension blocking spacers. (It is safe to always use the suspension blocking spacers whenever the Delphi is being moved to avoid damage). Delphi MkVI Gen-2 Owner’s Manual Oracle Audio Technologies... -
Page 15: Calibrating The Micro Vibration Stabiliser System
The threaded wheel lock nuts and the adjustable taper shaped plungers are threaded on the sub-chassis threaded stems to complete the mechanism. Once the tonearm and cartridge are precisely calibrated and the suspension system perfectly adjusted the turntable is ready to operate. Delphi MkVI Gen-2 Owner’s Manual Oracle Audio Technologies... -
Page 16: Attaching The Phono Lead
If the loop is too long, the lead could come in contact with the table below. If it is too short, it will prevent the suspension system from moving freely. In both cases, this would be detrimental to the sound. Delphi MkVI Gen-2 Owner’s Manual Oracle Audio Technologies... -
Page 17: Connecting The Power Supply
Loosen the knurled nut from under the sub-chassis and insert one end of the groung lead. Attach the other end of the lead to the ground post of your pre-amplifier. Delphi MkVI Gen-2 Owner’s Manual Oracle Audio Technologies... -
Page 18: Installing And Calibrating The Hinges
THE RECORD CLAMP AND TAPERED WASHER Position the tapered washer over the spindle on the acrylic mat Place a record over the acylic mat. Delphi MkVI Gen-2 Owner’s Manual Oracle Audio Technologies... -
Page 19: Leveling Your Delphi Mkvi Second Generation
Delphi MK VI. Delphi MkVI Gen-2 Owner’s Manual Oracle Audio Technologies... -
Page 20: Maintenance
Regular power supply : 24 to 28 VDC / 500ma Turbo power supply MkII: 24 to 28 VDC / 500ma … 210 x 184 x 70 mm ( 8,25 x 7,25 x 2,75 inches ) Delphi MkVI Gen-2 Owner’s Manual Oracle Audio Technologies... -
Page 21: Warranty Registration Card
The original bill of sale from an authorized dealer or distributor is required for any warranty repair. Fill the information below and mail a copy back to Oracle Audio for your warranty registration Oracle Delphi MkVI serial Number:...
Need help?
Do you have a question about the Delphi MkVI Gen-2 and is the answer not in the manual?
Questions and answers