Table of Contents
Advertisement
Quick Links
Download this manual
See also:
Owner's Manual
Advertisement
Table of Contents

Subscribe to Our Youtube Channel
Related Manuals for Oracle Audio Delphi Mk VI


Summary of Contents for Oracle Audio Delphi Mk VI
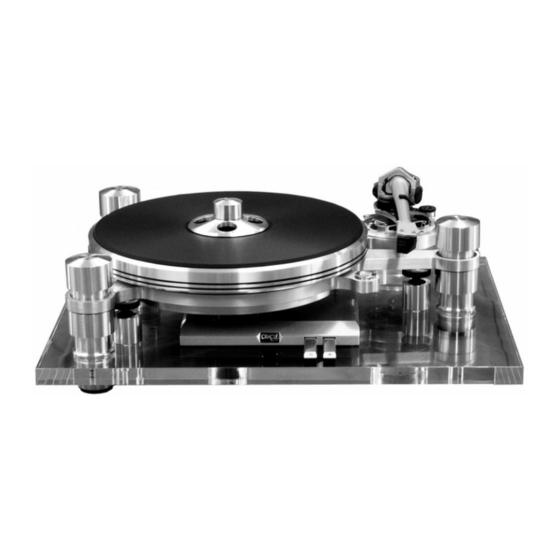
- Page 1 The Fine Art of Playing Music Oracle Audio Technologies Delphi Mk VI Owner’s Manual...
- Page 2 Your Delphi Mk VI is a precision instrument and its performance will be affected by the different adjustments. It is important to set up your new turntable with the utmost care...
-
Page 3: Table Of Contents
Note : The pictures of the drive module in this manual have not yet been up dated with the pictures of the drive module you will find on your new Delphi Mk VI. This is also the case for the new Mk VI subchassis and the Micro Vibration Stabilizer System. The black sub-chassis counterweight system displayed in this manual is also different than the one used in the new Delphi Mk VI. -
Page 4: Pack And Unpack Your Turntable
PACK AND UNPACK YOUR DELPHI MK VI Your ORACLE’s packaging has been designed to protect it from the abusive handling normally encountered during shipping. Such packing materials are expensive and we recommend you save it for future shipping. When shipping the turntable, position each item in its allocated section. It is mandatory to use the original packaging for any return to the factory. -
Page 5: Assemble The Sub Chassis
The main bearing mounting flange is marked with a red dot. When installed this red dot must be on the axis of the motor pulley and the platter spindle. Any other positioning will impair the operation of your Delphi Mk VI. Oracle Audio Technologies... -
Page 6: Adjust The Plinth Assembly
Seat the sub chassis evenly on the 3 blocks and use the spirit level on the sub chassis to level the plinth. The suspension modules are not required for this operation. Oracle Audio Technologies Delphi MK VI Installation Manual... -
Page 7: Install The Tone Arm And Phono Cartridge
Use stainless steel or aluminium screws to mount the cartridge for maximum rigidity. • In preparation for the final alignment, tighten the screws so the cartridge can be moved in the head shell. Oracle Audio Technologies Delphi MK VI Installation Manual... -
Page 8: Align The Phono Cartridge
• Check the stylus pressure and adjust it to the cartridge manufacturer's specifications. • Install the stylus guard to complete the assembly of your Delphi Mk VI. Do not install the phono lead at this time. Oracle Audio Technologies Delphi MK VI Installation Manual... -
Page 9: Prepare The Spring Modules
The factory standard settings: Yellow - front left module Green - right module Red - rear left module The blue spring is supplied as extra Note: The standard spring combination will accommodate most tonearms. Oracle Audio Technologies Delphi MK VI Installation Manual... -
Page 10: Calibrate The Suspension
Always apply a downward pressure on the record clamp to stretch the spring prior to taking a new reading. Note: In the event that the suspension housing goes below the "B" step, start the procedure step one again. Oracle Audio Technologies Delphi MK VI Installation Manual... -
Page 11: Attach The Phono Lead
ATTACH THE PHONO LEAD (DOES NOT APPLY TO THE DELPHI MK VI WITH A GRANITE BASE EDITION) • The phono lead can now be connected to the base of your tone arm. -
Page 12: Install The Drive Belt
Rotate the platter by hand a few turns to allow the belt to position itself around the hub and the motor pulley. Note: The special lubricating oil supplied with your Delphi Mk VI is designed to protect and preserve the mating parts for many years. Unless contaminated with dirt or alcohol, this lubrication will last for many years Note: In the event that the drive belt becomes contaminated, clean it with denatured alcohol. -
Page 13: To Remove The Platter
TO REMOVE THE PLATTER WITH THE DRIVE BELT INSTALLED Note: The following is not an operation related to the assembly of your Delphi Mk VI but a procedure to prevent overstretching the drive belt. • Place one hand at the rear of the platter, over the motor, one hand at the front, lift the platter about 2.5 cm (one inch) and with one finger pull the belt off the motor pulley, then lift the platter... -
Page 14: Adjust The 33 / 45 Speed
Loosen the thumb nut from under the sub-chassis near the tonearm and insert one end of the lead. • Attach the other end of the lead to the ground post of your pre-amplifier. Oracle Audio Technologies Delphi MK VI Installation Manual... -
Page 15: Install And Calibrate The Hinges
INSTALL THE RECORD CLAMP • Tighten the clamp so the record is pushed flat against the mat. Note: Damages may occur to your albums when over tightening the record clamp. Oracle Audio Technologies Delphi MK VI Installation Manual... -
Page 16: Level The Turntable
LEVEL YOUR DELPHI MK VI Your turntable is now ready to be moved to its final location. • Level the acrylic base by turning the levelling feet. Use the sub chassis spirit level to complete this final adjustment since the relative level has already been established between the sub chassis and the acrylic base. -
Page 17: Troubleshooting
• for damaged of defective main bearing • motor connection plug for a broken wire • drive module for a broken wire • defective motor • defective drive module Oracle Audio Technologies Delphi MK VI Installation Manual... -
Page 18: Maintenance
• As a precaution to preserve the furniture your Delphi Mk VI sits on, it is advisable to use a folded paper towel under the main bearing for a few weeks in the case of a bearing spillage. -
Page 19: Specifications
SPECIFICATIONS Suspension : The Delphi Mk VI subchassis / platter / tonearm assembly is suspended by a tripedal mounting, which custs out room vibrations. Each suspension tower assembly combines 12 different components, using 7 different mechanical filters, all working as a whole to efficiently control unwanted vibrations. - Page 20 You are now ready for the real and only purpose of all this... to sit down and relax, and to enjoy the Fine Art of Playing Music The folks at Oracle Audio Technologies Inc 6136 Boulevard Bertrand Fabi, Suite 101...
Need help?
Do you have a question about the Delphi Mk VI and is the answer not in the manual?
Questions and answers