
Related Manuals for Hefter TF MINI plus

Summary of Contents for Hefter TF MINI plus
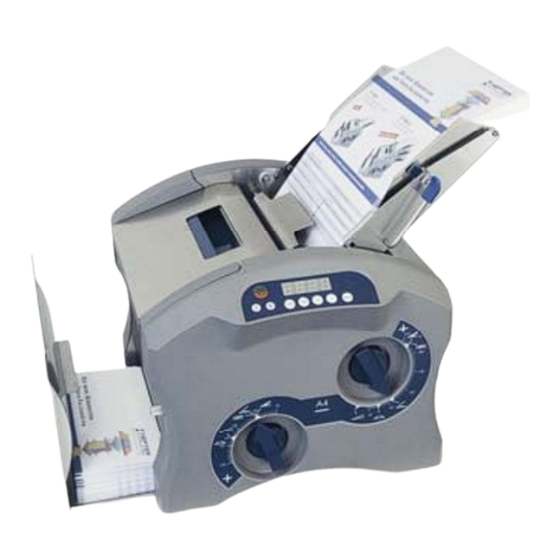
- Page 1 Table Folder series MINI plus MULTI plus OPERATING MANUAL V 1.5.1 Stand: 31.07.2007...
-
Page 2: Table Of Contents
2.2. Installation and start-up..............5 2.3. Set-up of the receiving tray .............7 2.4. Paper feeding..................7 2.4.1 - for the TF MINI plus (1 single feeding station) ........7 2.4.2 - for the TF MULTI plus (3 feeding stations)..........7 2.5. Daily Mail ..................8 3. -
Page 3: Introduction
1. INTRODUCTION 1.1. General information The folder TF M series is a folding machine which has been constructed for the office environment. It can process documents with different widths as well as various fold types. The different fold types can be adjusted at the fold plates. 1.2. -
Page 4: Safety Instructions
The manufacturer cannot be held liable for any personal injury or material damage occurred due to inadequate handling of the machine. Do only use the power cord supplied or released by HEFTER Systemform. Take care that the connexion cable is not damaged. -
Page 5: Preparation For Using The Folder
(= Quickadjustment incl. closing pusher) Vernier adjustment A 10. Position marker B (=Quickadjust.) for second fold plate (incl. closing pusher) Vernier adjustment B Display and control unit for TF MINI plus 11. Display Display for sheet counter Countdown information Display for machine status Display for the speed 12. -
Page 6: Installation And Start-Up
2. PREPARATION FOR USING THE FOLDER Display and control unit for TF MULTI plus 16. Display Display for sheet counter Countdown display Display for machine status Display for the speed 17. Start / Stop button 18. Speed buttons > = Reduce >>... - Page 7 (photos 01, 02 and 03). Caution: Do not get your fingers caught when turning the paper tray! Photo 1 Photo 02 Photo 03 TF MINI plus TF MINI plus TF MINI plus (replacement) Position 1...
-
Page 8: Set-Up Of The Receiving Tray
No jam may occur (The scores at the drawer help you to find the correct stacking width)! 2.4. Paper feeding 2.4.1 Paper feeding at the TF MINI plus (= one single feeding station, see photo 06) Adjust both paper guidances centered and symmetric and with a minimal slack to the paper width needed. -
Page 9: Daily Mail
2. PREPARATION FOR USING THE FOLDER Example: For the set-up of the wrap fold for A4 (see point 3.4.1) feed the paper face up and foot first. Tip: - Fan the paper before you insert it! Always make a test fold to check the fold! Note: When foldings out of 2 or 3 feeding stations are necessary there may be no paper fed before the folding process starts. -
Page 10: Working With The Machine
3. WORKING WITH THE MACHINE 3.1. Switch on the machine Before starting the machine take care: long hair, clothes such as ties and jewellery can be grasped by the rotary wheels. Turn the main switch to the position I (= On) (see under 2.1) 3.2. -
Page 11: Select The Fold Type
3. WORKING WITH THE MACHINE 3.3. Select the fold type The TF M series has two fold pockets! Position marker A for the first fold pocket (incl. closing pusher) Vernier adjustment A Position marker B for the second fold pocket (incl. -
Page 12: How To Correct The Fold Position
3. WORKING WITH THE MACHINE 3.5 How to correct the fold position If you need to change the fold position this can be done very easily (scale +/-) Move the position marker by using the vernier adjustment A or B. 1. - Page 13 3. WORKING WITH THE MACHINE Single fold (half fold) (DIN A4 documents) For the correct result of the single fold you need to close the first fold pocket, meaning the position index A must be turned clockwise as far as possible. The position index B controls the length B.
-
Page 14: How To Correct The Feeding Station (Diagonally)
3. WORKING WITH THE MACHINE 3.6. How to correct the paper tray To correct the paper tray diagonally you need to adjust the edgewise paper guidance by means of the adjusting wheel for the feeding angle (under the paper tray, right). Adjusting wheel for the paper feeding angle 3.7. -
Page 15: Additional Set-Ups And Indications
3.8. Additional set-ups and indications 3.8.1 Set-up of the feeding time at the TF Mini plus & TF Multi plus for the daily mail The machine starts automatically with the daily mail mode according to an factory settings: TF MINI +: 1.0 sec., TF MULT +: 2.0 sec.) adjustable Time ( i.e. -
Page 16: Reference Part
4. REFERENCE PART 4.1. Error handling Error description Possible reason Corrective action Machine does not start No current Check the power supply, the socket Display does not light up and the cable Fuse blown out Check the fuse (see page 14, fuse type 1,5 A slow) Paper jam in the Fold pockets are... -
Page 17: Changing Paper Cassette, Paper Feed Roller And Pad
4. REFERENCE PART Before changing the fuse or opening the cover for the paper jam clearance please note: Machine must be switched off and the power supply must be disconnected! Now open the cover by means of the lever (in the hollow). The wheels are now easy to reach and the paper can be removed. -
Page 18: Technical Data
4. REFERENCE PART 4.3. Technical data Paper width: 100 mm – 218 mm (3,94 inch – 8,58 inch) Paper length: TF MINI plus 80mm - 448mm (3,15“–17,64“) TF MULTI plus 150mm - 448mm (5,90“–17,64“) Paper weight: 50 – 150 g/m... -
Page 19: Maintenance And Cleaning
Take care that no liquids get into the machine! 4.5. Repair and customer service Hefter Systemform is always available to you in case of any questions to this folder TF M series or if service support is needed (www.hefter.de). Please contact HEFTER Systemform directly or one of our distributors close to your place. -
Page 20: Ce Certificate
4. REFERENCE PART 4.6. CE certificate Product: Table-top folder Type: TF MINI plus TF MULTI plus The design of this 98/37/EWG machine conforms with 73/23/EWG the following regulations: 89/336/EWG Applied harmonised EN 292-1 standards: EN 292-2 EN 294 EN 349...
Need help?
Do you have a question about the TF MINI plus and is the answer not in the manual?
Questions and answers