Table of Contents
Advertisement
3000271 03.07
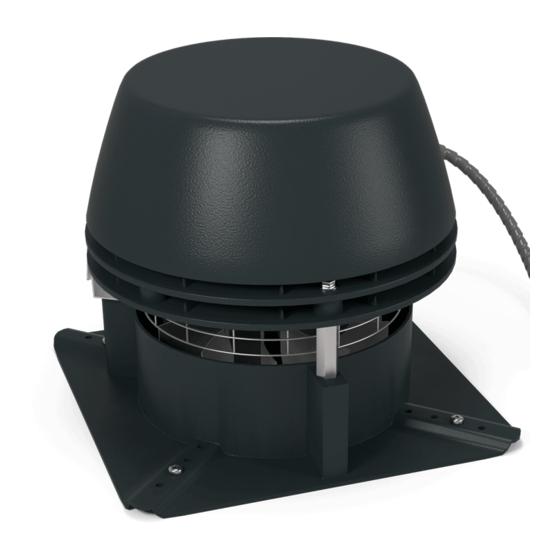
RS Chimney Fan
for Solid Fuel Applications
Product Information
Mechanical Installation
Electrical Installation
Start Up and Configuration
Maintenance and Troubleshooting
CM
C
US
READ AND SAVE THESE INSTRUCTIONS!
EXHAUSTO Inc.
1200 Northmeadow Pkwy.
Suite 180
Roswell, GA 30076
........................ Chapters 1 + 2
......................... Chapter 3
............................. Chapter 4
.................. Chapter 5
P: 770.587.3238
F: 770.587.4731
T: 800.255.2923
info@exhausto.com
us.exhausto.com
Installation & Operating Manual
USA
CAN
...... Chapter 6
Job Name:
Installer:
Installation Date:
Advertisement
Table of Contents

Related Manuals for Exhausto RS


Summary of Contents for Exhausto RS
- Page 1 Installation & Operating Manual 3000271 03.07 RS Chimney Fan for Solid Fuel Applications Product Information ......Chapters 1 + 2 Mechanical Installation ......Chapter 3 Electrical Installation ......Chapter 4 Start Up and Configuration ....Chapter 5 Maintenance and Troubleshooting ..
-
Page 2: Table Of Contents
System design documentation is available from any telephone number listed on the front of the manual. authorized EXHAUSTO representative. 2. Before servicing or cleaning the unit, switch off at service panel Accessories and controls are not covered by this manual. Please refer and lock service panel to prevent power from being switched on to these component’s individual manuals. -
Page 3: Function
(refer to the manual: “RS for Gas & Oil Applications”). The use of the EXHAUSTO RS Chimney Fan is not restricted to any type of chimney, because the fan creates a negative pressure (below atmospheric) in the chimney. -
Page 4: Dimensions And Capacities
3000271 03.07 2. Specifications 2.1 Dimensions & Capacities Model RS 009 RS 012 RS 014 RS 016 Discharge Horizontal Fan Type Axial Vane Motor Type Totally enclosed, Variable speed, Class H Voltage V AC 1x120 1600 0.0 Ps 1400 1950 Amperage... -
Page 5: Planning Ahead
3000271 03.07 2.2 Planning Ahead 1. Observe proper combustion air requirements. 2. Provide a firm support system for the chimney fan. 3. Determine the type of system involved. 4. Observe proper safety measures are taken to assure safe use of the wood burning appliances. Combustion Air Requirements: Provisions for combustion air must be in accordance with applicable local codes. -
Page 6: Transport Safety Device
If a transport safety device is present, remove it from the vane and make sure that the vane can revolve without hindrance. RS 14/16: Before mounting, the transport safety device on the hinges must be removed. 3.2 Single Fan on Steel Chimney Step 1: Prepare fan location If a stack cap is already installed, it must be removed. -
Page 7: Single Fan On Brick Chimney
3000271 03.07 3.3 Single Fan on Brick Chimney Step 1: Prepare fan location The installation procedure is the same whether the flue is round or square. If a clay tile flue liner is installed, it might stick up a few inches. Cut it back so it is flush with or no more than 1/2 inch above the chimney crown. Measure the inside diameter of the flue, cut a corresponding hole in the fiber mat leaving a minimum distance of 3/4” to any side of the fiber mat. The aluminum foil on the fiber mat must face upwards (against fan base). Step 2: Preparation of fan Locate the installation brackets in the grooves on the underside of the fan base using the bolts and nuts supplied to secure the brackets. -
Page 8: Multiple Fans On Steel Chimney
3000271 03.07 3.4 Multiple Fans on Steel Chimney If two or more chimney fans are required to create sufficient draft, installation procedures are the same as for single fan installation on a steel chimney. The only difference is that the fans are sitting next to each other on the top of the chimney. A special adapter plate is required (14 GA or thicker). -
Page 9: General
National Electrical Code NFPA 70 — latest edition. Power requirements for the system depends on the fan size. Electrical requirements are: RS 9 1 x 120 V/60Hz 0.4 Amps... -
Page 10: Connection And Wiring Diagram For Two Fans With Fsc
3000271 03.07 4.3 Connection and Wiring Diagram for Two Fans with Fan Speed Control The diagrams below show the wiring of two chimney fans and how they are connected to the fan speed control. Chimney Fans MOTOR MOTOR Junction Junction 120/1/60 WEATHERPROOF All wiring must be in... -
Page 11: System Testing
3000271 03.07 5. Start-Up and Configuration 5.1 System testing Before any adjustments are made to the system, follow these procedures: Turn the chimney fan ON and make sure that it is operating. Increase and decrease the speed of the fan by adjusting the fan speed control to make sure it is operating properly. Danger: Check heating appliances (water heater, furnace, etc.) for proper operation while the chimney fan is operating. Make sure no flue gases are spilling out as this can lead to carbon monoxide poisoning. -
Page 12: Operating Fireplace And Stove
3000271 03.07 5.4 Operating Fireplace and Stove Prior to starting a fire, set the fan at high/full speed and start the fire following the normal instructions for burning a fire in a fireplace or stove. After the fire catches on, after 3-5 minutes, reduce the speed of the chimney fan to a level where it safely removes the flue gases and a perfect flame can be maintained. When adding wood to the fire, it may be necessary to increase the fan speed for a short period of time. Following this procedure will help conserve energy and at the same time assure a maximum heating output from the heating appliance. 5.5 Operating Pizza Oven Prior to starting a fire, set the fan at high/full speed and start the fire following the oven manufacturer’s instructions or, in the absence of such instructions, normal instructions for burning a fire in a fireplace or stove. After the fire catches on, after 3-5 minutes, reduce the speed of the chimney fan to a level where it safely removes the flue gases and a perfect flame can be maintained. When adding wood to the fire, it may be necessary to increase the fan speed for a short period of time. Caution: Do not over-fire the fireplace, stove or pizza oven. Small deposits of creosote could be ignited and start a small chimney fire which could cause the chimney flue to reach a dangerously high temperature. -
Page 13: Prior To Cleaning
Screw from each Hinge 6.2 Care and cleaning The EXHAUSTO Chimney Fan is designed for prolonged use. The fan should be inspected at least once a year when the chimney is inspected. Creosote and other deposits should be removed from the fan blades and the bottom of the motor housing. -
Page 14: Troubleshooting
3000271 03.07 6.3 Troubleshooting Observation Problem Solution There is no power - The circuit - Check the circuit breaker going to the fan breaker may be off - Fan speed - Turn fan speed control on control is off - Bad electrical - Check and correct problem connections There is power to... - Page 15 3000271 03.07 Notes...
- Page 16 3000271 03.07 EXHAUSTO Inc. P: 770.587.3238 1200 Northmeadow Pkwy. F: 770.587.4731 Suite 180 T: 800.255.2923 Roswell, GA 30076 info@exhausto.com us.exhausto.com...
Need help?
Do you have a question about the RS and is the answer not in the manual?
Questions and answers