Table of Contents
Advertisement
Quick Links
Advertisement
Table of Contents

Related Manuals for Lyngdorf Audio RoomPerfect TDA 2200


Summary of Contents for Lyngdorf Audio RoomPerfect TDA 2200
- Page 1 TDA 2200 RoomPerfect™ True Digital Amplifier Owner’s Manual...
-
Page 3: Table Of Contents
WARNINGS ... 5 Explanation of graphical symbols ... 5 Exclamation symbol ... 5 Lightning symbol ... 5 Important safety instructions... 6 Unpacking the TDA 2200... 7 Accessories ... 7 Operating Voltage... 8 Product Registration ... 8 Introduction ... 9 Front Panel ... 10 Controls ... - Page 4 RoomPerfect™ Advanced Menu ... 29 Selected Position ... 29 Adding a New Focus Position... 29 Adding a New Room Position... 31 RoomKnowledge Index ... 32 RoomCorrection Index... 32 Daily Use of RoomPerfect™ ... 33 Global Listening ... 33 Focus Listening... 33 RoomPerfect™...
-
Page 5: Warnings
1. WARNINGS CAUTION: TO REDUCE THE RISK OF ELECTRICAL SHOCK, DO NOT REMOVE COVER. NO USER-SERVICEABLE PARTS INSIDE. REFER SERVICING TO QUALIFIED PERSONNEL. TO REDUCE RISK OF FIRE OR ELECTRIC SHOCK, DO NOT EXPOSE THIS APPLIANCE TO RAIN OR MOISTURE. a. -
Page 6: Important Safety Instructions
b. Important safety instructions Read these instructions carefully before installing or operating this apparatus. Keep these instructions. Heed all warnings. Follow all instructions. Do not use this apparatus near water. Clean only with a dry cloth. Do not block any ventilation openings. Install in accordance with the manufacturer’s instructions. -
Page 7: Unpacking The Tda 2200
Carefully remove the unit and accessory kit from the carton, visually check for shipping damage. Contact both the shipper and Lyngdorf Audio immediately if the unit bears any sign of damage from mishandling. All Lyngdorf Audio equipment is carefully inspected before leaving our factory. -
Page 8: Operating Voltage
The TDA 2200 is available in two versions: one for 115V mains voltage and another for 230V mains voltage. Check the label on the TDA 2200 rear panel and verify you have the version with the proper voltage for your area. -
Page 9: Introduction
Congratulations on your investment in the Lyngdorf Audio TDA 2200 with RoomPerfect™ The TDA 2200 is more than just a very good high-end amplifier, one that’s exceptionally pure and natural sounding with even the most ‘demanding’ speaker loads. It also happens to be a completely unique Digital Control Centre. -
Page 10: Front Panel
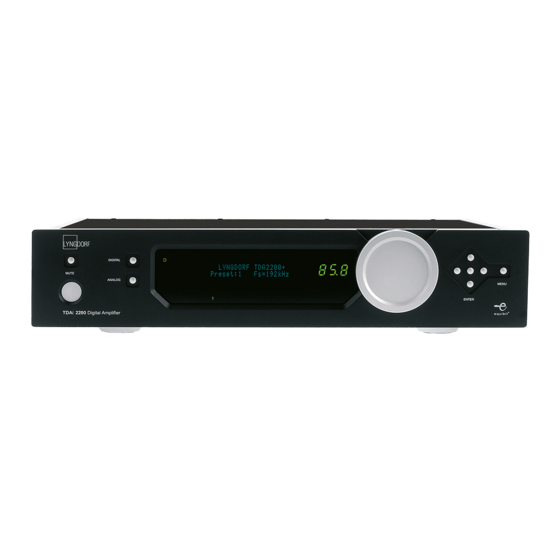
Fig 1: TDA 2200 front panel. a. Controls The buttons/controls on the front panel of the TDA 2200 can all be operated either with direct presses or by operating the corresponding keys on the supplied remote control. All the keys on the front panel [except the Mains switch (1)] are duplicated on the remote control as well. -
Page 11: Display Indicators
b. Display Indicators POWER Power on is indicated with display showing all information on status and volume control, Standby mode is indicated with the decimal dot from the volume control being lit only. MENU The Alphanumeric Display (2*20 Characters) is used for navigating the Menu system Illuminates the active input Illuminates to show whether the active input is Analog or Digital VOLUME... -
Page 12: Rear Panel
6. Rear Panel Fig 2: TDA 2200 rear panel. DIGITAL INPUT 1-3 (1) RCA Connectors for SPDIF input DIGITAL OUTPUT (2) Selected digital input is sent – full range or filtered via the DSP - to the Digital Output connector for daisy-chaining more than one TDA-2200. The sample rate is fixed at 96 kHz. -
Page 13: Remote Control
The buttons are as follows:- The four buttons used for selecting which device to control are described below. To control the TDA 2200 the AMP key should be pressed [please note the amplifier’s volume and mute buttons still work when in CD mode]. -
Page 14: Menu System
The Main Display on the front panel of the TDA 2200 shows all functionality and current status of the TDA 2200. An overview of the menu tree can be seen in the appendix. When the amplifier is powered up the Main screen shows the current Software revision in... -
Page 15: Roomperfect
a. RoomPerfect™ The sub menus accessible in the RoomPerfect™ menu are: • Guided set-up • Advanced options (available when Guided set-up has been performed) RoomPerfect™ and the sub menus are described in-depth in the RoomPerfect section, page 19. b. Voicing The Voicing setting is an EQ filter that can be used to gently amplify or attenuate certain frequencies according to your personal preferences and/or to compensate if a given recording sounds too ‘bright’... -
Page 16: Delay
However, if the distance isn’t identical and/or you are using a subwoofer or a Lyngdorf Audio 2+2 system, you can set a delay in order to ensure that the sound from each loudspeaker reaches the listening position simultaneously. -
Page 17: Adc Level - Otional
Pressing Menu again exits the menu without changing the current settings. The PC software must know the address of the TDA 2200 in order to communicate with it. The Comm Speed setting is the RS232 Link interface speed. The default setting is 57600 baud. -
Page 18: Trigger Set-Up
Remote Control set-up makes it possible to activate or de-activate the remote control. This is useful in set-ups with more than one TDA 2200 amplifier in the room. The master amplifier then becomes the only one receiving signals from the remote, processes them and controls the rest of the TDA 2200’s over the Lyngdorf RS232 link. -
Page 19: Volume
j. Volume The sub menus accessible in the Volume menu are: • Def. Volume • Max. Volume The Default Volume setting controls the default volume at start-up and can be set from 0 to 99 dB. However, a setting over 88 is not recommended as this corresponds to max output with full scale digital input. -
Page 20: Advanced Set-Up
• Software version • Default As default a TDA 2200 is set as a Slave. The Master setting should be used if you are using two TDA 2200, e.g. for bi-amping or if using one to drive the main loudspeakers and one to drive the (sub)woofer(s). -
Page 21: Roomperfect
Nevertheless, it’s a challenge that has been met in the Lyngdorf Audio-developed and patented RoomPerfect™ system. The main task of RoomPerfect™ is to learn the 3-dimensional acoustical properties of a room, by combining room measurements with measurements at the listening positions (Focus). -
Page 22: The Guided Set-Up - A Quick Guide
The Guided Set-up – a Quick Guide The RoomPerfect™ menu is found under the TDA 2200 main menu. If you have just turned on your TDA 2200, press MENU to enter the TDA 2200 main menu. Thereafter press enter to enter the RoomPerfect™ menu. -
Page 23: Setting The Measurement Volume Level
b. Setting the measurement volume level The measurement volume – also called the calibration volume – is a recommended maximum volume. It is important that you always judge whether the measurement volume is too loud. The calibration volume should not be so loud that it causes:- 1. - Page 24 The test signal will start and shortly thereafter the TDA2200 will suggest an initial estimate of the desired maximum calibration volume (in dB). Please raise or lower the volume towards the desired maximum volume shown on the display but ensure you avoid clipping, uncomfortably loud levels and damage to the loudspeakers.
-
Page 25: Focus Measurement
c. Focus Measurement When the calibration is OK, press enter to start the measuring process and the following message will be displayed. Each measurement comprises four steps: a low and a high frequency measuring signal first in the left and then in the right channel. The length of each measurement depends on a combination of the measurement volume, set in the calibration process, and the background noise in your local environment. -
Page 26: Room Measurements
d. Room Measurements The number of room positions needed depends on the value of RoomKnowledge, if it is below 90% after the third measurement the guide automatically includes extra room measurements until a RoomKnowledge of 90% or more has been achieved. The remaining measurements are to be placed in random positions in the room with random orientations of the microphone. -
Page 27: Adding More Room Measurements
If it is an error that needs correcting, then correct the error (see RoomPerfect™ trouble- shooting) and proceed with the room position measurement by pressing enter. The measurement has ended successfully when the last measuring signal stops and the display shows the following. This process is repeated at least three times and until the RoomKnowledge reaches 90%. -
Page 28: Calculation Of Focus 1 And Global Filters
The above will be displayed when exiting a successfully completed guided set-up. Choose No if you wish to exit the guided set-up without calculating any room correction filters, without saving the performed measurements and without setting the calibration volume. Choose Yes to save the results of the guided set-up and calculate the focus and the global room correction filters. -
Page 29: Roomperfect™ Advanced Menu
10. RoomPerfect™ Advanced Menu This section describes the options in the advanced menu. Here you can select position, add new listening positions and room measurements, check the RoomKnowledge of your current set-up, and check the RoomCorrection for the different filters. a. - Page 30 The saved calibration volume from the guided set-up is used as a default when adding extra focus/listening and room positions though, as mentioned, the volume can be changed at any time between measurements to suit a particular situation. After a successful measurement the following message is displayed. The value of Roomknowledge can be different.
-
Page 31: Adding A New Room Position
c. Adding a New Room Position It is always possible to add more room measurements, which can increase RoomKnowledge and thereby fine tune all the room correction filters. Press enter to start a new room measurement. As previously described, place the microphone correctly in a random room position and the measurement can commence. -
Page 32: Roomknowledge Index
Choose Yes to save the performed room measurement and No to exit without saving any of the performed measurements. Adding one or more room measurements leads to a re-calculation of all filters (i.e. Global and all Focus filters) due to the fact that more of room’s acoustic properties have been learned, something that affects all filters. -
Page 33: Daily Use Of Roomperfect
placement in frequency of the processing. For low values (below 10%) of the room correction index, only subtle correction is needed to the original sound in the room. With high room correction index values more extensive processing is employed. The RoomCorrection index for a specific RoomPerfect™ filter shown above can be viewed by pressing the numerical button of the corresponding filter. -
Page 34: Roomperfect™ Troubleshooting
12. RoomPerfect™ Troubleshooting a. No microphone connected This is displayed when no microphone is connected to the TDA2200. Solution: Connect the microphone on the right-hand side of the back panel. b. Fault - No signal The error message shown above is displayed when the incoming signal is classified as pure noise. -
Page 35: Fault - Signal Clipping
c. Fault - Signal clipping The above error message is displayed when the incoming signal is classified as too loud resulting in clipping (distortion). An overly loud measuring signal results in this error message. Solution: Lower the measuring signal volume before continuing with the measurement. A loud noise from the local environment that has corrupted the measurement results in this error message. -
Page 36: Software
13. Software The TDA 2200 firmware can be upgraded using the ‘Lyngdorf Serial Load, software upgrade tool’. This is in the PC package available from www.Lyngdorf.com. Follow the upgrade steps shown below to bring the product into upgrade mode. Fig 5: Software Upgrade Tool. -
Page 37: Connectors
WARNING: Make sure that no conductive part of the loudspeaker wiring is accessible. Do not connect loudspeakers with uninsulated terminals. When the TDA 2200 is operating, there is up to 35V DC on its output terminals with reference to ground. -
Page 38: Optional Ad Converter Board
15. Optional AD Converter Board The Optional AD Converter card for the TDA 2200 has input connectors for both balanced (XLR) and unbalanced (RCA) signals. The input impedance of the inputs are 10 kOhm. a. Balanced inputs The balanced XLR inputs are wired in accordance with IEC268: Pin 1: Chassis and ground. -
Page 39: Technical Specifications
17. Technical Specifications a. Audio Parameter Balanced input connectors Balanced input impedance Unbalanced input connectors RCA (phono) jack, gold-plated. Case=Gnd, Tip=Hot(+) Unbalanced input impedance 10kOhm DAC Out impedance Input sensitivity Power Supply Variation Output connectors Output power, 8ohms Output power, 4ohms Nominal load impedance Frequency response Frequency response... -
Page 40: Protection
b. Protection Parameter Grounding Output short circuit current Output DC voltage Over temperature c. Mains Parameter Mains input connector Mains voltage range Mains voltage range Internal mains fuse Internal mains fuse Power consumption Power consumption Power consumption Power consumption d. Trigger Parameter TRIGGER OUT connector TRIGGER OUT Voltage... -
Page 41: Technical Assistance
18. Technical Assistance If you have any problems with or questions regarding your Lyngdorf Audio product, please contact Lyngdorf Audio or your nearest representative. a. Support Please check the Lyngdorf Audio website under “Support” for latest version of control software, newest version of this document and “Questions and Answers”. -
Page 42: Appendix
19. Appendix a. Menu Tree... -
Page 43: Voicing Curves
b. Voicing Curves Soft 1 Magnitude Response: Soft 1 10 Hz 100 Hz 1kHz Frequency (Hz) Open 1 Magnitude Response: Open 1 10 Hz 100 Hz 1kHz Frequency (Hz) Desharp1 Magnitude Response: Desharp 1 10 Hz 100 Hz 1kHz Frequency (Hz) Soft 2 10kHz 10 Hz... - Page 44 www.lyngdorf.com...
Need help?
Do you have a question about the RoomPerfect TDA 2200 and is the answer not in the manual?
Questions and answers