Table of Contents
Advertisement
Quick Links
THANK YOU!
We are grateful for your purchase of HYT product. We believe this easy–to-use
radio will provide you with dependable and reliable communications. This HYT
portable two-way radio is a precision device. Treat it with care, and you will enjoy
years of reliable operation.
MODELS COVERED IN THIS MANUAL
TC3000 VHF Radio
TC3000 UHF Radio
1
Advertisement
Table of Contents

Related Manuals for HYT TC3000


Summary of Contents for HYT TC3000
- Page 1 THANK YOU! We are grateful for your purchase of HYT product. We believe this easy–to-use radio will provide you with dependable and reliable communications. This HYT portable two-way radio is a precision device. Treat it with care, and you will enjoy years of reliable operation.
-
Page 2: Table Of Contents
Contents User Safety, Training, and General Information Compliance with RF Energy Exposure Standards FCC Compliance Precautions Product Inspection Battery Information Accessory Installation Battery Antenna Belt Clip Earplug Cover External Earphone/Microphone (optional) Getting Started Features and Operation Turn on/off the radio Adjust the Volume Select Channel Transmit... -
Page 3: User Safety, Training, And General Information
BEFORE USING YOUR HYT PORTABLE TWO-WAY RADIO. Compliance with RF Energy Exposure Standards Your HYT two-way radio is designed and tested to comply with a number of national and international standards and guidelines (listed below) regarding human exposure to radio frequency electromagnetic energy. -
Page 4: Fcc Compliance
Use of non- HYT -approved batteries may exceed FCC RF exposure guidelines. Approved Accessories For a list of HYT approved accessories, see the accessories page of this user manual or visit the following website which lists approved accessories: http://www.HYT.com.cn FCC Compliance This equipment has been tested and found to comply with the limits for a Class B digital device, pursuant to part 15 of the FCC Rules. - Page 5 heating source. • Do not place the radio in excessively dusty, humid areas, nor on unstable surfaces. Safety: It is important that the operator is aware of and understands hazards common to the operation of any radio.
-
Page 6: Product Inspection
Product Inspection Thank you for your use of HYT portable two-way radio TC3000. Before use, you are recommended to inspect the product as follows. First check the shipping carton for any signs of damage. If any damage has occurred, please contact your dealer immediately. -
Page 7: Accessory Installation
Charging the battery in over 35℃ temperature will affect the battery capacity. Charging the Battery You are recommended to use HYT authorized charger. Charger LED will indicate the charging status. -
Page 8: Belt Clip
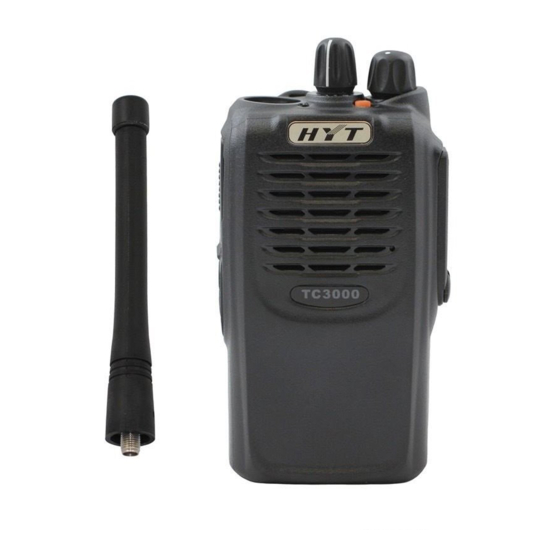
Battery Latch Fig.2 Antenna Insert the threaded end of the antenna into the connector on top of the radio. Rotate the antenna clockwise to fasten it. Rotate the antenna counterclockwise to remove it. (See the following figure) Remove Install Belt Clip Attach Belt Clip Align the slot of the belt clip with the T-slot at the battery cover and press the belt clip downwards until it is locked. -
Page 9: Earplug Cover
Fig.3 Remove the belt clip Press the disassembly release upwards with a key until it releases and then push the belt clip upwards with your thumb to remove it. (See figure 4) Disassembly Release 拆卸擎 Fig.4 Earplug Cover Rotate the screw at the bottom of the cover counter clockwise by a screwdriver until it is out of the nut to remove the Earphone/Microphone jack cover. -
Page 10: External Earphone/Microphone (Optional)
Fig.5 External Earphone/Microphone (Optional) Insert the tab at the bottom of the earphone/microphone into the slot on top of the radio. (See figure 6). Align the nuts at top of the earphone/microphone with the holes on the radio and then turn them clockwise to fasten. Fig.6... -
Page 11: Getting Started
Getting Started (1) Antenna Used to transmit/receive signals. (2) LED Following table indicates LED indication and corresponding radio status. Status No display Standby Green Receive Transmit Flashing green Scan Flashing red Low battery voltage Flashing orange Call waiting (3) Channel Selector Used to select wanted channel. - Page 12 Used to connect with external earphone or programming cable. (10) Belt Clip Used to clip the radio on your belt. (11) Battery Pack (12) PTT key Press and hold PTT, radio operates in transmit mode. Release PTT, radio returns to receive mode.
-
Page 13: Features And Operation
Features and Operation Note: TC3000 provides a series of audible alert tones. A series of tones may be sounded with the following conditions: Bourdon Operation Description Audible Tone Turn on the radio Power on-Ready Turn on the radio Power on-Failure... -
Page 14: Repeater/Reverse Frequency
4. Then you can receive a valid call. LED glows green during receiving. 5. If CTCSS/CDCSS or squelch tail elimination feature is set by your dealer: 1) Noise will be removed by the end of a conversation if roger tone is disabled. 2) Beep tone sounds by the end of a conversation if roger tone is enabled;... -
Page 15: Call
Nuisance Delete Nuisance delete feature allows you to temporarily delete an unwanted channel from the scan list. When the radio stops on the nuisance channel, press the programmed “nuisance delete” key until an alert tone is sounded to delete this channel. When scan feature is enabled again. -
Page 16: Vox Feature
enabled, the radio will sound continuously at highest volume. 1. Press Emergency Siren key to activate Emergency Siren feature. 2. Press and hold Emergency Siren key to disable Emergency Siren feature. 3. Press Emergency Siren key again to activate Emergency Siren feature. VOX Feature Plug an earphone with VOX feature into the radio to enable VOX feature. -
Page 17: Care And Cleaning
Care and Cleaning Do not carry your radio by the antenna or remote microphone; Wipe the battery with a lint-free cloth to remove dirt, grease, or other material that may prevent good electrical connection; When not in use, keep the accessory jacks covered with the protective caps; Clean the shell, controls and keys of your radio with neutral detergent and warm water after a long period of usage. -
Page 18: Frequency Chart
Frequency Chart Model: Serial Number: Chan Transmit Transmit Transmit Transmit Transmit Transmit Receive Receive Receive Receive Receive Frequency CTCSS CDCSS 2-Tone 5-Tone ANI DTMF Frequency CTCSS CDCSS 2-Tone 5-Tone... - Page 19 HYT endeavor to achieve the accuracy and completeness of this manual, but cannot guarantee its accuracy at all times. All the above specifications and design are subject to change by HYT without notice. All the reproduction and translation of this manual without authorization of HYT is not allowed.
Need help?
Do you have a question about the TC3000 and is the answer not in the manual?
Questions and answers