Table of Contents
Advertisement
Quick Links
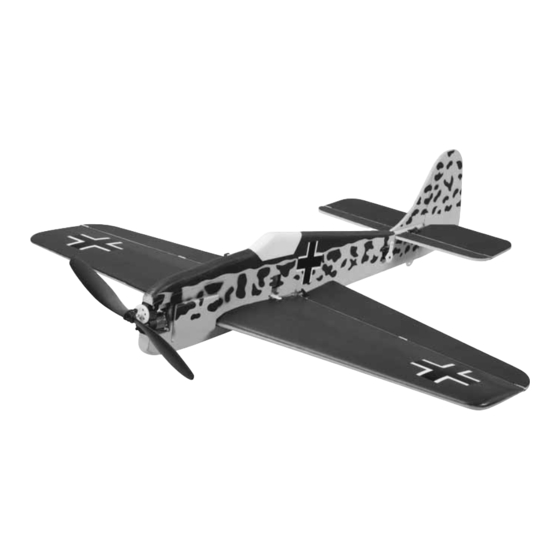
Wingspan: 33.5 in [850 mm]
Wing Area: 302 sq in [19.5dm
Weight: 14 – 16 oz [397-455g]
Wing Loading: 6.4 – 7.1 oz/sq ft [20-23g/dm
Length: 34.5 in [877 mm]
Radio: 4-channel w/ three micro servos and 20 – 25 Amp ESC
Motor: Supplied Speed Force S370 Motor w/ 5:1 gearbox
Great Planes
®
Model Manufacturing Co. guarantees this kit to be free from defects in both material and workmanship at the date of purchase.
This warranty does not cover any component parts damaged by use or modification. In no case shall Great Planes' liability exceed the
original cost of the purchased kit. Further, Great Planes reserves the right to change or modify this warranty without notice.
In that Great Planes has no control over the final assembly or material used for final assembly, no liability shall be assumed nor accepted for
any damage resulting from the use by the user of the final user-assembled product. By the act of using the user-assembled product, the user
accepts all resulting liability.
If the buyer is not prepared to accept the liability associated with the use of this product, the buyer is advised to return this kit
immediately in new and unused condition to the place of purchase.
To make a warranty claim send the defective part or item to Hobby Services at the address below:
Include a letter stating your name, return shipping address, as much contact information as possible (daytime telephone number, fax number,
e-mail address), a detailed description of the problem and a photocopy of the purchase receipt. Upon receipt of the package the problem will
be evaluated as quickly as possible.
READ THROUGH THIS MANUAL BEFORE STARTING
CONSTRUCTION. IT CONTAINS IMPORTANT INSTRUCTIONS
AND WARNINGS CONCERNING THE ASSEMBLY AND
USE OF THIS MODEL.
© Copyright 2005
INSTRUCTION MANUAL
™
2
]
2
]
3002 N. Apollo Dr., Suite 1
WARRANTY
Hobby Services
Champaign, IL 61822
USA
Champaign, Illinois
(217) 398-8970, Ext 5
airsupport@greatplanes.com
GPMZ0179 for GPMA1193 V1.0
Advertisement
Table of Contents

Related Manuals for GREAT PLANES FW-190 Focke Wulf


Summary of Contents for GREAT PLANES FW-190 Focke Wulf
-
Page 1: Instruction Manual
Further, Great Planes reserves the right to change or modify this warranty without notice. In that Great Planes has no control over the final assembly or material used for final assembly, no liability shall be assumed nor accepted for any damage resulting from the use by the user of the final user-assembled product. -
Page 2: Table Of Contents
Speed Control .............4 Charger ...............4 For the latest technical updates or manual corrections to the Battery Charging Leads ..........4 EP FW-190 ARF visit the Great Planes web site at Glue ................4 www.greatplanes.com. Open the “Airplanes” link, and then ADDITIONAL ITEMS REQUIRED........4 select the EP FW-190 ARF. -
Page 3: Safety Precautions
PROTECT YOUR MODEL, YOURSELF LITHIUM BATTERY HANDLING & USAGE & OTHERS...FOLLOW THESE IMPORTANT SAFETY PRECAUTIONS WARNING!! Failure to follow all instructions could cause permanent damage to the battery and its surroundings, and cause bodily harm! 1. Your EP FW-190 ARF should not be considered a toy, but rather a sophisticated, working model that functions very •... -
Page 4: Receiver
servos that will physically fit in the model, those outside the Charger recommended weight and torque specifications will adversely affect flight performance recommended. Note: During assembly when it’s time to A charger capable of charging 3-cell (11.1V) LiPo batteries mount the servos, you will be instructed to glue them in. Do such as the ElectriFly PolyCharge 1 to 3-cell LiPo charger not be alarmed as this is a common practice with this type (GPMM3010) must be used. -
Page 5: Adhesives & Building Supplies
4.0 mm 12" = 304.8 mm 3/16" 4.8 mm 18" = 457.2 mm Replacement parts for the Great Planes EP FW-190 ARF are 1/4" 6.4 mm 21" = 533.4 mm available using the order numbers in the Replacement Parts 3/8"... -
Page 6: Kit Inspection
If any parts are missing or are not of acceptable quality, or if you need assistance with assembly, contact Product Support. When reporting defective or missing parts, use the part names exactly as they are written in the Kit Contents list. Great Planes Product Support 3002 N. Apollo Drive, Suite 1 Champaign, IL 61822 Telephone: (217) 398-8970, ext. -
Page 7: Building Instructions
Join the Wing to the Fuselage BUILDING INSTRUCTIONS Note: This model is covered with a very thin layer of film which is then painted with a special lightweight paint to conserve weight. Avoid the use of tape to help position the fuselage components during assembly. -
Page 8: Install The Tail Surfaces
Install the Tail Surfaces ❏ 4. Glue the fin and rudder to the fuselage with epoxy. Make sure that the fin remains perpendicular to the stab and centered on the fuselage. Hinge the Ailerons ❏ 1. Slide the stab into the slot in the rear of the fuselage. Center it as you did with the wing. -
Page 9: Install The Servos
❏ ❏ ❏ 3. Slide the loose carbon rod through the bearings. 2. Trim the mounting posts off of the servo as shown in the photo. ❏ ❏ 4. Test fit an aileron onto the carbon rod as shown. If satisfied with the fit, glue the aileron to the carbon rod using ❏... -
Page 10: Install The Control Horns & Pushrods
❏ ❏ 2. Center your aileron servo to ensure it is at neutral. Use a small clamp or some masking tape to hold the aileron at neutral. Align the pushrods straight back towards the ailerons. ❏ 5. Epoxy the other tail servo into the cutout from the right side of the plane side with the output shaft toward the front. -
Page 11: Install The Motor & Speed Control
❏ ❏ 6. Install a black nylon snap keeper onto the pushrod ❏ at the control horn. 3. Slide the gearbox onto the square wood stick in the nose. Secure it with the supplied #2 x 3/8" [9.5 mm] screw. ❏... -
Page 12: Final Setup
❏ 6. Test fit the mount in the groove. It should insert up to Final Setup the midpoint line. Glue in place using epoxy. ❏ ❏ 1. Attach the receiver to the cutout in the rear of the 7. Drill two 1/8" [3.2 mm] holes in the mount. If not flying fuselage using a small section of the supplied hook and loop combat, use the two holes to route the antenna from tape. -
Page 13: Get The Model Ready To Fly
Set the Control Throws At this stage the model should be in ready-to-fly condition with all of the systems in place. Use a Great Planes AccuThrow ™ (or a ruler) to accurately measure and set the control throw of each control surface as indicated in the chart that follows. -
Page 14: Balance The Model Laterally
(ready to fly), place the model upside- system. This will “condition” the batteries so that the next down on a Great Planes CG Machine, or lift it upside-down charge may be done using the fast-charger of your choice. -
Page 15: Ground Check
We use a Top Flite Precision Magnetic Prop Balancer ™ AMA SAFETY CODE (excerpts) (TOPQ5700) in the workshop and keep a Great Planes Fingertip Prop Balancer (GPMQ5000) in our flight box. Read and abide by the following excerpts from the Academy Ground Check of Model Aeronautics Safety Code. -
Page 16: Check List
CAUTION (THIS APPLIES TO ALL R/C AIRPLANES): If, CHECK LIST while flying, you notice an alarming or unusual sound such as a low-pitched “buzz,” this may indicate control surface flutter . Flutter occurs when a control surface (such as an aileron or elevator) or a flying surface (such as a During the last few moments of preparation your mind may wing or stab) rapidly vibrates up and down (thus causing be elsewhere anticipating the excitement of the first flight. -
Page 17: Landing
Make sure that you cut your power completely before touchdown, or gearbox Great Planes ElectriFly Yak 55 EP 3D ARF damage may result. You don’t need expensive brushless motor systems for 3D electric aerobatics. - Page 18 Speed Force 370 BB motor, 5:1 gearbox, prop and prop saver. GPMA1192 Great Planes ElectriFly 1500mAh Lithium-Polymer Battery Lithium-Polymer (LiPo) cells provide three times the voltage of NiCd and NiMH cells – at less than half the weight! Exclusive SafeCharge ™...
- Page 19 Save yourself the cost and inconvenience of “trading up,” with a radio that will be as useful tomorrow as it is today. The Great Planes C.G. Precision Aircraft Balancer ™ 4EXA includes an R124DF receiver, three S3108 servos Accurate balancing makes trainers more stable, low-wings and 600mAh Tx and Rx NiCds.
- Page 20 BUILDING NOTES Kit Purchased Date: _______________________ Date Construction Finished: _________________ Where Purchased:_________________________ Finished Weight: __________________________ Date Construction Started: __________________ Date of First Flight: ________________________ FLIGHT LOG...
Need help?
Do you have a question about the FW-190 Focke Wulf and is the answer not in the manual?
Questions and answers