Table of Contents
Advertisement
Quick Links
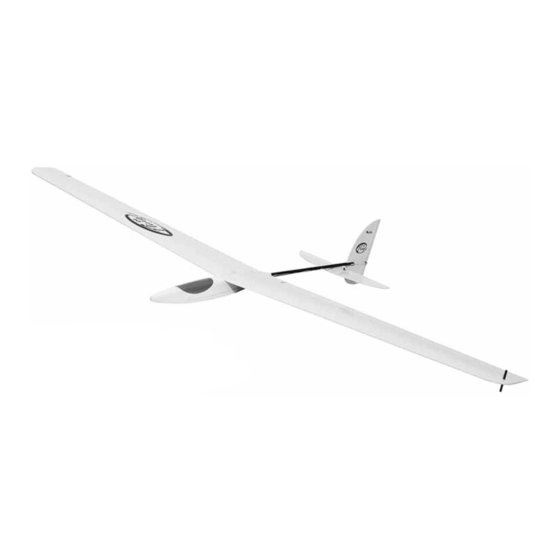
Wing Span: 60 in [1524mm]
Wing Area: 340 sq inches [22dm
Weight: 12 to 14 oz [340-400g]
Wing loading: 5.1-5.9 oz/sq ft [16-18g/dm
Fuse Length: 39-1/2 in [1000mm]
Great Planes
®
Model Manufacturing Co. guarantees this kit to be free from defects in both material and workmanship at the date of purchase. This
warranty does not cover any component parts damaged by use or modification. In no case shall Great Planes' liability exceed the original cost of the
purchased kit. Further, Great Planes reserves the right to change or modify this warranty without notice.
In that Great Planes has no control over the final assembly or material used for final assembly, no liability shall be assumed nor accepted for any
damage resulting from the use by the user of the final user-assembled product. By the act of using the user-assembled product, the user accepts all
resulting liability.
If the buyer is not prepared to accept the liability associated with the use of this product, the buyer is advised to return this kit immediately
in new and unused condition to the place of purchase.
To make a warranty claim send the defective
part or item to Hobby Services at this address:
Include a letter stating your name, return shipping address, as much contact information as possible (daytime telephone number, fax number, e-mail address),
a detailed description of the problem and a photocopy of the purchase receipt. Upon receipt of the package the problem will be evaluated as quickly as possible.
READ THROUGH THIS MANUAL BEFORE STARTING
CONSTRUCTION. IT CONTAINS IMPORTANT INSTRUCTIONS
AND WARNINGS CONCERNING THE ASSEMBLY AND
USE OF THIS MODEL.
Entire Contents © Copyright 2005
INSTRUCTION MANUAL
2
]
2
]
WARRANTY
Hobby Services
3002 N. Apollo Dr., Suite 1
Champaign IL 61822
USA
™
Champaign, IL
(217) 398-8970, Ext. 5
airsupport@greatplanes.com
GPMZ0191 for GPMA1070 V1.0
Advertisement
Table of Contents

Related Manuals for GREAT PLANES Fling DL ARF


Summary of Contents for GREAT PLANES Fling DL ARF
-
Page 1: Instruction Manual
Further, Great Planes reserves the right to change or modify this warranty without notice. In that Great Planes has no control over the final assembly or material used for final assembly, no liability shall be assumed nor accepted for any damage resulting from the use by the user of the final user-assembled product. -
Page 2: Table Of Contents
Adhesives & Building Supplies........3 “Radio Equipment” section of the manual. Have a friend IMPORTANT BUILDING NOTES........4 get a Fling DL ARF too, and you can have “first up / last down” contests or compete against each other trying to land ORDERING REPLACEMENT PARTS.......4 the Fling DL ARF closest to a certain place...a spot landing! -
Page 3: Safety Precautions
DECISIONS YOU MUST MAKE PROTECT YOUR MODEL, YOURSELF & OTHERS...FOLLOW THESE This is a partial list of items required to finish the Fling DL ARF IMPORTANT SAFETY PRECAUTIONS that may require planning or decision making before starting to build. Order numbers are provided in parentheses. -
Page 4: Important Building Notes
ORDERING REPLACEMENT PARTS Replacement parts for the Great Planes Fling DL ARF are available using the order numbers in the Replacement Parts List that follows. The fastest, most economical service can be provided by your hobby dealer or mail-order company. -
Page 5: Kit Contents
If any parts are missing or are not of acceptable quality, or if you need assistance with assembly, contact Product Support. When reporting defective or missing parts, use the part names exactly as they are written in the Kit Contents list. Great Planes Product Support 3002 N Apollo Drive, Suite 1 Champaign, IL 61822 Telephone: (217) 398-8970, ext. -
Page 6: Assemble The Wing
ASSEMBLE THE WING Install the Aileron Servos ❏ ❏ 5. Clean the side of the servo with alcohol. Lightly coat the inside of the servo opening with medium CA. Press the servo into the center of the servo opening. Use the pushrod and servo cover to position the servo. -
Page 7: Join The Wing
ASSEMBLE THE FUSELAGE Canopy Removal ❏ 9. Repeat steps 1-8 for the other wing half. Join the Wing ❏ 1. Slide the canopy forward. 3-1/8" [79mm] Rear View Top View ❏ 1. With the front half of the left wing flat on your workbench and the center joint on wax paper, raise the right wing tip 3-1/8"... -
Page 8: Attach The Tail
Attach the Tail ❏ 1. Mark the fin 1-3/4" [44mm] from the LE and centered on the carbon supports. ❏ 4. Place the plane upside down on a flat work surface. Align the carbon support in the fin with the carbon fuse. Check that the fin is perpendicular to the work surface. -
Page 9: Install Rudder And Elevator Servos
Install the Rudder & Elevator Servos ❏ 1. Trim the covering and slide the two sided plywood ❏ 7. Cut an 8" [200mm] piece of pushrod string. Loop it control horn through the rudder, center it and then glue it through the forward hole and around the carbon fuse and with thin CA. - Page 10 ❏ ❏ 4. Mount the servos to the servo tray. Optional: To keep 8. Slide the cut string that is on the right side of the fuse the weight low, use a drop of medium CA through each through the elevator turnaround. servo screw hole instead of the servo screws.
-
Page 11: Final Installation And C.g
❏ 2. Temporarily place the battery and Rx in the fuse, and FINAL INSTALLATION & CG mount the wing and canopy. Add the necessary weight to make the plane balance at 2-3/8" [60mm]. We found the best way to do this is to mix steel shot with epoxy and then Install the Throwing Peg pour the correct amount into the nose. -
Page 12: Set The Control Throws
If the initial charge is done with a fast- charger, the batteries may not reach their full capacity IMPORTANT: The Fling DL ARF has been extensively and you may be flying with batteries that are only flown and tested to arrive at the throws at which it flies partially charged. -
Page 13: Ama Safety Code
C C H H E E C C K K L L I I S S T T AMA SAFETY CODE ( EXCERPTS During the last few moments of preparation your mind may be elsewhere anticipating the excitement of the first General flight. -
Page 14: Flying
FLYING Launching The launch shown in the diagram and pictures assumes a right handed launch with the wind going from right to left. This launch style is not difficult and with just a little practice launches of over 100 feet are easily achieved. Note: To view a movie of an actual launch go to: http://www.greatplanes.com/airplanes/gpma1070.html WIND... -
Page 15: Thermal Flying
Thermal soaring is one of the most intriguing of all aspects sailplane carefully and it will tell you what it is encountering. of flying and the Fling DL ARF was designed to excel at thermal soaring even in the hands of a novice. It can be hard... -
Page 16: Slope Soaring
make a sailplane look like it is falling out of the air. Because turbulent air that can be very dangerous to try to fly in. The of this, it is important that you do not let the sailplane get too faster the wind is blowing, the stronger the lift and far downwind.
Need help?
Do you have a question about the Fling DL ARF and is the answer not in the manual?
Questions and answers