
Related Manuals for Morgana AutoFold Pro


Summary of Contents for Morgana AutoFold Pro
- Page 1 AutoFold Pro DOCUMENT FOLDING MACHINE OPERATORS MANUAL Morgana Systems Limited United Kingdom Telephone: ( 01908 ) 608888 Facsimile: ( 01908 ) 692399 Website: www.morgana.co.uk MAY 2011 ISSUE 7 184-011...
-
Page 2: Table Of Contents
INDEX INTRODUCTION & SPECIFICATION The Morgana AutoFold Pro PAGE SAFETY Do’s & Don’ts THE AutoFold Pro Labeled Photograph OPERATING THE AutoFold Pro Adjusting the Tilt of the Feed Bed Fitting the Transfer Bed Assembly to the Autocreaser and Aligning the Machines... - Page 3 AutoFold Pro INDEX ERROR SCREENS Sheet did Not Arrive Paper Crunch Clip 1 NOT Clear Clip 1 NOT Blocked Clip 2 NOT Clear Clip 2 NOT Blocked Overlap Sheets Too Close DISPATCH KIT ACCESSORIES AND OPTIONS RECOMMENDED SPARES 38 - 39 MACHINE CALIBRATION HISTORY SHEET FUSE POSITIONS &...
- Page 4 Morgana and 3rd party creasing machines. The AutoFold Pro features the unique Flying Knife Folding System used successfully in the much acclaimed Digifold which allows folding of most stocks from 0.1mm, reducing the possibility of scratching, marking or cracking of the substrate as is often associated with conventional folding systems.
-
Page 5: Safety Do's & Don'ts
AutoFold Pro Safety Do’s & Don’ts Safety Do’s & Don’ts REGLES DE SECURITE : « A FAIRE » ET « A NE PAS FAIRE » Do - read this operator manual fully before operating the machine. Lire ce mode d'emploi avant d'utiliser la machine. - Page 6 Warning Labels Do - be aware of any finger traps and rotating parts when operating the machine. Attention au risque de se coincer les doigts, et aux pièces en mouvement lors du fonctionnement de la machine. Do - read this operator manual fully before operating the machine. Lire ce mode d’emploi avant d’utiliser la machine.
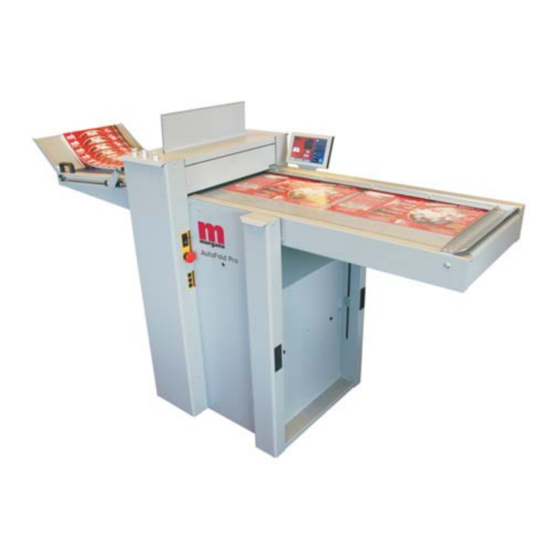
- Page 7 AutoFold Pro AutoFold Pro DOCUMENT FOLDING MACHINE Key to photograph below Delivery assembly Top Cover Touchscreen Gap Set Knobs System Switch Fuses Mains Input Socket Emergency Stop Switch SYSTEM Page 7...
-
Page 8: Operating The Autofold Pro Adjusting The Tilt Of The Feed Bed
Operating the AutoFold Pro ADJUSTING THE TILT OF THE FEED BED 1. The Feed Bed can be tilted, so that it matches the height of the creasing unit that is being used with it. (i) Open the front and rear column covers. - Page 9 AutoFold Pro Operating the AutoFold Pro (iii) Adjust the relative positions of the machines so that the Transfer Bed Assembly aligns with the Autofold Feed Bed as shown in FIG.9 (iv) Plug the connector, on the flying lead of the Transfer Bed Assembly, into the AutoFold Socket as shown in FIG.9.
- Page 10 Select the green tick icon only if you have been trained to operate this machine. If you have not been trained to operate this machine and you select the green tick icon, Morgana Systems Ltd accept no responsibility for personal injury, damage to the machine or damage to materials being processed by the machine.
-
Page 11: Paper Settings
AutoFold Pro Operating the AutoFold Pro Setting Pages. Paper settings Page Fold Selection - For quick setting of fold positions on standard size sheets. Highlighted fold is type currently selected, other folds may be selected. Paper Type - As a Currently selected fold is shown in the status area. - Page 12 Operating the AutoFold Pro Paper Thickness Selection. Pre-set Paper Thickness sizes for quick insertion. Paper Thickness input Page 12 FOLDING...
-
Page 13: Roller Gap Set
AutoFold Pro Operating the AutoFold Pro Roller Gap Set Page. To get to the roller gap setting page click the lower tab Roller gaps may be in the range of 0.05mm to 1.5mm, with increments of 0.05mm Current gap setting... - Page 14 Operating the AutoFold Pro The gap settings (Gap 1, Gap 2 & Gap 3) can be adjusted by rotating the Roller Gap Set Knobs (see FIG 14.1 below). IMPORTANT. When setting roller gaps, you must first adjust the gap to a value greater than that required and then decrease the value to the required setting.
- Page 15 AutoFold Pro Operating the AutoFold Pro GAP SET GUIDE FOLD TYPE GAP 3 GAP 2 GAP 1 Half Fold on Knife 1 Half K1 Half Fold on Knife 2 Half K2 Letter Concertina Gate Closed Gate Engineering Double Example 1:- When producing a Half K1 fold, if GAP 1 is 0.2 (X) then set GAP 2 to 0.4...
-
Page 16: Feed Bed Fans Settings
Operating the AutoFold Pro Feed Bed Fan Settings Pages. To get to the fed bed fan setting page click the lower tab from the status area. You can adjust the speed independently for the front and rear fans. On the optionally available long feed bed, a centre fan is also shown for adjustment. -
Page 17: Folds In 'Set By Fold' Mode
AutoFold Pro Operating the AutoFold Pro Fold Settings Pages. To get to the Fold setting page click the lower tab from the status area. If you have selected a predefined standard Fold Type from the paper settings page the recommended crease positions can be viewed by selecting the crease position button. -
Page 18: Folds In 'Set By Position-' Mode
Operating the AutoFold Pro Folds in ‘Set By Position’ mode. Fold distance from lead edge for knives (K1 & K2) increments of 0.1mm K1 deflect button K1 micro adjust selected Clicking this icon switches K1 in deflect position. deflect off &K1 returns to This can be micro adjusted. - Page 19 AutoFold Pro Operating the AutoFold Pro SET BY POSITION IMPORTANT NOTES 1. The best fold squareness is achieved when the fold is on the center line of the crease. It should be to one side of the crease center line as shown below.
- Page 20 Operating the AutoFold Pro Example of Set by Position. Paper Length = 350mm (13.8”) Feed Direction Leading Edge Crease 1 Crease 2 Crease 3 SETTINGS Fold 1 Fold 2 Crease 1 = 97.0mm (3.8”) Crease 2 = 179.0mm (7”) Crease 3 = 260.0mm (10.2”) All dimensions are from the leading edge of the paper Fold 1 = 179.0mm (7”)
-
Page 21: Delivery Settings
AutoFold Pro Operating the AutoFold Pro Delivery Settings Page. To get to the Delivery setting page click the lower tab Roller position may be micro adjusted by clicking here. Shingle may be micro adjusted by clicking here. Roller adjustment calculator. - Page 22 Operating the AutoFold Pro Setting the Delivery Conveyor System. WARNINGS:- 1. The Machine will start if the delivery unit is not in its up position. 2. If the delivery is turned off the roller will feed to the far end of the belt conveyor and park there until turned on again.
-
Page 23: Status Screen
AutoFold Pro Operating the AutoFold Pro Status Screen. Green icon indicates settings are Clicking in this area will take Clicking in this area will take saved - a red icon would show that you to the store page you to the paper setting settings have been changed but page. - Page 24 Operating the AutoFold Pro Run Job. Click to run machine. System Switch Not On. Click to confirm System switch is on & then click run button again The machine running screen will appear. Run count Job Count Click to stop machine.
-
Page 25: Setting The Machine To Operate In Manual Sheet Feed Mode
AutoFold Pro Operating the AutoFold Pro Setting the machine to operate in manual sheet feed mode In order to feed heavy stock, very small or very large sheets, embossed or even irregular shaped sheets, it may be necessary to feed the sheets manually. -
Page 26: Store
Operating the AutoFold Pro Store Pages. To get to the Store setting page click the lower tab from the status area. New Jobs. Having set up your job you can give the job a name and save it to a store. You can also retrieve previously saved jobs, modify them or delete jobs you no longer require. - Page 27 DigiFold Pro Operating the AutoFold Pro Save confirmation screen. To confirm saving of job click here. Search for current jobs to load or modify. You can search for jobs by clicking the search icon , this will bring up the search keyboard for text input.
- Page 28 Operating the AutoFold Pro Loading job confirmation screen. To cancel loading of Job press here To confirm loading of Job press here Loaded job may be modified and then re-saved as the same job name. Overwrite job confirmation screen. To cancel overwrite of Job press here.
-
Page 29: Tools Menu
AutoFold Pro Operating the AutoFold Pro Tools Menu. To get to the Tools page click the lower tab Inch paper in direction of arrow to clear jams Inch paper in direction of arrow to clear jams Clicking this icon will show Machine programme revision &... -
Page 30: Removing Paper Jams
Removing Paper Jams Removing Paper Jams In the event of a paper jam occurring, whilst running the machine, follow the steps described below to allow access to remove the jammed paper. 1. Unlock and lower the delivery unit, open the top cover; see FIG 29.1 below. 2. -
Page 31: Paper Fold Out Of Square
AutoFold Pro Trouble Shooting Paper fold out of square Note:- the best fold squareness is achieved when the fold is not on the center of the crease, but to one side or the other. Check that the fold is to one side of the crease center line. -
Page 32: Sheet Did Not Arrive
Trouble Shooting Error Screens Sheet did not arrive. If the machine stops and error message 01 is displayed on the touch screen, this indicates that the paper did not arrive at the end of the suck process; so the machine timed out. -
Page 33: Clip 1 Not Blocked
AutoFold Pro Trouble Shooting Error Screens (continued) Clip 1 NOT Blocked (Back Sensor) If the machine stops and error message 10 is displayed on the touch screen, this indicates that the sensor did not see the paper at the correct time. -
Page 34: Trouble Shooting
Trouble Shooting Clip 2 SENSOR POSITIONS (Top Sensor) Clip 1 (Back Sensor) Page 34 FOLDING... -
Page 35: Overlap
AutoFold Pro Trouble Shooting Error Screens (Continued) Overlap If the machine stops and error message 13 is displayed on the touch screen, this indicates that the ‘Lead Edge Sensor’ has seen a sheet subsequent to the first one as being longer. Again this could actually be a longer sheet, OR it could be a sensor problem (if it is a recurring problem). -
Page 36: Dispatch Kit
180-95-01 DISPATCH KIT ITEM PART NUMBER DESCRIPTION OPERATORS MANUAL - 184-011 AutoFold Pro 90-018 ROLLER CLEANING KIT 650-040 POWER CORD C19 UK 16A 2.5m 601-167 DIGITAL THICKNESS GAUGE 613-229 WRITE-ON SERIAL NO. LABEL 65-104 SPECIFICATION LABEL MSL/CE 620-027 BONDUS WRENCH 5mm... -
Page 37: Accessories And Options
AutoFold Pro ACCESSORIES AND OPTIONS ITEM PART NUMBER DESCRIPTION 182-01-02 FEED BED FRAME - SHORT 184-11-02 TRANSFER BED ASSY - AUTOCREASER 50 ACCESSORIES..OPTIONS..May be obtained from ..May also be obtained and your dealer and fitted to your fitted by your dealer. You should... -
Page 38: Recommended Spares
Controller PCB Assembly + Chip 184-04-01 Fan Control PCB Assembly 174-19-01 RS232 Adaptor PCB Assy. 75-500-04 Mini ITX Motherboard - Autofold Pro 126-059-02 Link - Paper Guide 145-093-02 Knife Driver Pin - M8 76-261 Lead - Delivery Input Connector 76-277... -
Page 39: Recommended Spares
AutoFold Pro RECOMMENDED SPARES PART NO. DESCRIPTION 175-125-01 Connecting Link Assembly - Drive 175-125-02 Connecting Link Assembly - Knife Hubs 182-014-02 Belt - Paper Transport - Medium 182-014-03 Belt Paper Transport - Short 184-03-01 Jam Detector - Emitter 184-03-02 Jam Detector - Receiver 186-02-01 Clip Sensor Assy. - Page 40 MACHINE CALIBRATION HISTORY Serial Number:- Date:- Total Count:- Stretch Lead Edge Trim Del. Roller Trim Knife 1 Trim Knife 2 Trim K1 Deflect Trim K2 Deflect Trim Date:- Total Count:- Stretch Lead Edge Trim Del. Roller Trim Knife 1 Trim Knife 2 Trim K1 Deflect Trim K2 Deflect Trim...
-
Page 41: Fuse Positions & Ratings
AutoFold Pro FUSE POSITIONS & RATINGS (POSITION ET CLASSIFICATION DES FUSIBLES) PSU (12V) (FUSIBLE PSU (12V) F3.15AH 250 (613-023) PSUs (24V & 48V) (FUSIBLE PSUs (24 V & 48 V) T6.3AH 250 (681-019) ANTI-STATIC UNIT (FUSIBLE ANTI-STATIQUE) T315mAH 250 (681-011) - Page 42 PRODUCT RECYCLING & DISPOSAL European Union Disposal Information for Commercial Users Application of this symbol on your equipment is confirmation that you must dispose of this equipment in compliance with agreed national Procedures. In accordance with European legislation end of life electrical and electronic equipment subject to disposal must be managed within agreed procedures.
- Page 43 AutoFold Pro FUSE POSITIONS & RATINGS (POSITION ET CLASSIFICATION DES FUSIBLES) PSU (5V / 12V) (FUSIBLE PSU (5V/12 V) F3.15AH 250 (613-023) PSUs (24V) (FUSIBLE PSUs (24 V ) T6.3AH 250 (681-019) ANTI-STATIC UNIT (FUSIBLE ANTI-STATIQUE) T315mAH 250 (681-011) SYSTEM...
Need help?
Do you have a question about the AutoFold Pro and is the answer not in the manual?
Questions and answers