
Related Manuals for Morgana DIGIFOLD


Summary of Contents for Morgana DIGIFOLD
- Page 1 DOCUMENT CREASING / FOLDING MACHINE OPERATORS MANUAL Morgana Systems Limited United Kingdom Telephone: ( 01908 ) 608888 Facsimile: ( 01908 ) 692399 Website: www.morgana.co.uk JULY 2006 ISSUE 9 120-101...
-
Page 2: Table Of Contents
INDEX INTRODUCTION & SPECIFICATION The Morgana Digifold PAGE THE DIGIFOLD Labeled Photograph THE CONTROL PANEL Detailed diagram and description Features on the control panel QUICK START GUIDE OPERATING THE DIGIFOLD Accessing Menus. Set by Fold Set by Position Example of Set by Position... - Page 3 Digifold INDEX REPLACING CREASING BLADE SETS Installing new blade sets PAGE Spare Blades TROUBLE SHOOTING Paper crease out of square Paper fold out of square Paper Jamming Machine will not start Paper not feeding Machine not counting Cracking of the printed material along the crease...
- Page 4 INTRODUCTION INTRODUCTION AND SPECIFICATION DigiFold is a registered trade mark of Morgana Systems Ltd. The unique patented creasing and folding system, makes it possible to fold most delicate stocks from 90gsm, upto and often above 300gsm. The DigiFold reduces the possibility of scratching, marking or cracking appearing on the substrate, as is often associated with conventional folding machine methods.
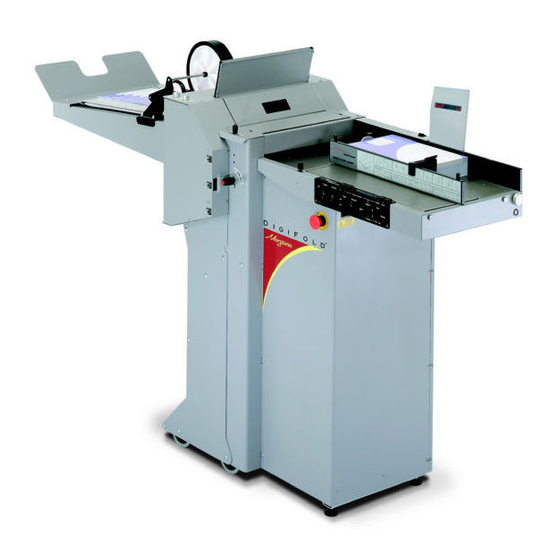
- Page 5 Digifold DOCUMENT CREASING / FOLDING MACHINE Key to photograph below Air distribution knob Paper Gate Delivery assembly Adjustable side lay Exit Guard Suction slot knob Back stop High Level Display Control panel Fixed side lay Extension table fixing Air separation knob...
- Page 6 The Control Panel The Control Panel on the Digifold allows the operator to read, edit, create and initiate numerous creasing / folding programs within the memory. The top face of the control panel houses four pushbuttons as shown in the diagram below.
-
Page 7: Features On The Control Panel
Digifold The Control Panel Features on the Control Panel Push Button 1 Used for adjusting a crease / fold position in increments of 10mm when used with the setting dial. Also used for inching feed forward when in handle or crunch / Clip 1 or Clip 2 situation. -
Page 8: Quick Start Guide
Quick Start Guide Setting the machine to operate in automatic mode. (i.e. ,Set by Fold’) Set the gap between the paper gate and the vacuum roller to approximately twice the thickness of the stock to be creased. (See page 17) Place the stock to be creased onto the loading table against the fixed side lay. - Page 9 Digifold Quick Start Guide INSTRUCTIONS OPERATION Step 1 Turn the Emergency Stop button clockwise to switch the power on. Step 2 Set the Set Up switch to its Mid- position. Mid-Posn. Step 3 SET MACHINE TO ‘SET BY FOLD’ Turn the Setting Dial clockwise until the (’SEt FoLd’...
-
Page 10: Accessing Menus
Operating the Digifold Accessing Menus. Main Menu. The mains switch on the machine must be off. Set the Set-up Switch to its mid position and then turn the mains switch on. Main Menu functions can then be accessed by turning the Setting Dial clockwise or anti-clockwise as shown. - Page 11 Digifold Operating the Digifold SYSTEM Page 11...
- Page 12 Operating the Digifold SET BY FOLD Typical Set by Fold main display screen fold type count fold on L = letter crease on Turn the Emergency Stop button clockwise to switch the power on, and select the main display screen.
- Page 13 Digifold Operating the Digifold Run the job by switching the System and Compressor switches on, then switch the Feed switch on. View the results, the ‘micro adjust’ function can be used to adjust positions. To ‘micro adjust’ the crease position, turn the Setting Dial clockwise until Cr1 is displayed.
-
Page 14: Set By Position
Operating the Digifold SET BY POSITION IMPORTANT NOTES. 1. If the fold is too near, or on the center line of the crease; the fold will try to fold diagonally across the crease profile and pull the fold out of square to the paper. - Page 15 Digifold Operating the Digifold Turn the Setting Dial clockwise to select ‘1 cr’ Hold down PB1or PB2 and turn the Setting Dial to adjust the crease position in 10.0mm or 0.1 mm increments. Release PB1 or PB2. (this can be done on all further crease positions) Turn the Setting Dial clockwise to ‘2 cr’...
-
Page 16: Example Of Set By Position
Operating the Digifold Example of Set by Position. Paper Length = 350mm Feed Direction Leading Edge SETTINGS Cr1 = 97.0mm Cr2 = 179.0mm All dimensions are from the leading edge of the paper Cr3 = 260.0mm F1 = 179.0mm F2 = 260mm = 179.0... -
Page 17: Adjusting The Papergate
Digifold Operating the Digifold Adjusting the Paper Gate The standard setting for horizontal adjustment of the paper gate is 6.5mm (1/4") away from the mounting block. Turn disc J to make this adjustment. This setting is only intended as a guide, for instance, sheets with an upward curl will require this setting to be increased. -
Page 18: Setting The Back-Stop
Operating the Digifold Setting the Back-Stop Place the back-stop on to the adjustable side lay and slide up towards the paper stack allowing a gap (as specified in the above step) before clamping. When the extension table is used for feeding longer sheets, remove clamp type back stop and use the magnetic type back stop as shown in fig. -
Page 19: Setting The Extension Table
Digifold Operating the Digifold To operate the motors manually, switch the machine ‘on’ at the Emergency Stop switch. Whilst holding down Push Button 1, flick the Set-up switch to ‘set up’. The display will now read ‘hAndLE’. Press the System switch to ‘on’ and use Push Button 1 (forward) and Push Button 2 (reverse) to manually rotate the rollers in short pulses. -
Page 20: Setting The Delivery Conveyor System
Operating the Digifold Setting the Delivery Conveyor System. WARNING:- The Digifold will start if the delivery unit is not fitted onto the machine. Turning the delivery system ‘on’ or ‘off’ Set the Set Up switch to its mid-position. Turn the Setting Dial until the display reads ‘dELrY’ on or off. -
Page 21: Adjusting The Batch Count
Digifold Operating the Digifold Adjusting the Batch Count The Batch Counter controls the feed of the machine. If for example the Batch Count is set to 10; the machine will feed 10 sheets of paper, pause for approximately 5 seconds, the conveyor belt will feed the 10 sheets forward (to allow the removal of the sheets from the conveyor) and then feed the next 10 sheets of paper. -
Page 22: Storing Programs
Operating the Digifold Storing Programs A maximum of 6 programs, of crease / fold settings, can be stored in the machine. When the crease / fold settings have been correctly entered, the program can be stored as follows:- Flick the Set Up switch down and then back up to its mid-position, the display reads ‘StorE 1’... -
Page 23: Feeding Sheets Manually
Digifold Operating the Digifold Feeding Sheets Manually In order to feed heavy stock, very small or very large sheets, embossed or even irregular shaped sheets, it may be required to operate the machine manually. The machine can be programmed and set up in exactly the same way as explained when operating the machine automatically. - Page 24 The Delivery Unit The delivery unit on the Digifold is used to catch the sheets once they have been creased, or folded. WARNING:- The Digifold will start if the delivery unit is not fitted onto the machine. Assemble the delivery unit as shown in FIG 23.1.
-
Page 25: Adjusting The Blade Alignment
Digifold The Blade Assembly Adjusting the blade pressure (no paper required) 1. Turn the Emergency Stop button clockwise to switch the machine ‘on’. 2. Activate the system switch and the motors will begin to operate. 3. Flick the ‘Feed’ switch to ‘on’ and then back to ‘off’ to ensure that the lower blade / anvil is at its bottom position. - Page 26 (one for blade, one for anvil). The two holes are repeated on the back of the machine for the back alignment. Remove the stacker unit from the Digifold. Using a 3mm allen key, loosen the cap head type locking screws located on the front face at both ends of the blade /anvil as shown below.
- Page 27 Digifold Replacing Blade Sets Before removing the blade assembly, ensure that the lower blade / anvil is at ‘top dead centre’, ie. Push Button 3 has not been pressed. Switch the machine off. Remove the delivery unit and lift the top guard.
- Page 28 However, components within the blade set can not be ordered separately i.e. single blade or anvil. Standard Blade set (fitted to Digifold as standard) Part number 76-213-01 Consisting of a standard blade and anvil, blade brushes, blade links and alignment bolts.
-
Page 29: Paper Fold Out Of Square
Digifold Trouble Shooting Paper crease out of square Check that the sheets are all square and exactly the same size before loading the stack on to the table. Check that the adjustable side lay has been correctly positioned ie. No further than 0.5mm from the paper stack. -
Page 30: Paper Not Feeding
On digital media, the feeding performance may be improved if the leading edge of the stack is trimmed before loading onto the Digifold. Check that the air distribution has been correctly set. Check that the air separation has been set high enough to feed the sheets. -
Page 31: Paper Marking Or Scratching
Digifold Trouble Shooting Cracking of the Printed Material along the Crease. (continued) When using dry ink or toner based print engines, the material must be fully acclimatised for at least 48 hours before putting an image onto the paper. Paper marking or scratching. - Page 32 Trouble Shooting ’Crunch’ (Paper Jamming) In the event of a paper jam occurring whilst the machine is operating the display window will read ‘crunch”. In order to remove the paper causing the jam:- Push Button 1 and Push Button 2 can be used to manually operate the motor. Push Button 1 will drive paper forward, in short pulses.
-
Page 33: Recommended Weekly Operator Maintenance
With the blade assembly removed, clean the slots and surrounding area within the creasing unit; add a small amount of grease to the slide ways. Technician Maintenance It is recommended that your Morgana Digifold is fully serviced at least once every six months by a factory trained Service Engineer. SYSTEM... - Page 34 120-95-01 DISPATCH KIT ITEM PART NUMBER DESCRIPTION OPERATORS MANUAL - DIGIFOLD 120-101 90-018 ROLLER CLEANING KIT 121-006 TILT LEVER 613-316 POWER CORD CE UK 3Pin 617-004 GLASS BALL - Ø20 SCREW - SOCKET CAP HEAD - M3 x 6 LG...
-
Page 35: Accessories And Options
Digifold ACCESSORIES AND OPTIONS ITEM PART NUMBER DESCRIPTION 76-213-03 BLADE SET - 320 Wide - Extra Narrow ACCESSORIES..OPTIONS..May be obtained from ..May also be obtained and your dealer and fitted to your fitted by your dealer. You should... -
Page 36: Recommended Spares
Knob Ø15 652-011 System Switch 681-007 Fuse - 3.15A - Time-Delay - (20 x 5mm) 75-040 Stacker Switch Assembly 75-077 Control PCB Assembly - Digifold 75-082 Display PCB Assembly 75-098 Switch Assembly - Feed 75-100 Switch Assembly - Set-up 75-101... - Page 37 Digifold RECOMMENDED SPARES PART NO. QUANTITY DESCRIPTION 76-203-01 Input Roller Assy - Upper 76-203-02 Input Roller Assy - Lower 76-204 Output Shaft Assembly 76-213-01 Blade Set - 320 Wide - Standard 76-228 Upper Sensor Assembly 76-229 Paper Jam Sensor Assembly...
-
Page 38: Recommended Spares
RECOMMENDED SPARES PART NO. QUANTITY DESCRIPTION 126-053 Blade Guide 126-053-02 Blade Guide - Long 126-059 Link - Paper Guide 126-060-01 Paper Sensor - Edge Detect RX 126-060-02 Paper Sensor - Edge Detect TX 126-060-03 Paper Sensor - Sync 2 RX 126-060-04 Paper Sensor - Sync 1 RX 126-063-01... - Page 39 Digifold MACHINE CALIBRATION HISTORY Serial Number:- Date:- Total Count:- Etch dEtr FECh dEtF gAPF Date:- Total Count:- Etch dEtr FECh dEtF gAPF Date:- Total Count:- Etch dEtr FECh dEtF gAPF SYSTEM Page 39...
- Page 40 Page 40 CREASING / FOLDING...
Need help?
Do you have a question about the DIGIFOLD and is the answer not in the manual?
Questions and answers