
Related Manuals for AeroWorks 60cc Freestyle 260 ARF QB-L


Summary of Contents for AeroWorks 60cc Freestyle 260 ARF QB-L
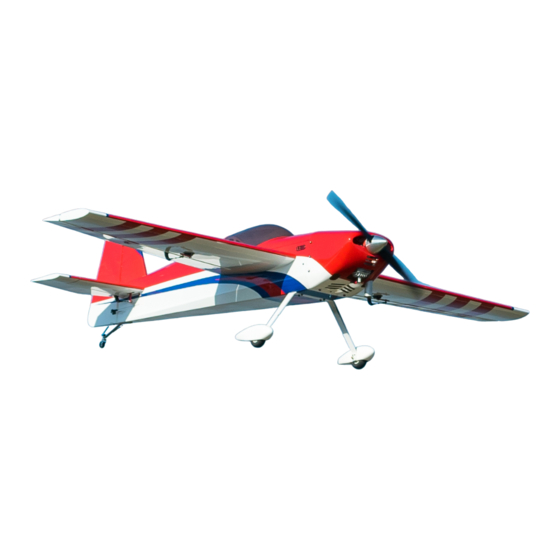
- Page 1 60cc Freestyle 260 ARF QB-L (Quick Build Light) ASSEMBLY MANUAL AEROWORKS 4903 Nome Street, Denver, CO. 80239 - Phone 303-371-4222 - Fax 303-371-4320 E-mail - info@aero-works.net...
-
Page 2: Table Of Contents
4903 Nome Street Tightening and Re-shrinking Covering ……… ……...7 Denver, CO 80239 In that Aeroworks has no control over the final Checking Glue Joints ….………………………. ……...8 Phone: (303) 371-4222 assembly or materials used for final assembly, Aileron Hinging/Servo/ Horn Installation…………….8... -
Page 3: Kit Contents
PREMIUM COVERING ASSEMBLY ASSEMBLY COLORS Aeroworks is always trying to improve both the qual- ity and price of our product. We have selected to use a premium covering imported from Taiwan that we have been testing. We have found the covering to be very durable, lighter weight and does not wrinkle as much as the Ultracote™... -
Page 4: Items Needed To Complete
8 - Motor mounting bolts 1 - 22 x 8 Propeller 2 - Header Clamps 1 - 22 x 8 Propeller 1 - Exhaust Gasket 2 - Header Mounting Bolts Aeroworks 60cc Freestyle Extra 260 Assembly Manual... - Page 5 Note: Servos available through Aeroworks well trimmed airplane. 5 - Hitec 7985MG Servos for flight surfaces 1 - Hitec 5625MG Servo for throttle 1 - 6-8 Channel 2.4 GHz or PCM Receiver Aeroworks 60cc Freestyle Extra 260 Assembly Manual...
- Page 6 Receiver Power System: TOOLS & ADHESIVES NEEDED Recommended Extensions: TO COMPLETE The Aeroworks 50cc Power Package is recom- 22 AWG extensions are recommended throughout mended. The package consists of the following the 60cc Extra 260 Freestyle QB-L. The following items: sizes will be used: ...
-
Page 7: Tightening And Re-Shrinking Covering
3. If bubbles persist, use a small pin to punch holes 5. Go over all seams and color overlaps with your in the bubble to relieve trapped air and reheat. sealing iron. Aeroworks 60cc Freestyle Extra 260 Assembly Manual... -
Page 8: Checking Glue Joints
Petroleum Jelly Isopropyl Alcohol Paper Towels Builders Tip: Wet paper towels with isopropyl alcohol before starting aileron installation. This will make cleaning any excess epoxy easier once the aileron is in- stalled. Aeroworks 60cc Freestyle Extra 260 Assembly Manual... - Page 9 Check that you have full aileron de- wing before epoxy cures. Wipe away excess flection before epoxy fully cures. epoxy with alcohol wetted wipes. Aeroworks 60cc Freestyle Extra 260 Assembly Manual...
- Page 10 8. Paint the top portion of the control horn and al- base leg are for the Ailerons. where it will be glued to the aileron as shown low time to fully dry before installing. below. Aileron Elevator Aeroworks 60cc Freestyle Extra 260 Assembly Manual...
- Page 11 12. Use a hobby knife to carefully remove the cover- mounting slots and the base plate mounting loca- ing. Take care not to cut to deep and damage the sembly shown below. tion as shown. wood underneath the covering. Aeroworks 60cc Freestyle Extra 260 Assembly Manual...
- Page 12 18. Secure using an Aeroworks Safety Clip. 21. Install servo in servo well with the output arm 19. Fasten the pull string from the servo hole to the 16.
- Page 13 Adjust the pushrod length so the con- trol surface is neutral when the servo arm is 90 degrees to the servo case. Aeroworks 60cc Freestyle Extra 260 Assembly Manual...
-
Page 14: Elevator Hinging/Servo/Horn Installation
5 Minute Epoxy 4. IMPORTANT - The control horn with the Hobby Knife Shorter base leg is for the Elevator. Ball Point Pen 1oz Bottle Thick CA Glue Aileron Elevator Aeroworks 60cc Freestyle Extra 260 Assembly Manual... - Page 15 Use a ball point pen below. to mark the location of the base plate as shown below. Aeroworks 60cc Freestyle Extra 260 Assembly Manual...
- Page 16 Drill holes for servo come out at this time. Ensure that the base plate mounting screws is flat and making full contact with the elevator at this time. Aeroworks 60cc Freestyle Extra 260 Assembly Manual...
- Page 17 This bolt can be reached of the receiver and power up. Turn on transmit- through the servo arm slot in the stab as shown ter to center elevator servo. Ensure servo trim below and sub-trims are centered. Aeroworks 60cc Freestyle Extra 260 Assembly Manual...
-
Page 18: Rudder Hinging Installation
6. Carefully slide the rudder onto each hinge and before epoxy cures. Wipe away excess epoxy against the trailing edge of the fin. Wipe away with alcohol wetted wipes. excess epoxy with alcohol wetted wipes. Aeroworks 60cc Freestyle Extra 260 Assembly Manual... -
Page 19: Rudder Servo/Pull-Pull Installation
3. Slide upper and lower rudder horns through the Small Phillips screw Driver pre-cut slot in the rudder as shown below. Wire Cutters Pliers 1oz Bottle Thick CA Glue Masking Tape Aeroworks 60cc Freestyle Extra 260 Assembly Manual... - Page 20 9. Use 80 grit sandpaper to lightly scuff the back of side of the rudder control horn as shown. ing. Take care not to cut too deep and damage the control horn mounting base as shown. the wood underneath the covering. Aeroworks 60cc Freestyle Extra 260 Assembly Manual...
- Page 21 Aeroworks 60cc Freestyle Extra 260 Assembly Manual...
- Page 22 Only thread the coupler into the ball link half way, ment and proper deflection. front of the fuse. Repeat for other side. this will allow for final adjustment once the pull-pull cables are installed. Aeroworks 60cc Freestyle Extra 260 Assembly Manual...
- Page 23 25. Thread cable through brass swage tube. 27. Loop the cable back through the brass swage rudder servo tray. tube and pull tight. Note: Cables run parallel down fuse and do not cross each other. Aeroworks 60cc Freestyle Extra 260 Assembly Manual...
- Page 24 Ensure servo trim and sub-trims are centered. Note: Use flat washers to prevent ball link from coming loose from the brass ball. Note: On metal geared servos use blue Loctite for all servo arm mounting screws. Aeroworks 60cc Freestyle Extra 260 Assembly Manual...
-
Page 25: Tail Wheel Installation
1oz Bottle Gap Filling CA Glue Notice: Please note optional carbon fiber tail wheel available from Aeroworks. All mounting steps will be identi- 35. Finished ball link pull-pull installation shown cal for carbon fiber tail wheel. below. Aeroworks 60cc Freestyle Extra 260 Assembly Manual... - Page 26 5. Mount the tail wheel steering tiller using two mounting screws before inserting in the pre- mounting holes at bottom of rudder. wood screws. drilled mounting holes on the bottom rear of the fuse. Aeroworks 60cc Freestyle Extra 260 Assembly Manual...
- Page 27 11. Repeat spring installation steps for the remaining Center the spring between both tail wheel and tail wheel spring. Ensure that the springs allow steering tillers. for full rudder deflection and that they do not bind. Aeroworks 60cc Freestyle Extra 260 Assembly Manual...
-
Page 28: Main Gear & Wheel Pant Installation
1 - .34oz Bottle Blue IC-Loc Thread Locker washer and flat washer. Use a drop of blue Loc- Only snug tighten axle lock nut at this time. tite on landing gear bolts before attaching the landing gear. Aeroworks 60cc Freestyle Extra 260 Assembly Manual... - Page 29 9. Install the wheel pant using two 4-40 mounting wheel pant. bolt, lock washers and flat washers. Use blue Loctite on mounting bolt to ensure it does not come loose from vibration. Note: Blind nuts have been preinstalled in wheel pant. Aeroworks 60cc Freestyle Extra 260 Assembly Manual...
-
Page 30: Engine Regular Muffler Installation
5. Mark the engine mounting hole locations. Be 3. Remove top hatch of engine box and front hatch 1 - 3/16” Drill Bit carful not to move the template. of exhaust tunnel. Aeroworks 60cc Freestyle Extra 260 Assembly Manual... - Page 31 7. Use blue Loctite to secure the engine mounting 9. Temporally mount muffler to check fit and en- bolts in place. This will insure that the mounting sure muffler will not hit engine box. bolts stay in place over time. Aeroworks 60cc Freestyle Extra 260 Assembly Manual...
-
Page 32: Canister Installation
Note: If floor will be left outside of fuse for an extended period of time it is recommended that it be weighted down on a flat surface to prevent warping. Aeroworks 60cc Freestyle Extra 260 Assembly Manual... - Page 33 9. Slide 4-40 mounting bolt and flat washer 11. Slide the canister into the canister tunnel as through canister mount as shown. shown below. Note: Reseal all edges with a covering iron to prevent fuel from soaking into the wood. Aeroworks 60cc Freestyle Extra 260 Assembly Manual...
- Page 34 13. Use blue locktite on canister mount mounting 15. Finished canister installation shown below, once bolts. satisfied with canister position, reinstall radio tray floor. Aeroworks 60cc Freestyle Extra 260 Assembly Manual...
-
Page 35: Pipe Installation
Note: If floor will be left outside of fuse for an extended period of time it is recommended that it be weighted down on a flat surface to prevent warping. Aeroworks 60cc Freestyle Extra 260 Assembly Manual... - Page 36 Use a drop of blue loctite to insure the bolts do 11. Installed tuned pipe mounting bracket shown not come out from vibration. below. Note: Reseal all edges with a covering iron to prevent fuel from soaking into the wood. Aeroworks 60cc Freestyle Extra 260 Assembly Manual...
- Page 37 Please refer to exhaust manufacturer instructions ing bolts with a drop of blue loctite. the pipe to be installed in the fuse easily. for proper header length and header to pipe spac- ing. Aeroworks 60cc Freestyle Extra 260 Assembly Manual...
-
Page 38: Throttle Servo Installation
1 - Wire Cutter 1 - Soldering Iron 1 - Silver Solder “Sta-Brite Recommended” 1 - 80 Grit Sandpaper 1 - .34oz Bottle Blue IC-Loc Thread Locker Aeroworks 60cc Freestyle Extra 260 Assembly Manual... - Page 39 Use the throttle pushrod to locate the servo arm as shown below. caution not to drill into the throttle servo. correct mounting area for throttle servo mount- ing tray and mark with a ball point pen. Aeroworks 60cc Freestyle Extra 260 Assembly Manual...
- Page 40 Note: For best results we recommend a high quality silver solder like “Sta-Brite” Silver eration. Ensure the servo or rod does not bind or jam at closed or full open positions. Solder. Aeroworks 60cc Freestyle Extra 260 Assembly Manual...
-
Page 41: Choke Installation
1 - 4-40 Ball Link Assembly with Hardware 1 - 4-40 Brass Spacer Required Parts -Not Included 1 - Large Nylon Tie 2 - Small Nylon Ties 3. Location of manual choke pushrod shown be- low. Aeroworks 60cc Freestyle Extra 260 Assembly Manual... -
Page 42: Ignition Installation
5. Roll foam rubber to make a pad as shown. Make 3. Use a 1/4” bit to drill the ignition module 1 - 1/16” Drill Bit the pad slightly larger than the ignition module. mounting holes. 1 - Wire Cutter Aeroworks 60cc Freestyle Extra 260 Assembly Manual... - Page 43 Note: Ensure ignition switch location does not interfere with the mounting of the wing. 7. Secure ignition pick up lead with Aeroworks 9. Using a small piece of hook and loop material, safety clip and secure wire to engine stand offs...
-
Page 44: Fuel Tank Assembly And Installation
1 - Phillips Head Bolts 2 - Brass Barbs for Fuel Line 2 - Small Nylon Ties 1 - Aeroworks Fuel Line Installation Kit Required Tools and Adhesives Pencil/Felt Tip Pen Phillips Screw Driver ... - Page 45 9. Secure the rubber stopper with set screw. Take 7. Install the fuel tubing and clunk. Secure the fuel care not to strip threads by over tightening set tubing with nylon ties to the pick-up tube and screw. clunk. Aeroworks 60cc Freestyle Extra 260 Assembly Manual...
-
Page 46: Fuel Tank Installation
2 - 8 x 450mm Nylon Ties 7 - 3 x 150mm Nylon Ties 1 - Aeroworks Fuel Line Installation Kit Required Tools and Adhesives Pliers Wire Cutter Fill ... - Page 47 13. Use thick CA to secure fuel vent exit dot in fuse. shown below. the fuse forward of the landing gear plate to al- low the fuel vent exit dot to pass through Note: Vent dot available from Aeroworks. Aeroworks 60cc Freestyle Extra 260 Assembly Manual...
- Page 48 15. Gather the fuel filler dot and hobby knife as 20. Secure fuel pick up line to engine carburetor shown below. with small nylon tie. Note: Fuel filler dot available from Aeroworks 18. Use thick CA to secure fuel dot in fuse. Aeroworks 60cc Freestyle Extra 260 Assembly Manual...
-
Page 49: Radio And Battery Installation
3. Install battery using foam padding and two one wrap Velcro straps, securely tighten one wrap Note: Ensure switch does not interfere with wing straps as shown. or cowl installation. Aeroworks 60cc Freestyle Extra 260 Assembly Manual... -
Page 50: Cowl For Regular Muffler Installation
3. Use a “T” pin to mark the location of the bottom 5. Mark the side of the template that will come in cowl mounting tabs as shown contact with the cowling. This will help when transferring the cut out locations onto the cowl. Aeroworks 60cc Freestyle Extra 260 Assembly Manual... - Page 51 Make any adjust- be easily removed. Also, When using ment to the cylinder head cut out at this time. rubbing alcohols or other paint removers, always test on painted parts before using! Aeroworks 60cc Freestyle Extra 260 Assembly Manual...
- Page 52 18. Finished cowl installation shown below. cowl. Use a felt tip marker to transfer the tem- plate cutout pattern to the cowl and mark cut Note: Aeroworks has found this method to provide 13. Mount the muffler to the engine and reinstall the location.
-
Page 53: Cowl For Canister/Pipe Installation
3. Use a “T” pin to mark the location of the bottom 5. Mark the side of the template that will come in cowl mounting tabs as shown contact with the cowling. This will help when transferring the cut out locations onto the cowl. Aeroworks 60cc Freestyle Extra 260 Assembly Manual... - Page 54 Some permanent markers may not be easily removed. Also, When using rubbing alcohols or other paint removers, always test on painted parts before using! Aeroworks 60cc Freestyle Extra 260 Assembly Manual...
- Page 55 12. Locate the supplied front air inlet template and tape to cowl. The front air inlets should be cen- Note: Aeroworks has found this method to provide tered both vertically and horizontally on the en- sufficient cooling for the engine. It is still gine head.
-
Page 56: Da70/Throttle/Cowl Installation
6 7/8”. information refer to engine and throttle the servo mounting screws installation steps shown previously in this manual for installing the DLE55RA. 6 7/8” Aeroworks 60cc Freestyle Extra 260 Assembly Manual... - Page 57 Use foam pad to help protect the ignition module from engine vibration. Aeroworks 60cc Freestyle Extra 260 Assembly Manual...
- Page 58 1/4”. bottom of the muffler exhaust stacks. Trace the cutout to get it to fit properly. location of the exhaust stack exit holes. Aeroworks 60cc Freestyle Extra 260 Assembly Manual...
- Page 59 19. Use a rotary cutting tool and sanding drum to cut 21. Locate the supplied bottom air exit template. Note: Aeroworks has found this method to provide the exhaust stack exit holes as needed. sufficient cooling for the engine. It is still important to check motor temperatures to en sure it is not running too hot.
- Page 60 Use a pen to ommend wrapping the cutout with small black transfer the location of the cut out onto the cowl. tubing as shown below. Repeat for other plug cap. Aeroworks 60cc Freestyle Extra 260 Assembly Manual...
-
Page 61: Wing/Stab Sfg Installation
Inner Bottom SFG 3. Locate the pre installed slot for the wing inner 5. Place the top inner SFG into the precut slot in SFG. Cut covering away from slot. the wing as shown below. Aeroworks 60cc Freestyle Extra 260 Assembly Manual... - Page 62 SFG mount the stab inner SFG. Use the wing and remove covering from location for 8. Repeat inner SFG mounting steps for the re- the supplied 4-40 mounting bolts and #6 bonded the mounting bolts. maining wing. washers. Aeroworks 60cc Freestyle Extra 260 Assembly Manual...
-
Page 63: Decal Installation
Scissors 2. Cut each decal away from the decal sheet and remove backing. Place decal on airplane in de- sired location. 6. Factory decal placement shown below. 4. Factory decal placement shown below. Aeroworks 60cc Freestyle Extra 260 Assembly Manual... -
Page 64: Preflight Preparations
Tighten snugly but do not loosening from normal engine vibration. over tighten and crack the fuse or wing root wood. Aeroworks 60cc Freestyle Extra 260 Assembly Manual... - Page 65 Tighten snugly but do not over Tighten snugly but do not over tighten and crush tighten and crack the stab mounting tabs or the the hatch or the fuse sides fuse sides. Aeroworks 60cc Freestyle Extra 260 Assembly Manual...
-
Page 66: Control Throws
CONTROL THROW DEFLECTION TABLE 1. Use the widest part of the aileron as shown to 3. Gather the Aeroworks Rudder Throw Meter measure the aileron throw in inches. (Not Supplied) and clear tape. Low Rate Medium Rate Throw Meter available through Aeroworks Aileron 2 1/4”... - Page 67 Note: Throw meter available from Aeroworks 6. Degrees are measured at the tip of the boost tab as shown below. 9. Use the widest part of the elevator to measure the elevator throw in degrees. Aeroworks 60cc Freestyle Extra 260 Assembly Manual...
-
Page 68: Checking Cg W/ "Cg Buddy
Make sure the “CG 6. Slide wing back against fuse insuring both wings Buddy” is securely latched to the wing tube and are pushed firmly against fuse. dowel before moving further. Aeroworks 60cc Freestyle Extra 260 Assembly Manual... -
Page 69: Flying The 60Cc Freestyle Extra 260
Always follow the manu- nose throughout harrier flight and you will be sur- facturer’s instructions when disposing of Lithium prised at how easy the airplane is to control. Polymer batteries. Aeroworks 60cc Freestyle Extra 260 Assembly Manual... - Page 70 RADIO CONTROL signed by all parties and copies provided to AMA Headquarters. 1. All model flying shall be conducted in a manner to avoid over flight of unprotected people. Aeroworks 60cc Freestyle Extra 260 Assembly Manual...
-
Page 71: 60Cc Freestyle Extra 260 Materials List
8mm rubber Grommets (4) 4-40 blind nuts installed on the wheel pants, 2 (1) Pre Installed Slot for the Inner SFG with per side. Covering Not Removed (1) Aluminum Tail Wheel Assembly – Medium Aeroworks 60cc Freestyle Extra 260 Assembly Manual... - Page 72 (2) Mounting Brackets for Canister (65mm hole) and Pipe (60mm hole) (8) Silicon Tubes (2) 4-40 x 16mm hex head bolts (2) 3mm flat Washer #13: (1) C.G. Buddy #14: (1) Decal Sheet #15: (1) Manual Instruction – on CD Aeroworks 60cc Freestyle Extra 260 Assembly Manual...
-
Page 73: Optional Accessories
15-40 LB Carbon Tail Wheel The 2.5 gallon hand crank gas fuel system is perfect Use the Aeroworks Throw Meter to precisely set This carbon tail wheel is designed to fit perfectly on for pilots venturing into gas powered airplanes for your control throws on the elevator and ailerons. - Page 74 Never drill your props wrong again! This easy to use chined from high quality aluminum these exit dots propeller drill jig guide will allow you to quickly are compatible with all fuel types. drill props for your DA50/60 or DLE 55/55RA Aeroworks 60cc Freestyle Extra 260 Assembly Manual...
- Page 75 Velcro “One Wrap” Straps Aeroworks Gas Fuel Tanks Simple and Secure way to mount your Battery and Custom fuel tanks for your Aeroworks model or any Radio Equipment. The Velcro “One Wrap” design model on your building table. Aeroworks fuel tanks secures too itself for an easy and fast way to mount are designed to last.
Need help?
Do you have a question about the 60cc Freestyle 260 ARF QB-L and is the answer not in the manual?
Questions and answers