Table of Contents
Advertisement
Quick Links
Download this manual
See also:
User Manual
Advertisement
Table of Contents

Subscribe to Our Youtube Channel
Related Manuals for Kramer VS-81H


Summary of Contents for Kramer VS-81H
-
Page 1: User Manual
Kramer Electronics, Ltd. USER MANUAL Model: VS-81H 8x1 HDMI Switcher... -
Page 2: Table Of Contents
Technical Specifications Kramer Protocol 2000 Figures Figure 1: VS-81H 8x1 HDMI Switcher Figure 2: Connecting a VS-81H 8x1 HDMI Switcher Figure 3: Local Area Connection Properties Window Figure 4: Internet Protocol (TCP/IP) Properties Window Tables Table 1: VS-81H 8x1 HDMI Switcher Features... -
Page 3: Introduction
VS-81H is ideal for conference room presentations and advertising applications, as well as for rental and staging. Note, that the Kramer VS-81H is identical to the VS-81HDMI; just the name has changed replacing the suffix “HDMI” by “H” (according to the HDMI Guideline). -
Page 4: Quick Start
Getting Started Quick Start This quick start chart summarizes the basic setup and operation steps. KRAMER: SIMPLE CREATIVE TECHNOLOGY... -
Page 5: Overview
) is a data-structure, provided by a display, to describe its capabilities to an HDMI source. The EDID enables the VS-81H to “know” what kind of monitor is connected to the output. The EDID includes the manufacturer’s name, the product type, the timing data supported by the display, the display size, luminance data and (for digital displays only) the pixel mapping data. -
Page 6: About Hdmi
It delivers the highest high-definition image and sound quality. Note that Kramer Electronics Limited is an HDMI Adopter and an HDCP Licensee. In particular, HDMI: interface between any audio/video source, such as •... -
Page 7: About Hdcp
Kramer VS-81H away from moisture, excessive sunlight and dust Your VS-81H 8x1 Switcher Figure 1 Table 1 define the VS-81H. 1 Developed by Intel 2 Available from Kramer Electronics on our Web site at http://www.kramerelectronics.com... -
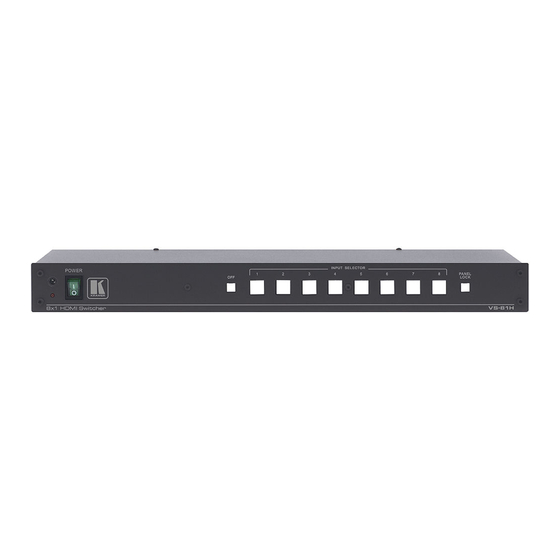
Page 8: Figure 1: Vs-81H 8X1 Hdmi Switcher
Your VS-81H 8x1 Switcher Figure 1: VS-81H 8x1 HDMI Switcher KRAMER: SIMPLE CREATIVE TECHNOLOGY... -
Page 9: Table 1: Vs-81H 8X1 Hdmi Switcher Features
Your VS-81H 8x1 Switcher Table 1: VS-81H 8x1 HDMI Switcher Features Feature Function IR Receiver The red LED lights when receiving signals from the Infrared remote control transmitter POWER Switch Illuminated switch for turning the unit ON or OFF OFF Button... -
Page 10: Installing The Vs-81H On A Rack
Installing the VS-81H on a Rack Installing the VS-81H on a Rack This section provides instructions for rack mounting the unit. KRAMER: SIMPLE CREATIVE TECHNOLOGY... -
Page 11: Connecting A Vs-81H 8X1 Hdmi Switcher
Press an INPUT SELECTOR button (from 1 to 8) to choose which HDMI input to route to the output 1 Switch OFF the power on each device before connecting it to your VS-81H. After connecting your VS-81H, switch on its power and then switch on the power on each device 2 You can connect up to 8 HDMI sources 3 Alternatively, you can connect a PC to any of the inputs and set those inputs to the PC mode (see section 7.1) -
Page 12: Operating The Vs-81H
Operating the VS-81H Figure 2: Connecting a VS-81H 8x1 HDMI Switcher Operating the VS-81H This section describes: • The PC mode and the DVD mode (see section 7.1) • How to acquire the EDID (see section 7.2) • How to control the machine via RS-232 (see section 7.3) •... -
Page 13: The Pc And Dvd Modes
6. You can connect a computer to the input(s) that is set to the PC mode and a DVD to the input(s) that is set to the DVD mode. 1 The default 2 For example, the Kramer C-HM/DM series in various lengths (3”, 6”, 10” and 15”) -
Page 14: Acquiring The Edid
Operating the VS-81H Table 2 summarizes the differences between the PC mode and the DVD mode: Table 2: DVD Mode and PC Mode Characteristics PC Mode DVD Mode The input is connected to a computer The input is connected to a multimedia application,... -
Page 15: Connecting A Pc
7.4.1 Connecting the ETHERNET Port directly to a PC (Crossover Cable) You can connect the Ethernet port of the VS-81H to the Ethernet port on your PC, via a crossover cable with RJ-45 connectors. This type of connection is recommended for identification of the factory default... -
Page 16: Connecting The Ethernet Port Via A Network Hub (Straight-Through Cable)
7.4.2 Connecting the ETHERNET Port via a Network Hub (Straight- Through Cable) You can connect the Ethernet port of the VS-81H to the Ethernet port on a network hub or network router, via a straight through cable with RJ-45 connectors. -
Page 17: Configuring The Ethernet Port
Power cord, rack “ears”, null-modem adapter, IR remote control OPTIONS: Kramer HDMI cables 1 Specifications are subject to change without notice 2 For best results, use Kramer cables such as the C-HM/HM series, the C-HM/DM series and/or our HDMI over fiber optics C-FOHM/FOHM series... -
Page 18: Kramer Protocol 2000
Kramer Protocol 2000 Kramer Protocol 2000 The VS-81H is compatible with Kramer’s Protocol 2000 (version 0.50) (below). This RS-232/RS-485 communication protocol uses four bytes of information as defined below. For RS-232, a null-modem connection between the machine and controller is used. The default data rate is 9600 baud, with no parity, 8 data bits and 1 stop bit. -
Page 19: Table 5: Instruction Codes For Protocol 2000
Kramer Protocol 2000 For a single machine controlled via the serial port, always set M4…M0 = 1, and make sure that the machine itself is configured as MACHINE NUMBER = 1. Table 5: Instruction Codes for Protocol 2000 Note: All values in the table are decimal, unless otherwise stated. - Page 20 EXCLUSION OF DAMAGES The liability of Kramer for any effective products is limited to the repair or replacement of the product at our option. Kramer shall not be liable for: 1. Damage to other property caused by defects in this product, damages based upon inconvenience, loss of use of the product, loss of time, commercial loss;...
- Page 21 For the latest information on our products and a list of Kramer distributors, visit our Web site: www.kramerelectronics.com, where updates to this user manual may be found. We welcome your questions, comments and feedback. Safety Warning: Disconnect the unit from the power supply before opening/servicing.
Need help?
Do you have a question about the VS-81H and is the answer not in the manual?
Questions and answers