
Related Manuals for Tesoro Outlaw


Summary of Contents for Tesoro Outlaw
- Page 1 BACK TO ALL MANUALS OUTLAW OPERATOR INSTRUCTION MANUAL Table of Contents open in browser PRO version pdfcrowd.com Are you a developer? Try out the HTML to PDF API...
- Page 2 FIELD USE GENERAL INFORMATION LIST OF FIGURES Congratulations on the purchase of your Tesoro Outlaw Metal Detector. You’ve taken the first step to be successful in treasure hunting, purchasing a high quality metal detector. The second step is to learn to use your metal detector properly. Please take the time to read and understand the manual.
- Page 3 All of us at Tesoro wish you success and enjoyment in your treasure hunting experience. Vince Gifford GETTING STARTED - UNPACKING THE BOX Your Outlaw was shipped with these parts: 1 Upper Pole Assembly –...
-
Page 4: Figure 1 Out Of The Box
If any of these items are missing, immediately contact the Tesoro Authorized Dealer where you purchased your detector. Assembly of the Outlaw is simple and requires no special tools. Just install the battery, mount the searchcoils on the lower pole assemblies, connect the three pole assemblies together, wrap the excess cable around the pole and plug the cable into the control housing. - Page 5 To install or replace the battery, first make sure the Sensitivity (SENS) control is set to OFF - turned completely counterclockwise past the “click”. Remove the battery door from the back of the control housing. Do this by pressing your thumb firmly on the louvered square - at the bottom of the battery door- and sliding the battery door upward (in the direction of the arrow) while pushing.
-
Page 6: Figure 3 Pole Tip In Searchcoil Mounting Ears
2. Insert the pole tip between the mounting ears of the searchcoil and align the holes of the pole tip and friction washers with those of the mounting ears. Note: The pole tip should fit very snugly into the mounting ears with friction washers in place. -
Page 7: Figure 5 Lower Poles Properly Attached To Coils
5. Wrap the cable around the pole and use one-wrap Velcro strip to hold cable per Figure 5. This will prevent the cable from flopping while not in use. Figure 5 – Lower Poles Properly Attached to Coils ASSEMBLING YOUR DETECTOR 1. -
Page 8: Figure 6 Attach Middle And Upper Pole Assemblies
the upper pole assembly until the spring buttons click into the holes, locking the two assemblies into place. Tighten the pole lock to secure the two assemblies together. 2. Choose the coil you’re going to use. Remove one- wrap Velcro strip from lower pole assembly. Loosen the pole lock on the middle pole assembly. -
Page 9: Figure 7 Connecting The Cable
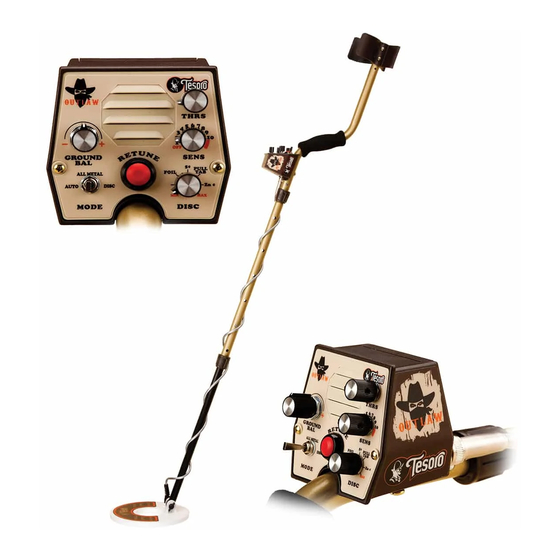
Figure 7 – Connecting the Cable Figure 8 – Properly Assembled Outlaw CONTROLS The Outlaw Metal Detector has only six controls, all mounted on the front panel of the housing for fingertip adjustment. How these controls should be set for peak performance will depend on the... -
Page 10: Figure 9 Outlaw Controls
Using your Outlaw Metal Detector in the field will allow you to learn the detector’s responses to various conditions and will guide you in fine Figure 9 – Outlaw Controls tuning the detector’s operating controls. - Page 11 DISC This rotary control has one function: Set the level of discrimination Turning the knob counterclockwise (MIN) will lower the amount of discrimination, lowering the amount of targets discriminated out. Turning the knob clockwise (MAX) will increase the amount of discrimination, increasing the type of targets discriminated out. SENS This rotary control switch has three functions: Turns the detector ON and OFF...
- Page 12 AIR TEST — SELF–GUIDED TUTORIAL INTRODUCTION The air test is designed to introduce the use of controls for the Outlaw Metal Detector. If you have never owned a metal detector before, follow each step carefully. You will need:...
-
Page 13: Figure 10 Outlaw On Non-Metal Surface
Figure 10 – Outlaw on Non–metal Surface Start with these control settings: Threshold (THRS) control to minimum (all the way counter-clockwise) Sensitivity (SENS) to OFF Discrimination level (DISC) to MIN MODE set to DISC Ground Balance (GROUND BAL) - starting point not important for air test Do the following steps: 1. - Page 14 The ground balance setting is extremely important when the mineral conditions in the ground are strong enough to affect the Outlaw Metal Detector. (See the Field Use Section on ground balancing for actual use.) The ground balance is not important for the air-test, so this step is done before the unit is turned on.
- Page 15 A solid tone will be heard for up to 6 seconds. The length and the volume of the tone indicate the strength of the battery. When the tone stops, the detector is up and running and the control can be adjusted. If there is no tone at all, the battery needs to be replaced. Now you should understand that when the unit is first turned on, the duration of the tone indicates the health of your battery.
- Page 16 Now you should know how to set the Threshold (THRS) to maximize your ALL METAL depth. Step 4 - Try the No-Motion ALL METAL MODE In the AUTO tune MODE, the sound at the speaker always wants to return to the baseline threshold level.
- Page 17 The Sensitivity Control is adjusted to control the amount of noise in the Discrimination (DISC) MODE. Flip the MODE switch to the Discrimination MODE (DISC). Wave a coin above the coil, slowly moving farther away from the coil. The signals will start out loud and sharp, then decreasing in intensity as the coin get farther from the coil.
- Page 18 repeatable signal. Start to turn up the Discrimination Level (DISC) while waving the target. As the DISC level approaches the 12:00 position, the sound should become broken and inconsistent. This is the discrimination circuit working to get rid of the target response. As the Discrimination Level is turned higher, the response should go away.
- Page 19 Outlaw. To achieve peak performance from your Outlaw, be sure to properly adjust the GROUND BAL control in ALL METAL MODE. The settings of this control will also affect the detector’s performance in Discrimination MODE, so make sure to adjust it properly first, even if you will not be hunting in ALL METAL MODE.
- Page 20 TUNING YOUR DETECTOR Tuning your Outlaw can be done in 6 simple steps: 1. Wait up to 6 seconds until the Audio Battery Test is complete once the detector is turned 2. Check/Adjust Threshold using THRS control.
- Page 21 Ground Balancing is not a difficult procedure, but it is critical if you desire maximum depth and stability. It is especially important if you are using the Outlaw in highly mineralized ground. NOTE: No matter where you will be searching, or whether you will be operating in the ALL METAL MODE or Discrimination MODE, make sure the detector is properly Ground Balanced in the AUTO tune mode of ALL METAL first.
-
Page 22: Figure 11 Lower Coil Quickly
As you listen to the threshold, one of three things should happen: 1. The sound will remain the same throughout the pump. 2. The sound will increase on the way down, or 3. The sound will get quiet on the way down. Figure 12 –... - Page 23 GROUND BAL knob to maintain peak performance. SELECTING THE PROPER OPERATING MODE The Outlaw offer two operating modes: ALL-METAL and Discrimination (DISC) MODE. open in browser PRO version pdfcrowd.com Are you a developer? Try out the...
- Page 24 For precise pinpointing, find the searchcoil position near the strongest signal. Hold the RETUNE button down to retune the Outlaw to the current target. Release the button, and the signal as you move the searchcoil should be very small.
- Page 25 metal objects,. As the Discrimination Level is increased, more of these trash metal objects are ignored and give no target response sound when inside the searchcoil’s range. The DISC LEVEL should be set to your desired “rejection level” for the particular area your searching.
- Page 26 2 to 5 range. Overall, you should always set the Sensitivity Control as high as possible, while still getting smooth operation. NOTE: The no-motion ALL METAL MODE of the Outlaw is not affected by the Sensitivity Control. open in browser PRO version pdfcrowd.com...
- Page 27 Nickel and most smaller rings are rejected when the Discrimination Level is set to reject pull tabs on any metal detector that is a TR Discriminator like the Outlaw. If you don’t dig any junk at all, you are surely passing up a lot of good finds as well. Set the Discrimination Level only high enough to suit the conditions where you are searching.
- Page 28 Cad will be weaker than an alkaline in the beginning, but will not weaken as much with use. CONTROLLING AUDIO VOLUME The speaker in the Outlaw does not have a volume control. The volume should be sufficient to accurately hear the target response sound in most environments. If more or less volume is required in your particular situation, we recommend using a set of good quality headphones with a built-in volume control.
- Page 29 pendulum – especially if they are hurrying. Try to avoid this, as any increase in height from the ground will cause a corresponding loss of depth. In areas with well-kept lawns, the easiest way to maintain a constant searchcoil height is to allow the coil to rest on the grass as you sweep from side to side.
- Page 30 Slowing the sweep will help you pick out the center of the X because the target response is reduced at very slow speeds making it easier to correlate the sound with the coil center. Another easy method is to sweep the coil from side to side across the target in very short sweeps as you slowly move forward and backward across the target.
- Page 31 GENERAL INFORMATION BASIC CARE The Outlaw is a sturdy instrument, but it is not designed to withstand abuse. In caring for your Outlaw, there are several important “DO NOTs” to remember. DO NOT use it to pry rocks loose or to beat bushes out of the way. DO NOT drop the machine into water. DO NOT use it unprotected in the rain.
- Page 32 NEGLECT OR ABUSE. PROTECTING YOUR INVESTMENT Often detectorists are disappointed when their new detector slowly becomes less and less responsive and seems to have lost some of its original peak performance. You can help avoid this from happening to you detector by following these basic care and protection guidelines: Operate your detector exactly as recommended in this operator instruction manual.
- Page 33 If there is a possibility of rain or spray, use a Tesoro rain jacket or protective weather resistant pouch. If you use anything other than the Tesoro rain jacket, leave the bottom open.
- Page 34 Wide scan searchcoils ignore ground mineralization better than concentric searchcoils and may offer improved performance in extreme ground conditions. The 12X10 wide scan searchcoil provided with the Outlaw is a large coil in the wide scan family. Selecting the right optional searchcoil depends on factors such as what you are searching for open in browser PRO version pdfcrowd.com...
- Page 35 No one searchcoil is better than all the rest. Several optional interchangeable searchcoils are available for the Outlaw. They are all easy to mount and require no special tools. See table below for a list of these searchcoils with the Tesoro part # and description.
- Page 36 Headphones help block out background noise (such as wind) and make it easier to hear faint signals. Headphones with a built in volume control will allow you to adjust the sound volume to your preference. The headphone jack is located on the bottom of the Outlaw housing. RECOMMENDED RECOVERY METHODS METAL DETECTORIST’S CODE OF ETHICS...
- Page 37 deserted structures), and never tamper with any equipment at the site. 5. Never litter. Always pack out what you take in and remove all trash dug in your search. 6. Fill all holes, regardless how remote the location, and never dig in a way that will damage, be damaging to, or kill any vegetation.
- Page 38 WARRANTY SERVICE Your Tesoro metal detector is covered by a Lifetime Warranty, the terms of which are listed below. If your metal detector should require service, you may return it to the Tesoro factory at the address below. LIMITED LIFETIME WARRANTY This warranty gives you specific legal rights, and you may have other rights which vary from state to state.
-
Page 39: Table Of Contents
Under the copyright laws this documentation may not be copied, photocopied, reproduced, translated or reduced to any electronic or machine-readable form, in whole or in part, without the prior written consent of Tesoro Electronics Incorporated, except in the manner described in this documentation. - Page 40 © 2001 Tesoro Electronics Incorporated. All rights reserved. Printed in the United States. open in browser PRO version pdfcrowd.com Are you a developer? Try out the HTML to PDF API...
Need help?
Do you have a question about the Outlaw and is the answer not in the manual?
Questions and answers