Table of Contents
Advertisement
Advertisement
Table of Contents

Related Manuals for Tesoro Euro Sabre


Summary of Contents for Tesoro Euro Sabre
- Page 1 "The Name That Means Treasure" OPERATOR INSTRUCTION MANUAL...
- Page 2 OPERATOR INSTRUCTION MANUAL CONGRATULATIONS! Your new Tesoro Euro Sabre metal detector is part of a new series of detectors designed to provide you with many happy hours of enjoyment in the most rewarding hobby I can think of—treasure hunting. Ahead of you lie fascinating and exciting experiences as you step into the past—uncov-...
-
Page 3: Getting Started
1 9 x 8 Concentric Searchcoil With 3’ Cable 1 9 Volt Alkaline Battery 1 Operator Instruction Manual If any of these items are missing, immediately contact the Tesoro Au- thorized Dealer where you purchased your detector. Assembling the Euro Sabre is simple and requires no special tools. -
Page 4: Installing The Battery
INSTALLING THE BATTERY Your Euro Sabre is equipped with a battery test switch so that you can always be sure you are getting top performance. (See QUICKSTART for operation.) The battery should be checked after the detector has been on for about 10 minutes and then periodically when used for long durations. -
Page 5: Assembling Your Detector
ASSEMBLING YOUR DETECTOR 1) On the lower pole assembly, remove the mounting screw and thumb nut from the pole tip. 2) Insert the pole tip between the mounting ears of the searchcoil and align the holes of the pole tip and washers with those of the mounting ears. Note: The pole tip should fit very snugly into the mounting ears. - Page 6 6) Slide the lower pole into the middle pole until spring buttons click into the first set of adjustment holes. Turn pole lock to tighten the assem- blies into place. 7) Wrap the cable around the pole leaving enough slack near the searchcoil to permit searchcoil adjustment.
-
Page 7: Adjusting The Pole & Searchcoil
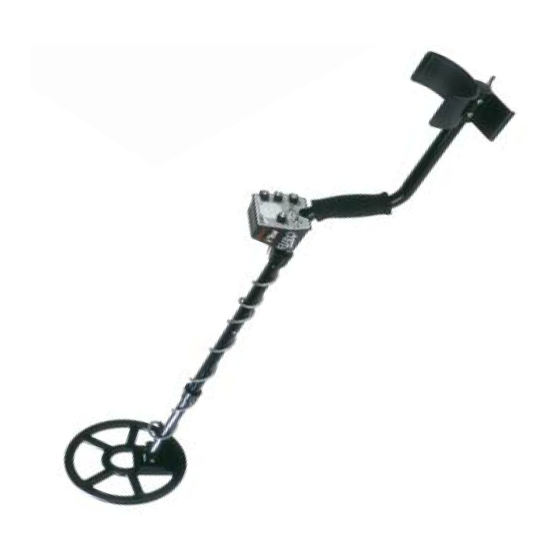
ADJUSTING THE POLE & SEARCHCOIL The pole length should be adjusted so that the detector does not be- come uncomfortable or tiring after long periods of use. The detector grip should rest in your hand with your arm relaxed, your elbow straight but not locked, with the pole extending out in front of you at the approximate angle shown in the photo. -
Page 8: Quickstart Self-Guided Tutorial
8) Perform Air Test in Iron ID Mode Prepare for the Quickstart Place your assembled Euro Sabre on the nonmetal surface. Make sure that there are no metal objects near the coil and remove any jewelry from your hands and wrists. -
Page 9: Perform Audio Battery Test
Start with the controls as shown in the photo below: 1) THRESHOLD, SENSITIVITY and DISCRIMINATE LEVEL knobs turned completely counterclockwise. 2) MODE and Iron ID switches in the center position. 3) GROUND BALANCE knob at the 12 o’clock position. Perform Audio Battery Test Turn the SENSITIVITY knob from OFF to about 7 or 8. -
Page 10: Adjust Threshold
Adjust GROUND BALANCE for Air Test The ground balance function for your Euro Sabre is a form of discrimi- nation that allows you to tune out the mineralization in the ground that may... -
Page 11: Perform Air Test In All Metal Mode
Air Test in the ALL METAL Mode. Your Euro Sabre has a VCO-style ALL METAL Mode. You will find that as targets get closer to the coil, the threshold tone will get louder and higher in pitch. -
Page 12: Adjust Sensitivity
Adjust SENSITIVITY We are now ready to switch the detector into the discriminate mode (DISC MODE). Go to the MODE switch and flip all the way to the right and into the DISC MODE setting. The switch will lock into position and you will notice that the threshold hum will stop. -
Page 13: Perform Air Test In Disc Mode
The SENSITIVITY knob is numbered from MIN to 10 and then has an orange area called the Max Boost Zone. For normal hunting, anywhere in the numbered zone will work very well. However, the Max Boost will al- low you to increase the power to the operational amplifiers to the point of overload. - Page 14 gold jewelry overlap. Also, the depth of the target and its orientation in the ground can change the received signal. A coin that is flat to the coil will produce a better signal than a coin that is on edge. Take some time to try different combinations of depths and orientation of your targets and find out how your detector responds.
- Page 15 This can cause headaches for most users. However, the Euro Sabre’s Iron ID Mode can accurately identify these problem targets.
- Page 16 Conclusion Congratulations, you have just finished the Quickstart for your new Euro Sabre detector and in the process have learned quite a lot about your detector. But experience is the best teacher. I would recommend that you get out and practice with your detector as much as possible. Any time spent...
-
Page 17: Operating Techniques
OPERATING TECHNIQUES Ground Balancing In The Field Ground balancing is not a difficult procedure, but it is critical if you desire maximum depth and stability. It is especially important if you plan to find deep relics or prospect for gold nuggets. No matter how or where you will be hunting, or whether you will be hunting in the All Metal or Discriminate Mode, you must tune the ground balance for the area that you will be hunting. - Page 18 tor will start to read the ground minerals and will give you one of three sounds: 1) The thresh- old tone will get louder and raise in pitch. This is a positive response. 2) The threshold tone will go quiet, followed by a quick tone.
-
Page 19: Handling Your Detector
STARTED. Swing the detector from side to side in about a three foot arc, overlapping succeeding strokes well. This motion is called a “sweep.” The Euro Sabre was designed to get maximum depth without the frantic pace required of earlier motion detectors, so go at a pace that is comfortable for you. -
Page 20: Planting A Test Garden
Euro Sabre in the All Metal & Discriminate Modes. Check the area in All Metal Mode to be sure it's clear of trash. -
Page 21: Recommended Recovery Methods
RECOMMENDED RECOVERY METHODS Adapted from "Tools 'N Techniques" By Robert H. Sickler METHOD 1 - “PROBE AND DRIVER” Used in less moist lawns where targets are not so deep (1 to 4 inches) and where “plugging” is objectionable. This method requires more practice but is much less damaging to grass than Method 2- “Plugging”... - Page 22 RECOMMENDED RECOVERY METHODS Adapted from "Tools 'N Techniques" By Robert H. Sickler METHOD 2 - “PLUGGING” Used only where allowed in natural wooded areas and very moist lawn areas. Plugging in hard dry ground can damage grass roots leaving yellow “dead spots”...
-
Page 23: General Information
CARE AND USE Basic Care The Euro Sabre is a sturdy instrument, but it is not designed to with- stand abuse. In caring for your Euro Sabre there are several important “DO NOTs” to remember. DO NOT use it to pry rocks loose or to beat bushes out of the way. - Page 24 Keep cables properly wound around the pole stems and protect them during use. Floppy, pinched, or cables that become snagged during use may short, causing erratic noises or unnecessary replacement of the searchcoil. Sweep the searchcoil carefully, especially when using around rocks and building foundations.
-
Page 25: Optional Accessories Optional Accessories
Scuff Covers We highly recommend using a scuff cover to protect your searchcoil at all times. The scuff cover for the Euro Sabre fitted with the 9 x 8 searchcoil is Tesoro Part # SCUF-9x8 CS. Searchcoils The 9 x 8 concentric searchcoil provided with the Euro Sabre is de- signed for best all-around performance. -
Page 26: Tesoro Searchcoils
11" round wide scan (closed center, white) COIL-12x10 12 x 10" concentric (spoked, white) Optional scuff covers are also available for any Tesoro searchcoil. Headphones Most metal detectorists prefer to use headphones instead of the detector's built-in speaker. Headphones help block out background noise (such as wind) and make it easier to hear faint signals. - Page 27 Metal Detectorist's Code of Ethics Always check federal, state, county and local laws before search- ing. It is your responsibility to “know the law.” Abide by all laws, ordinances or regulations that may govern your search and the area you will be in. Never trespass.
-
Page 28: Warranty & Service
WARRANTY SERVICE Your Tesoro metal detector is covered by a Lifetime Warranty, the terms of which are listed below. If your metal detector should require service, you may return it to the Tesoro factory at the ad- dress below. WARRANTY DESCRIPTION This warranty gives you specific legal rights, and you may have other rights which vary from state to state.
Need help?
Do you have a question about the Euro Sabre and is the answer not in the manual?
Questions and answers